When I first loaded up Gravity 2, I honestly wasn’t sure what to expect. The original Gravity came out back in 2015 and quickly became one of those libraries that everyone seemed to have in their template. Fast forward to now, and Heavyocity has completely rebuilt the thing from scratch with over 1,000 new sound sources and a fresh engine that actually makes sense.
I’ve had it running for a bit now, and the workflow improvements are noticeable right away. But let’s get into what actually matters, the sounds themselves and how you interact with them.
What You’re Actually Getting
Heavyocity Gravity 2 ships with 600 presets spread across three main instruments. There’s the Designer, which is where you build layered patches from up to three sound sources. Then you have Menu and Menu XL, which are basically instant gratification tools that map 36 or 72 sounds across your keyboard respectively.
The sample content covers rhythmic pedals, textures, stings, transitions, and impacts. Everything is recorded from analog synths like the Moog Sub 37 and Minitaur, modular gear including the Lyra 8, Make Noise Strega, processed acoustic instruments like cello, violin, koto, zither, waterphone, and piano, and what Heavyocity calls junkyard metals. I found that last category particularly useful for creating industrial-sounding beds and transitions.
The library runs in Kontakt 7.6 or later and works just fine in the free Kontakt Player, which means you don’t need to pay for a full version. Installation is handled through Heavyocity’s portal, which downloads and unpacks everything to your chosen location. The whole thing takes up 9.55GB on your drive, which honestly feels pretty reasonable given the amount of content.
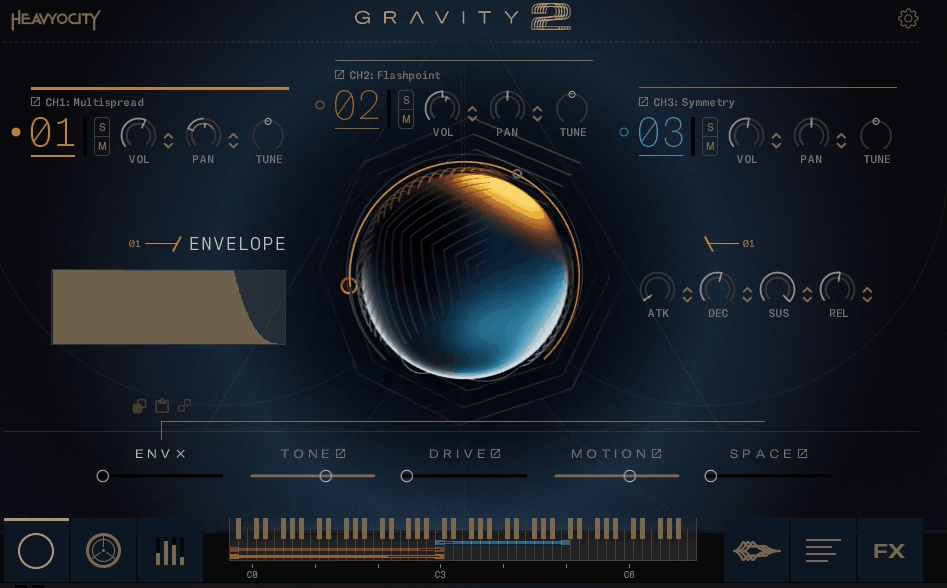
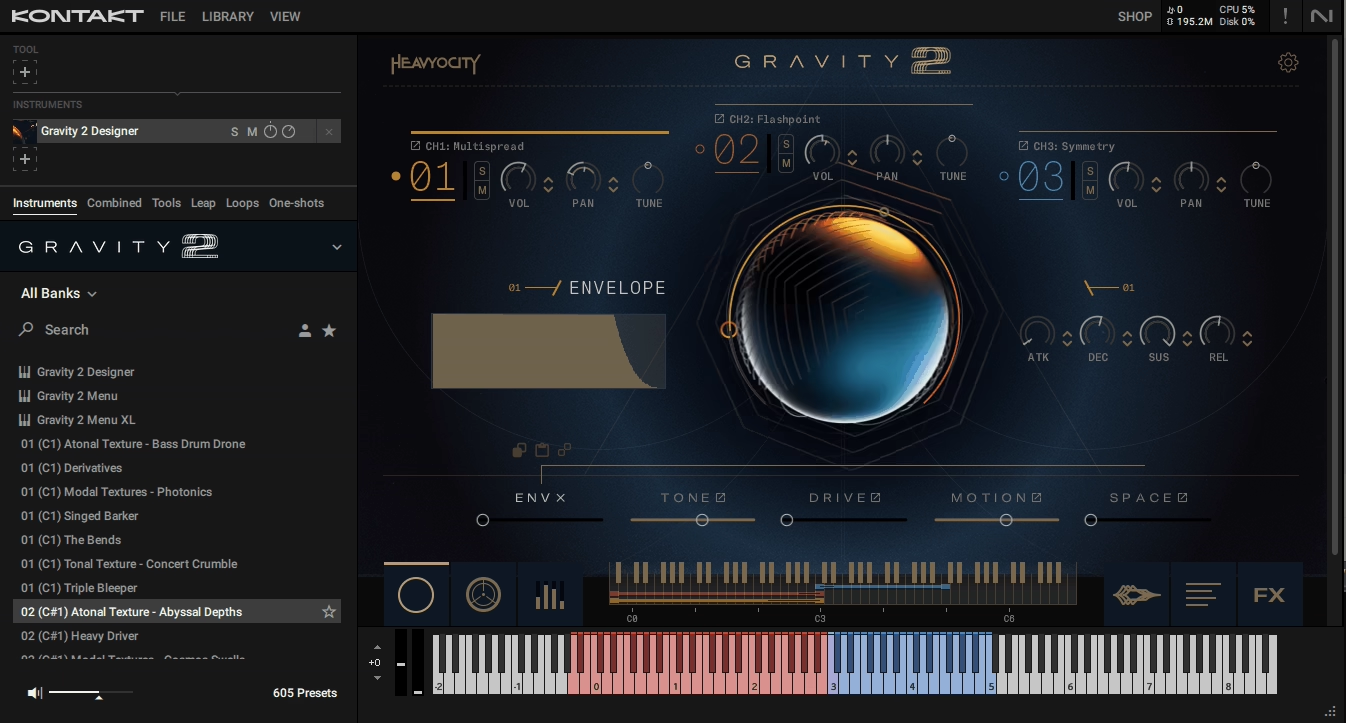
The Designer Instrument and How It Actually Works
The interface has this clean, modern look with a large central macro knob that controls macro modulation across multiple parameters at once. You can load up to three sound sources in separate channels and blend them however you want.
Each channel has independent ADSR envelope controls, multimode filtering, and effects routing. What I really like is that you’re not locked into any specific signal flow. You can route channels through different effects chains, automate parameters via the built-in sequencer, or just leave things simple if that’s what the cue needs.
The macro knob is probably the most useful feature here. You can assign it to modulate filter cutoff, envelope attack, distortion amount, reverb mix, and a bunch of other parameters simultaneously. In practice, this means you can take a static pad and turn it into something evolving and dynamic just by automating one control. I’ve been using this for building tension in underscores where I need gradual changes over 30 or 40 seconds.
There’s also a Punish knob on the master effects page, which is Heavyocity’s signature distortion processor. It’s basically a one-knob solution for adding aggression to sounds. I would recommend using it sparingly because it can get harsh fast, but when you need something to cut through a dense mix, it works.
Rhythmic Pedals Change Everything
The biggest addition to Gravity 2 is the 144 rhythmic pedal loops. These are tempo-synced patterns created from analog synths, modular gear, and processed acoustic sources. They’re divided into straight and triplet-based timing, which covers most of what you’d need for modern scoring work.
I’ve been layering these under string ostinatos or using them as the main rhythmic element in electronic cues. The sound quality is excellent, they’re multisampled across a wide pitch range, so you can play them melodically without artifacts. Some of the standouts for me are Cine Sneak, which is this driving plucked synth pattern that works great for tension-building, and Zero Day, a heavy synth bass riff that sounds massive in the low end.
What’s interesting about the triplet loops is that you can mentally reframe them to work in 4/4 time. If you’ve got a triplet loop running at 120bpm, you can hear it as straight 16th notes at 90bpm. It’s basically a metric modulation trick that opens up more creative possibilities. I tried this with the Synaptic Error preset and it worked perfectly for a downtempo electronic track I was working on.
The loops have adjustable start times and playback rates (half speed, normal, or double), so you can sync them to different sections of your project without needing to edit the samples. This is one of those workflow things that seems small but saves a ton of time when you’re working fast.
Textures for Days
The texture category is split into tonal, atonal, and modal sections. Tonal textures have a clear pitch, atonal ones are more sound design-focused, and modal textures contain major or minor chord elements.
I would use the tonal textures for pads and drones. Something like Safe In Your Arms is a slowly evolving major seventh chord that works great under dialogue or as a foundation for bigger orchestral sections. On the other hand, Stare At The Sun is massive cinematic rumble that sits perfectly in the low end without fighting with bass instruments.
The atonal textures are where things get weird. These are perfect for sci-fi and horror scoring. Personally, I would use them for creating unsettling backgrounds that don’t have a specific pitch but still contribute to the overall mood. The modal textures sit somewhere in between, they have harmonic content but it’s processed enough that you can use them without worrying too much about key.
One thing I noticed is that these textures loop really cleanly. There’s no obvious seam or click when they cycle, which means you can hold them for as long as you need without any technical issues.
Stings That Actually Have Character
The 252 stings in Gravity 2 cover a huge range. Some are aggressively distorted and metallic, like Bass Bender and Filth Factor, which sound like malfunctioning machinery. Others are cleaner and more musical, like Tracking Signal, which is this bright, perky synth sound that works well for upbeat transitions.
Neil Goldberg contributed a bunch of guitar-based stings created with various pedals, including some really nasty feedback and slide effects. I’ve been using these for dramatic reveals and transition points where I need something organic-sounding but still heavily processed.
What makes these stings useful is that they’re not just one-shot samples. You can adjust the sample start time to change their attack characteristics, which effectively gives you multiple variations of each sting. For example, Trailer Open Warp can be turned into a pitched marimba sound just by tweaking where the sample starts playing.
Transitions and Risers That Build Properly
Gravity 2 includes 144 transitions and a separate set of risers. The transitions are two-bar tempo-synced events that build to a climax. They’re divided into reverses (which end in a backwards whoosh) and swells (which reach a peak then decay).
You can use these for moving between sections in tracks. Something like Seven Flare is this huge ascending synth blast that works great for transitioning from a quiet verse into a full chorus. The swells like SloMo Fission have this sci-fi quality that fits perfectly in futuristic or space-themed cues.
The risers are four-bar builds that reach their peak at the end. Orchestral Cyclone is probably my favorite, it sounds like accelerating jet engines with a ton of movement and automation. These are perfect for building tension before a big hit or section change.
All of these tempo-synced elements have a Tempo-Sync slider that lets you play them at half or double speed, so a two-bar transition can become a one-bar hit or a four-bar buildup depending on what you need. This flexibility means you’re not stuck with the default timing.
Impacts Built in Layers
The 36 impacts follow the same format as the original Gravity. Each impact has three layers: sub, mid, and tail. You can load them as full mixes or grab individual layers to build your own custom hits.
The sub layers on their own work great as massive boom sounds for low-end reinforcement. The mid layers add the main impact character, whether that’s metallic, wooden, or synthetic. The tail layers are these long, evolving decays that you can use as standalone sound effects or to extend the length of your hits.
Devil’s Ringtone is probably the most aggressive impact in the library. The sub is a huge cinematic drum, the mid adds this crushing metallic clang, and the tail sounds like distorted machinery falling apart. It’s over the top but sometimes that’s exactly what you need.
I’ve also been using the sub samples as kick drum replacements in electronic tracks. They have that cinematic weight but still punch through in a mix. Just remember to turn off the reverb in the master effects if you’re using them in a rhythmic context.
The Menu Instruments for Quick Access
Menu and Menu XL are designed for speed. Menu maps 36 sounds across three octaves, Menu XL maps 72 sounds across six octaves. These are great for when you need to audition a bunch of different textures or impacts quickly without loading individual patches.
The sounds in these instruments are organized by category, so you’ll have all the stings in one preset, all the transitions in another, and so on. I like to use these mostly for live scoring situations where I need instant access to a variety of sounds without menu diving.
One limitation is that you can’t easily map a single sound across the full keyboard range in these instruments. There’s an Expand Source function in the Designer that does this, but it’s not available in Menu or Menu XL. For melodic work, you’re better off loading individual sounds in the Designer.
Master Effects and Sound Shaping
The master effects page includes everything you’d expect: EQ, compression, modulation, delay, and reverb. The Punish knob lives here too. All of these effects sound good and are easy to dial in.
The multimode filter has standard types (lowpass, highpass, bandpass, notch) with resonance control. The compressor is transparent enough that you can push it hard without destroying your transients. The delay and reverb are both tempo-synced and musical-sounding.
What I appreciate is that the effects don’t feel tacked on. They’re integrated into the workflow in a way that makes sense. You can automate them via MIDI CC or use the built-in modulation system to create movement over time.
Performance Features and Sequencing
The Designer has a step sequencer built in that lets you create rhythmic patterns and arpeggios. It’s 16 steps with velocity control for each step. You can use it to sequence the sample start points, which essentially lets you create new rhythmic variations from existing loops.
In practice, I found the step sequencer more useful for creating evolving textures than for precise rhythmic programming. The sample start sequencing is a bit trial-and-error since you’re working blind with the slice points. But when you hit on something good, it can be really effective.
There’s also a Macro LFO that can modulate the central macro knob automatically. You can sync it to tempo and adjust the depth. I would use this for creating slow-moving automation on pads and textures without having to record it manually.
Workflow and CPU Usage
CPU usage is reasonable. I’m running this on i7 9700K Intel (the better one) and I can load multiple instances of the Designer without issues. The heaviest patches are the fully layered Designer presets with all three channels active and effects running, but even those aren’t terrible.
The interface is high-resolution and looks clean on both regular and Retina displays. Everything is clearly labeled and the organization makes sense. The snapshot browser lets you preview sounds by clicking on their names, which saves a ton of time when you’re searching for something specific.
One small issue I’ve noticed is that some of the graphics don’t render properly on occasion, but this seems to be a minor bug that’ll probably get fixed in an update. It doesn’t affect functionality, just visual appearance.
The Keyswitching System
Gravity 2 uses keyswitches to control pitch for single sounds in the Menu presets. The keyswitches are mapped in the lower octaves, which is standard. I found this system works just fine for playing individual sounds at different pitches, but it’s not as flexible as just loading a sound in the Designer and expanding it across the keyboard.
For timed elements like transitions and risers, the keyswitches don’t really come into play since you’re mostly triggering these as one-shots. But for tonal material, being able to quickly transpose via keyswitch is useful.
Where It Fits in My Template
I keep Gravity 2 loaded in my trailer template alongside the original Gravity. The new rhythmic pedals give me options that the first version didn’t have, and the Designer workflow is faster for building custom patches on the fly.
I would use it primarily for three things: rhythmic underlays, transition effects, and massive impacts. The textures are great but I have other libraries I reach for first in that category. For rhythmic work though, especially in modern hybrid scoring, Gravity 2 is really strong.
The Menu instruments stay loaded in my live scoring template because I can trigger different sounds quickly without switching patches. This is particularly useful when you are working with directors who want to try multiple options in real time.
What Could Be Better
The main limitation for me is the lack of direct control over some of the deeper parameters without using a mouse. The NKS mapping covers the basics but there are things like per-channel pan and tuning that aren’t accessible via Komplete Kontrol. This isn’t a dealbreaker but it does mean you need to dive into Kontakt itself for more detailed editing.
The step sequencer is cool in theory but I find it frustrating for precise work. The sample start sequencing especially feels like you’re just randomizing things until something sounds good. More visual feedback about where the slices are being triggered would help.
Final Thoughts
At the end of the day, Gravity 2 delivers on what it promises. It’s a massive collection of high-quality cinematic sounds with a workflow that actually makes sense. The addition of rhythmic pedals gives you more creative options, and the Designer instrument is flexible enough to handle most sound design tasks.
I think it’s worth noting that this isn’t a library for subtle, organic orchestral work. If that’s what you need, look elsewhere. But for modern hybrid scoring, trailer music, or aggressive electronic production, Gravity 2 has the goods. The presets are production-ready, the sounds are unique, and the engine gives you enough control to shape things however you need. The combination of rhythmic loops, massive impacts, and flexible sound design tools makes it a solid addition to your toolkit.
Hello, I’m Viliam, I started this audio plugin focused blog to keep you updated on the latest trends, news and everything plugin related. I’ll put the most emphasis on the topics covering best VST, AU and AAX plugins. If you find some great plugin suggestions for us to include on our site, feel free to let me know, so I can take a look!