
Delay plugins add space, rhythm, and atmosphere to your tracks in ways that other effects just can’t match. Whether you’re producing vocals, synths, guitars, or full mixes, the right delay can turn a flat sound into something that feels alive and three-dimensional.
They give you control over everything from simple echoes to complex modulated textures that shape the entire vibe of your music. Some replicate classic tape machines and vintage hardware, while others push into experimental territory with creative routing and sound design features. I’ve tested many of options to find the ones that actually make a difference in real sessions.
This guide walks you through eleven delay plugins that cover every style and budget. You’ll also find a bonus pick, practical tips for getting better results, and answers to common questions about using delay in your productions.
From the Pluginerds Store
Before you get into the plugins on this list, two things that change how reliably reverb and delay decisions translate. The room around you contributes more to what you hear than most producers realise — acoustic foam at the first reflection points reduces that — and IEMs as a second reference are one of the most honest ways to check whether your reverb is sitting in the mix or fighting it.


1. Pulsar Audio Echorec

If you want that dirty, warm, vintage delay sound without spending thousands on rare hardware, Pulsar Audio Echorec delay plugin delivers exactly that vibe in plugin form.
Echorec captures the magic of the Binson Echorec 2 from the 1960s. This isn’t a tape delay emulation. It models a magnetic disk delay that spun a metal drum past playback heads to create echoes. Bands like Pink Floyd and artists like Jimmy Page used the original hardware to shape their signature sounds.
The plugin gives you that same character but with modern flexibility. You can change the motor speed in real-time or sync it to your DAW tempo, even using tap tempo. That’s something the original hardware couldn’t do, and it makes Echorec way more practical for today’s production workflows.
- Magnetic Disk Delay Emulation with Vintage Character
Echorec uses one record head and four playback heads to create its echo patterns. You can choose different combinations of these heads to get anything from simple slapback to complex multi-tap delays. The plugin also models tube preamp coloration and magnetic saturation, which adds warmth and grit to your repeats.
This is what makes Echorec sound different from clean digital delays or even tape delays.
- Three Delay Modes for Different Creative Options
You get three distinct modes: Echo mode gives you straightforward single-tap echoes without feedback. Rip mode adds feedback so your delays can self-oscillate and create wild, runaway echo tails. Lastly, Swell mode fires all heads at once regardless of your pattern setting, which creates reverb-like ambience or thick, layered textures.
I would recommend Echo mode for clean vintage vibes and Rip mode when you want things to get experimental.
- Unit Condition Control
This feature lets you pick between “Used,” “Good,” and “Mint” settings. Each one affects how clean or degraded your delay sounds. Used gives you more grit and timing imperfections between the heads, while Mint sounds cleaner and more precise.
Since I use this plugin myself, I usually land somewhere between Good and Used when I want that authentic vintage feel without things getting too muddy.
- Stereo Drift and Disk Braking for Sound Design
Stereo Drift creates slight timing offsets between left and right channels, giving you wide, stereo-spaced echoes that sit beautifully in a mix. Disk braking lets you manually slow down the drum, which introduces pitch modulation, wow, and flutter.
This is perfect for psychedelic effects or lo-fi textures. You can automate the motor speed to create pitch-glide effects on your repeats, turning Echorec into a creative sound design tool beyond just delay.
2. FabFilter Timeless 3
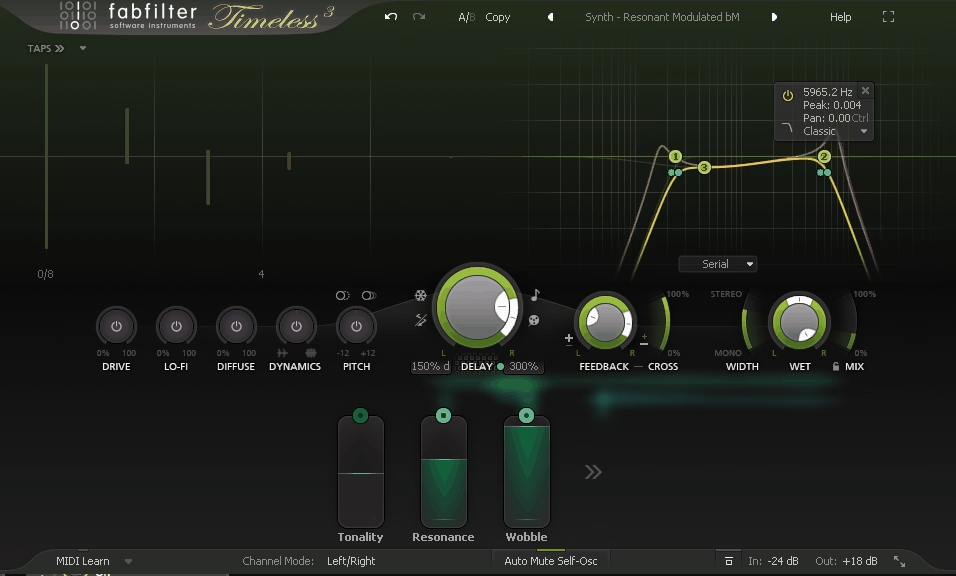
Timeless 3 VST delay plugin gives you lots of control. What’s unique here is a dual delay line system. You’re working with two completely separate delay engines that can run from 5 milliseconds all the way up to 5 seconds. Each line supports up to 16 individual delay taps, and every single tap has its own level, pan position, and timing.
That level of control means you can build complex rhythmic patterns or subtle ambience without layering multiple delay instances. The 50-slot modulation matrix is where things get really interesting. You can assign LFOs, envelope followers, step sequencers, and MIDI sources to nearly any parameter in the plugin. Delay time, feedback amount, pan position, filter cutoff, all of it can move and evolve.
I’ve used this to create delays that shift in pitch as they decay or panning that follows the rhythm of my track.
- Flexible Tap Control & Timing Options
The 16 taps per delay line let you design intricate rhythmic delays or spread out repeats across the stereo field exactly how you want them. You can drag taps around visually to adjust their timing, which makes building syncopated patterns faster than typing numbers.
The plugin also gives you both tempo-sync and free timing modes, plus a stretch versus tape mode that either pitch-shifts or time-stretches when you change delay times. I use tape mode when I want that classic analog vibe where pitch bends with the delay time.
- Built-In Effects Chain for Feedback Path
Timeless 3 routes your delayed signal through five effects: Drive for saturation, Lo-Fi for bit-crushing and sample-rate reduction, Diffuse for reverb-like smearing, Dynamics for compression or gating, and Pitch for shifting repeats up or down by an octave.
Every effect sits in the feedback loop and can be modulated. When I want gritty dub delays or glitchy textures, I push the Drive and Lo-Fi sections hard. For ambient stuff, Diffuse smooths everything into a wash.
- Six Multimode Filters with Visual Editing
You get six filter slots that can run in series or parallel, with modes covering low-pass, high-pass, band-pass, bell, shelf, and notch. Slopes go down to 6 dB for gentle shaping.
The filters show up as curves you can drag and reshape directly on the interface, which makes sculpting the tone of your delays feel immediate. I often use a high-pass to keep low-end repeats from muddying the mix and a bell to add character in the mids.
- Modulation Matrix with Visual Feedback
The 50 modulation slots support drag-and-drop routing, and active modulations display as animated trails across the interface. This makes it easy to see which mod source is affecting which parameter.
You can assign envelope followers to feedback so the delay responds to how hard you play, or linked LFOs to pan for auto-panning repeats. The visual feedback keeps me from getting lost even when I’m running multiple modulations at once.
3. iZotope Cascadia
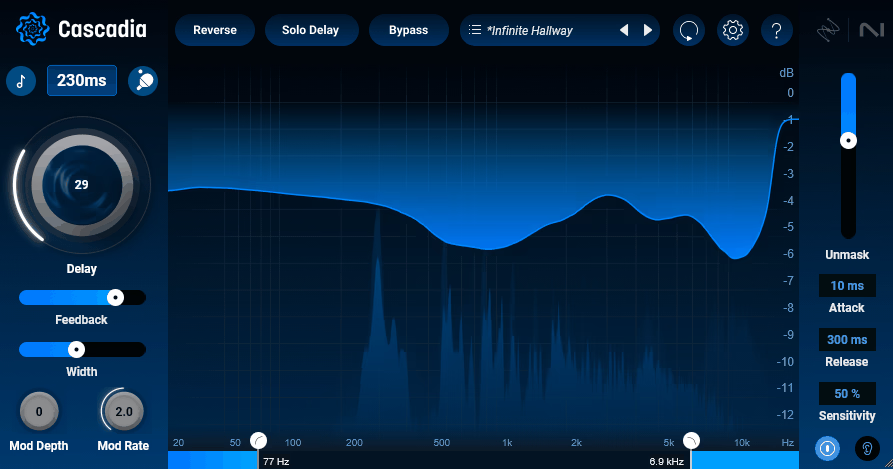
What drew me to iZotope Cascadia is how it handles the biggest challenge I face with delay: keeping my mix clear while still adding depth and space.
Most delay plugins force you to choose between a bold effect and a clean mix. Cascadia uses adaptive unmasking technology that carves out space for your original signal in real time. The delay signal automatically ducks around the frequencies your dry track is using, so you never lose clarity or punch.
I find this especially helpful on vocals and lead instruments. You can push the delay harder without worrying about it smearing your main sound or making everything muddy. The plugin does the work for you instead of requiring complicated side-chain setups or manual automation.
Cascadia also brings tape delay character with modulation controls that add subtle pitch drift and warmth. If you want clean digital repeats, you can dial it back. If you want vintage wobble and texture, you can push it forward. That range makes it useful across different genres and production styles.
- Adaptive Unmasking Technology
This feature listens to your incoming audio and automatically reduces the delay signal where your dry track needs space. You get full control over how aggressive the unmasking acts, with adjustable sensitivity and attack/release settings.
I use this when I want atmospheric delay tails on vocals without losing the clarity of the words themselves. It keeps your source material upfront while the delay sits behind it naturally.
- Tape Delay Emulation With Modulation
Cascadia gives you pitch drift and modulation controls that recreate the warm, wobbly character of vintage tape machines. You can adjust the modulation depth and rate to add anything from subtle movement to heavy lo-fi effects. I like how this adds life to otherwise static delay patterns, especially on synths and guitars.
- Tempo-Synced and Free Time Modes
You can lock delay times to your project tempo or set them freely in milliseconds. The plugin offers standard stereo modes, ping-pong panning, and even reversed delay for experimental textures. I switch between synced rhythmic echoes for electronic tracks and free-time delays for ambient work depending on what the song needs.
- Over 50 Factory Presets
Cascadia comes loaded with presets covering vocals, drums, pads, guitars, and creative effects. These give you solid starting points that you can tweak instead of building from scratch every time. I appreciate this when I’m working fast or just need inspiration for a different delay approach.
4. Brainworx bx_pulsar
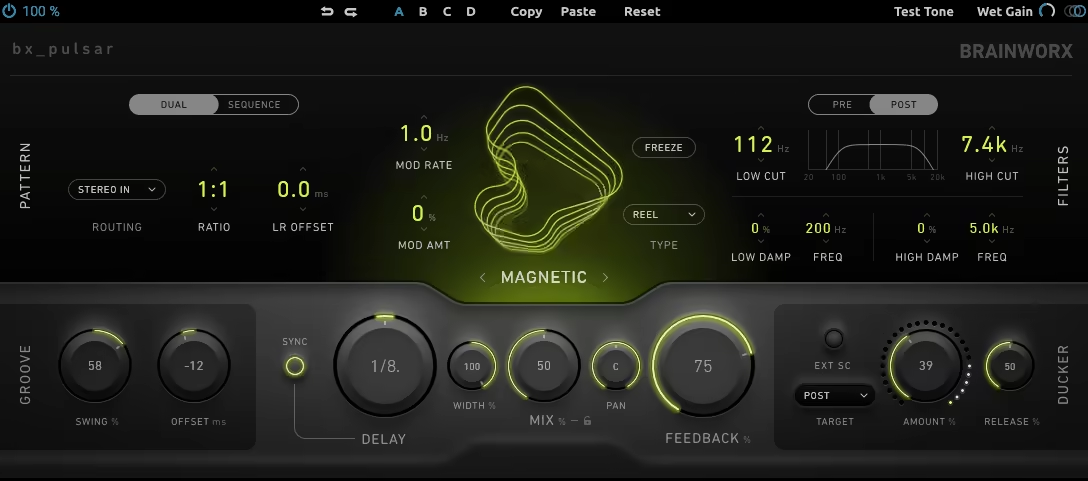
With bx_Pulsar you get five totally different delay engines in one plugin, each with its own sonic personality.
I would recommend Air mode for clean digital delays and Magnetic when you want that worn-in tape vibe. Circuit mode gives you bucket-brigade warmth that works perfectly on synths or guitars. Then there’s Reverse and Aether for when you need something more experimental or textured.
The 8-step sequencer changes how I use delay entirely. Instead of just setting a tempo and feedback amount, you can program rhythmic patterns, pan each step differently, and build delays that feel like part of the arrangement rather than just an effect. It keeps things moving and unpredictable in ways a standard delay can’t.
- Five Core Delay Modes
Air delivers transparent digital delay when you need clarity. Magnetic recreates tape and reel-to-reel characteristics with modulation and vintage coloration that sits beautifully on vocals or keys. Circuit brings analog pedal-style grit.
Reverse mode adds diffusion and compression for dreamy textures. Aether goes furthest with pitch-shifting and grain-based processing for genuinely weird and creative results. Having all these options means you’re not jumping between plugins mid-session.
- 8-Step Delay Sequencer
This feature turns delay into a compositional tool. You can program panning per step, choose looping or one-shot triggers, and create non-standard rhythmic patterns that don’t just repeat the same thing over and over. Try this if you want to build tension or adding movement to static parts. It’s especially powerful in electronic music where rhythm matters as much as melody.
- Ducking Compressor & Filters
The built-in ducking keeps your delays from masking the dry signal, which is huge when you’re working in dense mixes. You also get low-cut and high-cut filters plus dampening controls to shape the tonal character of each repeat. I usually roll off low end to avoid muddiness and tame highs so the delays don’t get harsh after a few repeats.
- Stereo Routing & Ratios
bx_pulsar offers Ping-Pong and Criss-Cross stereo modes, but the real fun is in the Ratio control for asymmetric delay divisions. You can set left and right channels to different rhythmic values like 2:3 or use preset ratios like Golden or Plastic for polyrhythmic delays that create interesting stereo movement and rhythmic complexity.
- Freeze & Swing Controls
Freeze lets you lock the delay buffer for infinite repeats, perfect for building ambient pads or drones. The swing and timing offset controls add humanized feel to your delays so they don’t sound robotic or overly quantized. These small touches make a big difference when you want delays that feel musical rather than mechanical.
5. Moog Moogerfooger MF-104S Analog Delay
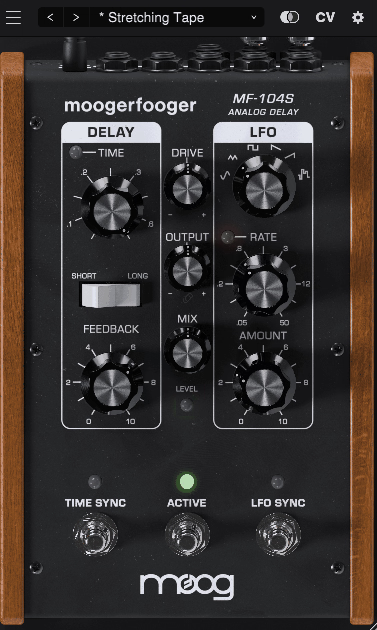
If you’ve ever wished you could bottle up the sound of a classic analog delay pedal and use it inside your DAW, MF-104S VST does exactly that.
The MF-104S plugin brings back the original MF-104 hardware delay that Bob Moog designed back in 2000. What made that pedal special was its dual-range Bucket Brigade Device (BBD) that gave delays a warm, slightly imperfect character you just don’t get with clean digital delays. This plugin recreates that same feel while adding features that only software can offer.
You get delay times from 40 milliseconds up to 800 milliseconds, which covers everything from tight slapback echoes to spacious ambient repeats. The plugin includes both standard stereo and ping-pong modes, so you can spread delays across your stereo field or bounce them back and forth for rhythmic effects.
- Bucket Brigade Device Modeling
The core of this plugin is how it recreates the BBD circuit from the original pedal. You hear the same frequency roll-off and subtle modulation that made the hardware version famous. When I run guitars or synths through it, the repeats feel alive rather than sterile.
They sit in a mix differently than digital delays, with a softer edge that glues nicely with other elements without extra EQ work.
- Tone Control with Three Character Modes
You can shape how your delays sound with three distinct tone settings. Legacy mode gives you the darker, murkier character of the original pedal. Analog mode softens the high end while keeping warmth intact.
Modern mode delivers fuller, brighter repeats when you need more clarity. I switch between these depending on whether I want vintage grit or something cleaner that still has analog warmth.
- Flexible Timing Options
The plugin lets you choose between tight digital-style timing or looser, more organic timing that mimics how analog circuits naturally drift. This matters more than you’d think. When I want repeats that feel human and slightly imperfect, the looser timing adds character that makes delays feel less robotic.
For synced rhythmic delays, the tight mode locks everything in place.
- Modulation and Automation Support
Unlike the hardware version, you can modulate nearly everything here. Delay time, feedback, LFO rate, and mix all respond to automation or MIDI control.
Good for evolving pad textures where the delay time slowly shifts, creating movement that changes throughout a track. It turns a simple delay into something that breathes and evolves on its own.
6. ujam UFX DELAY
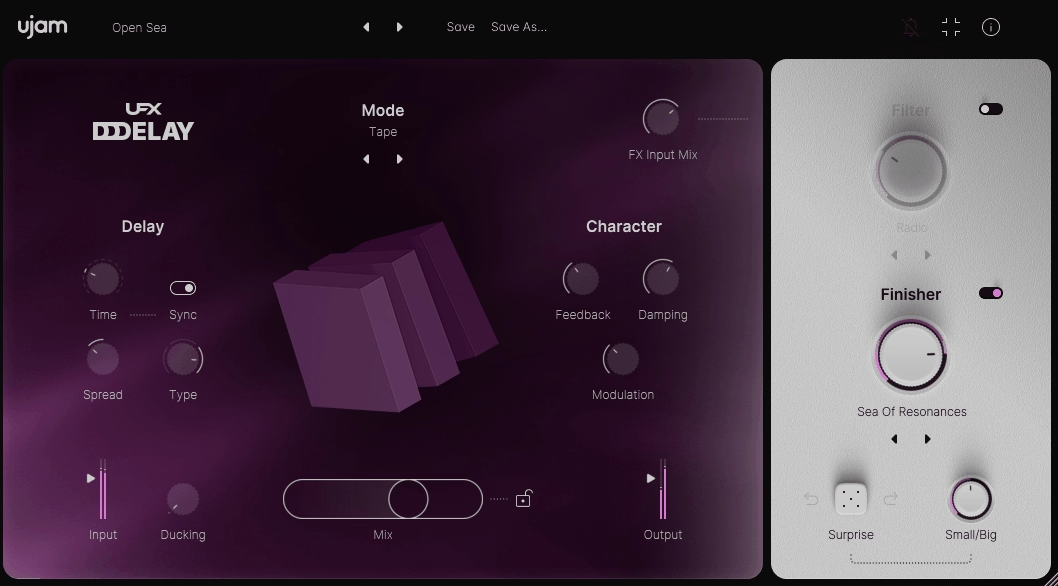
UJAM built this plugin around 20 different delay modes, which is honestly more variety than I’ve seen in most delays. You’re not stuck with the usual suspects.
Clean and tape modes handle your standard mix needs, but then you’ve got grain processing, pitch-shifted delays that jump octaves, filter sweeps, and even a sequencer mode that creates rhythmic patterns on its own.
With UFX Delay I can dial in a preset from the 150+ options available and tweak from there, or I can build something from scratch using the dual multi-effects sections. The ducking feature alone saves me tons of automation time because it pulls the delay volume down when my dry signal plays, keeping vocals and drums clear without manual riding.
- 20 Delay Modes for Different Creative Directions
You get access to modes like Grain for textured repeats, Ricochet for bouncing filter effects, Oct Up and Oct Down for pitch-shifted echoes, and Flam for percussive layering. Consider Doubling mode on vocals because it creates width without sounding like obvious delay.
The Filter Complex mode works great when I want movement in the repeats rather than static echoes. Each mode changes how the plugin behaves, so you’re really getting multiple delays in one package.
- Built-In Multi-Effects Processing
UFX DELAY includes two separate multi-FX sections that let you shape your delayed signal beyond basic feedback and time controls. I can add chorus, saturation, bit-crushing, or grain clouds directly to the wet signal. This means
I’m not bouncing between plugins to get lo-fi tape vibes or gritty industrial textures. The filter section gives you different filter types that sculpt the tone of your repeats, which helps delays sit better in dense arrangements.
- Intelligent Randomization with Control
When I hit the randomize button, I’m not getting complete chaos. You can adjust how much variation happens using the Small/Big control, so you get subtle tweaks or totally new delay configurations depending on what you need.
This feature pushes me toward sounds I wouldn’t program manually, especially when I’m stuck or need quick inspiration for experimental tracks.
- Ducking for Automatic Mix Clarity
The ducking feature automatically lowers delay volume when your source signal is active. I rely on this constantly for drums and lead vocals because it prevents that muddy buildup you get when delays fight with the dry sound. You set the threshold and release, and the plugin handles the rest without needing sidechain compression or volume automation.
7. UnitedPlugins Pluralis
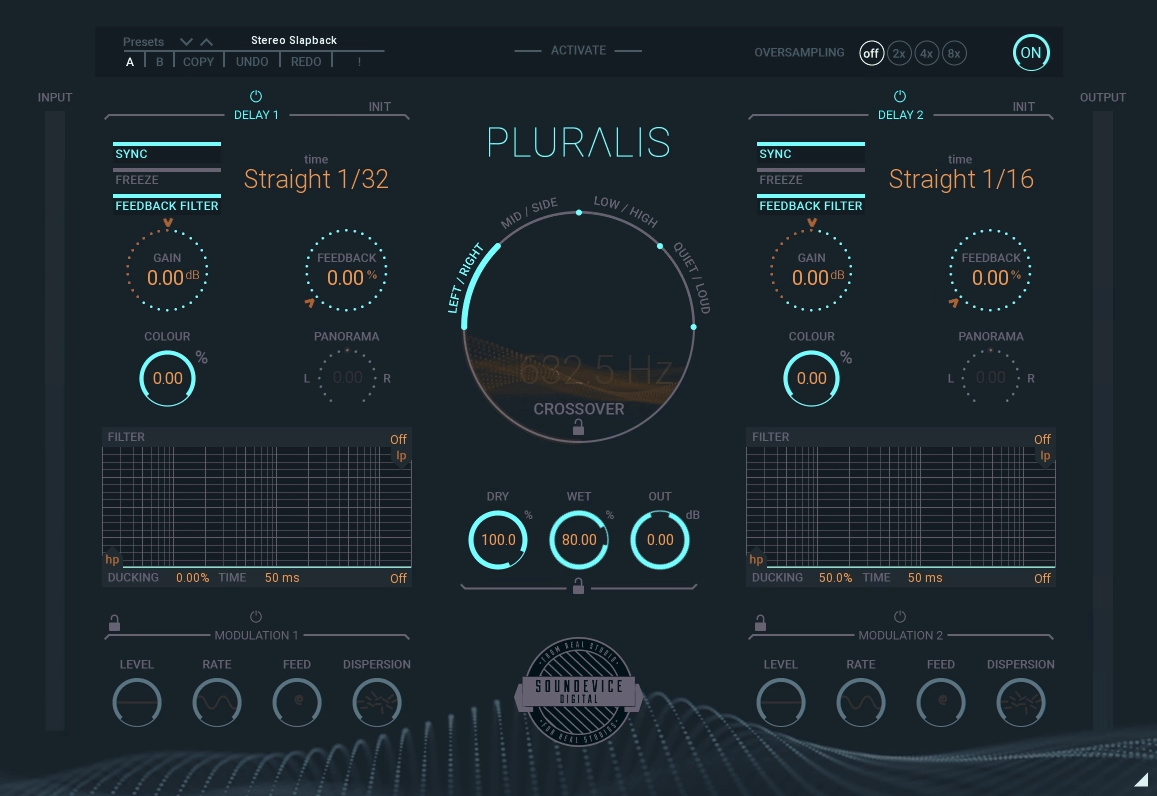
Pluralis delay explores delay in ways that most plugins overlook, turning simple echoes into complex, evolving textures. Instead of just throwing echoes left and right, it actually splits your signal into separate layers and lets you delay each part differently.
That layered approach opens up creative possibilities I didn’t know I needed. You can split by stereo position, frequency range, or even how loud different parts of your signal are. Then you apply two independent delay engines to those splits and suddenly you’re crafting delays that react to your audio in ways that feel almost alive. Pluralis feels more like a sound design tool that happens to be built around delay.
- Signal Splitting with Four Modes
Pluralis VST delay plugin gives you four different ways to split your incoming audio: Left/Right for stereo separation, Mid/Side for width control, Quiet/Loud based on amplitude, and Low/High based on frequency content.
Each mode lets you route different parts of your sound to separate delay lines. I love using the frequency split on drums where I can delay the highs short and tight while letting low-end hits breathe with longer repeats.
- Two Independent Delay Engines
You get two fully programmable delay lines running side by side, each with its own time, feedback, and color controls. These aren’t just copies of each other. You can set one to a fast slapback rhythm and the other to long ambient washes, then blend them however you want.
The control you get over each engine separately makes complex delay textures way easier to dial in than bouncing between multiple plugin instances.
- Dual Modulation Sections
Each delay engine comes with its own modulation section that can move parameters like rate, feedback, and dispersion. When I want subtle movement, light modulation adds just enough wobble to keep things interesting without screaming “effect.”
Push it harder and you get glitchy, chaotic echoes that work great for transitions or experimental passages. The modulation depth makes a huge difference in how organic or wild your delays feel.
- Freeze Function for Infinite Tails
The freeze button captures your delay buffer and holds it indefinitely, which turns rhythmic delays into evolving ambient layers instantly. I use this when building atmospheric sections. You can freeze a delay tail, let it loop and decay naturally, then process it further or layer new material on top. It’s perfect for creating pad-like textures from percussive sources.
- Tap Patterns and Filter Options
Pluralis includes tap pattern control and six analog-emulating filters built into the feedback path. The filters let you shape how your delays degrade over time, from bright and clear to dark and murky. Tap patterns add rhythmic variation beyond straight repeats. Combined with the split modes, you can create polyrhythmic delay patterns where different frequency ranges bounce at different intervals.
8. Newfangled Audio Recirculate
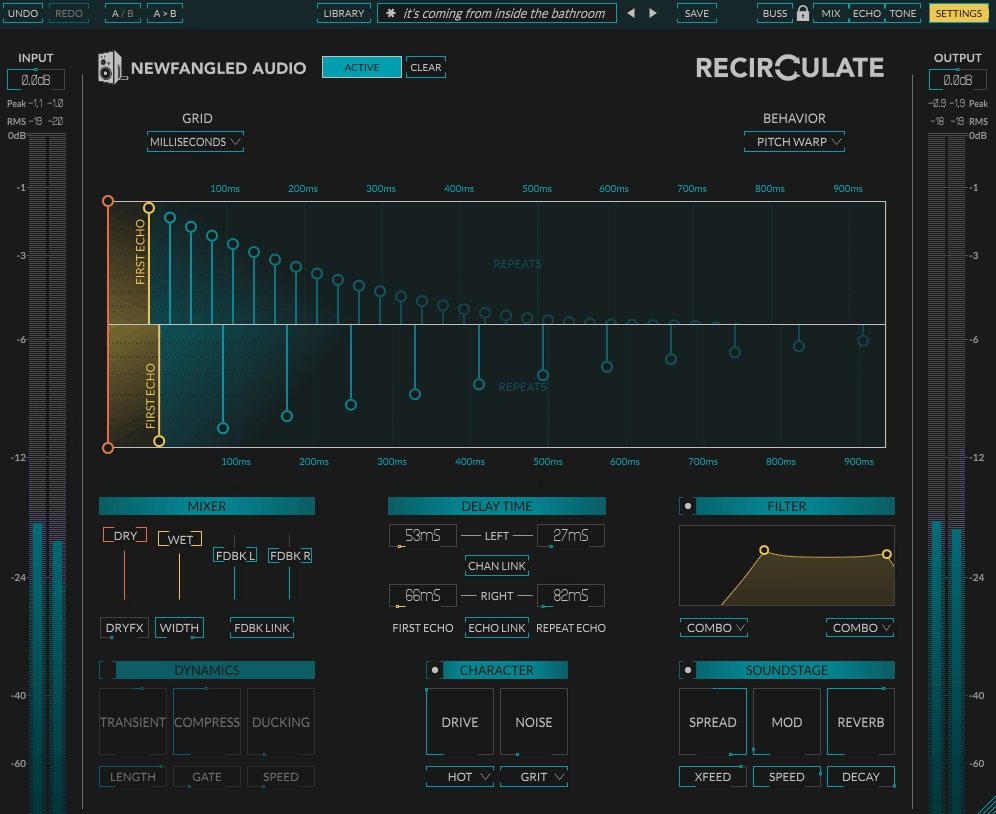
This delay is not trying to copy vintage hardware or stick to one classic sound. What you get is a modern delay engine where you can shape everything from clean rhythmic taps to chaotic granular textures.
You can use it on vocals, synths, drums, and even as an ambient texture builder. The Dual Time Control feature alone change how you approach delay timing. You can set the first echo to land on a specific beat, then have the repeats follow a totally different rhythm. That opens up syncopated patterns and offbeat echoes I couldn’t easily get with standard delay plugins.
Recirculate‘s UI is divided into clear sections, and while there’s a lot going on, it never feels cluttered. You get a visual display showing your delay taps, and you can drag them around or sync them to your DAW tempo. I like that you can work in note divisions or milliseconds depending on what the track needs.
- Four Delay Behaviors for Different Creative Directions
Recirculate gives you four distinct delay modes: Standard, Pitch Warp, Ping-Pong, and Granular. Each one changes how your echoes behave and sound. Standard is straightforward and clean. Pitch Warp shifts the pitch of repeats up or down.
Ping-Pong bounces delays across the stereo field. Granular breaks echoes into tiny grains for glitchy, textured effects. This means you’re not stuck with one delay character. You can switch modes depending on whether you want tight rhythmic control or experimental sound design.
- Independent First Echo and Repeat Timing
The dual-time control lets you set the initial delay separately from the feedback repeats. For example, your first echo could hit on an eighth note while the repeats follow a dotted rhythm. This creates patterns that feel less predictable and more musical.
Feedback Shaping with Filters, Saturation, and Dynamics
You get a two-band EQ for shaping the tone of your echoes, plus saturation and noise options with 28 possible combinations. That means you can keep delays clean or push them into dirty, lo-fi territory. There’s also a dynamics section with ducking, gating, and compression. Ducking is especially useful because it lets the delay sit behind your dry signal without fighting for space.
- Built-In Reverb and Stereo Soundstage Tools
Recirculate includes eight different Soundstage effects that add reverb, modulation, and stereo width to your delays. This turns it into more than just a delay plugin. You can blur echoes into reverb tails or spread them wide across the stereo field. I would recommend this to create ambient textures that evolve over time without needing a separate reverb plugin.
- Transient Control for Rhythmic Precision
The transient designer lets you sharpen or soften the attack of your delayed signal. This is helpful when you’re delaying drums or percussion and want the echoes to either punch through or sit back in the mix. It gives you more control over how rhythmic elements interact with delay feedback.
9. BLEASS Tides (Best Value)
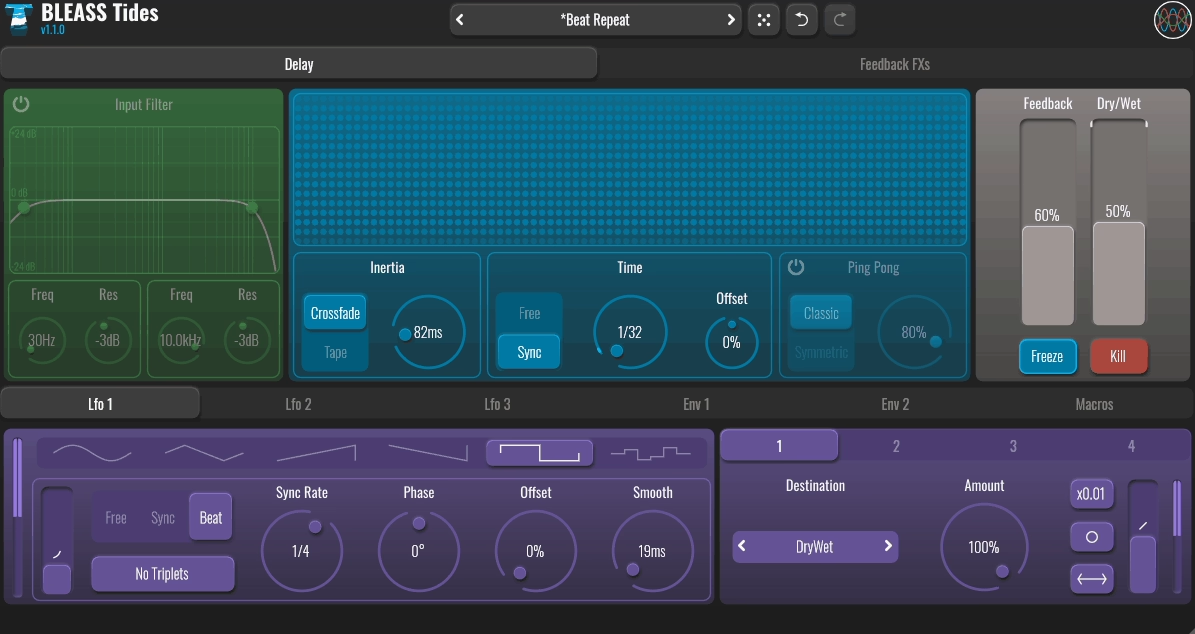
At $39 USD for desktop and $14.99 USD for iOS, Tides VST delivers more creative potential than some plugins that cost twice as much. What makes Tides stand out is how it treats delay as a full sound design tool instead of just echo repeats. You can shape, distort, and modulate your delays in ways that turn simple rhythmic echoes into evolving textures.
The interface looks clean but packs serious depth once you start exploring. I can dial in a basic tempo-synced delay in seconds, but when I want to experiment, the feedback processing and modulation options open up a whole different world of possibilities.
- Inertia-Based Delay Time Adjustment
Tides handles delay time changes without the usual digital artifacts that plague other plugins. You get smooth transitions when automating or tweaking delay time, with an Inertia control that lets you choose how fast or slow the change happens.
This creates tape-style pitch shifts or seamless crossfades depending on how you set it, which is perfect for creative automation moves during builds or breakdowns.
- 11 Effects in the Feedback Loop
This feature changes everything about how I use delay. You can load up to five effect slots in the feedback path, choosing from 11 different processors including distortion, bit-crush, ring modulation, frequency shifter, and pitch shifter.
Each repeat evolves as it passes through these effects, so your delays can degrade naturally, shift pitch progressively, or transform into something totally unexpected You can create some wild ambient textures just by stacking a frequency shifter with light distortion in the feedback
- Advanced Modulation System
Tides includes three LFOs, two envelope followers, and two macro controllers that you can assign to almost any parameter. I often link an envelope follower to the feedback filter so my delays react dynamically to incoming audio. The LFOs can modulate delay time for rhythmic variations or control effect parameters for evolving movement. It turns static delays into living, breathing elements in your mix.
- Interactive Spectral Visualizer with Frequency Shifting
The spectral display shows your input and delay signals in real time, but here’s the cool part: you can click directly on the visualizer to trigger frequency shifting in the feedback. It’s an intuitive way to morph your delays on the fly, especially useful during live sessions or when you’re hunting for that perfect experimental sound.
The Freeze button locks your current delay buffer for infinite sustain, while Kill clears everything instantly.
10. Sound Particles inDelay
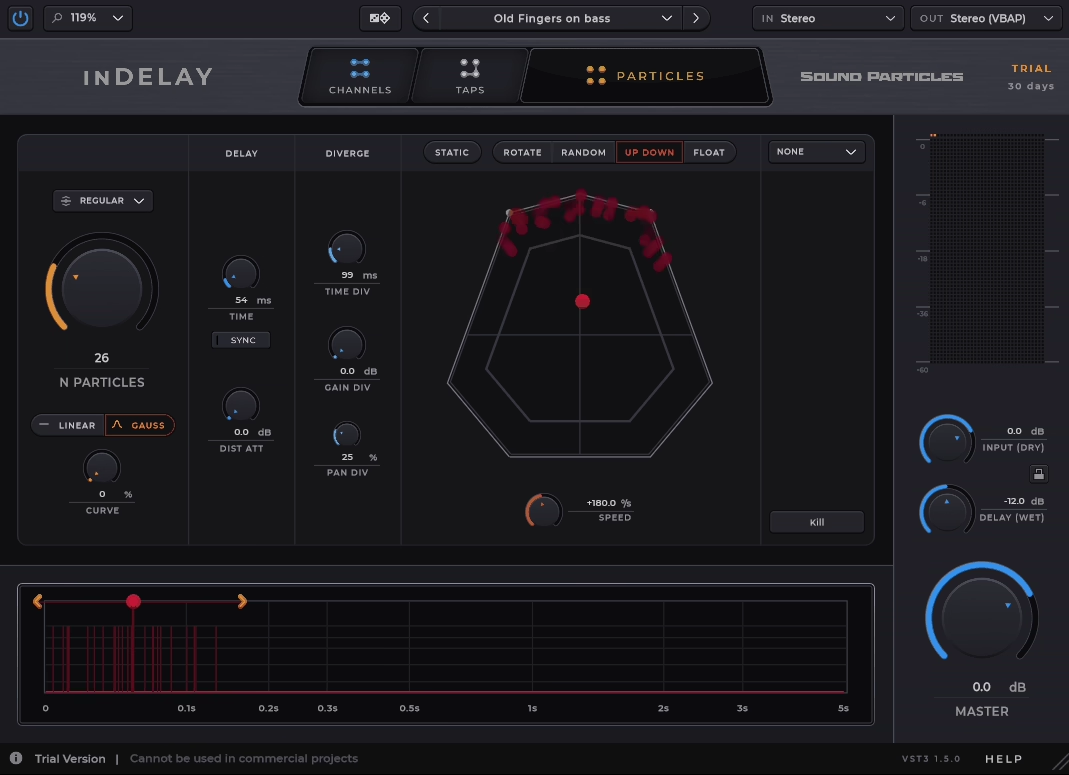
It’s built on the same 3D audio engine that Sound Particles uses for film and VR sound design, which means you’re not just working with standard left-right stereo delays anymore!
With inDelay you can create up to 100 simultaneous delay particles and position each one in 3D space. This opens up possibilities I’ve never had with traditional delay plugins. You can build moving soundscapes, cinematic echoes, or evolving textures that wrap around the listener instead of just bouncing between speakers.
The plugin gives you three different workflow modes depending on what you’re trying to do. You can work in Channels mode for independent per-channel delays, Taps mode for managing up to 16 discrete taps, or Particles mode where things get really creative with spatial movement and randomization. I find myself switching between these modes depending on whether I need precision or experimentation..
- 3D Particle System
This is where inDelay separates itself from every other delay plugin. You can place delay particles anywhere in three-dimensional space and animate their movement over time.
You can use this to create echoes that circle around the stereo field or delays that travel from front to back in an immersive mix. The spatial positioning feels natural because it’s using the same technology that major film productions rely on for realistic spatial audio.
- Air Simulation
One feature that immediately made my delays sound more realistic is the Air simulation. It mimics how sound naturally loses high frequencies as it travels through air and creates distance-based attenuation.
When I turn this on, my delays automatically get that sense of depth and space without needing separate EQ adjustments. Longer delays sound farther away, which adds instant dimension to the sound.
- Visual Time Editor
Instead of twisting knobs blindly, you get a visual timeline where you can click and drag to adjust timing, gain, and feedback across all your taps or particles. You can see exactly where each delay hit lands and how they interact with each other.
This makes complex multi-tap patterns way easier to design and understand at a glance.
- Multiple Output Format Support
Because of its spatial engine, inDelay supports more than just stereo output. You can work in surround formats, Ambisonics, or even Dolby Atmos configurations. I would recommend this for film work and immersive audio projects where you need delays that move through a full 3D speaker array instead of just left and right channels.
11. Universal Audio Galaxy Tape Echo
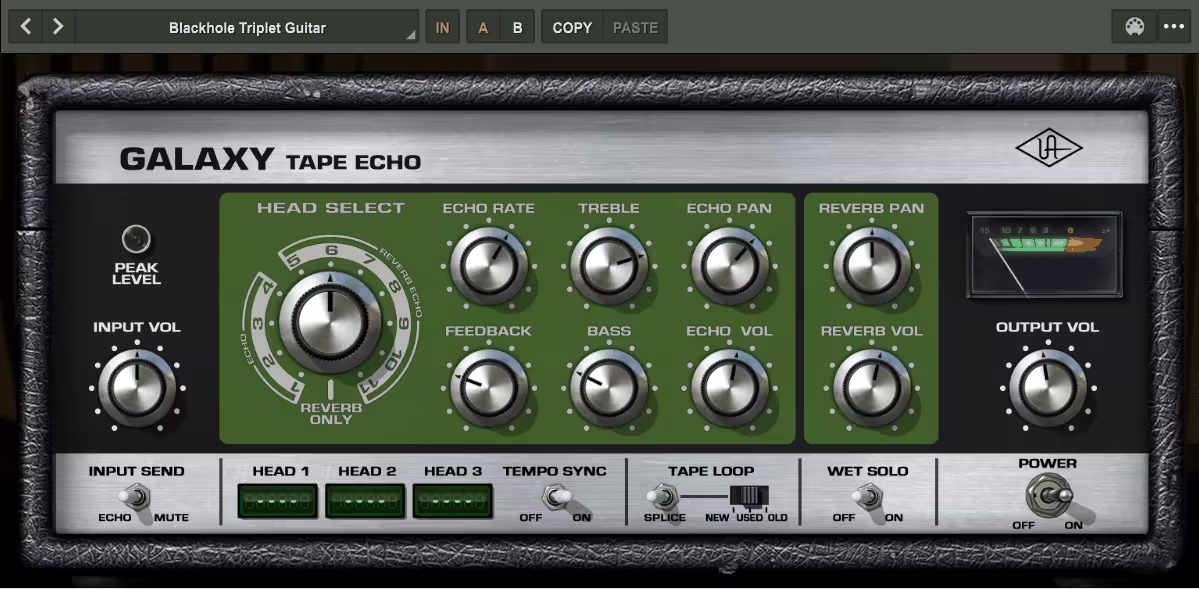
Galaxy Tape Echo recreates the entire experience of working with a Roland RE-201 Space Echo, complete with all the tape quirks and spring reverb that made the original hardware legendary. When you need that warm tape saturation or those wobbly pitch shifts that define classic dub and psychedelic records, this plugin delivers.
The tape-based artifacts like wow and flutter feel authentic, not like someone just slapped a lo-fi filter on a digital delay.
What makes this delay VST especially useful is how Universal Audio updated it for modern workflows. You get Tempo Sync, Pan controls, and Tape Select options that let you dial in different tape timbres. You can also lock delays to your project tempo or let them drift naturally depending on what the track needs.
- Authentic Tape Head Selection System
Galaxy Tape Echo uses the original multi-head playback system from the hardware, giving you different delay time ranges based on which heads you activate. You can adjust the virtual tape motor speed to change both timing and the amount of analog character.
When I want tighter slapback delays, I use faster tape speeds. For more degraded, wobbly echoes, I slow it down and let the imperfections build.
- Built-In Spring Reverb Engine
Unlike most delay plugins, this one includes authentic spring reverb emulation that you can blend with your delays. The reverb has that metallic, bouncy quality you’d expect from vintage hardware. I would use this combination for creating atmospheric textures on synths and guitars without needing to load separate reverb plugins.
- Tape Select and Saturation Controls
The Tape Select feature lets you choose between different tape conditions, from fresh tape to worn-out vintage character. Combined with the distortion circuit, you can push signals into saturated territory or keep things subtle. It seems pretty useful for adding warmth to digital synths that sound too clean. The saturation alone makes it worth loading on certain sources.
- Creative Self-Oscillation Capabilities
Push the feedback up and Galaxy Tape Echo transforms into a self-oscillating feedback machine that can create wild pitch-shifting swells and psychedelic runaway delays.
This isn’t just for chaos, I use controlled oscillation for dramatic transition effects and experimental sound design moments. You can automate the feedback parameter to build tension before drops or create evolving ambient beds.
12. Bonus Item: Audiority Space Station UM282
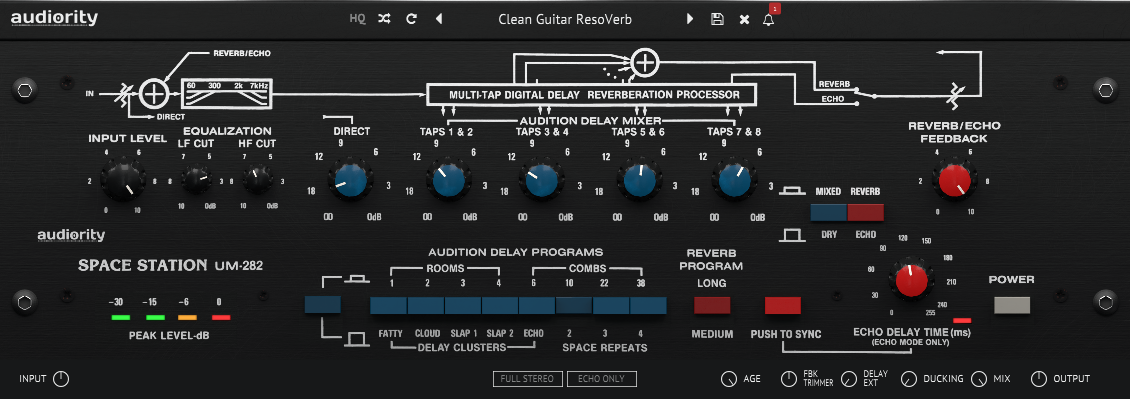
I’m throwing in Space Station UM282 because it sits in this weird, wonderful space between delay and reverb that hardly any modern plugin touches. It’s modeled after the Ursa Major Space Station SST-282, an early 80s unit that used delay tricks instead of standard reverb algorithms to create stereo space.
The plugin uses 8 audition taps in its multi-tap delay line, which means you’re not just getting one or two echoes bouncing back.
You’re getting a complex pattern that builds into something closer to a reverb tail. It’s perfect when you want that retro-digital character without reaching for yet another algorithmic reverb.
The bandwidth is intentionally limited to 20 Hz to 7 kHz, which might sound like a downside until you hear it. That rolloff gives everything this warm, slightly degraded quality that feels like it came from an old tape or early digital unit. I use it constantly on synths and guitars when I want instant 80s vibe without faking it.
- Multi-Tap Delay Architecture
The 8 audition taps give you way more control than standard ping-pong delays. Each tap can be adjusted, so you’re shaping the entire stereo field and how the echoes stack up. When you switch into reverb mode, these taps blend together into a wash that can stretch up to 3.5 seconds with the delay extension turned on. I would use it on vocals and pads when I want something between a slap delay and a hall reverb.
- Tempo Sync with Ducking
Space Station locks to your DAW tempo in echo mode, which makes rhythmic delays stupidly easy to dial in. The ducking feature automatically pulls down the wet signal when your dry signal hits, so you don’t get that muddy buildup that kills your mix clarity. This combo is a lifesaver on dense tracks where delays usually fight for space.
- Vintage Bandwidth Coloration
That 7 kHz ceiling isn’t a bug, it’s the whole point. It cuts the brittle high end and gives you this softer, rolled-off texture that modern plugins try to emulate with filters. If you’re working on synthwave, lo-fi beats, or anything retro-inspired, this coloration does half the work for you.
It’s also great for taking harsh digital synths and making them sit nicely without extra EQ.
- Echo and Space Modes
You get two totally different modes here. Echo mode gives you standard delay behavior with up to 255 ms by default, or stretch it to 2.55 seconds with the extension engaged. Space mode flips it into reverb territory, using those delay taps to build diffusion and stereo width.
Tips for Getting the Most Out of Delay Plugins
Delay plugins work best when you understand how to push them creatively and avoid the traps that muddy your mix. I’ve found that intentional automation and knowing what not to do make the biggest difference in how professional your delays sound.
Creative Automation Techniques
I automate delay parameters constantly because static delays rarely give me the movement I’m looking for. Automating feedback during a vocal phrase creates those swelling buildups that pull listeners into a chorus, especially when I push it from 20% to 85% right before a drop.
Delay time automation is where things get fun. I’ll map it to jump between 1/4 notes and 1/16 triplets mid-section to add rhythmic surprise without layering new sounds. Ping-pong width automation also works beautifully on synth leads. I start narrow at 30% during verses and open it to 100% in the hook.
Filter sweeps on your delay tail can shape tone without touching your source. I often automate a low-pass filter from 8kHz down to 2kHz across eight bars to make delays fade naturally into the background. Modulation rate changes turn simple delays into textural tools. Cranking mod speed from 0.1Hz to 3Hz on a pad delay adds instant motion.
Common Mistakes to Avoid
The biggest mistake I see is using too much feedback on every track. When feedback sits above 50% on multiple elements, your mix turns into a washy mess. I keep vocal delays around 25-35% and reserve higher values for specific moments.
Ignoring pre-delay is another issue. Adding 15-30ms of pre-delay on vocals keeps the original signal clear while the effect still sits in the mix. Without it, delays step on your dry sound.
I also avoid using the same delay time across multiple instruments. If your lead and pad both use 1/4 note delays, they fight for the same rhythmic space. I’ll offset one to dotted 1/8 or 1/8 triplets instead.
Finally, not using high-pass filters on delay returns clutters your low end fast. I roll off everything below 200-400Hz on most delays to keep bass clean and focused.
How Delay Plugins Shape Modern Music
Delay plugins create space and movement in ways that define how we hear music today. They turn flat recordings into living tracks by adding rhythmic repetition and atmospheric depth that works across every genre.
Key Roles in Music Production
These plugins do three main jobs in modern production. They create space without using reverb, which keeps mixes cleaner while still adding dimension. I use short delays under 50 milliseconds to make vocals sit forward in a mix without sounding distant.
Rhythmic delays sync to tempo and turn single notes into patterns. When I set a delay to dotted eighth notes, a simple guitar line becomes a moving texture that fills gaps between chords. This works especially well at 300-600 millisecond intervals where you hear clear repetitions that groove with the beat.
Delays also fix width problems. Ping-pong delays bounce between left and right speakers, making mono synths feel wider. I run short delays at 15-30 milliseconds on one channel to create the Haas effect, which pushes sounds to the sides without obvious repeats.
Impact on Different Genres
Electronic music relies on feedback-heavy delays that build into walls of sound. I push feedback past 70% in techno and ambient tracks to create self-oscillating textures that become instruments themselves.
Hip-hop and R&B use eighth-note delays with low feedback around 20-30% to add bounce to vocals without cluttering lyrics. The delays sit quiet in the mix but add motion that makes performances feel more natural.
Rock and indie producers love tape-style delays with modulation. I add 0.2-0.5 Hz wobble to delay repeats on guitars, which creates analog warmth. This works especially well on leads where you want character without digital precision.
Country and pop vocals often use slap delays under 120 milliseconds. These quick repeats thicken voices and add energy without the wash that longer delays create. I keep these delays 15-25 dB quieter than the dry signal so they support rather than compete.
FAQ
How does digital delay work?
Digital delay takes your audio signal and records it into a buffer stored in memory. The plugin then plays that recorded signal back after a set amount of time, measured in milliseconds or note values synced to your project tempo.
The magic happens in how that delayed signal gets processed before you hear it. Most delay plugins let you control the feedback amount, which sends part of the delayed signal back into the buffer to create repeats. You can usually adjust anywhere from 0% to 100% feedback, with higher values creating more echoes that fade out gradually.
The delay time sets how long the plugin waits before playing back your signal. Short delays under 50ms create doubling or slapback effects. Medium delays between 100ms and 500ms add rhythmic bounce. Longer delays above 500ms create distinct echoes that sit apart from your original sound.
In addition, most modern delay plugins include filtering options that shape the tone of your repeats. High-pass and low-pass filters let you remove low or high frequencies from the echoes, making them sit better in your mix without cluttering your main signal.
Modulation is another key feature you’ll find in plugins like FabFilter Timeless 3 and Pulsar Audio Echorec. The plugin applies subtle pitch or time variations to the delayed signal, creating movement and warmth similar to vintage tape machines. These variations typically range from 0.1Hz to 5Hz in speed.
The dry/wet balance determines how much of the effected signal you hear compared to your original. Most delays work best with 20% to 40% wet signal for subtle space, while creative effects might push to 70% or higher.
Some plugins like iZotope Cascadia add spectral processing that analyzes your audio and applies delay only to specific frequency ranges. This gives you surgical control over which parts of your sound get the delay treatment.
Hello, I’m Viliam, I started this audio plugin focused blog to keep you updated on the latest trends, news and everything plugin related. I’ll put the most emphasis on the topics covering best VST, AU and AAX plugins. If you find some great plugin suggestions for us to include on our site, feel free to let me know, so I can take a look!