DaVinci Resolve has come a long way as a complete editing and post-production environment, and Fairlight is genuinely capable for most audio work you’ll throw at it. But the moment you start working with dialogue-heavy projects, location audio, or content that needs to hit specific loudness targets for broadcast or streaming, you start running into the edges of what the built-in tools can do. That’s where VST plugins come in, and Resolve supports them well on both Windows and Mac.
The plugins on this list cover the full picture: EQ, compression, gating, dynamic processing, noise removal, loudness metering, and the kind of surgical frequency control that turns problem audio into something broadcast-ready. Some are completely free and come from the same team behind REAPER, others are industry-standard paid tools that video editors and post-production engineers use on real projects every day.
All of them are worth your time. The free options from Cockos, Tokyo Dawn Labs, and Analog Obsession compete seriously with paid alternatives, and I’d say every editor working in Resolve should have at least the ReaPlugs suite installed before anything else. The paid options like Waves Clarity Vx and FabFilter Pro-Q 4 solve specific problems that free tools simply can’t match at the same level.
Cockos ReaEQ
Type: Equalizer
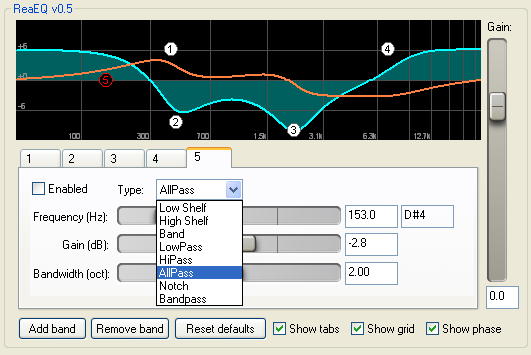
Image credit: Reaper
Free, no installation needed, and more capable than it looks at first glance, ReaEQ from Cockos is the parametric EQ I’d put on every dialogue track in DaVinci Resolve before reaching for anything else.
It’s part of the ReaPlugs VST FX Suite, which you download as a standalone pack separate from REAPER itself, drops into any folder you point Resolve to, and requires no copy protection or registration of any kind.
I love how you can add as many bands as you need without hitting a cap, which makes it genuinely useful for complex dialogue problems where you might need a high-pass, a surgical notch, a broad presence boost, and a de-essing dip all on the same track simultaneously. The frequency response and phase response display updates in real time as you drag nodes around, and the per-band bypass control lets you A/B individual corrections without touching the rest of your EQ curve. For something that’s been around since the early 2000s, it’s held up remarkably well.
- Unlimited EQ Bands
There’s no cap on how many bands you can add to a single instance, which matters in post-production work where a single dialogue clip might need a high-pass, a narrow notch for a resonant frequency, a broad dip in the low mids, and a gentle presence boost all at the same time. Each band is fully independent with its own bypass switch, so you can isolate the contribution of any individual correction while the rest stays active.
- Multiple Filter Types
Every band supports shelves, bell bands, low-pass, high-pass, band-pass, all-pass, and notch filters, giving you access to the full toolkit of corrective EQ shapes from a single instance. For dialogue editing in Resolve, this means you rarely need more than one instance of the plugin per track to handle everything from rumble removal to air recovery.
- Phase Response Display
The real-time phase response curve sits alongside the frequency response display so you can see exactly how your EQ decisions are affecting the phase of the signal, which matters whenever you’re stacking multiple instances or working with audio that will be summed to mono. This kind of transparency is unusual at any price point and especially valuable when you’re editing dialogue that needs to sit clearly in a mix.
- Zero CPU and No Installation
ReaEQ uses minimal CPU even with many bands active, runs from any folder without an installer, and carries no copy protection or registration requirements. In a DaVinci Resolve session with many dialogue tracks all needing individual EQ treatment, the ability to stack as many instances as you need without watching your CPU meter is practically significant.
Cockos ReaComp
Type: Free compressor
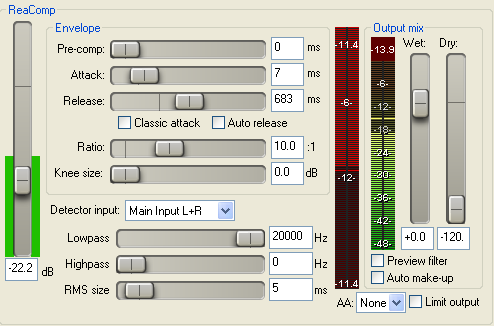
Image credit: Reaper
ReaComp is the other half of what I’d call the essential Cockos toolkit for Resolve, and it’s just as freely available from the same ReaPlugs suite download. This is a transparent, ultra-configurable compressor rather than a simple one, and that framing is accurate when you start exploring what it actually does.
Audio engineer Dan Worrall produced an in-depth analysis video comparing it to paid compressors and arrived at a conclusion that’s hard to argue with: for transparent compression, it delivers results on par with tools that cost considerably more.
For me, what makes ReaComp so useful in a DaVinci Resolve context is the combination of its sidechain filtering and its feedback compression mode, both of which are features you’d normally expect to pay for.
The sidechain filtering lets you restrict the frequency range the compressor’s detector responds to, which is genuinely practical for dialogue work where you want compression driven by the midrange presence of the voice rather than by low-frequency proximity effect.
I’d also say the variable RMS size control is one of the most underappreciated features in any free compressor, since it lets you dial the detector behavior anywhere from peak-responsive to slow RMS response, effectively mimicking the character of different hardware compression styles without a fixed personality baked in.
- Sidechain Filters with External Input
The sidechain detector has its own high-pass and low-pass filters that restrict which frequency range triggers the compression, and an external sidechain input allows compression to be triggered by a separate audio source entirely. For dialogue in Resolve, the internal sidechain HPF alone solves the common problem of low-frequency energy from room noise or proximity effect driving the compressor disproportionately.
- Feedback Compression Mode
A mode that changes the detector from feedforward (analyzing the incoming signal) to feedback (analyzing the output), which changes the compression character significantly and produces a more vintage, less predictable behavior that can sit more naturally on voice. This is the kind of option you’d normally find only in higher-end commercial compressors.
Cockos ReaGate
Type: Free gate

ReaGate completes the Cockos trio and addresses one of the most persistent challenges in Resolve dialogue editing: cutting background noise, room sound, and HVAC hum between words without making the gate sound mechanical or unnatural.
It’s part of the same free ReaPlugs suite as ReaEQ and ReaComp, requires no installation. KVR reviewers have called it the best freeware noise gate ever made, and for most practical dialogue gating purposes in DaVinci Resolve, I agree.
The feature that sets it apart from OBS’s built-in gate or a generic threshold gate is the sidechain filtering, which lets you restrict the frequency range the gate listens to when deciding whether to open or close. For dialogue, applying a high-pass around 80 Hz to the sidechain means the gate won’t be triggered or held open by low-frequency room rumble, only by the actual midrange energy of the voice.
I found the lookahead pre-open feature particularly important for natural-sounding gating, since it lets the gate open just before the signal crosses threshold and prevents hard consonants at the start of words from being clipped.
- Sidechain Filters
High-pass and low-pass filters on the internal sidechain detector let you specify exactly which frequency range the gate responds to. Setting a high-pass around 80 Hz for dialogue means low-frequency room noise and HVAC rumble won’t hold the gate open, and the voice opens it cleanly every time you speak without false triggers from environmental sounds.
- Lookahead Pre-Open
Gives the gate a brief lookahead window so it opens slightly before the signal crosses the threshold, preserving the attack of the voice and preventing hard consonants from being truncated. This is the feature that most separates a professional-quality gate from a basic one when you’re working with natural speech.
TDR Nova
Type: Free Dynamic Equalizer
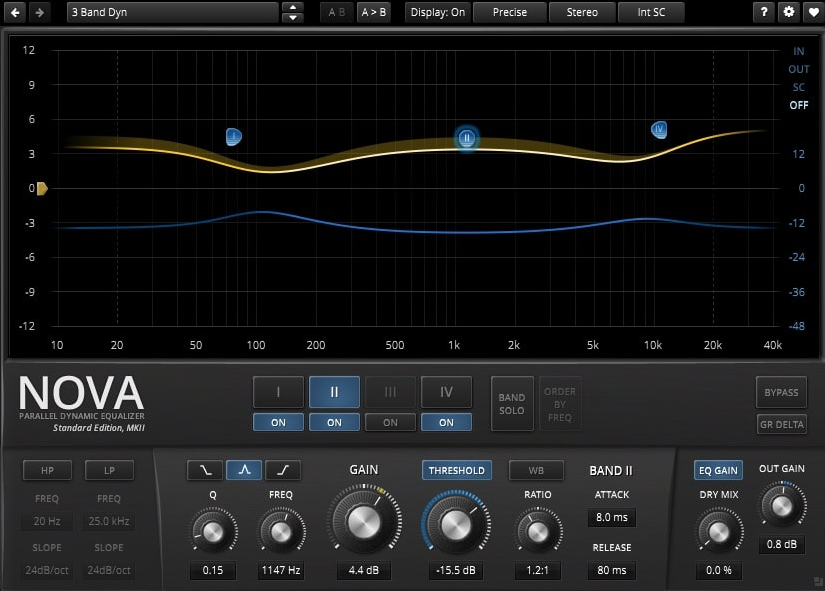
TDR Nova from Tokyo Dawn Labs handles the frequency-specific dynamics work that a static EQ can’t do and a standard compressor handles too bluntly. It’s a free parallel dynamic equalizer where each of the four parametric bands can function as a standard EQ, a dynamic EQ that responds only when the signal exceeds a threshold in that frequency region, or both simultaneously.
For DaVinci Resolve work, the practical value is in treating specific frequency problems that only appear intermittently. A harsh peak at 3-4 kHz that shows up when a speaker raises their voice, a boxy low-mid buildup that emerges during certain vowel sounds, a muddy 200 Hz buildup from mic proximity that comes and goes with head movement: all of these respond far better to a dynamic EQ band tuned to that frequency than to a static EQ cut that thins the voice constantly.
I believe the GR Delta monitoring function is one of the most underappreciated mixing tools in any free plugin, giving you direct feedback on exactly what the dynamic section is removing across your frequency range.
- Four Dynamic EQ Bands
Each parametric band has independent Threshold, Ratio, Attack, and Release controls in addition to the standard EQ parameters, allowing every band to react to the signal level in its own frequency region independently of the others. The ratio direction can be set for downward compression or upward expansion from the same band, making it useful for both problem frequency taming and gentle frequency-specific enhancement.
- Wideband Compressor
An independent wideband compressor operates across the full frequency range separately from the band-specific dynamics. The WB button links the wideband section to the band dynamics, and Alt-clicking the Threshold in Sticky mode excludes individual bands from the wideband compression, which effectively turns the plugin into a configurable multiband compressor without any additional routing.
Youlean Loudness Meter
Type: Free Loudness & Metering Tool
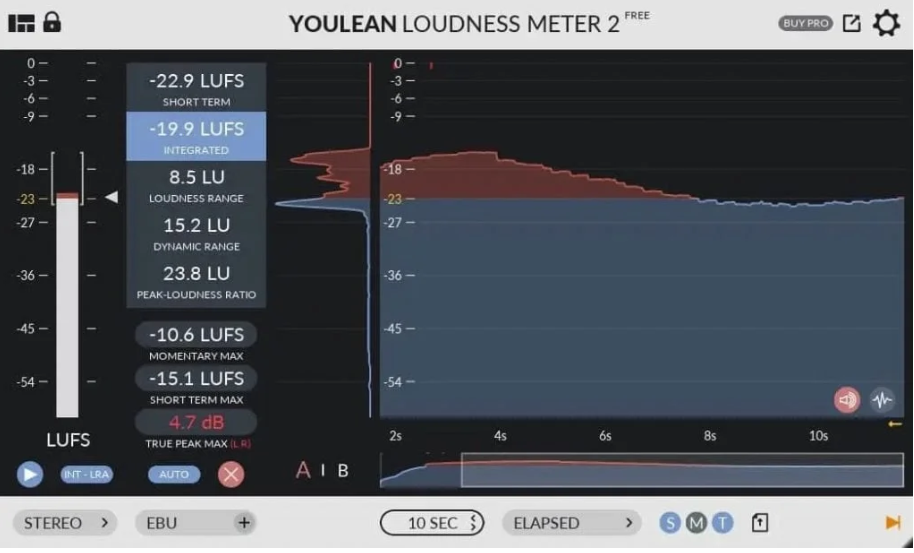
Loudness compliance might feel like an optional extra until the first time a platform rejects your deliverable or a broadcast client sends your mix back for re-delivery. Youlean Loudness Meter is the tool that makes sure that doesn’t happen, and it won the KVR Developer Challenge 2016 based on the strength of a free version that remains one of the most capable loudness metering tools available at any price.
It measures LUFS/LKFS perceived loudness according to the ITU-R BS.1770-4 standard, displays Momentary, Short-term, and Integrated LUFS simultaneously in real time, and shows True Peak and Loudness Range alongside a continuously updating histogram graph.
I must say the streaming platform presets in the Pro version are what push this from useful to genuinely practical. Rather than looking up the target for each platform, you select Spotify, YouTube, Apple Music, Netflix, HBO, or Disney+ from a preset list and the meter immediately shows you how your current integrated LUFS compares to the target for that specific platform. For DaVinci Resolve users delivering to multiple destinations, this alone saves significant time per project. The free version is fully functional for metering and is more than adequate for most Resolve users who just need accurate LUFS monitoring.
- LUFS/LKFS Real-Time Metering
Simultaneously displays Momentary, Short-term, and Integrated LUFS alongside Loudness Range and True Peak, all calibrated to ITU-R BS.1770-4. This is the standard measurement set used by broadcast delivery specifications and streaming platform normalization algorithms, and having all values visible at once removes the need for multiple metering tools.
- Loudness Histogram
A continuously updating graph shows loudness over time, filling blue for audio below the ceiling and red for anything above it. This makes it immediately clear whether your mix is dynamically consistent or has sections that are pushing too hard relative to the integrated loudness target, which is particularly useful for long-form content editing in Resolve.
Analog Obsession BUSTERse
Type: Free character bus compressor

Analog Obsession BUSTERse is one of the most talked-about free plugins in the post-production and mixing community, a convincing emulation of the SSL G-series bus compressor.
It’s available free from Analog Obsession’s Patreon with no signup required, and for DaVinci Resolve users working with music under video, dialogue buses, or final deliverable masters, it’s the plugin that makes a mix sound finished rather than assembled.
I think what separates this from generic bus compressor emulations is the sidechain filter section and the XFORMER switch, neither of which exist on the original hardware. The HPF in the sidechain is immediately practical since it prevents kick drum and bass energy from triggering the compressor disproportionately, which is exactly the kind of problem that makes glue compression pump on mixed content.
- XFORMER Transformer Emulation
Replaces the input and output ICs with a transformer circuit model that introduces impedance characteristics and harmonic coloration not present in the baseline emulation. This changes the overall sound in a way that’s clearly audible on the output and gives the plugin a personality beyond a standard SSL clone.
- Turbo Mode and 4x Oversampling
Turbo mode bypasses the internal mid-frequency focus of the compressor so it affects the full spectrum evenly, and clicking the Analog Obsession logo enables 4x oversampling for cleaner processing at higher gain reduction settings. The interface is resizable from 50% to 200%, which is useful when working in Resolve’s Fairlight workspace on smaller screens.
Waves Clarity Vx Pro
Type: Paid Noise Reduction
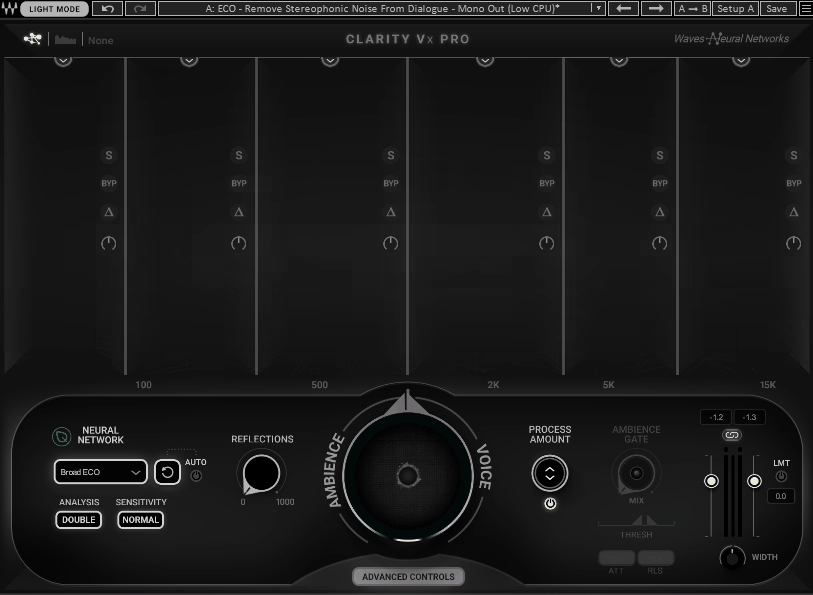
Waves Clarity Vx Pro is the more capable sibling of Clarity Vx, designed for situations where the standard version’s processing isn’t aggressive enough or where you need more control over how the noise removal is applied.
Where Clarity Vx gives you a single dial and gets out of your way, Clarity Vx Pro adds a second processing layer targeting ambience and room sound specifically, independent stem outputs for voice and noise, and a transient control that helps preserve the natural attack and clarity of speech after heavy noise reduction.
It’s still neural network-based and still doesn’t require a noise profile, but it gives experienced editors more hands-on control when the source material demands it.
The use case that separates Clarity Vx Pro from the standard version is dialogue recorded in genuinely difficult conditions: heavy room reverb, outdoor wind ambience layered under voice, or location recordings where the noise and the voice share frequency content closely enough that single-pass processing starts to affect speech quality. In those situations, the additional processing layer and the independent output control give you the tools to push harder without degrading the voice itself.
- Two Independent Neural Processing Layers:
Clarity Vx Pro runs two separate neural network processes simultaneously: the Voice layer handles broadband background noise the same way Clarity Vx does, while the Ambience layer specifically targets room reverb, environmental reflections, and spatial noise that the Voice layer alone doesn’t fully address. Each layer has its own level control, so you can dial in how much of each type of processing applies to the signal independently rather than applying both at the same fixed ratio.
- Voice and Noise Stem Outputs:
The plugin outputs the separated Voice and Noise signals as individual stems, which opens up several practical post-production applications beyond simple noise removal. Routing the separated noise stem to its own track lets you verify what the algorithm is removing before committing to the settings, blend a small amount of the noise back in if the cleaned result sounds over-processed, or use the isolated noise as a natural room tone fill elsewhere in the edit.
- Three Neural Network Models:
Like the standard version, Clarity Vx Pro offers Broad 1 for typical noise situations, Broad 2 for more extreme noise or bleed from nearby voices, and Broad ECO for significantly lower CPU usage when running multiple instances across a large session. The model selection is per-instance, so you can match the processing intensity to each clip individually rather than applying the same model globally.
FabFilter Pro-Q 4
Type: M/S, Linear Phase Dynamic EQ

I believe Pro-Q 4 is worth the investment for anyone doing serious post-production work in DaVinci Resolve because the Instance List alone changes how you manage EQ across large sessions.
Instead of opening and closing individual plugin windows across dozens of tracks, you can see and edit every instance of Pro-Q 4 in your session from a single interface, which is exactly the kind of workflow tool that makes the difference between an efficient post session and a frustrating one.
It also ships with a full preset library inherited from Pro-Q 3 plus new Pro-Q 4-specific presets, all of which transfer cleanly between instances via the Instance List.
- Spectral Dynamics Processing
A per-band mode that applies dynamic processing only to specific frequencies within a band rather than the entire band signal, targeting resonances and peaks without affecting surrounding content. Production Expert specifically highlighted its value for difficult voice recordings in boxy rooms, proximity mic changes, and sibilance control, and Tape Op’s reviewer noted that it addresses the need for dedicated resonance suppression tools like Soothe without requiring a separate plugin.
- EQ Sketch
Draw an EQ curve with a single mouse gesture rather than adding individual bands one at a time. The plugin interprets your drawn curve and creates the appropriate band types and parameters to match it, which is a genuinely fast way to establish a starting EQ shape on a new track before fine-tuning the individual bands. MusicTech described it as one of the most notable workflow improvements in the update.
- Instance List
A single interface window displays all instances of Pro-Q 4 across your entire session, allowing you to view and edit any track’s EQ curve without navigating between individual plugin windows.
- Character Modes with Analog Warmth
Clean, Subtle, and Warm character modes introduce varying degrees of analog-style saturation and harmonic coloring to the processing
- Continuous Slope and Dynamic EQ Improvements
Slopes are now continuously adjustable anywhere from 6 to 96 dB per octave rather than limited to fixed steps, and the Dynamic EQ section has been updated with proper Attack and Release controls plus optional sidechain filtering. Gearnews described the combination of these two improvements as representing a substantial precision upgrade over Pro-Q 3, particularly for mastering and high-precision dialogue editing work.
Hello, I’m Viliam, I started this audio plugin focused blog to keep you updated on the latest trends, news and everything plugin related. I’ll put the most emphasis on the topics covering best VST, AU and AAX plugins. If you find some great plugin suggestions for us to include on our site, feel free to let me know, so I can take a look!