Kick drums determine whether your low end sits powerfully or fights with the bass. Sample-based approaches force you into endless auditioning hoping to find something close, then layering multiple samples and fighting phase cancellation when the transient smears or the sub disappears.
Synthesis-based kick design solves this by giving you direct control over the transient attack, body sustain, pitch envelope, and harmonic content as distinct parameters you shape independently rather than hoping preset combinations work.
In this list, I will go through some of the best kick drum plugins I would recommend for producers and sound designers who need punchy, mix-ready kicks without relying on sample pack roulette or hoping layer stacks magically work together.
What separates effective kick plugins from basic sine generators: precise envelope control over transient shaping so the attack cuts without harshness, independent pitch modulation that creates impact without destroying the fundamental frequency relationship with your bassline, harmonic saturation tools that add presence on small speakers without muddying the sub, and phase-aware layering systems when you need multiple components working together instead of canceling each other.
Modern mixes demand kicks that translate from club systems to earbuds while maintaining both weight and definition – these tools give you the synthesis depth and processing control to build exactly that.
This guide covers kick plugins that handle synthesis, layering, and finishing workflows for contemporary production demands. The selection includes Kick Ninja, Audija KickDrum, and few more with freebies as well. Each entry explains what the plugin delivers for kick design, which synthesis or layering approach it uses, and when its particular workflow justifies choosing it over alternatives. Let’s go!
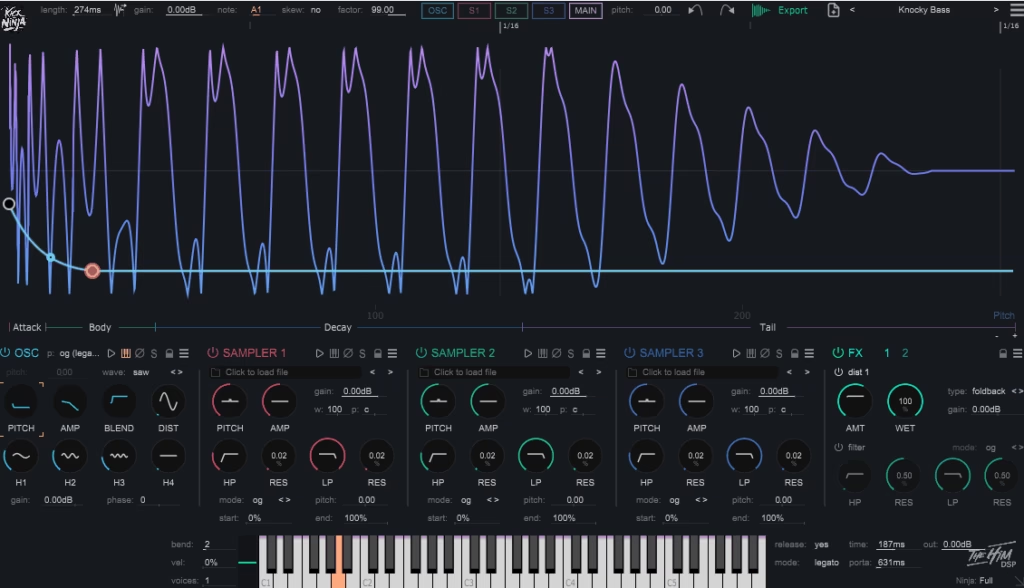
1. Kick Ninja by The Him DSP

I must say, Kick Ninja takes a refreshingly different approach to kick drum design by putting synthesis at the center rather than relying on sample libraries. The oscillator engine generates genuinely weighty low-end that holds its shape even when you push it hard in dense mixes.
The sub frequencies stay controlled and defined instead of turning into that bloated mess you often get with budget kick generators.
I feel that the way the transient and body sections interact feels quite natural. You can dial in anything from a sharp, aggressive click to something softer and more rounded while maintaining complete independence over how the tail behaves.
Where this plugin really distinguishes itself is in how it handles harmonic content and saturation. When it comes to distortion options, it add perceived loudness and density without destroying the fundamental frequency. For instance, you’re getting that forward, aggressive character modern mixes demand while keeping the low-end intact and powerful. In addition to that, interface stays refreshingly straightforward with everything laid out logically, so you’re designing kicks quickly instead of hunting through menus.
- Synthesis-Based Architecture
The core synthesis engine generates kicks from scratch rather than triggering samples, which gives you consistency across every instance you create. The oscillators produce clean, stable fundamental frequencies that don’t collapse under heavy processing or loud mastering chains.
You’re working with sound generation that responds predictably to every adjustment you make, which means you can recall exact settings weeks later and get identical results.
Lastly, the synthesis approach eliminates phase issues and sample artifacts that plague sample-based kick tools, giving you cleaner mixes right from the start without fighting alignment problems.
- Integrated Transient Control
The transient shaping lives directly inside the synthesis workflow instead of being tacked on as an afterthought, so you’re sculpting the attack characteristics as part of the actual sound design process, which means your kicks feel immediate and forward without getting brittle or harsh. That being said, this integration makes it possible for you to achieve serious punch that cuts through club systems without resorting to extreme EQ moves that hollow out your low-end.
- Harmonic Saturation Engine
I like how saturation tools add perceived volume and presence while preserving the fundamental weight you need for modern production. You can push kicks forward in busy arrangements without sacrificing depth or turning the low-end into mud. The character stays controllable across the full range from clean and minimal to gritty and aggressive, giving you flexibility across different genres and production styles.
Also, I feel that the saturation adds harmonic complexity without harsh artifacts that make your kicks sound cheap or digital. Let’s say when you need a kick to sit prominently in a dense EDM mix, you’re using this saturation to create space and definition rather than just cranking volume.
The distortion remains musical even at extreme settings, which opens up creative possibilities for more experimental sound design when you’re pushing boundaries.
- Musical Pitch Envelope Behavior
Pitch modulation feels natural and musical rather than exaggerated or cartoonish. You can add movement and character to your kicks while maintaining their relationship with basslines and other low-end elements. The stability here prevents those tuning conflicts that force you into endless tweaking just to make things sit together properly.
- Velocity and MIDI Responsiveness
Also, the plugin responds dynamically to velocity input and MIDI data, treating kicks as playable instruments rather than static sound generators. You get variation and expression across performances, which adds life and movement to your patterns. This responsiveness makes programming feel more organic and less mechanical than most kick plugins allow you.
When you’re playing kicks live or recording MIDI performances, the velocity sensitivity creates natural dynamics that sound far more human than robotic grid programming
You can also map velocity to multiple parameters simultaneously, giving you expressive control over transient intensity, tonal character, and decay length all from how hard you hit the keys, which transforms how you interact with kick design!
2. Audija KickDrum

Audija approaches kick design from a completely different angle by making the waveform itself your primary workspace. The oscillogram sits at the center of everything you do, letting you see exactly how your kick is shaping up in real time.
You can zoom and pan smoothly across the waveform and dB scale, freeze the view for independent analysis, and adjust loop length relative to the grid so you’re inspecting full tails or single transients without changing your project timeline. What really separates this from typical drum synths is how it pulls mix problems forward into the design stage.
You’re catching phase issues, transient smear, and tail length conflicts while you’re building the sound instead of discovering them later when you layer with bass. I think the visual feedback makes timing and shape decisions immediate rather than guesswork, which fundamentally changes how you approach kick creation.
KickDrum by Audija processes through device stages from start to end before moving to the next layer, which means you get predictable behavior when you’re stacking multiple processing stages. You’re shaping amplitude, adding harmonics, limiting peaks, controlling decay, and carving frequency content in a modular way that encourages you to think through each step.
The sidechain input visual overlay lets you compare your kick against other signals directly, which is incredibly practical when you’re building low-end that needs to feel glued rather than just loud.
- Waveform Centered Design Workflow
The oscillogram functions as your actual design surface rather than just a visual decoration. You get multiple draw modes, adjustable grid, and gain scale for measuring peak gain while you’re actively shaping the sound.
I mean, this makes the plugin feel closer to a sound design bench than a typical drum synth with a tiny output meter. When you’re working on kicks that need surgical precision, you can freeze the view for independent analysis and make decisions based on what you’re actually seeing happen at the sample level.
- Linear Phase EQ with Unlimited Bands
The built in linear phase EQ includes unlimited bands and a comprehensive set of filter types including high/low pass, shelves, bell, and notch with steep slopes up to 16th order. Linear phase processing inside a kick designer isn’t just a technical flex it’s there for surgical frequency work while minimizing phase shift.
I would say this matters when you’re tuning punch in the low mids or trimming sub clutter. You can make precise frequency adjustments without changing the perceived alignment between your transient and body relationship.
When you’re carving out problem frequencies or enhancing specific harmonic content, you’re doing it without introducing the phase rotation that standard EQs create, keeping your kick’s punch intact and focused where you need it. In addition, the unlimited band capability means you’re never restricted in how many surgical cuts or boosts you need to make across the frequency spectrum.
- Integrated Processing Chain
KickDrum includes the entire modern kick finishing chain embedded directly inside the instrument. You get a gain envelope device for shaping volume over time, a tanh saturator with modifiers for everything from subtle thickening to heavy drive, and a clipper that moves from soft to hard clipping.
This means you’re handling envelope control for punch and tail, saturation for density and perceived loudness, and clipping for peak control and aggression all in one place. When you’re building kicks that need to survive loud masters, you’re not bouncing out to external plugins and hoping everything translates you’re finishing the sound with precise control over dynamics and character while watching how each change affects the waveform.
In addition, the modular approach lets you experiment with processing order without leaving the plugin environment. The tanh saturator adds that harmonic complexity and perceived volume without destroying your fundamental frequencies, while the clipper gives you controlled aggression that maintains clarity even when you push it hard.
- Stereo Engine and Wavetable Editing Suite
The 2.5 version brought a full stereo sound engine and an OSC wavetable editing suite that lets you move, rotate, or resize waveforms in a 3D wavetable view. You can create timbres that go beyond basic shapes, which I think is extremely relevant for kick design because subtle harmonic structure changes are often the difference between sub only kicks and punchy transients that translate on smaller speakers.
- Sidechain Visual Overlay for Bass Alignment
The sidechain input visual overlay lets you compare your kick against another signal directly in the waveform view, typically for kick bass alignment work. You get overlay and individual view options that make the comparison quick and visual instead of relying on solo switching and guesswork.
3. Sonic Academy KICK 3

The core promise is simple: design a finished, mix-ready kick inside a single plugin without relying on sample pack roulette. I think what sets Sonic Academy KICK 3 apart is the Import and Analyze feature, which lets you drag in an existing kick sample or even a full track, then separate the click from the low end and rebuild the sub so you can edit it like a synthesized kick.
You’re working with five independent layers instead of one kick that must do everything, which fundamentally changes how you approach punch. I mean, you can mix and match clicks and subs on any layer, making it practical to split responsibilities like sub weight, mid punch, and transient definition without leaving the plugin.
This matters especially for modern genres that need both impact and translation. You can keep a controlled sine foundation for the low end while using additional layers for texture and audibility on small speakers, then route the whole stack through inserts and master processing inside the plugin.
The workflow encourages you to build kicks as a system rather than hoping a single layer does everything perfectly.
- Import and Analyze with Sample Resynthesis
The Import and Analyze feature is the defining reason to choose KICK 3 over many older kick synths. The workflow is direct you drag a sample in, and the plugin attempts to isolate the click, then resynthesize the sub so you can reshape pitch, amplitude, and timing with node based controls.
The import algorithm was trained across thousands of kick samples to improve accuracy, which I would say makes a noticeable difference in how well it handles different source material. In practice, straightforward electronic kicks tend to recreate more cleanly than heavily processed, layered, or already clipped samples.
- Selective Keytracking and Pitch Control
The sub layer includes Selective Keytracking, which lets you decide which pitch nodes respond to keytracking and which stay fixed. This means you can keep the low end foundation consistent across notes while allowing parts of the pitch envelope to move musically for different notes or patterns.
I think it’s important when you’re building kicks that need to work across multiple keys without losing their fundamental power. Pitch Snap helps keep nodes in key by snapping to harmonically relevant notes, and Master Tuning can shift the whole instrument by cents so the kick sits correctly against the track key without re editing every layer.
In addition to that, there’s a Sustain mode that can loop a region until note off, and a Gate mode that ties kick length to MIDI note length. These features make KICK 3 usable not only as a one shot designer but also as a playable low percussion instrument when you want controlled sustain or tempo locked tails.
The pitch control gives you musical movement without wrecking your foundation, which is exactly what you need when your kick has to lock with a bassline across different sections.
- Phase Adjustment and Lock Controls
KICK 3 includes phase adjustment tools for the sub, including the ability to rotate phase, then lock phase from a chosen node onward so you can change earlier parts of the sub without breaking alignment later in the tail where it interacts with the bassline. I mean, this is aimed directly at the real world problem where tiny edits to pitch or timing can cause low end cancellation when the kick and bass overlap.
The existence of dedicated phase tools shows a deep understanding of how kick bass relationships work in dense mixes. You’re getting control over phase rotation and locking that prevents the constant back and forth tweaking when you realize your low end is fighting itself.
When it comes to building low end that needs to feel glued, having these phase controls built into the synthesis workflow saves you from bouncing audio and fixing problems externally. The ability to lock phase from a specific node means you can experiment with the attack and early body without destroying the carefully aligned tail section.
- Five Layer Architecture with Independent Routing
You’re working with five independent layers where you can build a kick as a stack where each layer has a specific job. The ability to mix and match clicks and subs on any layer makes it practical to split responsibilities without creating a messy external routing situation.
I like how this architecture lets you keep a controlled foundation for the low end while using additional layers for texture and audibility on small speakers. Each layer can be routed through two insert channels plus a master channel for shaping, giving you flexibility in how you process different elements.
The five layer system means you’re not forcing one kick to handle sub weight, mid presence, and transient definition simultaneously. You can dedicate layers to specific frequency ranges and processing needs, then blend them into a cohesive result.
The factory content includes 500 plus factory presets and 540 plus sub layer presets, so you can mix and match low end shapes with different transient profiles quickly. This deep preset library combined with the layering architecture gives you serious creative range without starting from scratch every time.
- Internal Effects Chain with Master Limiter
KICK 3 includes an expanded internal effects section with multiple distortion types including clip, tube, wave, and tape, plus tools like bit crushing, ring modulation, delay, reverb, filter, drive, dual compressors, and a four band EQ with real time spectral analysis. I think this matters because a kick is rarely just synthesis you often need controlled distortion for presence, compression for density, and EQ to carve room for bass.
The built in master limiter includes release and lookahead controls, plus the ability to set gain behavior around the limiter. This is designed to get level and punch without ugly clipping, and it’s especially useful when you want to export a kick that will still hit correctly after mastering.
Being able to handle most of the processing without building a long external chain speeds up your workflow significantly. The real time spectral analysis in the EQ lets you see exactly what you’re doing to the frequency content as you make adjustments.
In addition, the Trigger mode can use a reference track as a sidechain input to trigger the plugin without manually sequencing MIDI, which is designed for replacing or augmenting kicks in an existing project. You’re getting the full production workflow from design to export to triggering all inside one environment.
4. Chop Suey SINEE
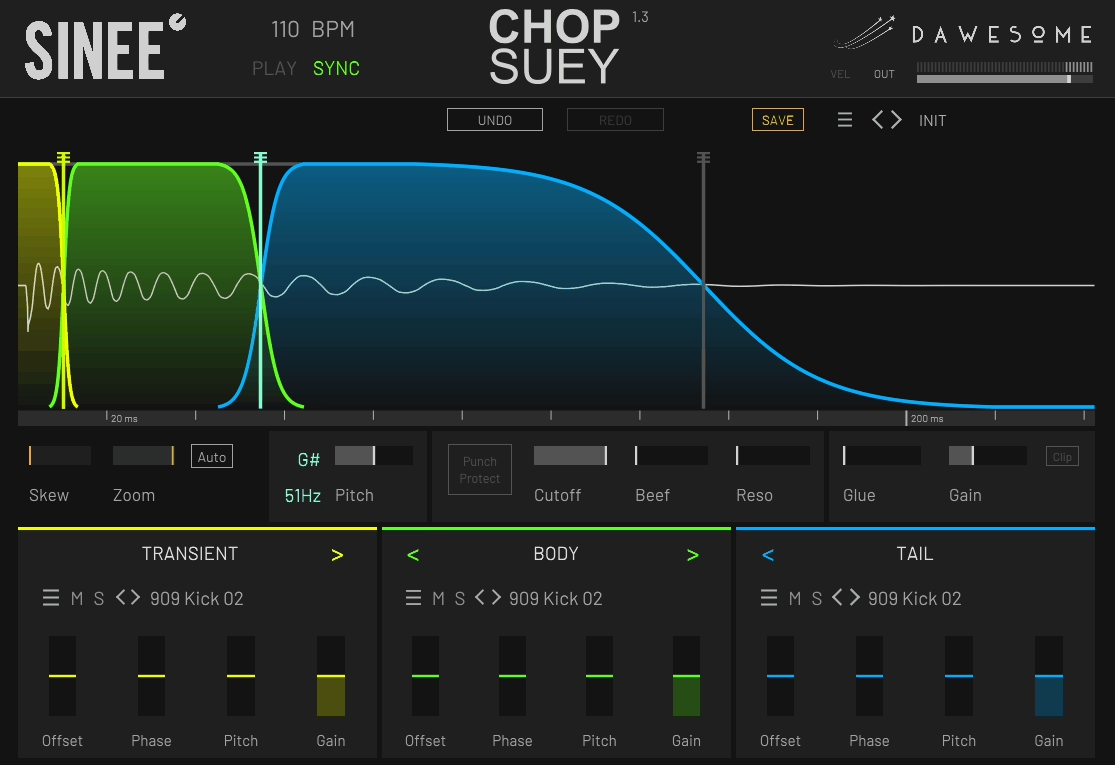
Next kick plugin takes a completely different approach to kick design by focusing on time ordered component assembly rather than traditional layering. You’re building kicks from three sequential sections called transient, body, and tail instead of stacking sounds on top of each other. I think what makes Chop Suey kick VST plugin unique is how it sequences the components in a linear timeline and blends the transitions with crossfades, letting you combine different source kicks without the usual phase mess that comes from classic layering.
The punch of a modern kick lives in how cleanly the first few milliseconds connect to the sustained low end, and this plugin is aimed right at that junction. You pick a transient that has the right click and impact, a body that carries the main weight and mid punch, and a tail that gives length, sub energy, or rumble.
Then you shape how the transient flows into the body, and how the body flows into the tail, using crossfade control designed to keep the waveform progression smooth rather than fighting cancellations. I mean, because the sections are in sequence, you’re building kicks that translate consistently under heavy limiting without the low end turning into a cloudy blend.
- Sequential Component Architecture
You’re assembling kicks from three time ordered components that play in sequence rather than simultaneously. The transient, body, and tail sections are arranged on a linear timeline with crossfade transitions, which fundamentally changes how you approach kick construction.
I like how this eliminates the phase mess that traditional layering creates when you stack multiple kick samples on top of each other. You can keep the transient crisp, keep the body stable, and control the tail length precisely without creating frequency cancellations or cloudy low end.
- Visual Editing with Skew and Zoom
Chop Suey includes Skew functionality that enlarges the transient region on the timeline so you can edit the part that matters most without needing extreme zooming or awkward envelopes. I think this is a deliberate solution to transient editing, since the transient is short but disproportionately important for the perceived punch.
The plugin shows a marker for the next beat at the selected tempo, which helps you design a kick that doesn’t overlap into the next hit in a standard four on the floor context. The plugin plays the kick at full length regardless of MIDI note length and will fade out quickly if a new hit arrives while the previous one is still ringing.
I mean, this makes tail length a deliberate design choice rather than a MIDI programming trick. You’re seeing exactly how your kick behaves in the context of your tempo and deciding if the tail needs to be shorter or if it has room to breathe.
The visual workflow encourages you to work with the waveform directly, giving you zoom and skew controls that make editing the critical transient section practical instead of frustrating.
- Pitch Detection and Envelope Shaping
Chop Suey includes pitch detection of the root note based on the last 100 ms of the kick, focusing on the tonal body and tail rather than the transient. This matters because the transient pitch is not a reliable indicator of perceived musical pitch, and you need accurate detection to tune the low end to your track key.
The pitch control can be shaped as an envelope in the waveform interface, letting you add movement or keep the fundamental stable depending on what your track needs.
I like that you can shape pitch behavior across the kick’s duration without fighting unpredictable detection. The envelope approach gives you precise control over pitch movement while maintaining the musical relationship with your low end elements.
- Phase and Offset Controls for Clean Transitions
The plugin directly addresses phase issues with Phase and Offset controls intended to help you create phase pure transitions between the transient, body, and tail sections. I mean, this is exactly where most layering tools fail you’re getting dedicated controls for the exact problem kick layering creates, which is usually swallowed or weakened transients when combining elements.
Building kicks from multiple sources is way easier with these controls as they give you surgical adjustment over how sections blend at the waveform level. You’re not hoping two samples magically work together; you’re actively shaping the phase relationship to ensure smooth, powerful transitions.
I think having phase and offset built into the core workflow saves you from bouncing audio and trying to fix alignment problems externally. The workflow is meant to make it easy to blend the waveform progression smoothly, keeping your transient impact intact while the body and tail contribute weight and character.
- Lowpass Filter with Punch Protect
Chop Suey includes an integrated lowpass filter with resonance that’s optimized for kick work, including responding very quickly to rapid cutoff changes so you can create classic electronic kick movement. The Punch Protect feature is designed to protect frequencies below roughly 150 Hz from being affected by the filter, which is exactly the range you typically don’t want to smear when you add resonant filtering for character.
I like how this lets you add filtering and resonance for tonal shaping without destroying the fundamental punch that lives in the sub and low mid range. When you’re creating movement with filter sweeps, the Punch Protect ensures your low frequencies stay intact and powerful.
In addition, Chop Suey uses Beef and Glue controls for distortion and saturation, plus an optional clipper as a creative and level control tool. The intent is to let you add audible energy and perceived loudness without immediately destroying the sub foundation you just tuned.
I would say the combination of protected low pass filtering and controlled saturation tools gives you the ability to add aggression and character while maintaining the clean, powerful low end modern mixes demand. The clipper adds another layer of control for pushing level and creating controlled aggression when you need your kicks to cut through dense arrangements.
5. Geonkick (Free)
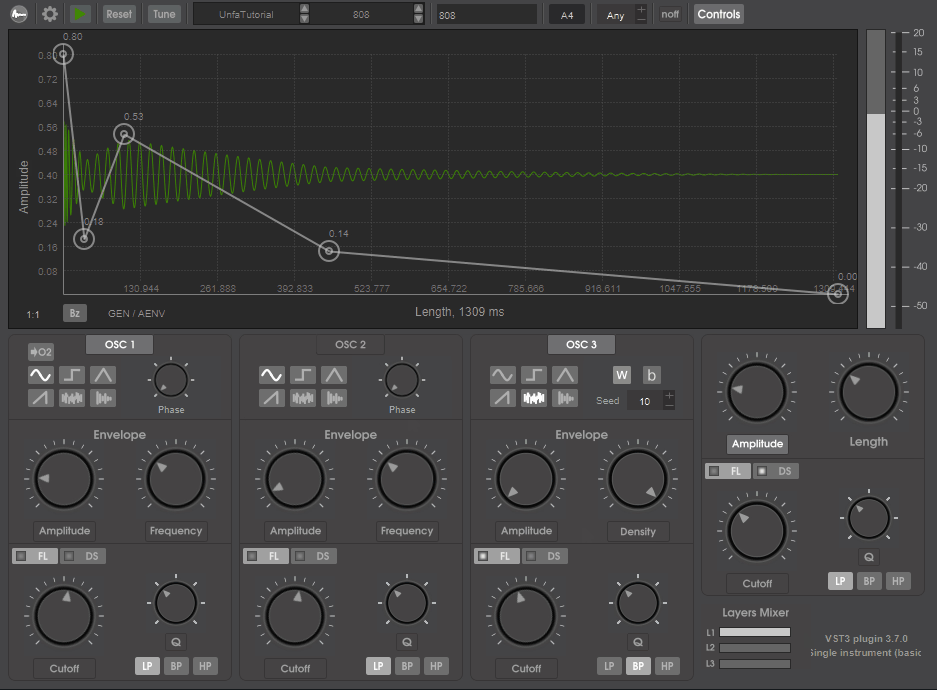
When it comes to free kick designer, Geonkick is an open source percussive synthesizer focused on building drum hits from scratch, with kick drums as the most common use case.
The plugin is designed to generate not only kicks but also snares, claps, hats, shakers, and effect percussion, so it functions more like a full drum sound designer than a single purpose kick tool.
The sound design model is based on kits that can hold up to 16 instruments, and each instrument is built from three layers. Each layer provides a synthesis section centered on multiple oscillators plus noise, which lets you separate the transient, the tonal body, and the noisy click without needing external layering in your DAW.
I mean, the practical advantage for modern punch is that you can keep the sub foundation controlled and stable while designing the attack and presence on separate layer elements that you can tweak independently. Because the layers live inside a single instrument voice, you can make changes that preserve cohesion without ending up with a kick that looks loud but collapses in the mix.
- Three Layer Architecture with Multiple Oscillators
You’re working with three independent layers where each layer provides multiple oscillators plus noise, letting you build kicks from first principles. I like that this lets you separate the transient, tonal body, and noisy click without creating phase problems that come from external DAW layering.
- Bézier Curve Envelope Shaping
Geonkick free kick plugin provides envelope control over amplitude, frequency, and filter cutoff, which enables classic kick behaviors like fast pitch drops, tight transient snaps, and tails that sit exactly where you want them rhythmically. I think the standout detail is support for Bézier curves for envelopes, which matters because percussive shapes often need a curve that’s neither purely linear nor purely exponential.
With Bézier style shaping you can dial in hard at the front, smooth after behavior without stacking multiple modulators. When it comes to getting that perfect transient response, having curved envelope control gives you precision that standard ADSR envelopes can’t match.
I mean, this is especially useful when you’re chasing consistent peak behavior across different notes or velocities because you can shape exactly how your kick responds dynamically. The real time visualization of the percussion shape lets you see the transient profile and decay while you adjust envelopes and oscillator balance.
- Oscillator Distortion with Six Types
Modern kick punch usually needs harmonics in the low mids so the kick reads on small speakers, and Geonkick builds that in with oscillator level processing and distortion options. The plugin includes an oscillator distortion effect with six distortion types including hard clip and several curve based variants.
I like how this is useful because you can add harmonics early in the sound creation stage instead of relying on external saturation that might also smear the transient. If you want clean sub, you keep the sub layer simple, if you want density, you distort a mid focused oscillator or the click layer.
- Hybrid Synthesis and Sample Integration
Geonkick isn’t limited to pure synthesis as it supports playing, modifying, and blending samples with synthesis, which is useful when you want a very specific transient taken from a real recording but still want synthesized control over the sub and body. I would say this hybrid approach gives you flexibility that pure synthesis or pure sample playback can’t match.
The plugin supports saving presets in JSON and exporting sounds in common audio formats like WAV, FLAC, and Ogg, plus it also supports SFZ export for building playable drum sets outside the plugin. I mean, this matters for modern punch workflows because you can design, export, then treat the kick as an audio asset for layering, resampling, or fast arrangement.
6. Matt Tytel Vital (Free)

Another great free kick plugin Vital by Matt Tytel, is actually spectral warping wavetable synthesizer that can function as a full kick design workstation when you build a dedicated kick patch and treat it like a drum module. The reason it belongs in a modern punch context is how it combines high resolution modulation, precise envelope control, spectral warping, and a strong internal effects chain in a workflow that’s fast enough to design kicks from scratch. I think what makes Vital particularly powerful is that you’re not limited by preset-driven workflows. You’re building exactly the kick you need with synthesis and modulation depth that doesn’t force compromises on transient, sub, or harmonic translation.
A modern kick needs a transient that cuts, a controlled sub fundamental, and harmonics that read on small speakers. Vital’s engine makes those three jobs easy to separate and refine independently.
You can dedicate one oscillator to the sub and keep it clean, then use another for the click and mid punch. The plugin’s design goal is deep modulation with immediate visual feedback, which is exactly what kick synthesis needs because you’re making decisions in milliseconds, not bars.
- Spectral Warping for Harmonic Control
Vital’s core identity is spectral warping, meaning you can reshape the harmonic structure of a wavetable by stretching, shifting, smearing, and skewing harmonics.
I would say, for kicks this is nice when you start from a simple sine-like wavetable for the sub and want to keep the fundamental stable while adding controlled upper harmonics so the kick stays audible on phones and laptops.
If you want a harder techno style body, you can use more aggressive warp modes to add upper partials that feel like distortion but remain tightly tied to the fundamental pitch. The oscillators also support classic wavetable style shaping, plus unison and stereo capable behavior, which lets you keep the sub mono focused while widening only the higher components if you want perceived size without low end phase risk.
- Envelope and Pitch Modulation System
Kick punch lives largely in the pitch envelope. You need a fast drop at the start for impact, then a stable sustain region that holds the note long enough to feel weighty but short enough to leave space for bass.
Vital is built for this kind of modulation with snappy envelopes and custom LFO shapes, and its workflow emphasizes drag and drop modulation with preview so you can audition changes without ruining the patch.
A practical approach is to set the amp envelope for a tight decay, then use a second envelope to control oscillator pitch with a steep initial curve that relaxes quickly into the fundamental. If you need more complex motion like a pre-click spike, a fast dip, then a settle, Vital’s modulation system supports that kind of shape without needing external automation.
I think the visual modulation routing makes it immediately clear what’s affecting what, which saves you from the confusion that often comes with deep synthesis when you’re trying to dial in that perfect transient response.
- Click and Attack Design Tools
The click is what makes a kick read through a busy mix, and Vital gives you multiple ways to create it. You can generate click from a noise source and shape it with a short envelope, which tends to produce a consistent transient that survives limiting.
- Dual Voice Filters with Modulation
Vital includes two routable voice filters with multiple models and blending modes, which means you can treat filtering as part of the sound design rather than corrective EQ. I would say for kick work, a common strategy is to keep the sub oscillator relatively unfiltered for stability, then route the click and body through a filter that emphasizes a specific band around the low mids to add knock.
Because the filters are in the voice path, you can also modulate cutoff with an envelope to create a short, punchy opening that closes quickly. That often reads as impact even when the waveform isn’t extremely loud.
The dual filter routing lets you process different frequency ranges independently. You can keep your sub clean and powerful while adding filter movement and resonance to the mid and high content for texture and presence.
With multiple filter models you’re not stuck with one flavor and you can choose the filter type that best suits whether you want clean surgical cuts or more colored, resonant character.
- Internal Effects Chain for Finishing
Vital isn’t just an oscillator box but designed to finish sounds internally. For kicks you typically need harmonic shaping, dynamic control, and sometimes hard peak management to get a kick that feels loud in a mastered track.
Vital’s internal effects can be used as a full kick finishing chain. You can add saturation to generate harmonics for translation, compression to densify the body, and distortion selectively so the mid punch speaks without turning the sub into fuzz.
All of this can be saved as part of the patch, making the kick repeatable across projects. Regarding workflow efficiency, being able to design and finish a kick entirely within one plugin means you’re not building complex external processing chains that might behave differently session to session.
In addition, the text to wavetable feature can create complex harmonic snapshots that, when used briefly at the front of a sound, become distinctive click and bite layers. I would say this is comes in handy if you want kicks that don’t sound like standard sine plus noise constructions.
The expression features like aftertouch and MPE support might seem irrelevant for one-shot kicks, but the useful part is that these modulation sources exist if you want velocity driven variations. Softer hits can shorten the tail or reduce drive automatically, which is a clean way to get groove variation without manually designing multiple kicks.
7. Chowdhury DSP ChowKick (Free)
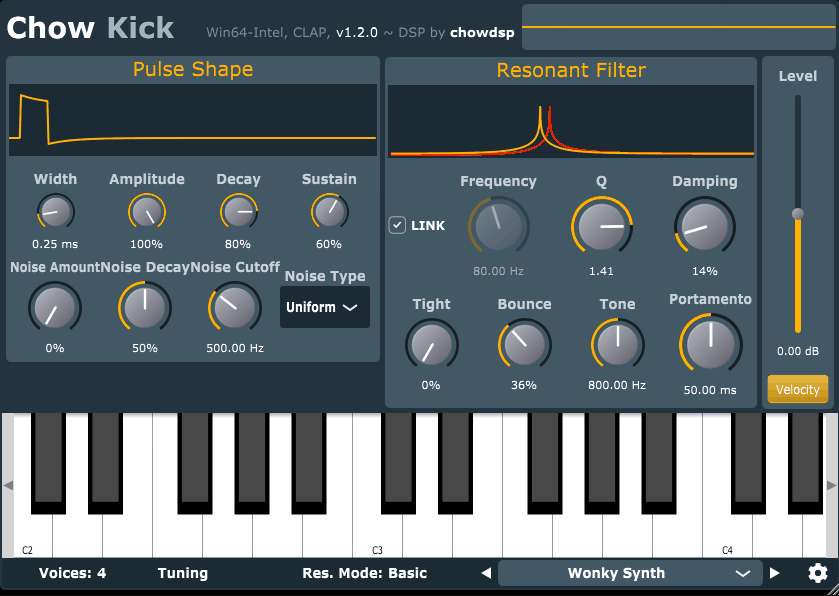
Lastly, to sum things up, ChowKick is a last free kick drum synthesizer in our list that aims for classic drum machine behavior without copying a single fixed circuit. The core idea is creative physical modeling of old drum machine circuits, where a triggered pulse excites a resonant system that behaves like an analog kick voice rather than a modern clean sine generator.
The plugin is organized into three main sections that behave like a simple drum voice chain: a Pulse Shaper that generates the initial hit, a Noise Generator that adds transient grit, and a nonlinear Resonant Filter with global feedback that produces the actual drum tone when driven by the pulse. You’re working with circuit-driven sound design rather than purely abstract envelopes, which fundamentally changes how you approach kick creation.
I mean, this structure matters because you’re shaping the underlying genetics of the kick rather than applying superficial tweaks. To getting tight, characterful synthesized kicks, you can go from clean to aggressive by changing how the resonator reacts, not by stacking distortion after the fact.
- Pulse Shaper for Impact Control
The Pulse Shaper is the trigger energy source that defines how hard and how clicky your kick starts. Width sets how long the pulse is, from 25 microseconds to 2.5 milliseconds, which is a big deal because even tiny differences here change how hard the resonator gets excited.
Amplitude sets the pulse peak level, Decay shapes how quickly the pulse falls from its maximum, and Sustain sets the pulse sustain level. I would say these parameters are tied to specific resistors in the pulse shaper circuit model, which is a clue that the plugin is intentionally designed to behave like a circuit-driven sound rather than a purely abstract envelope.
In practical kick design terms, you use Width and Amplitude to decide how sharp the initial impact is, then you use Decay and Sustain to decide whether the resonator gets a short jab or a longer push. That single interaction is why ChowKick can cover tight modern thumps as well as longer boomy drum machine style tails.
- Nonlinear Resonant Filter Engine
The Resonant Filter is described as a nonlinear resonant filter with global feedback, and it’s the reason ChowKick has character when you push it. Frequency sets the resonant center frequency from 30 Hz to 500 Hz, and Link lets incoming MIDI notes determine that frequency so you can tune the kick to the song.
Q sets resonance sharpness, while Damping controls how much feedback wraps around the filter. I mean, lower damping produces a longer decay because you’re effectively letting the resonant system ring, which is the closest thing ChowKick has to tail length control.
Two controls define ChowKick’s personality. Tight changes the nonlinearity so resonance decreases as amplitude increases, which the manual explicitly compares to a compressor style tightening effect. Bounce changes the nonlinearity so frequency increases as amplitude increases, which can create a pitch modulation style movement that reads as punch and impact when set subtly.
- Noise Generator for Click Definition
This kick drum plugin includes a dedicated Noise Generator that adds noise into the shaped pulse before it hits the resonator. Noise Amount controls level, Noise Decay controls whether the noise dies with the pulse or faster, Noise Cutoff filters the noise, and Noise Type switches between uniform white noise, Gaussian white noise, and pink noise.
Hello, I’m Viliam, I started this audio plugin focused blog to keep you updated on the latest trends, news and everything plugin related. I’ll put the most emphasis on the topics covering best VST, AU and AAX plugins. If you find some great plugin suggestions for us to include on our site, feel free to let me know, so I can take a look!