Cakewalk has been through quite a journey over the years, from its origins as a MIDI sequencer through the Sonar era to its current form as a capable, full featured DAW that handles everything from tracking and editing to mixing and mastering.
The built in processing is decent enough for basic work, but like any DAW, the real power comes from expanding it with third party VST plugins that bring specialized tools and higher quality processing to your sessions.
One thing worth knowing about Cakewalk and plugin compatibility: the DAW supports VST2, VST3, and DX plugin formats, and virtually every modern VST plugin runs in it without issues. I’ve tested all of the plugins on this list within Cakewalk sessions and haven’t encountered compatibility problems.
The plugin scanning and management in Cakewalk is straightforward, and the DAW handles multi output instruments like Kontakt and drum machines without the configuration headaches that some other DAWs introduce.
This list covers sixteen plugins spanning the full production workflow: vocal processing, EQ, compression, saturation, reverb, delay, synths, drums, sampling, mastering, and stereo imaging. Whether you’re recording vocals, building beats, mixing a full arrangement, or preparing a final master, there’s something here for every stage of the process.
From the Pluginerds Store
Before we get into the synths, two things that are easy to overlook when you are focused on the instrument itself. A stable stand at the right height and a sustain pedal are the two things you will want sorted before your first real session. Neither comes with any synth on this list, and you will notice the absence of both immediately.


1. FabFilter Pro-DS (Precise De-Esser)

Sibilance control is one of those processing tasks that every vocal recording needs but few plugins handle with real precision. Pro-DS provides a transparent, highly controllable de-esser with visual feedback that shows you exactly what’s being detected and how much reduction is being applied.
Unlike de-essers that operate on a fixed frequency range, Pro-DS uses intelligent detection that distinguishes between actual sibilance and similar sounding but non problematic content.
What makes Pro-DS practical for Cakewalk sessions is the visual display that shows the sibilance detection in real time alongside the gain reduction. When I’m setting up a de-esser, I need to know whether it’s catching the right moments and leaving the rest alone.
Pro-DS shows me this clearly, which means I can configure it with confidence rather than guessing at the threshold and hoping it sounds right. The wide and single band modes give you the choice between reducing only the sibilant frequencies or ducking the entire signal during sibilance, and each approach sounds different depending on the source.
- Detection Display
A real time visual display shows the sibilance detection threshold alongside the incoming signal and gain reduction, letting you see exactly when the de-esser is engaging and how aggressively it’s working. The visual feedback eliminates the guesswork from setting the threshold and makes it obvious when the detection is catching content it shouldn’t.
- Wide/Single Band
Two processing modes give you distinct approaches to sibilance reduction. Single band mode reduces only the sibilant frequency range, leaving the rest of the spectrum untouched.
Wide band mode reduces the entire signal during sibilant moments, which sounds more natural on some voices but can produce more obvious ducking.
- Split Stereo
The processing can operate in mid/side or left/right split modes, which is useful for processing stereo recordings or bus signals where sibilance might be more prominent in one channel than the other.
The split processing provides more precise control than a simple stereo linked approach.
- Oversampling
Variable oversampling up to 4x improves the accuracy of the sibilance detection in the high frequency range where aliasing can cause false triggers. For critical vocal work, the oversampling ensures the detection responds to the actual sibilant content rather than digital artifacts.
Available from FabFilter in VST, VST3, AU, AAX, and CLAP formats.
2. UAD Topline Vocal Suite (Vocal Channel Strip)
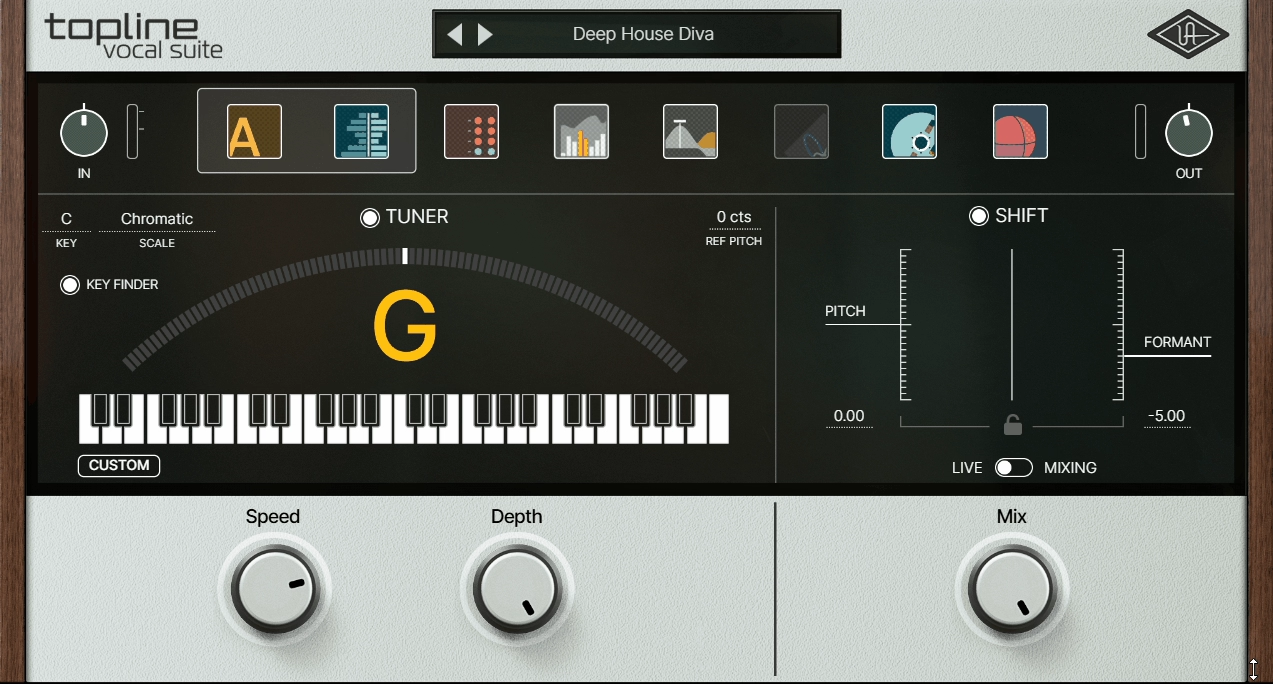
Processing vocals typically involves loading five or six separate plugins and configuring each one individually. Topline Vocal Suite combines EQ, compression, de essing, saturation, reverb, and delay into a single interface designed specifically for vocal processing. Every section is tuned for voice frequencies, and the presets provide genre appropriate starting points that you can refine rather than building from scratch.
I’ve covered the Topline Vocal Suite in previous articles, and the reason it keeps appearing is the workflow advantage. For Cakewalk users who process vocals regularly, having a complete vocal chain in one plugin reduces the number of plugin windows you’re managing and the CPU load of running multiple separate processors.
The trade off is less granular control compared to individual premium plugins in each category. But for getting a polished vocal sound quickly, especially when you’re working on multiple songs or tight deadlines, the convenience is genuine.
- Integrated Chain
A single interface combines EQ, compression, de essing, saturation, reverb, and delay optimized for vocal processing. Each section is voiced for vocal frequencies rather than being a generic processor, which means the starting positions of every control are closer to useful for voice than general purpose tools.
- Chain Ordering
The processing modules can be reordered to change the signal flow. Compressing before EQ produces different results than the reverse, and the flexibility to rearrange modules within the single interface provides options that fixed order channel strips don’t offer.
- Genre Presets
Style based presets provide complete processing chains organized by genre and vocal type. Loading a preset designed for your style gives you an immediate starting point that usually requires only minor tweaking to produce polished results.
- Vocal EQ
The EQ section provides frequency presets designed for common vocal processing moves: removing proximity effect, adding presence, controlling muddiness, boosting air. The fixed frequency options accelerate the EQ process by eliminating the search for the right frequency on every session.
- Spatial Effects
Built in reverb and delay handle the spatial processing that most vocal mixes require. The spatial section is designed for voice, with pre delay, diffusion, and EQ settings suited to speech and singing frequencies.
- De-Essing
An integrated de esser positioned within the chain catches sibilance after other processing (like compression, which often increases sibilance) has been applied. The positioning within the chain means it’s addressing the final sibilant content rather than the raw recording.
Available in VST, VST3, AU, and AAX formats.
3. u-he Diva (Analog Synth)

Every DAW needs at least one genuinely good synthesizer, and u-he Diva is one of the most convincing analog emulations available in any plugin format. The modular architecture lets you combine oscillator, filter, and envelope modules inspired by different vintage synth families (Moog, Roland, Korg, Sequential) to build hybrid instruments that capture the warmth, drift, and harmonic richness of real analog hardware.
Diva runs well in Cakewalk, though I should mention that it’s one of the more CPU intensive synth plugins available due to its zero delay feedback filter modeling.
On modern hardware, this is manageable, but if you’re running Cakewalk on an older system, you might need to render Diva tracks to audio before mixing rather than running multiple instances simultaneously. The sound quality justifies the CPU cost. Diva produces analog tones that genuinely compete with hardware synthesizers in blind listening tests.
- Module Selection
Selectable oscillator, filter, and envelope modules inspired by different vintage hardware (Minimoog, Jupiter, Juno, Prophet) let you build hybrid architectures. You can pair a Moog style filter with Roland style oscillators, creating instruments that don’t exist in any single piece of hardware.
- Zero Delay Filters
The ZDF (zero delay feedback) filter modeling is the most accurate method for reproducing analog filter behavior in software, capturing the nonlinear interaction between input and output that defines how resonance responds to different signals. The accuracy is what makes Diva sound convincingly analog rather than “digital trying to sound analog.”
- Oscillator Drift
Adjustable analog drift adds the pitch instability of real vintage synths, from subtle organic movement at low settings to obvious detuning at higher values. The drift is what gives analog instruments their living, breathing quality that perfectly stable digital oscillators lack.
Available from u-he in VST, VST3, AU, AAX, and CLAP formats.
4. Waves Vocal Rider (Automatic Level Control)
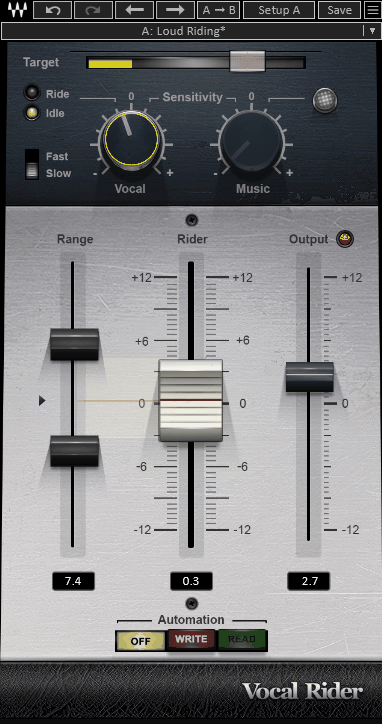
Consistent vocal volume is essential for a professional mix, and manually riding the fader throughout an entire song is tedious work. Waves Vocal Rider automates this process by continuously adjusting the vocal level to maintain a consistent volume within a target range you define. The plugin operates on volume rather than dynamics, bringing quiet parts up and loud parts down by actually moving the level rather than applying compression.
For Cakewalk users, Vocal Rider has a practical integration advantage: it writes its adjustments as automation data in your DAW timeline. This means you can see exactly what the plugin did and edit the automation manually if any specific phrase needs fine tuning. The visual automation lane in Cakewalk makes it easy to identify and correct any moments where the automatic riding doesn’t match your creative intent.
- Automatic Riding
The plugin continuously adjusts vocal level in real time, maintaining consistent volume throughout the performance. The riding mimics what a skilled engineer does with the fader, but it operates with more consistency and speed than human hands manage over a full song.
- Target Range
A definable loudness window determines where the voice should sit in the mix. Narrow ranges produce more aggressive level control. Wider ranges allow more natural dynamic variation. You choose the balance between consistency and expressiveness.
- Music Sidechain
A sidechain input from the music bus lets Vocal Rider adjust the voice level relative to the instrumental content. When the music gets louder, the vocal rides up to maintain presence. When the music drops, the vocal settles back naturally.
- Editable Automation
The level adjustments are written as DAW automation, visible and editable in Cakewalk’s automation lanes. You can manually override any specific moment where the automatic riding doesn’t match your creative preference.
Available from Waves in VST, VST3, AU, and AAX formats.
5. Waves Clarity Vx Pro (Noise Reduction)
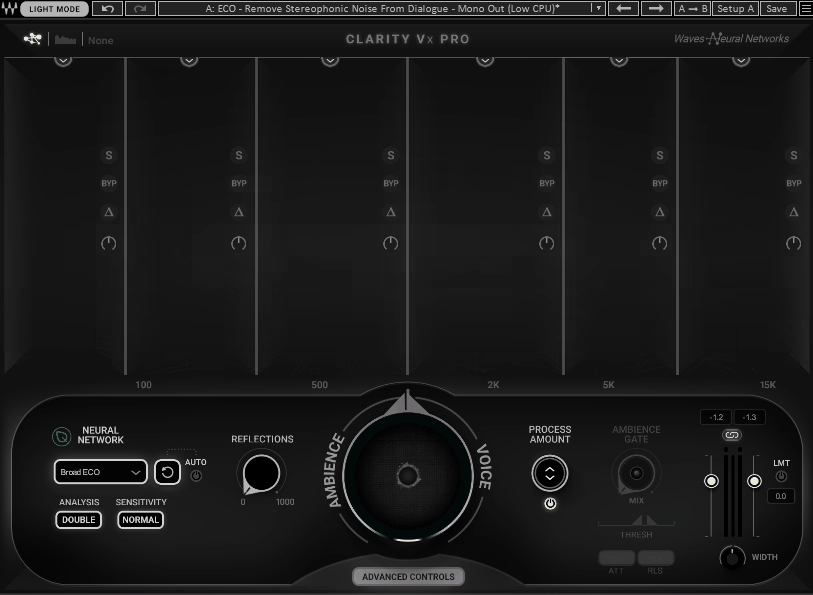
Background noise from air conditioning, computer fans, electrical hum, and room ambience degrades the quality of home studio recordings. Clarity Vx Pro uses neural network processing to separate voice from background noise, reducing the noise floor while preserving the natural quality of the vocal or instrument recording.
The Pro version provides significantly more control than the standard Clarity Vx, with separate parameters for different noise types and a spectral display showing what’s being removed. For Cakewalk sessions where you’re working with recordings from less than ideal environments, which describes most home studios, Clarity Vx Pro can be the difference between a recording that sounds amateur and one that sounds like it was captured in a properly treated room.
- Neural Separation
The AI driven processing identifies and isolates voice from background noise using trained neural networks rather than traditional spectral subtraction. The neural approach produces cleaner results with fewer of the hollow artifacts that older noise reduction methods introduce.
- Adjustable Depth
Fine grained controls over reduction intensity let you find the right balance between clean audio and natural sounding voice. Too much noise reduction sounds processed. Too little leaves audible background noise. The Pro version gives you the control to find the sweet spot.
- Real Time Operation
The processing runs in real time with low enough latency for monitoring during recording. You can hear the noise reduced signal while tracking, which helps you judge performance quality more accurately than listening through a noisy signal.
Available from Waves in VST, VST3, AU, and AAX formats.
6. FabFilter Pro-Q 4 (Professional EQ)
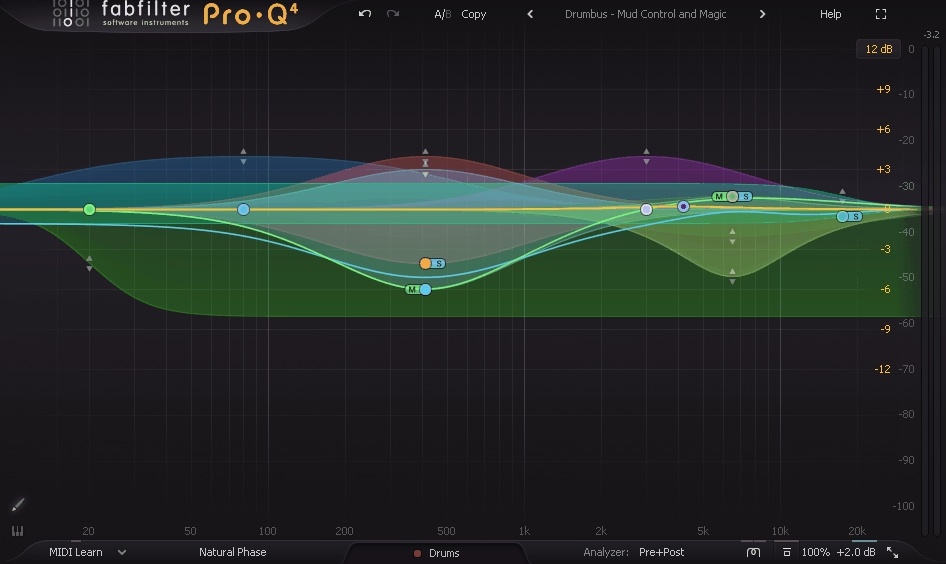
I’ve written about Pro-Q 4 extensively across multiple articles because it keeps earning its place on every production focused list. The combination of parametric, dynamic, mid/side, and linear phase EQ in a single plugin with an interactive visual display and the multi instance overview makes it the most complete EQ available for any DAW, Cakewalk included.
For Cakewalk users specifically, Pro-Q 4’s Instance List feature is particularly valuable because it lets you see and adjust EQ settings across your entire session from a single window. When you’re mixing a full arrangement with 30 or 40 tracks, the ability to overlay EQ curves from different instruments and identify frequency conflicts visually accelerates the mixing process enormously. You spend less time hunting for problem frequencies and more time making musical decisions.
- Dynamic Bands
Every band can switch to dynamic mode, applying the EQ adjustment only when the signal crosses a threshold. For mixing in Cakewalk, dynamic EQ addresses problems that only occur on specific notes or at certain energy levels without permanently changing the tonal balance during quieter passages.
- Instance List
The multi instance overview displays all Pro-Q 4 instances across your Cakewalk session in a single window, with overlaid EQ curves for identifying frequency conflicts between tracks. This feature alone saves significant time in sessions with many tracks.
- Per Band M/S
Each band independently processes mid, side, left, or right signal. You can widen the stereo image by boosting air on the sides while tightening the center with mid only cuts, all from a single plugin instance.
- Spectral Dynamic
The full spectrum dynamic mode applies intelligent processing across the entire frequency range simultaneously, addressing broadband tonal issues without requiring you to identify and target specific frequencies manually. This mode works well on mix buses and master channels.
- Surround Support
Support for formats up to Dolby Atmos 9.1.6 future proofs your investment for immersive audio production, which is increasingly relevant as spatial audio becomes more common across music distribution platforms.
Available from FabFilter in VST, VST3, AU, AAX, and CLAP formats.
7. Shadow Hills OptoMax (Opto Compressor)
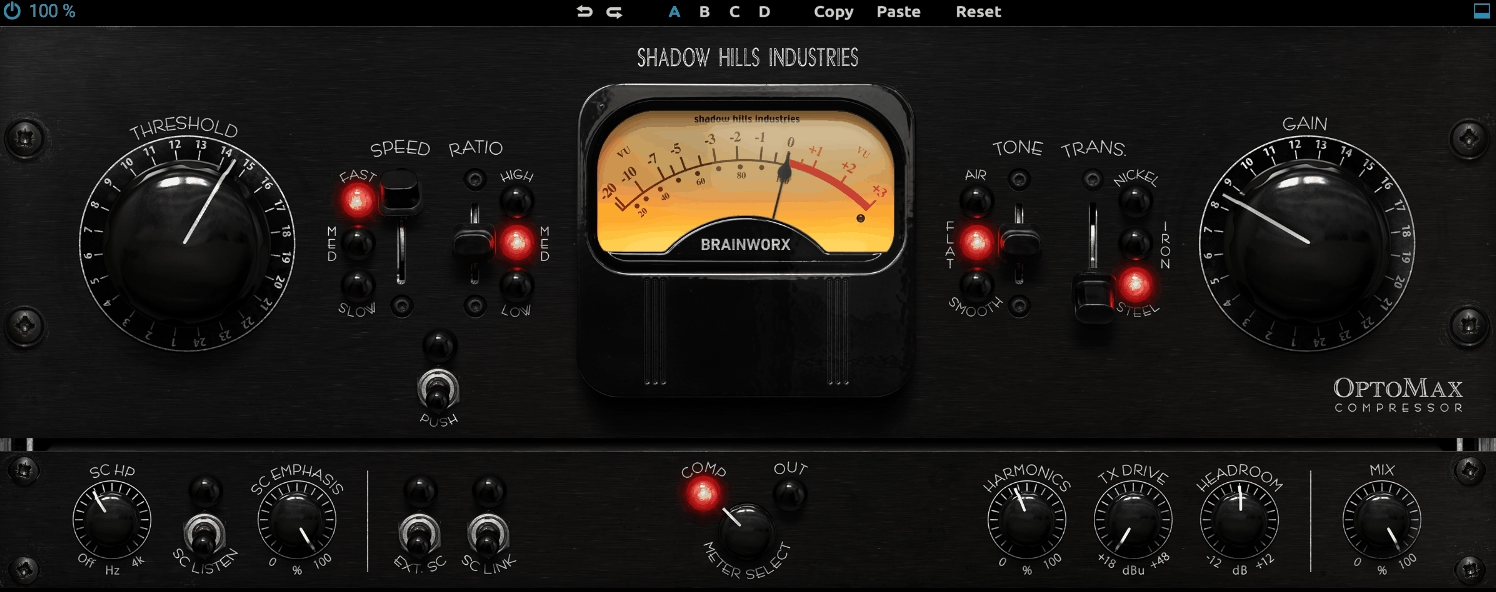
Optical compressors have a smooth, musical compression character that works particularly well on vocals, bass, and mix bus material. OptoMax models the specific gain cell and transformer coloration of Shadow Hills’ hardware, where the optical element responds to signal changes with program dependent timing that produces transparent, natural sounding dynamic control.
The OptoMax is the kind of compressor where you don’t hear the compression as compression. The signal just sounds fuller, more consistent, and more polished. For Cakewalk sessions where you’re mixing vocals, I typically place the OptoMax first in the dynamics chain as a leveling stage before any more aggressive compression, because the smooth optical response handles the broad dynamic range of a performance without removing the expressiveness that makes vocals feel human.
- Opto Response
The optical gain cell produces compression timing that depends on the signal history rather than fixed attack and release settings. The program dependent behavior handles transients and sustained signals differently, which is why optical compression sounds natural on voices and acoustic instruments.
- Transformer Weight
The modeled Shadow Hills transformer adds harmonic warmth independently of the compression amount. Even at minimal gain reduction, the transformer coloration thickens the low end and adds midrange presence, giving your tracks more weight and body.
- Parallel Blend
A wet/dry mix enables parallel compression directly within the plugin. Blending the compressed signal with the original retains natural dynamics while adding the density and consistency of optical compression.
Available from Shadow Hills / Plugin Alliance in VST, VST3, AU, and AAX formats.
8. FabFilter Saturn 2 (Saturation & Color)

Saturation adds the harmonic richness that makes the difference between a mix that sounds “correct” and one that sounds “alive.” FabFilter Saturn 2 provides multiband saturation with sixteen different algorithms covering tube, tape, transformer, transistor, and more extreme distortion types. The multiband approach means you can apply different saturation characters to different frequency ranges simultaneously.
Where Saturn 2 becomes practical in a Cakewalk mixing workflow is in the per band flexibility. On a vocal, I might add warm tube saturation to the low mids for body, gentle tape character in the midrange for presence, and a touch of transistor drive in the highs for air. Each frequency band gets the saturation type that suits it, which is far more nuanced than running the entire signal through a single saturation algorithm and hoping it sounds good everywhere.
- Multiband Engine
Up to six frequency bands with independent saturation type, drive amount, and dynamics per band. Each band uses a different algorithm, letting you tailor the harmonic character across the spectrum. The crossover frequencies are fully adjustable for precise targeting.
- 16 Algorithms
Sixteen distinct saturation types cover tube, tape, transformer, transistor, amp, fuzz, and beyond. Each type produces different harmonics and responds differently to input dynamics, providing a broad palette of coloration options for any source material.
- Modulation System
Built in modulation with LFOs, envelopes, and MIDI can animate saturation parameters over time. The modulation turns static saturation into a dynamic, evolving effect that responds to your music and changes character throughout a passage.
- Visual Display
A real time spectrum view shows which harmonics are being generated and at what level, giving you visual confirmation of how much coloration each band is adding. The display helps you make informed decisions rather than relying purely on your ears.
Available from FabFilter in VST, VST3, AU, AAX, and CLAP formats.
9. iZotope Neoverb (Versatile Reverb)
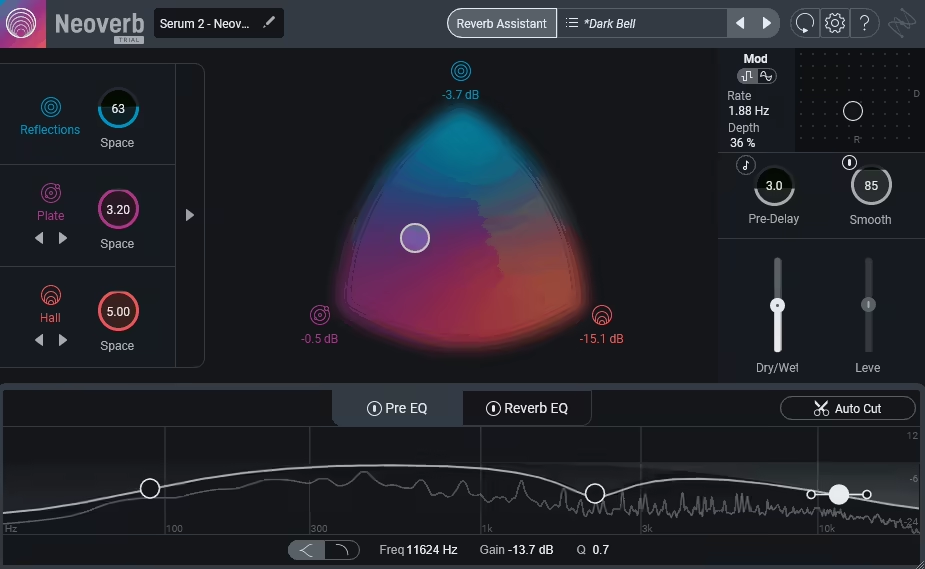
Reverb is one of those effects where having the right tool matters more than having the most expensive one. iZotope Neoverb provides a three engine reverb that blends early reflections, a main reverb algorithm, and a late tail independently, giving you control over the spatial character that single algorithm reverbs don’t offer.
The Reverb Assistant analyzes your source and suggests settings, which is genuinely useful for producers who find reverb configuration intimidating.
What makes Neoverb a practical choice for Cakewalk sessions is the combination of the AI assistant with manual override. You can let the assistant generate a starting point, then dive into the detailed controls to refine the result.
The EQ within the reverb lets you shape the frequency content of the reverb tail independently of the dry signal, which is essential for keeping reverb from muddying up a mix. For Cakewalk users who want one reverb plugin that handles everything from tight room ambience to lush vocal plates to expansive hall sounds, Neoverb covers that range.
- Three Engines
The early reflections, main reverb, and late tail engines operate independently with separate controls, letting you shape each component of the reverb space individually. You can have tight, bright early reflections with a long, dark tail, or any other combination that suits your material.
- Reverb Assistant
An AI analysis tool listens to your source and suggests reverb settings based on the input characteristics. The assistant provides a musically appropriate starting point that you can refine manually, which accelerates the configuration process significantly.
- Reverb EQ
A built in EQ shapes the frequency content of the reverb signal independently of the dry sound. You can cut low frequencies from the reverb to prevent bass buildup, or reduce high frequencies to create a darker, more distant spatial character without affecting the direct signal.
- Blend Controls
Independent level controls for each reverb engine let you balance the relative contribution of early reflections, main body, and tail to the overall effect. This granular control over the reverb components lets you create spaces that sound natural and purposeful rather than generic.
- Pre Delay
An adjustable pre delay with tempo sync separates the dry signal from the reverb onset, maintaining clarity on the source material while the reverb fills in behind it. On vocals, a pre delay of 50 to 100 milliseconds keeps consonants clear and intelligible.
Available from iZotope in VST, VST3, AU, and AAX formats.
10. Wave Alchemy Triaz (Drum Machine)
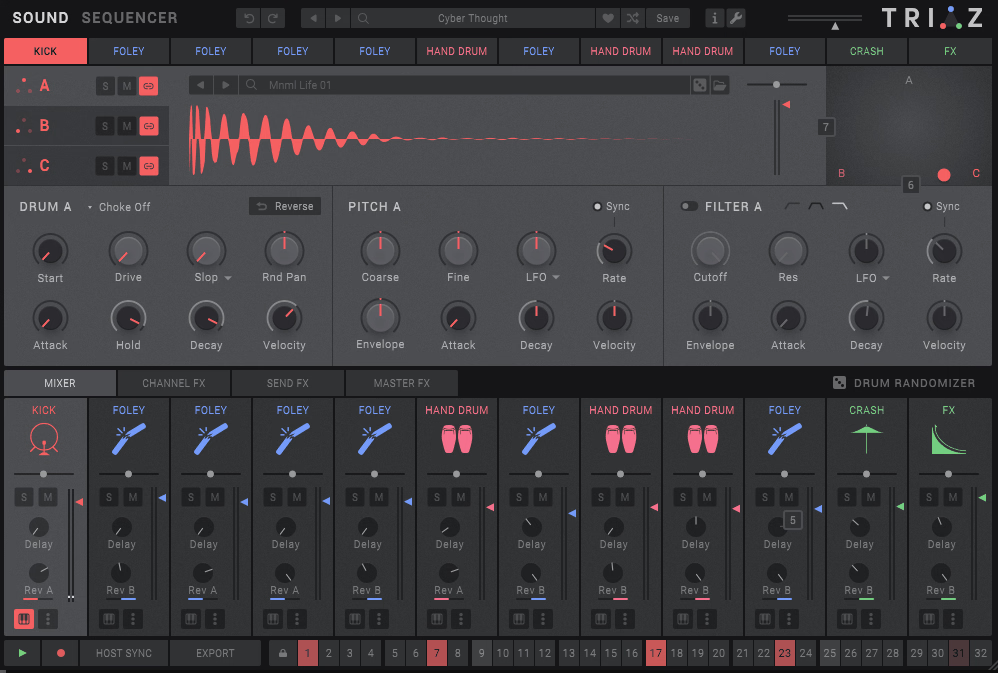
Cakewalk’s built in drum tools are functional but limited, and if you produce electronic music, hip hop, or anything that relies on designed drum sounds, you’ll want a dedicated drum machine plugin. Wave Alchemy Triaz provides a three layer drum synthesis and sampling engine with a built in step sequencer that lets you design and sequence drum sounds from within a single interface.
The strength of Triaz is in the layering approach. Each drum voice combines up to three layers that can mix synthesis, sampling, and noise in any proportion. You can layer a synthesized kick body with a sampled transient and a noise burst, for example, creating custom drum sounds that are impossible to achieve with samples alone. The step sequencer with parameter locks (where individual steps can have unique settings) provides the kind of per step sound variation that makes programmed drums feel less mechanical and more alive.
- Three Layer Engine
Each drum voice combines up to three sound layers that can independently use synthesis, sampling, or noise generation. The layering lets you build sounds from the ground up rather than relying on pre recorded samples, giving you complete control over every aspect of the drum sound.
- Step Sequencer
A pattern based sequencer with per step parameter locks lets you change sound parameters on individual steps. The parameter locks mean you can have a different filter cutoff, pitch, or decay on every step, which creates natural variation that makes programmed patterns feel more organic.
- Sound Library
A curated collection of samples and synthesis presets provides starting points organized by genre and drum type. The library covers electronic, acoustic, processed, and hybrid drum sounds that you can use directly or customize through the layering engine.
- Effects Section
Built in per voice effects including saturation, filtering, compression, and spatial processing let you finish drum sounds within Triaz without loading external plugins. The per voice processing means each element of your kit can have independent effects treatment.
Available from Wave Alchemy in VST, VST3, AU, and AAX formats.
11. AIR Music Technology Flavor Pro (Multi Effect)

Flavor Pro is a multi effect processor that provides a collection of creative effects in a single interface with an approach that prioritizes quick experimentation over deep parameter control. You choose an effect type, adjust a few controls, and move on. The plugin covers modulation, delay, reverb, distortion, filtering, and other categories with enough variety to handle most creative processing tasks.
For Cakewalk sessions where I need to quickly try different effects on a track without loading and configuring separate plugins for each one, Flavor Pro saves time. The quality isn’t going to match dedicated premium plugins in any individual category, but the convenience of having a wide range of effects accessible from a single interface is genuinely practical for quick sound design and creative exploration. When you find an effect you like, you can always replace it with a dedicated plugin later if the quality needs to be higher.
- Effect Categories
Multiple effect categories cover modulation (chorus, flanger, phaser), time based (delay, reverb), distortion (overdrive, fuzz, bitcrush), filtering, and more. Each category contains several variations with distinct characters, providing a broad range of creative processing options.
- Quick Access
The interface is designed for rapid effect selection and adjustment rather than deep parameter editing. You browse effects, try them on your material, and move on. The speed of experimentation is the plugin’s primary advantage over loading individual effect plugins.
- Parallel Routing
Multiple effects can be combined in parallel or series configurations, creating complex processing chains within the single plugin. The routing flexibility lets you build creative effects that would normally require multiple separate plugins and a bus routing setup.
- Performance Controls
Macro style controls provide real time adjustment of multiple effect parameters simultaneously, which is useful for creating evolving effects during recording or for automating dramatic effect changes throughout a song.
- CPU Efficient
The lightweight processing means you can run Flavor Pro on multiple tracks without significant performance impact. The low CPU usage makes it practical as a creative tool you leave active while experimenting, rather than something you render and remove.
- Mix Control
A wet/dry blend handles parallel processing directly within the plugin, letting you maintain the clarity of the original signal while adding whatever amount of effect character your mix needs.
Available from AIR Music Technology in VST, VST3, AU, and AAX formats.
12. Imaginando DLYM (Free Modulation Effect)

Imaginando DLYM is a free creative effect that combines chorus, delay, and flanger processing into a single plugin with an unusually intuitive XY pad interface. Rather than adjusting individual parameters for each effect type, you move a point across the two dimensional pad and the plugin blends between different modulation behaviors based on position.
The free price and the visual, hands on interface make DLYM particularly appealing for Cakewalk users who want creative modulation effects without spending anything. I use it primarily for adding movement and character to synths and guitars where a conventional chorus or flanger would work but DLYM’s XY approach lets me find settings that fall between the standard effect categories. The visual interaction makes it fun to experiment with, which is worth something when you’re looking for creative inspiration.
- XY Control
The two dimensional pad controls multiple parameters simultaneously, letting you navigate between different modulation characters by moving a single point. The XY approach produces results that fall between conventional chorus, delay, and flanger, creating hybrid effects that standard controls can’t easily replicate.
- Visual Feedback
The graphical display shows the modulation behavior in real time, making it easy to see how your XY position translates into the actual processing being applied. The visual feedback helps you understand the relationship between position and effect character.
- Free Plugin
Completely free with no feature restrictions, trial limitations, or registration requirements. The plugin loads quickly and runs on minimal CPU, making it a zero risk addition to your Cakewalk plugin folder.
Available from Imaginando in VST, VST3, AU, and AAX formats. Free.
13. FabFilter Timeless 3 (Sound Design Delay)

Most delay plugins provide echo effects. Timeless 3 provides a creative delay environment that doubles as a sound design tool, with tape style delays, filters in the feedback path, diffusion, and an extensive modulation system that can turn a simple echo into a complex, evolving texture. The delay is beautiful for conventional echo effects, but its real power shows up when you start modulating the feedback, filtering, and time parameters.
For Cakewalk producers working in electronic, ambient, experimental, or cinematic genres, Timeless 3 is the kind of delay that inspires new ideas. I’ve started tracks just by feeding a simple sound into Timeless 3 and experimenting with the feedback and modulation until something interesting emerged. The drag and drop modulation system (borrowed from FabFilter’s approach in other plugins) makes complex routing accessible, and the visual feedback shows you exactly what the modulation is doing to each parameter.
- Tape Mode
A tape delay emulation adds the warm, slightly degraded character of analog tape echo to the repeats. The tape mode introduces subtle pitch wobble, saturation, and high frequency loss on each repeat, creating delays that feel organic rather than digitally precise.
- Feedback Filters
Filters in the delay feedback path shape how the echoes evolve over time. Each repeat passes through the filter, so the echoes progressively change character. Low pass filtering creates increasingly dark, distant repeats. Band pass creates a focused, resonant quality that becomes more pronounced with each repetition.
- Modulation System
A drag and drop modulation system with multiple LFOs, envelopes, and XY controllers can modulate virtually any delay parameter. The modulation is what transforms Timeless 3 from a standard delay into a sound design tool, creating delays that shift, evolve, and mutate over time.
- Diffusion
A diffusion control smears the delay repeats into reverb like textures without using a separate reverb algorithm. Higher diffusion settings blur the distinct echoes into a wash of ambient sound, which is useful for creating spatial depth that sits between obvious delay and conventional reverb.
Available from FabFilter in VST, VST3, AU, AAX, and CLAP formats.
14. LANDR Mastering Plugin PRO (AI Mastering)
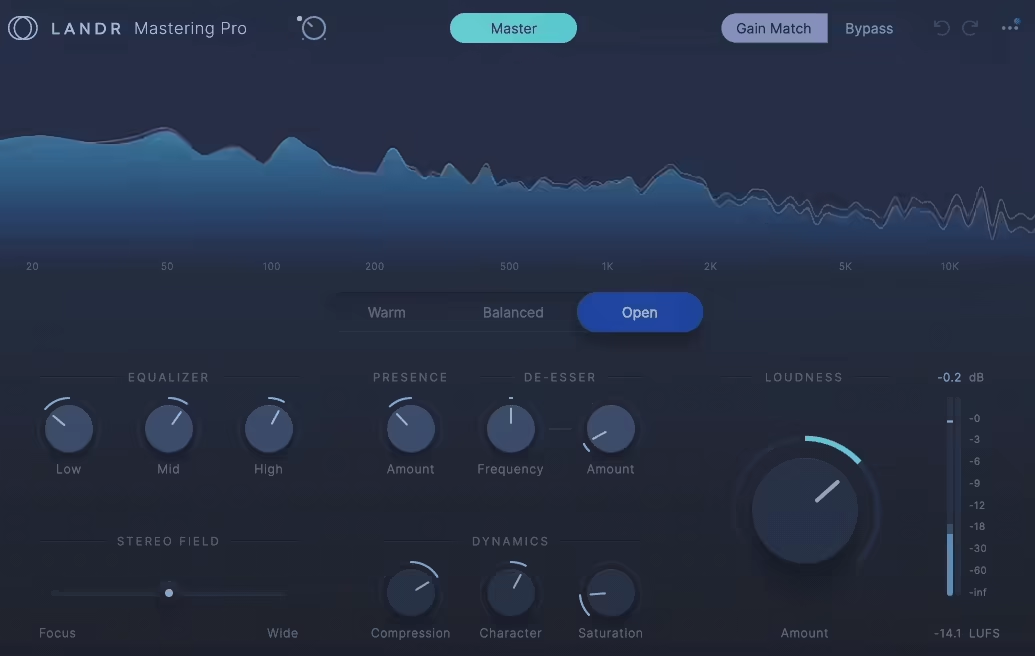
Mastering inside Cakewalk without sending your tracks to an external service is possible with the Mastering Plugin PRO, which brings the AI powered mastering engine from the LANDR online platform directly into your DAW as a plugin. The processor analyzes your mix and applies EQ, compression, stereo enhancement, and limiting calibrated to the specific content of your material.
I want to be realistic about AI mastering: it won’t replace a skilled human mastering engineer for critical releases. What the LANDR plugin provides is a fast, consistent mastering process for demos, singles, content for social media, and releases where budget or timeline doesn’t justify hiring a mastering engineer. The results are professional enough for most distribution contexts, and having the mastering happen inside Cakewalk means you can make mix adjustments and hear the mastered result immediately without the back and forth of an external service.
- AI Analysis
The engine analyzes your mix and automatically determines appropriate processing settings for EQ, compression, limiting, and stereo treatment based on the spectral content and dynamic characteristics of your specific material. The analysis adapts to each song rather than applying a fixed processing chain.
- Style Selection
Multiple mastering styles let you bias the processing toward different aesthetic goals: warm, balanced, open, or punchy. The style selection gives you creative direction over the AI’s decisions without requiring you to configure individual processing parameters.
- Loudness Targeting
The processing targets appropriate loudness levels for streaming platforms, matching the LUFS specifications that Apple Music, Spotify, and other services use for normalization. The loudness targeting ensures your masters meet distribution requirements without you needing to measure and adjust manually.
- Reference Matching
A reference track comparison feature lets you load a commercially mastered song and the AI adjusts its processing to match the tonal and dynamic characteristics of your reference. This is useful when you want your master to sit tonally alongside specific commercial releases.
- In DAW Processing
The plugin processes inside Cakewalk’s signal path rather than requiring you to export, upload, and download. You can make mix changes in Cakewalk, play the session, and hear the mastered result in real time through the plugin insert. The immediate feedback loop accelerates the mastering process significantly.
Available from LANDR in VST, VST3, AU, and AAX formats. Requires LANDR subscription.
15. Native Instruments Kontakt 8 (Sampler Platform)
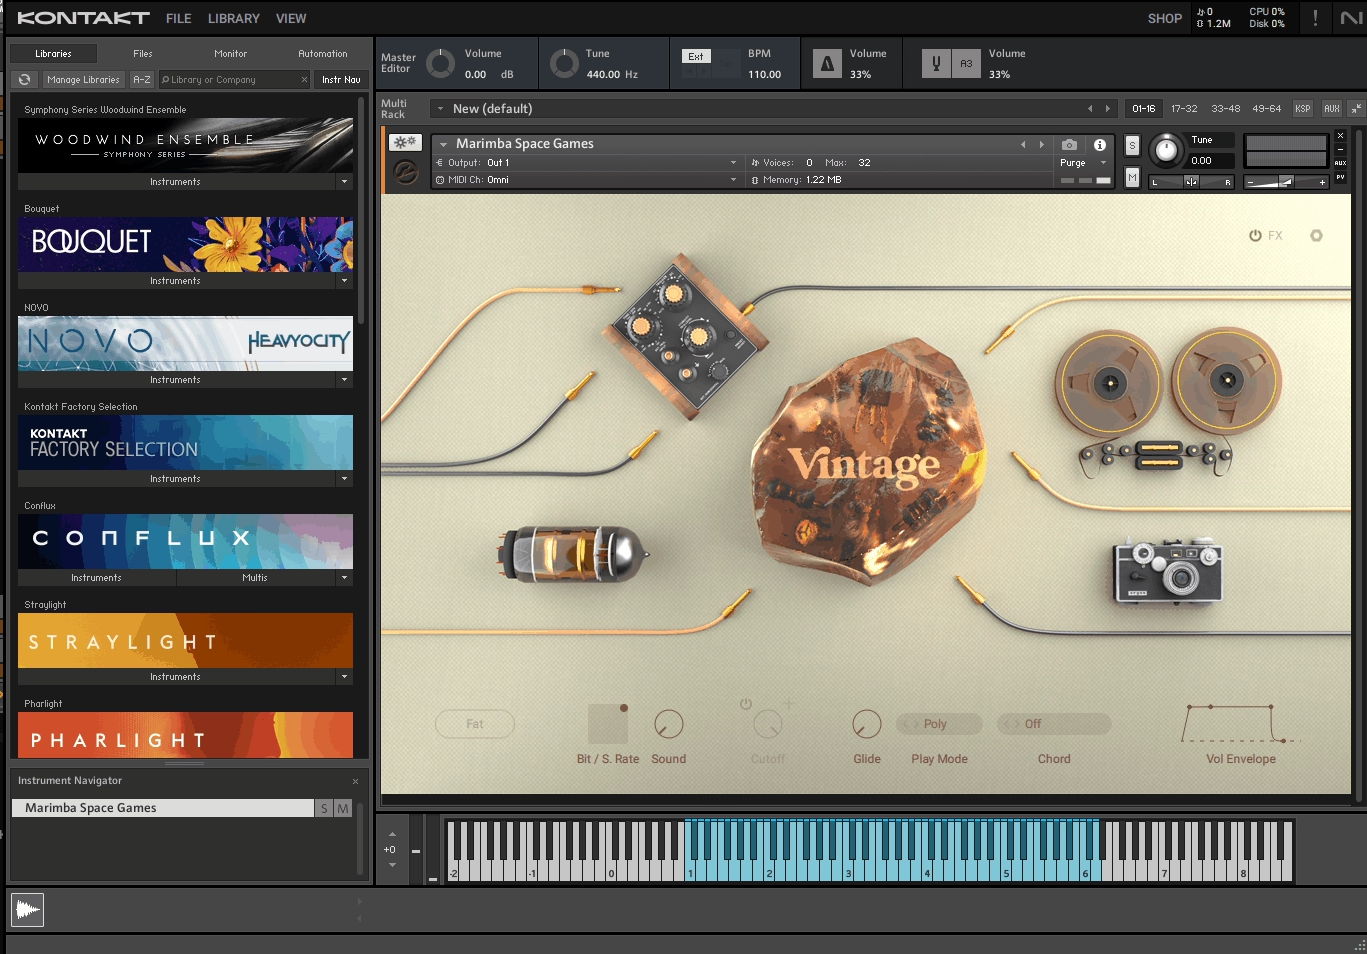
This one is less of a single instrument and more of a platform that runs thousands of third party sample libraries spanning every instrument category imaginable. Orchestral strings, pianos, guitars, drums, ethnic instruments, synthesized sounds, and niche specialty libraries all run inside Kontakt. Having it installed in Cakewalk opens the door to a massive ecosystem of virtual instruments.
The practical reality of Kontakt 8 is that the included library provides enough content to get started, but the real value comes from the third party ecosystem. Companies like Spitfire Audio, Heavyocity, 8Dio, Cinesamples, and dozens of others develop libraries exclusively for Kontakt. Once you own the full version of Kontakt (as opposed to the free Kontakt Player, which has library restrictions), you can run virtually any sample based instrument from any developer. For Cakewalk users building a production toolkit, Kontakt is the foundation that everything else builds on.
- Library Ecosystem
Thousands of third party sample libraries from hundreds of developers run inside Kontakt, covering every instrument category from orchestral to electronic to ethnic to experimental. The ecosystem is the largest of any sampler platform, and owning Kontakt gives you access to this entire catalog.
- Factory Library
The included factory content provides usable instruments across piano, strings, brass, woodwinds, drums, synths, and other categories. The factory library is enough to start producing immediately while you build your third party collection over time.
- Scripting Engine
A powerful scripting system allows library developers to create custom interfaces, articulation systems, and performance tools. The scripting is why Kontakt libraries can provide complex, responsive instruments that go far beyond simple sample playback.
Available from Native Instruments in VST, VST3, AU, and AAX formats.
16. PSP stereoController2 (Stereo Widener)

Managing the stereo image is one of the final steps in mixing, and PSP stereoController2 provides a focused, lightweight stereo width and balance tool that handles the job without unnecessary complexity. The plugin adjusts stereo width, mid/side balance, stereo rotation, and channel delay with simple controls and reliable metering that shows you exactly what’s happening to your stereo field.
I keep PSP stereoController2 as a permanent fixture on my master bus in Cakewalk because it’s the fastest way to make final stereo image adjustments. Narrowing the width slightly for a more focused center. Widening the sides for a sense of space. Correcting a slight left/right imbalance. Checking mono compatibility with a single click. These are small but important finishing moves, and having them available in a single, clean interface with proper correlation metering means I make these decisions with confidence rather than guessing.
- Width Control
A stereo width adjustment narrows or widens the stereo image using mid/side processing. The width control is the primary tool, and the range extends from mono (fully collapsed) through normal stereo to expanded width that pushes content beyond the speaker boundaries.
- Correlation Meter
A phase correlation display shows the relationship between left and right channels in real time, helping you avoid widening to the point where the mix collapses in mono. The meter is essential for catching phase problems before they reach your listeners.
- Channel Delay
An adjustable inter channel delay creates stereo width through timing differences between left and right channels. Small delays (under 30 milliseconds) produce a Haas effect widening that sounds natural on many sources and creates width differently than mid/side processing.
- Mono Check
A mono summing switch lets you instantly audition how your stereo processing translates to mono playback. Since many listeners hear music through single speakers, earbuds, or mono Bluetooth devices, mono compatibility checking is an essential part of the mixing process.
Available from PSP Audioware in VST, VST3, AU, and AAX formats.
Hello, I’m Viliam, I started this audio plugin focused blog to keep you updated on the latest trends, news and everything plugin related. I’ll put the most emphasis on the topics covering best VST, AU and AAX plugins. If you find some great plugin suggestions for us to include on our site, feel free to let me know, so I can take a look!