Premiere Pro has decent built-in audio tools, but the moment you’re working with location audio, dialogue-heavy content, or anything headed toward a broadcast or streaming delivery spec, you’re going to want VST support to fill in the gaps. The good news is that Premiere handles VST plugins well, and there are genuinely excellent free options that compete with paid tools you’d pay hundreds for.
This list covers the full workflow: noise removal, EQ, compression, gating, de-essing, and metering. Whether you’re a solo content creator or cutting for broadcast, every plugin here earns its place with real results.
The free options, particularly from Cockos and Tokyo Dawn Labs, are absolutely worth installing first. The paid tools from Waves and FabFilter solve specific problems at a professional level that free alternatives can’t fully match.
Waves Clarity Vx
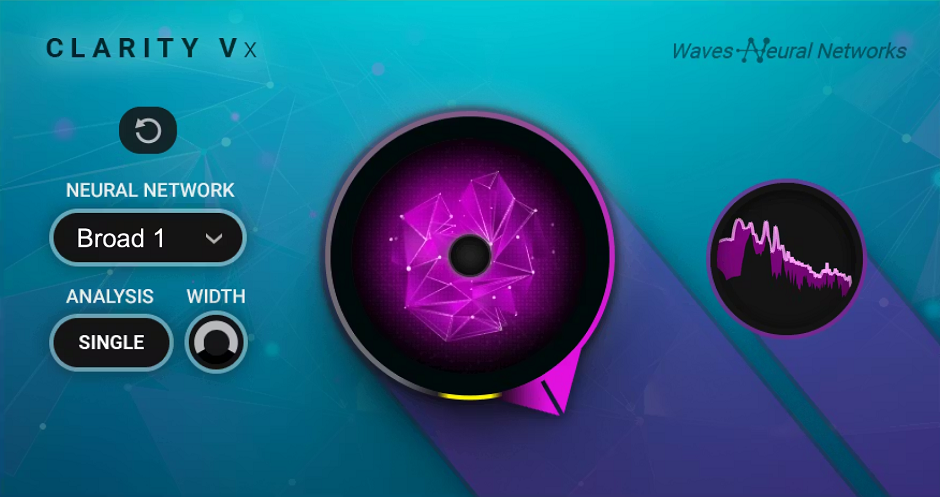
Waves Clarity Vx is the noise removal plugin that content creators and post-production editors have been consistently recommending since its release, and for good reason. It uses Waves Neural Networks trained on millions of hours of dialogue recordings to separate voice from background noise in real time, with no noise profile to capture and no threshold to dial in.
The whole workflow is a single knob from 0% to 100%, and the neural network handles the rest. You choose between three models: Broad 1 for most situations, Broad 2 for more extreme noise or competing voices in the background, and Broad ECO for significantly lower CPU usage when you’re running multiple instances. It’s currently priced around $29-39 on regular sale, which makes it one of the best-value paid plugins for Premiere Pro dialogue work.
- Three Neural Network Models
Broad 1 handles most background noise cleanly, Broad 2 tackles more aggressive environments or background voices, and Broad ECO reduces CPU usage significantly when you need to run multiple instances across a large Premiere session.
- Single-Knob Workflow
One dial controls the entire noise reduction amount without requiring you to capture a noise profile, set a threshold, or learn complex processing parameters. Everything is handled by the underlying neural network, making it practical to apply directly on a timeline without an external audio session.
- Real-Time Non-Destructive Processing
Works in real time inside Premiere Pro without rendering, bouncing, or consolidating clips. You hear the cleaned result immediately in context with the rest of your edit.
- Native Apple Silicon Support
Runs natively on M1 and M2 Macs, with Waves having updated it from its earlier Rosetta-only release. The native version is noticeably more efficient in large Premiere sessions on Apple Silicon hardware.
TDR Nova
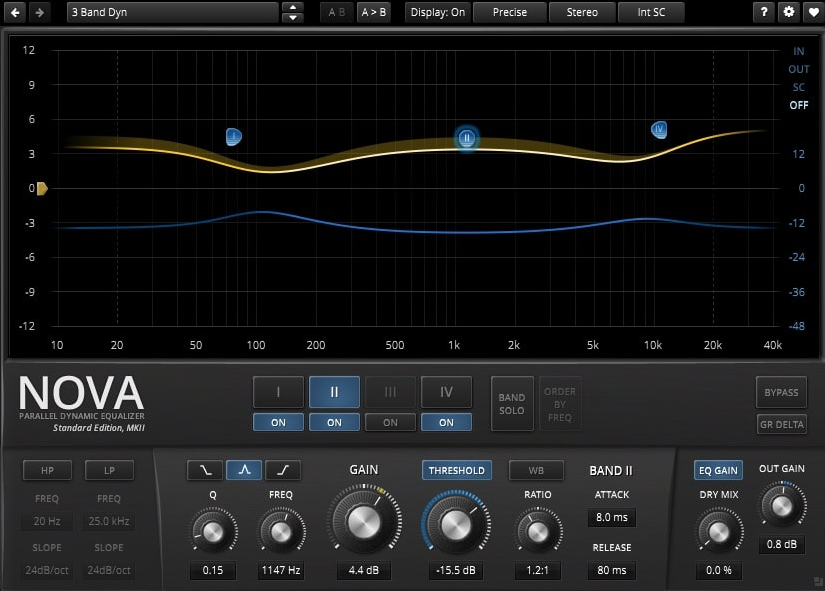
A free parallel dynamic equalizer from Tokyo Dawn Labs, TDR Nova is one of the most capable free plugins you’ll find in any category, full stop. Each of its four parametric EQ bands can function as a static EQ, a dynamic EQ that only responds when the signal in that frequency region crosses a threshold, or both at the same time, which gives you precise, context-sensitive frequency control that a standard parametric EQ simply can’t do.
For Premiere Pro dialogue work, the value is immediate. Instead of permanently cutting a harsh 3-4 kHz peak that’s thinning your voice every time it plays, you set a dynamic band that only compresses when the harshness actually appears. The result sounds more natural across the whole clip rather than permanently altered. I believe the GR Delta monitoring is genuinely one of the most useful mixing tools available in any free plugin, since it lets you solo exactly what the dynamic section is removing in real time.
- Four Dynamic EQ Bands
Each band has independent Threshold, Ratio, Attack, and Release controls alongside its EQ parameters, letting it respond to signal level in its own frequency region without affecting the rest. Ratio direction can swing between downward compression and upward expansion from the same band.
- Wideband Compressor
An independent wideband compressor section operates across the full frequency range separately from the band dynamics. The WB button links the two, and Alt-clicking the Threshold in Sticky mode excludes individual bands from the wideband compression, effectively building a configurable multiband compressor inside one plugin.
- GR Delta Monitoring
Solos only the gain reduction signal so you can hear exactly what the dynamic section is removing across which frequencies. This is the fastest way to confirm a dynamic EQ band is targeting the right problem without over-processing adjacent content.
- Free with No Feature Locks
The full dynamic EQ functionality is available in the free Gentleman’s Edition with no trial period and no feature restrictions. A paid Plus version adds additional workflow features but the core processing is identical and completely free.
- Four Static and Dynamic Band Modes
Every band can be switched between pure static EQ, pure dynamic EQ, or both simultaneously running in parallel on the same frequency region. This flexibility means you can use a single instance of TDR Nova as both a corrective EQ and a multiband compressor at the same time on a single dialogue track.
ReaPlugs Suite
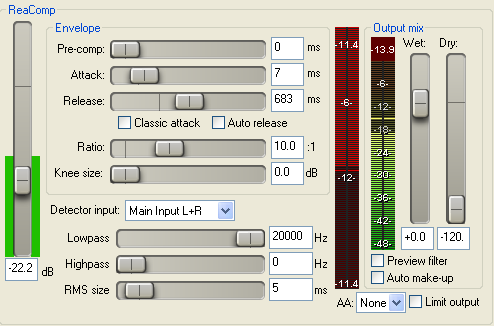
Reacomp
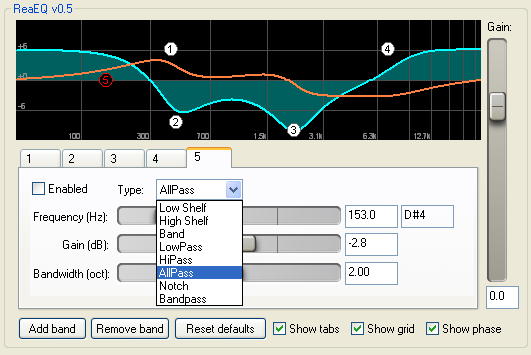
ReaEQ
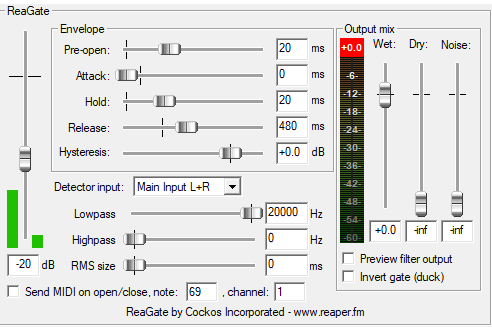
ReaGate
ReaEQ, ReaComp, and ReaGate from Cockos come as part of the free ReaPlugs VST FX Suite, which you download as a standalone package entirely separate from the REAPER DAW. No installer, no copy protection, no registration required. These three plugins together cover the essential processing chain for any Premiere Pro dialogue or audio cleanup workflow, and they’ve been consistently praised by engineers for their transparency and depth of control.
ReaEQ is an unlimited-band IIR parametric EQ that Bedroom Producers Blog called “surgically precise and transparent.” ReaComp is an ultra-configurable transparent compressor with sidechain filtering, feedback compression mode, and variable RMS detection that one longtime engineer described as a “dynamics engine” rather than a simple compressor. ReaGate is widely considered the best freeware noise gate available, with sidechain filters, lookahead pre-open, hysteresis control, and a wet/dry blend that make it far more capable than any generic threshold gate. All three together are worth installing before reaching for any paid alternative in Premiere Pro.
- Unlimited EQ Bands
ReaEQ places no cap on the number of bands in a single instance, covering shelf EQ, bell, low-pass, high-pass, band-pass, all-pass, and notch filters all from one plugin. Every band has its own bypass switch for individual A/B comparison without touching the rest of the curve.
- Transparent Compression with Feedback Mode
ReaComp includes a feedback compression mode that changes the detector from analyzing the incoming signal to analyzing the output, producing a more vintage, less predictable character compared to standard feedforward designs. The variable RMS size lets you dial behavior from fast peak detection to slow optical-style averaging.
- Sidechain Filters on Gate and Compressor
Both ReaGate and ReaComp include high-pass and low-pass filters on their sidechain detectors, restricting the frequency range that triggers either the gate or the compression. For dialogue in Premiere, a high-pass on the gate sidechain around 80 Hz prevents low-frequency room noise from holding the gate open when there’s no voice present.
- Lookahead Pre-Open on Gate
ReaGate’s Pre-open parameter gives the gate a lookahead window so it opens slightly before the signal crosses threshold, preserving the attack of the voice and preventing hard consonants from being clipped at the start of words. This is the feature that separates a natural-sounding gate from a robotic one.
- Zero Installation, No Copy Protection
The entire ReaPlugs suite drops into any folder you point Premiere Pro’s VST scanner to and runs without an installer, activation, or registration of any kind. Multiple instances of all three plugins run simultaneously with minimal CPU impact, which matters when you have a long timeline full of individual dialogue clips.
Techivation T-De-Esser 2
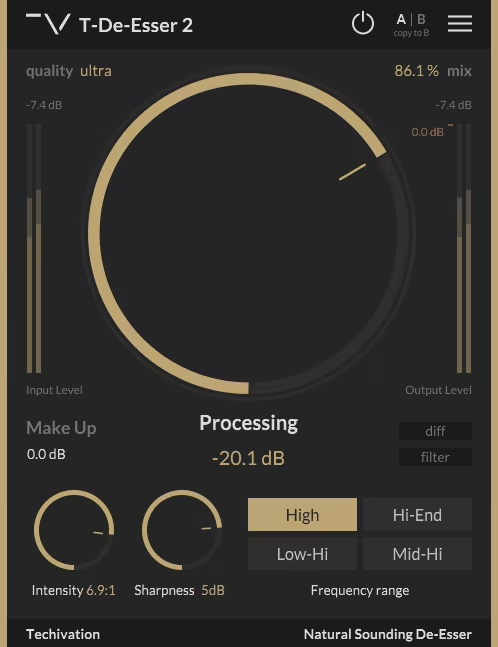
T-De-Esser 2 from Techivation is completely free and genuinely one of the best de-essers available at any price, which is a statement that holds up after comparing it to paid alternatives. It works differently from most de-essers: rather than using a fixed compressor triggered by a detection frequency, it operates more like a volume rider for the targeted high-frequency range, which produces significantly more transparent and natural-sounding results on dialogue and vocals. KVR reviewers consistently cite its transparency as the primary reason they replaced paid de-essers with it.
I appreciate how Techivation designed the interface around listening rather than looking: there’s no analyzer or visual feedback fighting for your attention, just the processing controls, a Filter output button to audition the selected frequency range in isolation, and a Diff button to hear only what’s being removed. It’s available as VST, VST3, AU, and AAX on both Windows and Mac, with Apple Silicon native support.
- Volume Rider Approach
Rather than triggering a compressor when the detection frequency exceeds a threshold, it operates as a gain rider that reduces volume in the targeted range proportionally. This approach avoids the pumping and over-processing artifacts common in compressor-based de-essers, producing a more natural result on dialogue and vocals.
- Four Frequency Range Modes
Four selectable frequency range buttons let you target the part of the spectrum where your specific sibilance problem lives, from lower sibilance around 1-4 kHz to upper air and harshness above 8 kHz. Each mode adjusts which frequencies the plugin monitors and reduces, making it easy to dial in a result without sweeping manually.
- Filter and Diff Monitoring
The Filter button outputs only the selected frequency range so you can identify exactly what the plugin is listening to before setting the processing amount. The Diff button outputs only the difference between the processed and unprocessed signal so you can hear exactly what’s being removed as you adjust Intensity and Sharpness.
- Quality Selector and Dry/Wet Mix
A Quality selector with Standard, Good, Great, and Ultra modes controls the oversampling level for reducing aliasing artifacts in the processing, and a Dry/Wet mix control allows parallel de-essing for a blend of processed and unprocessed signal. Both are additions over the original T-De-Esser and contribute to the more refined behavior of version 2.
Melda MEqualizer
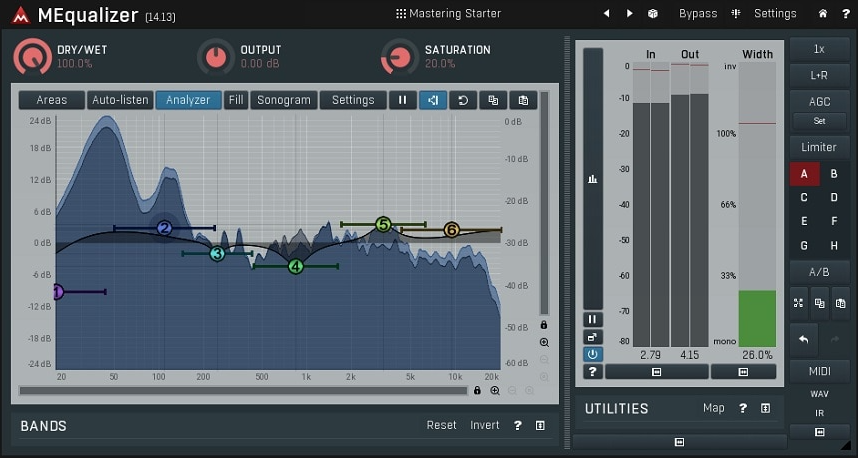
Part of Melda’s MFreeFXBundle, which installs 37 free plugins in a single download, MEqualizer is a 6-band parametric EQ with built-in tube saturation, a harmonics control that adds subtle analog character to the sound, and Mid/Side processing that’s genuinely rare in a free EQ. Integraudio described it as “sleeker and more usable compared to many other free EQs,” and Future Sound Academy specifically built it into their mixing curriculum for students. The combination of visual feedback, tube coloration, and M/S capability gives it a feature set that competes seriously with paid EQs.
I love how the harmonics control lets you add warmth to the EQ processing itself, not just the boosted frequencies, which gives it a character more like hardware than most digital EQs. For Premiere Pro work it’s useful across any frequency shaping task, and the built-in spectrum analyzer and sonogram make identifying problem frequencies faster than working by ear alone. It runs as VST, VST3, AU, and AAX across Windows and Mac with Apple Silicon support.
- Six Bands with Seven Filter Types
Each of the six bands supports low-shelf, high-shelf, low-pass, high-pass, band-pass, all-pass, and notch filters, covering the full range of corrective and creative EQ shapes. All parameters are adjustable directly in the graphical display by dragging nodes.
- Integrated Tube Saturation
A built-in tube saturation stage adds subtle harmonic distortion and warmth to the processed signal, giving the EQ a more analog character without needing a separate saturation plugin. The amount is adjustable so you can dial it from barely audible to clearly present depending on the source.
- Mid/Side Processing
Each band can be set to process the Mid channel, Side channel, or both independently, which is a level of stereo control usually found only in paid EQ plugins. For Premiere Pro users working with stereo dialogue or music beds, this enables precise frequency correction that doesn’t affect the stereo image globally.
- Spectrum Analyzer and Sonogram
A real-time spectrum analyzer and sonogram display run simultaneously behind the EQ curve, making it easier to identify resonances, harshness, or buildup that you’d otherwise have to hunt by ear. The visualization updates immediately as you adjust bands.
- Preset Manager with Community Sharing
Presets are stored in a system-wide database accessible from any project or DAW, and the plugin supports online preset exchange with other Melda users. If you connect to the internet, it submits your presets and downloads community presets automatically, which is an unusual feature for a free plugin.
FabFilter Pro-C 3
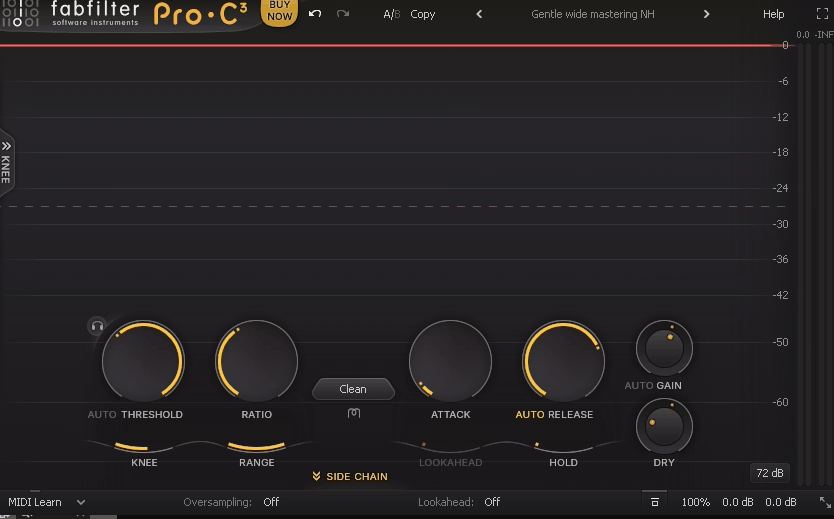
Released in January 2026, FabFilter Pro-C 3 is the current flagship compressor from FabFilter and a significant upgrade over the already well-regarded Pro-C 2. It now ships with 14 compression algorithms, including six brand-new styles covering everything from transparent gain leveling to vintage optical and variable-mu character.
For me, what makes Pro-C 3 genuinely different from most compressors is the six-band sidechain EQ and the integration with FabFilter Pro-Q 4’s Instance List, which means you can manage compression settings across an entire session from a single window without clicking through individual tracks. The Auto Threshold mode is also worth specific attention for Premiere Pro dialogue work since it keeps the compression behavior consistent even when input levels change significantly across clips.
- 14 Compression Algorithms
Fourteen distinct compression styles ranging from Versatile (general purpose), Smooth (low-ratio gluing), Upward (pumping upward compression), TTM (combined downward and upward), Op-El (vintage optical warmth), and Vari-Mu (variable-mu feedback character), alongside the eight styles from Pro-C 2. Each algorithm responds differently to material and envelope settings.
- Character Modes with Analog Saturation
Tube, Diode, and Bright character modes introduce analog-style saturation, coloration, and subtle drift to the compression processing. Drive amount is adjustable, and Pre/Post routing determines whether saturation happens before or after the dynamic processing, changing the character significantly.
- Six-Band Sidechain EQ
The sidechain EQ has expanded from three bands in Pro-C 2 to six full bands, each supporting the same filter shapes as FabFilter Pro-Q 4 including brickwall low-pass and high-pass options. Individual bands can be set to Mid or Side processing for precise control over which frequency content triggers the compression.
- Auto Threshold
Dynamically shifts the compressor’s threshold so that the same amount of compression is triggered at different input levels. Production Expert specifically highlighted this for maintaining consistent dynamic behavior on dialogue and vocal tracks where levels change significantly across clips.
- Host Sync Triggering
A new trigger mode outputs a tempo-synced internal pulse that triggers the compressor at any note value with adjustable Offset and Length controls. This makes rhythmic ducking effects straightforward without needing an external audio trigger, which is useful for music-to-dialogue ducking in Premiere Pro.
FabFilter Pro-Q 4
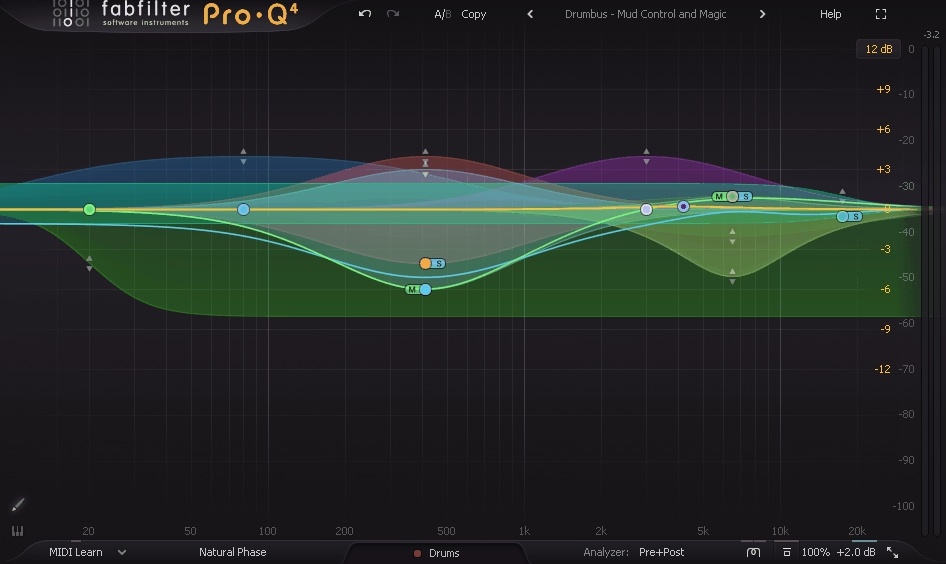
FabFilter Pro-Q 4 adds Spectral Dynamics processing, the Instance List for multi-track EQ management, EQ Sketch for drawing curves by hand, and Character Modes for analog warmth, all on top of the already comprehensive feature set of Pro-Q 3.
I found the Instance List to be the most immediately practical new feature for larger Premiere Pro projects, since you can see and adjust every instance of Pro-Q 4 across all tracks from a single window, which dramatically reduces the time spent navigating between individual plugin windows. The Spectral Dynamics mode is what makes it genuinely superior to static EQ for dialogue: instead of cutting a frequency permanently, you target only the moments when a resonance or harshness crosses a threshold, leaving the voice unaffected the rest of the time.
- Spectral Dynamics Mode
Per-band processing that applies dynamic compression only to specific frequencies within a band rather than the entire band, targeting resonances and peaks without affecting surrounding content.
- EQ Sketch
Draw an EQ curve with a single mouse gesture and the plugin creates the appropriate band types and parameters to match it. MusicTech described this as one of the most notable workflow improvements in the update, making it genuinely faster to establish an initial EQ shape before fine-tuning individual bands.
- Instance List
A single plugin window shows all Pro-Q 4 instances across the entire Premiere Pro session, allowing you to view and edit any track’s EQ without opening individual plugin windows. The 4.10 update extended Instance List support to also control Pro-C 3, Pro-DS, and Pro-G instances, effectively creating a session-wide channel strip view.
- Character Modes
Clean, Subtle, and Warm modes add varying degrees of analog-style saturation and harmonic coloring to the processing. Tape Op’s reviewer found that engaging either character mode across a session of flat-sounding preamp recordings immediately pushed the mix profile forward.
- Continuous Slope and Dynamic EQ Improvements
Slopes are continuously adjustable anywhere from 6 to 96 dB per octave rather than fixed steps, and the Dynamic EQ section now has proper Attack and Release controls with optional sidechain filtering. Gearnews described these two combined as a substantial precision upgrade over Pro-Q 3 for mastering and dialogue editing work.
- Wide Format and Preset Support
Available as VST, VST3, AU, AAX, AudioSuite, and CLAP across Mac and Windows, and reads all presets from previous Pro-Q versions. A full preset library covering common mix scenarios is included and transfers between instances via the Instance List.
Hello, I’m Viliam, I started this audio plugin focused blog to keep you updated on the latest trends, news and everything plugin related. I’ll put the most emphasis on the topics covering best VST, AU and AAX plugins. If you find some great plugin suggestions for us to include on our site, feel free to let me know, so I can take a look!