FL Studio is one of the most flexible DAWs out there, and what makes it even stronger is how it plays nicely with third-party plugins. Whether you’re producing EDM, hip-hop, pop, or film scores, the right plugins can fill in gaps, speed up your workflow, and push your sound in directions the stock tools can’t quite reach.
While FL Studio’s native tools are powerful, adding the right FL Studio plugins from third-party developers can unlock creative possibilities and sonic quality that take your productions to the next level.
In this list, I will talk about plugins like Current 2, Kontakt 8, and GrainDust to see how they handle modern sound design, alongside workhorse tools like EZDrummer 3, VOXGURU, and VCV Rack 2. I’ve also included specialized processors like Temperance Pro and Hex FX because, in a real session, these are the tools that actually determine whether a track gets finished or stays a loop. Of course there will be more of it I will talk about, but now I don’t want to overwhelm you with so many options..
With that said, I’ve spent time testing a wide range of tools, from wavetable and modular synths to vocal chains, reverbs, distortion units, and specialized sound designers and here is what I found:
| Plugin Name | Best For | Engine Type | Key Strength | My Verdict | Pros | Cons |
|---|---|---|---|---|---|---|
| 1. Minimal Audio Current 2 | Modern electronic sound design | Wavetable Synth | Fast modulation routing, CPU efficient | Best for sound Designers | Clean UI, high sonic density | Limited organic timbres |
| 2. Native Instruments Kontakt 8 | Professional sampling workflows | Advanced Sampler Platform | Disk streaming, scripting engine | Industry Standard Sampler | Massive third-party support | Workflow complexity |
| 3. SoundParticles GrainDust | Granular texture creation | Granular Synth | High-resolution grain control | Specialized Granular Engine | Distinct spatial movement | Limited traditional synthesis roles |
| 4. Eventide Temperance Pro | High-end spatial effects | Algorithmic Reverb | Zero-latency diffusion | Precision Reverb Processor | Clear, controlled decay | Minimal tonal coloration options |
| 5. Serato Hex FX | Live performance effects | Multi-FX Processor | Macro-based effect switching | Performance-Oriented FX Tool | Fast creative execution | Limited parameter depth |
| 6. VCV Rack 2 | Modular synthesis exploration | Virtual Modular System | Sample-accurate signal routing | Deep Modular Environment | Extensive module ecosystem | High CPU demand at scale |
| 7. Toontrack EZDrummer 3 | Songwriting and demo drums | Sample-Based Drum Engine | Humanized groove playback | Songwriting Accelerator | Fast arrangement building | Limited micro-editing control |
| 8. THRaudio VOXGURU | Vocal chain consistency | Integrated Channel Strip | Zero-latency vocal processing | Dedicated Vocal Workflow | Reliable vocal tone | Fixed processing order |
| 9. ujam STRIIIINGS | Cinematic scoring sketches | Phrase-Based Sampler | Adaptive articulation engine | Cinematic Sketching Tool | Instant orchestral impact | Reduced manual articulation control |
| 10. Ample Guitar AGM | Realistic acoustic guitar parts | Sampled Instrument | Round-robin realism | Reference Acoustic Guitar Plugin | Natural dynamics | Large library size |
| 11. PluginBoutique DC Snares | Snare layering and design | Sample Instrument | Phase-aligned transients | Focused Drum Layering Tool | Punchy snare presence | Single-instrument scope |
| 12. Sonic Academy KICK 3 | Kick drum synthesis | Hybrid Synth/Sampler | True Peak shaping | Low-End Precision Tool | Consistent mix translation | Dense interface layout |
| 13. Minimal Audio Rift 2 | Creative distortion design | Multiband FX Processor | Feedback-based modulation | Advanced Distortion Engine | Extreme tonal flexibility | Easy to over-saturate |
| 14. Beatsurfing RANDOM | Sub bass generation | Synthesis Utility | Randomized harmonic creation | Idea-Generation Utility | Fast inspiration source | Limited tonal predictability |
| 15. IK Multimedia MODO Bass 2 | Expressive bass performances | Physical Modeling | Articulation-aware response | Real-Time Modeled Bass Engine | No samples, low memory usage | Requires precise MIDI programming |
| 16. Arturia B-3 V | Classic organ sounds | Tonewheel Modeling | Authentic drawbar behavior | Authentic Hammond Emulation | Highly expressive control | Genre-specific usage |
| 17. Surge XT | Experimental synthesis | Hybrid Synth | Open-source modulation depth | Power-User Synth Toolkit | Extremely flexible architecture | Visually dense interface |
| 18. Waves StudioRack | Complex mix routing | Plugin Host Utility | Parallel buffer shuffling | Mix Chain Management System | Fast recall and consistency | Dependent on Waves plugins |
| 19. Matt Tytel Vital | Modern wavetable synthesis | Wavetable Synth | High-resolution modulation | Accessible High-End Synth | Strong free feature set | CPU spikes at complex settings |
| 20. Caelum Audio Tape Cassette 2 | Lo-fi coloration | Saturation FX | Wow, flutter, noise modeling | Intentional Degradation Tool | Instant character | Not suitable for clean mixes |
| 21. Steinberg Taped Vibes | Subtle analog warmth | Tape Emulation | Soft harmonic saturation | Lightweight Tape Color | Very CPU efficient | Limited shaping controls |
| 22. Waves Free Plugin Pack | Basic mixing utilities | Utility Plugin Bundle | Zero-latency processing | Foundational Utility Set | Covers essential tasks | Basic processing depth |
1. Minimal Audio Current 2 (Wavetable Synth)

What makes Current 2 stand out is how it combines five different sound engines in one plugin. I can run two wavetable oscillators alongside a granular engine, a time-stretching sampler, and a sub engine all at the same time. That kind of layering power means you can build complex textures without stacking three or four different synths.
The workflow feels designed for speed. You can drag modulators directly onto any knob you want to control, and the visual feedback shows me exactly what’s happening. FL Studio’s automation clips link up perfectly with Current’s parameters, which keeps your process smooth when you’re building drops or evolving pads.
This kind of seamless integration is what separates great FL Studio plugins from ones that fight your workflow – Current 2 feels like it was built specifically for this FL Studio.
Current 2 gives you two spectral wavetable oscillators with over 40 warp modes each. You also get a granular engine that turns any sample into moving textures, plus a time-stretching sampler and a sub oscillator.
All five can run at once, which is ho you can build thick basses or layered leads that sound like multiple synths playing together.
- Drag-and-Drop Modulation System
The modulation workflow in Current 2 changed how fast you can design sounds. You have nine modulators including envelopes, LFOs, step sequencers, and randomizers. You just drag one onto any control and adjust the range with a quick turn. No routing menus or confusing matrices. When you want movement in my sound, this system gets me there in seconds instead of minutes.
- Built-In Effects Rack
Current 2 also includes a full effects chain with up to nine slots I can reorder however you want. The distortion, delay, reverb, and chorus all sound polished enough that you don’t need to add much in FL’s mixer.
The Wave Shifter effect is especially useful for metallic textures and frequency-shifted arps that sit perfectly in EDM and trap productions. You can finish most patches inside the synth without reaching for external plugins which is very handy
- XY Performance Pad
Version 2 added a Play View with an XY pad that controls four macros at once. You can actually use this for live tweaking during arrangement or when you want one automation clip to control multiple sound changes at the same time.
Lastly, Stream Library Integration Current 2 connects to Minimal Audio’s Stream library, which gives you access to hundreds of presets, wavetables, and samples without leaving the plugin.
New content shows up automatically, and you can audition everything directly in the browser. It keeps your workflow moving because you’re not hunting through folders or importing files manually.
2. Native Instruments Kontakt 8 (Sampler & Platform for Sample Libraries)
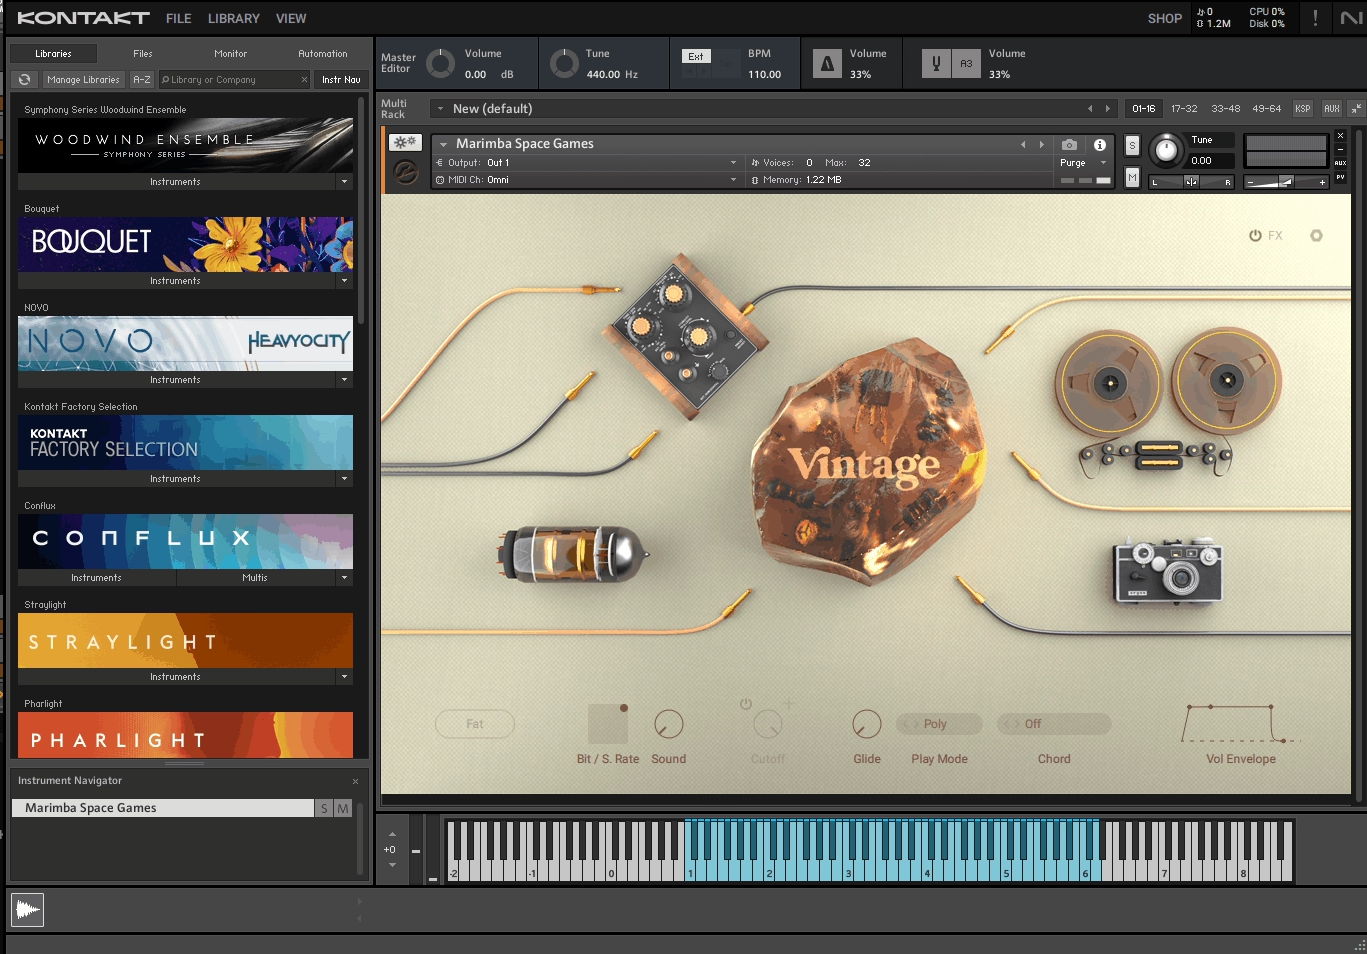
Kontakt 8 stands out as the most trusted sampler in music production right now. It’s not just about playing back samples. It’s a complete platform where you can layer sounds, build instruments, and access thousands of libraries from Native Instruments and third-party creators.
What makes Kontakt different is how it balances power with possibility. I can load a simple piano patch in seconds or spend hours designing my own hybrid instrument using the built-in synthesis tools.
The factory library alone gives you lots of instruments to start with, covering orchestral sounds, vintage keys, world instruments, and experimental textures.
The new tools in version 8 turned Kontakt into something more creative and less clinical. You’re not just triggering samples anymore. You can actually generate chord voicings, building melodic phrases, and designing rhythmic patterns without leaving the plugin. When it comes to compatibility, it works as a VST3, AU, and AAX plugin in FL Studio, and you can even run it standalone when you want to sketch ideas quickly.
Features:
- Huge Library
Kontakt’s Factory Library comprises over 43 GB of meticulously recorded sample content distributed across nearly 900 instruments.
- Chords Tool
This feature lets you play full chords with a single MIDI note, which saves you time when I’m working fast. You can simply adjust how the chord sounds by adding humanization, which slightly shifts timing and velocity to make it feel more natural.
The strum control is perfect when you want to mimic guitar-style chord rolls. You can also lock chords to specific keys and scales, and save custom chord sets for different projects. It’s especially helpful when you’re working with orchestral or cinematic libraries where complex voicings would take forever to program manually.
- Conflux Hybrid Instrument
Conflux combines sample-based sounds with wavetable synthesis, and that mix opens up a lot of creative options I didn’t expect. I can blend real recordings with synthetic tones, then shape everything using FM, ring modulation, and phase modulation.
The multi-page interface keeps things organized. There’s a Play page for quick tweaks, an Edit page for deep sound design, and a Settings page for routing. It also includes effects like delay and reverb, plus a step animator for rhythmic movement.
I recommend Conflux when you need something that sits between acoustic and electronic, like textured pads or evolving leads.
- Leap Sampler
Leap is a fast, performance-focused sampler built into Kontakt 8. You can drag in your own samples or use the included Leap Expansions, then trigger loops or one-shots across 16 keys. What makes it interesting is how I can assign effects like stutter, speed changes, and pitch shifts to other keys on my keyboard. So you’re not just playing sounds, you’re manipulating them in real time.
The loop editor is simple but effective, letting me adjust start and end points, set filters, and tweak envelopes. It’s my go-to when I want to chop vocals or create glitchy textures without bouncing out of Kontakt.
- Patterns Tool
Lastly, the Patterns tool gives you a polyphonic step sequencer and arpeggiator right inside Kontakt. That said, you can program up to 32 steps, adjust swing, control velocity per step, and set retrigger or latch modes.
It works with any Kontakt instrument, so you can take a simple piano sound and turn it into a moving pattern or take a string patch and build a rhythmic sequence. I like using this for creating melodic loops or adding movement to static sounds. It’s especially useful in electronic and pop productions where repetition and groove matter.
3. SoundParticles GrainDust (Granular Synth)

What pulled me to GrainDust right away was how it takes granular synthesis beyond flat stereo. The plugin gives you four completely separate granular layers that I can shape, stack, and move in actual 3D space.
GrainDust comes from Sound Particles, a company known for spatial audio tools in film and game work. This synth uses the same 3D engine they built for SkyDust, so the spatial movement isn’t just a trick or an afterthought. It’s built into the core of how grains behave and travel.
You can load my own samples or dig through the 1,200+ sounds they include. Each layer works on its own, so you’re free to experiment without locking myself into one texture or idea.
Features:
- 4 Independent Granular Layers
Every layer runs separately with its own sample, grain size, density, rate, and playback direction. Yiz can set one layer to play forward while another reverses or mirrors, which opens up interesting combinations fast.
The control feels direct, and you’re not fighting the interface to get your grains moving the way you hear them. When you want thick, layered textures or something more minimal and clean, having four layers to work with gives you exactly the space you need.
- Spatial Movement & 3D Engine
This is where GrainDust stands out. Each grain can move in 3D space using LFOs, envelopes, or the built-in spatial sequencer. I can watch grains shift around me in the visual display, and that movement actually shows up in the stereo field or in surround formats if I’m working in immersive audio.
For headphone mixes, I can load custom HRTF files or use the included binaural setups. The spatial tools aren’t buried in menus. They’re right there, easy to tweak and hear instantly.
- Deep Modulation System
GrainDust gives me more than just the standard ADSR and LFO. There are eight extra envelopes and LFOs per layer, plus over 15 waveforms and 70 modifiers according to what I’ve read. The modulation matrix lets me route almost anything to anything, and there’s a curve editor for shaping how mods behave over time.
I use this when I want grains that breathe, pulse, or evolve without me drawing in automation. It keeps my patches moving and feeling less static.
- Effects & Filters
There are six filter types and four effect slots with ten different effects to choose from. I can apply filters globally or per layer, and each filter has its own envelope and LFO. The effects include reverb, delay, distortion, bit crush, chorus, flanger, phaser, vibrato, EQ, and an extra filter slot.
I like stacking a bit of distortion on one layer and leaving another clean. It gives me contrast without needing to route things through separate channels in FL Studio.
- Sequencer, Arpeggiator & MPE Support
The 128-step polyphonic sequencer isn’t just for notes. I can sequence spatial parameters too, so my grains move in patterns across the stereo field or 3D space. The arpeggiator has seven modes, and MPE support means I can use expressive controllers to shape each note differently.
Four macro knobs let me map multiple parameters at once for live tweaking. When I’m jamming or building evolving pads, these performance tools keep me engaged instead of just clicking presets.
GrainDust works great for sound design, experimental production, film scoring, and any project where I need textures that feel alive. The 30-day trial gives me enough time to explore before committing.
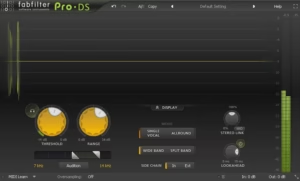
4. Eventide Temperance Pro (Reverb)

Eventide takes a completely different angle on reverb by treating space as something you tune, not just shape.
Instead of adjusting room size or decay curves like most reverbs, Temperance Pro uses modal technology that responds to musical notes. I can pick which pitches bloom inside the reverb tail and which ones stay quiet. That lets me build spaces that feel connected to the harmony of my track instead of just sitting on top of it.
What surprised me most is how much control I have without things getting confusing. I can target early reflections or just the tail, shift the entire resonator field up or down in pitch, and even sequence note changes so the reverb evolves with my chord progressions.
The 29 included spaces cover everything from tight rooms to huge halls to weird synthetic textures I’ve never heard anywhere else.
Features:
- Note Selection & Tempering
Temperance Pro VST lets me choose which notes get emphasized in the reverb using a simple roll interface, or I can pick from scales, chords, and intervals. The Temper control decides how strong that emphasis is, and Range lets me focus on specific octaves.
I also get a Sequencer mode that steps through notes over time, which is wild for evolving pads or leads. There’s even a MIDI mode where I play my keyboard and the reverb follows along in real time.
- Target Select & Modal Shape
The Target Select control is one of my favorite parts. I can apply my note choices to just the early reflections, just the tail, or both. That means I can keep the onset tight and musical while letting the tail drift into something more abstract.
Then there’s Density, which thins out the number of active resonators. Turning it down gives me fractured, lo-fi textures that sound amazing on vocals or synths. Position shifts the balance between early and late reflections, and Offset moves the entire frequency center without changing my audio’s actual pitch.
- Visual Feedback & Workflow Tools
The NoteScape Visualizer shows me which notes are being boosted or cut in real time, and the Spectrum Analyzer maps out the frequency response of every mode. It’s helpful when I’m dialing in something specific or just want to see what’s happening under the hood.
I also get Notes Lock and Mix Lock, so I can browse presets without losing my settings. A/B comparison, undo/redo, and Eco Mode for lighter CPU use round out the workflow. It’s low latency too, so I can track with it active and not worry about lag.
Temperance Pro works best when I want reverb that feels like part of the arrangement, not just an effect. It’s especially useful in genres where harmony matters, like R&B, electronic, and cinematic production.
5. Serato Hex FX (Multi FX)

This one caught my attention the moment I realized how much it could replace in my effects folder. Instead of opening five different plugins to get that glitchy, layered, textured sound I’m after, I can chain everything together in one window and control it all with a single dial.
What makes Hex FX different from other multi-effect plugins is how performance-focused it feels. I can twist the Hex Dial during playback and hear my sound morph in real time, which is perfect for building tension or adding movement to a drop. It doesn’t feel like a static mixing tool. It feels like an instrument.
The 45+ effects cover everything from subtle coloring to full sonic destruction. I’ve used the Half-Time effect on vocal chops, the Pitch Looper on synth leads, and the Vinyl Transform on drums to add texture. The fact that I can reorder up to six effects in a chain and save the whole thing as a preset keeps my workflow fast.
Features:
- Hex Dial Macro Control
This is the feature that makes Hex FX feel alive. I assign multiple parameters across my effect chain to one macro knob, then twist it to morph between clean and crushed, or tight and spacey, all in one motion.
It’s especially useful when I’m automating builds or breakdowns because I only need to automate one knob instead of juggling six different parameters. The way it responds feels smooth and musical, not robotic.
- Performance FX Collection
Hex FX includes effects I don’t find in most plugins. Brakers, Repeaters, and Vinyl Transform are designed for live manipulation and creative performance, not just polishing a mix. I use the Repeater on hi-hats to add stutter fills, and the Half-Time effect on drums when I want that slowed-down, trap-style feel. These effects work great for adding energy and surprise to my beats.
- Effect Chain Flexibility & Randomizer
I can load up to six effects in any order, adjust wet/dry for each one, and save the whole chain as a custom preset. When I’m stuck or looking for happy accidents, the randomizer button gives me new combinations instantly. Some of the randomized chains sound wild, but I’ve found usable ideas I never would’ve built myself. It’s a great way to break out of my usual effect habits.
- 200+ Presets from Professional Producers
Hex FX comes with over 200 factory presets, including signature chains from producers like Disclosure, Jake One, and Decap. I use these as starting points when I want a specific vibe but don’t want to build from scratch.
Even when I don’t use a preset as-is, I’ll open one to see how the chain is built, then tweak it to fit my track. It’s a fast way to learn new effect combinations.
Hex FX is one of those plugins I keep open in almost every project. I reach for it when I want to add character, movement, or chaos to a sound, especially in hip-hop, trap, electronic, and experimental beats where texture and energy matter just as much as melody.
6. VCV Rack 2 (Modular Synth – Paid & Free)

VCV Rack 2 feels less like a plugin and more like a full modular playground inside your computer. If you’ve ever stared at those towering walls of Eurorack gear and felt curious but overwhelmed, this gives you the same creative freedom without the cost or cable mess.
I use VCV Rack when I want sounds that don’t come out of normal synths. The patching workflow pushes me to experiment in ways preset browsers never do. Each session feels like building something from scratch, which can be time-consuming but also deeply rewarding when you land on a texture no one else has.
The free version runs standalone, which works fine if you don’t mind routing audio manually. The Pro version loads inside FL Studio like any other plugin, which makes it way easier to integrate into your actual projects. That alone made Pro worth it for me.
Features:
- Virtual Modular Environment
VCV Rack mimics the Eurorack format, so you get virtual modules with patch cables, CV signals, and gate triggers. I can plug oscillators into filters, route LFOs to anything, and build signal chains that would cost thousands in hardware.
The patching feels intuitive once you understand the basics. I spent my first few hours just connecting things randomly and stumbling into wild sounds I never expected. It’s chaotic at first, but that’s part of the fun.
- Over 2,000 Modules
The module library is massive. VCV ships with 30+ core modules in the free version, and the library has over 2,000 additional modules from developers around the world. Some are free, some are paid, but there’s enough variety to keep me busy for years. I’ve found modules that emulate classic hardware, experimental noise generators, sequencers with unusual timing, and effects I didn’t know existed!
- Pro Version
Plugin Support The Pro version turns VCV Rack into a VST3 plugin that works inside FL Studio. I can load multiple instances, automate up to 1,024 parameters from my DAW, and bounce audio offline without real-time rendering.
It also supports 16 audio outputs and 16 MIDI channels, so I can route different parts of my rack to different mixer tracks. Before Pro, I had to export audio from the standalone version and reimport it, which killed my creative flow. Now I just patch inside FL and keep working.
- Dark Room Mode and Module Organization
Rack 2 added Dark Room Mode, which dims the background and makes long sessions easier on my eyes. I also love the module selection tools. I can group modules together, save those groups, and move entire sections of my patch around without re-cabling everything.
The module browser got a big upgrade too. I can zoom in, mark favorites, and filter by function. It’s not perfect, but it’s way better than scrolling through endless lists.
- Polyphonic Cables
VCV Rack supports up to 16 voices on a single cable, which means I can run full chords through my patches without duplicating everything. Most hardware modulars don’t handle polyphony this smoothly. I use this all the time for pad sounds and chord stabs. One oscillator feeds one filter, but the cable carries all 16 voices at once. It keeps my patches cleaner and my CPU happier!
VCV Rack 2 has a learning curve. You won’t open it and make a track in five minutes. But if you want sounds that feel alive and unpredictable, or if you’re tired of scrolling through presets that everyone else uses, this is the tool that rewards patience.
For producers building complex modular patches, VCV Rack 2 Pro ranks among the most powerful FL Studio plugins for experimental sound design and generative composition.
7. Toontrack EZDrummer 3 (Drums)

EZDrummer 3 works in FL Studio without major issues, which matters if you’re building drum tracks that need to sound real without spending hours programming.
What stands out most is how EZDrummer 3 by Toontrack handles the balance between quick workflow and detailed control. I can drop in a MIDI groove and tweak it right away, or I can route every drum piece to its own mixer channel in FL Studio for full mixing control.
That routing setup gives me the flexibility to process kicks, snares, and cymbals separately, which is important when I’m trying to get drums to sit right in a busy mix.
The core library has enough variety that I’m not reaching for expansions right away. The kits sound natural, the samples respond well to velocity changes, and the room tone doesn’t feel fake. I also like that the MIDI grooves included aren’t just basic loops. They feel like something a real drummer would play, with fills and transitions that actually make sense in a song.
Features:
- Compatibility with FL Studio
EZDrummer 3 wasn’t officially tested for FL Studio, but it works fine for most users. I haven’t run into any major bugs or crashes when using it as a VST. The routing process takes a few extra steps compared to other DAWs, but once it’s set up, everything behaves like it should.
If you’re used to FL Studio’s mixer, the workflow feels natural after the first session.
- Multi-Channel Routing
One of the most useful features is the ability to route each drum piece to its own channel in FL Studio. I can send the kick to channel one, snare to channel two, and so on, then process them all separately with EQ, compression, or whatever else I need.
This is important when I’m trying to shape the drum sound to fit a specific track. It’s also helpful for sidechain setups or when I want more control over the stereo field.
- Core Library and Expansions
The included drum kits cover modern and vintage styles, plus there’s an auxiliary percussion library with tambourines, claps, shakers, and cowbells. The sounds are clean and sit well in a mix without needing a ton of extra work.
I like that the expansions are compatible with Superior Drummer 3, so if I ever need more detail or larger sample libraries, I can move up without starting over. The kits feel like they were recorded in real rooms, not just layered samples with reverb slapped on top.
- MIDI Groove Library
The groove library saves time when I’m stuck or need a starting point. The patterns include variations, fills, and transitions that sound like actual drum performances. I can drag them into FL Studio’s piano roll, chop them up, or layer them with my own programming.
They work well across different genres, and I don’t feel like I’m using the same loop everyone else is using. The grooves also respond to changes in velocity and timing, so they don’t sound robotic when I tweak them.
8. THRaudio VOXGURU (Vocal Chain)

What makes VoxGuru different from other vocal plugins is the modular design. I can rearrange the five main modules by dragging their tabs around, which means I can put saturation before compression or reverb before EQ, whatever my vocal needs. That flexibility keeps me from fighting against a fixed signal path.
The 600+ presets give me solid starting points across different vocal styles. I usually tweak them to fit my track, but they save me from starting with a blank slate every single time.
Features:
- Dynamics Module with Multiple Compression Styles
The dynamics section gives me four compression types: Clean, Analogue, Tube, and Dynamic. I switch between them depending on whether I want transparency or color. The built-in de-esser handles harsh sibilance without needing another plugin.
Attack and release settings include Fast, Slow, and Auto modes, plus there’s auto-makeup gain so I don’t have to manually adjust levels after compression.
- EQ Module with Visual Feedback
The EQ offers four different modes (Classic, Pop, Modern, Vintage) and a 4-band parametric setup with Low, Mid, High, and Air bands. The high-pass filter quickly removes low-end rumble that muddies vocal recordings.
I really appreciate the built-in frequency analyzer because it shows me exactly where problem frequencies sit without guessing.
- Time Module for Space and Depth
This is where I add reverb and delay. Seven reverb algorithms cover everything from tight rooms to massive spaces, with controls for decay, size, diffusion, and damping. The delay syncs to my project tempo and includes ping-pong options.
The ducking feature automatically lowers reverb level when the vocal plays, which keeps my lead vocal clear instead of drowning in effects.
- FX Module with Harmonizer
Six creative effects live here: Doubler, Phone, Chorus, Amplifier, Harmonizer, and Phaser. The harmonizer supports up to two voices and can create thirds, fifths, or sixths above or below the original vocal.
I use the doubler when I need width, the phone effect for lo-fi sections, and the amp sim when I want grit. These tools turn VoxGuru into more than just a mixing plugin.
- Flexible Workflow with Two UI Modes
Simple mode gives me quick access to essential controls when I’m tracking ideas fast. Advanced mode opens up every parameter for detailed mixing work. The drag-to-reorder tabs let me restructure my entire vocal chain in seconds, which helps me experiment with different processing orders until I find what sounds best for each track.
9. ujam STRIIIINGS (Symphonic/Orchestral Strings)

STRIIIINGS simplifies something that usually takes hours of layering and tweaking. Instead of dealing with endless articulations and velocity layers, I get ready-to-play string phrases that already sound like they belong in a film score.
What makes this plugin different is that it’s built around phrases rather than individual notes. I play a chord, and ujam STRIIIINGS instantly gives me a fully arranged string section with movement and expression already baked in.
It’s recorded at Hans Zimmer’s Remote Control Studios, so the quality is way beyond what I’d normally expect from something this easy to use.
The two-layer system lets me control low strings and high strings separately. I can crossfade between them or blend them together, which gives me more control over the texture without needing to load multiple instances.
The Highlighter filter is perfect for creating those rising sweeps that make transitions feel more cinematic.
Features:
- 60 Playing Styles with Phrase-Based Performance
The phrase system is what sold me on STRIIIINGS. I’m not stuck playing individual notes and hoping they sound like a real ensemble. Each style includes pre-recorded phrases like arpeggios, ostinatos, and motifs that respond to the chords I play.
When I need a string line that moves and breathes on its own, I just pick a style and play. The plugin handles the rest, making it feel like I have an actual string section following my lead.
- Dual-Layer String Architecture
Having separate controls for low strings and high strings changes how I approach arrangement. I can emphasize cellos and basses for a darker foundation, then bring in violins and violas for brightness on top.
The crossfade control lets me shift between layers smoothly, which is great for building tension or creating dynamic shifts. It’s way more flexible than a single preset with everything locked together.
- Character and Motion
FX Per Layer Each string layer gets its own Character knob with about 30 different effects, from subtle EQ to heavy distortion. Motion FX adds rhythmic movement like tremolo or vibrato, and I can apply these separately to low and high sections.
This means I can keep my low strings warm and clean while adding grit or pulse to the highs. It opens up a lot of creative options without needing external effects chains.
- Highlighter Filter for Dynamic Movement
The Highlighter knob is basically a 24dB multimode filter designed for risers and intros. I use it constantly when I need a string swell to build into a drop or transition. It’s simple to automate and gives me that cinematic lift without having to layer a bunch of automation on separate parameters. One knob does the job, and it sounds smooth every time.
- Over 200 Presets for Fast Workflow
When I’m working quickly, the preset library saves me. There are realistic orchestral sounds, lush pads, and hybrid textures that lean more toward sound design. I can start with a preset and tweak the layers, effects, and filter to fit my track. It’s a solid starting point whether I’m scoring or just adding atmosphere to a pop or EDM production.
10. Ample Guitar AGM (Acoustic Guitar)

When I need acoustic guitar in a track but don’t have access to a player or mic setup, Ample Guitar AGM saves the day. It’s built around samples of a Martin D-41, which gives it that warm, full-bodied steel-string tone I reach for in folk, singer-songwriter, and pop productions.
What makes Ample Guitar M stand out is how much control it gives me over playing styles. I can switch between finger and pick modes, trigger different articulations like hammer-ons or slides, and even load Guitar Pro tabs directly into the plugin. That last feature is wild because I can drop in a GP file and hear it played back instantly with realistic timing and technique.
The Strummer tool is where things get really practical. Instead of programming every chord stroke by hand, I can define a progression and let AGM generate strumming patterns that actually sound like a guitarist’s hand movement. It responds to velocity and rhythm in ways that feel natural, not robotic.
Features:
- Martin D-41 Steel-String Sampling
AGM captures over 3,800 samples from a Martin D-41 acoustic guitar, recorded in 24-bit quality. The tone sits right in that sweet spot between bright and warm, making it work across genres without sounding too thin or too dark. I use it when I want that classic acoustic sound without the hassle of mic placement or room noise.
- Finger and Pick Playing Modes
I can choose between finger or pick articulation banks depending on the vibe I’m going for.
Fingerstyle gives me softer, more intimate playing, while pick mode brings out brighter attack and clearer note definition. Switching between them mid-project helps me match the energy of different song sections.
- Tab Reader with Guitar Pro Support
This might be my favorite workflow feature. I can import Guitar Pro files from GP3 all the way to GP8 and watch AGM play them back with proper technique. If I’m working with a songwriter who sends tabs, I don’t have to translate notation into MIDI by hand anymore.
It just loads and plays.
- Strummer Engine with Pattern Control
The Strummer lets me program chord progressions and apply realistic strumming patterns without triggering every note manually. I can adjust strum direction, speed, and rhythm feel, and it responds like an actual player would.
It’s perfect when I need quick acoustic backing that still sounds human.
- Adjustable Articulations and Resonance
AGM includes articulations like hammer-ons, pull-offs, slides, palm mutes, and harmonics, all controllable via keyswitches or MIDI CC. The resonance modeling adds that body vibration you get from real acoustic guitars. I tweak these when I want more expression or need the part to sit naturally in a dense mix.
11. PluginBoutique DC Snares (Pro Snares)

DC Snares stands out because it tackles snare design from a completely different angle than most sample libraries.
What caught my attention immediately is how it treats snares as something you build and shape, not just trigger. Created by producer Davide Carbone, this plugin gives me four separate sound slots that I can fill with anything from acoustic hits to orchestral booms to vinyl crackle. I can layer them, tweak each one individually, and end up with snares that feel uniquely mine.
The built-in randomizer has become one of my favorite shortcuts when I’m stuck. It generates new snare combinations on the spot and even names them automatically based on what it created. Sometimes I hit randomize five times in a row just to hear what shows up.
Features:
- 684 Internal Sounds & Layering Engine
DC Snares ships with 684 sounds covering acoustic snares, electronic hits, cinematic textures, rims, claps, and more. I can load up to four of these into separate slots and blend them together.
Each slot works independently, so I can pitch one layer down, reverse another, and keep the third untouched. It’s the fastest way I’ve found to build snares that sit perfectly in a mix without hunting through folders of samples.
- 12 Custom FX Modules
The effects in DC Snares are built specifically for percussive sound design. There’s a Sizzler that mimics room rattle, a Transient Shaper for attack control, plus EQ, compression, saturation, and a resonator
. Each of the four sound slots can hold six insert effects, and there are master sends for reverb and delay. I use the Transient Shaper constantly to make snares punch harder or sit back in the mix depending on the track.
- Pitch & Amp Envelopes with Real-Time Waveform Display
Every layer in DC Snares has its own pitch and amplitude envelope. I can shape the start and end points, adjust decay, or reverse the sample entirely.
What makes this really useful is the real-time waveform display that updates as I tweak things. I can see exactly how my envelope changes affect the sound, which keeps me from guessing or toggling back and forth to hear tiny adjustments.
- Built-In Sequencer Engine
The sequencer lets me program snare rolls, play chromatically, or trigger pitch-able triplets without leaving the plugin. It’s great for live performance or when I want to sketch out a rhythmic idea quickly. I’ve used it to create drum fills and percussive sequences that would’ve taken way longer to program by hand in FL Studio’s piano roll.
- Modulation & Routing Options
DC Snares includes four modulation envelopes that I can assign to almost any parameter. I can route each sound slot through different FX chains, adjust gain and panning, and control how everything blends at the master stage. The flexibility here is what keeps me coming back. I can go as simple or as deep as the track needs without hitting any walls.
12. Sonic Academy KICK 3 (Pro Kick)

Instead of digging through hundreds of kick samples hoping one fits, with Kick 3 plugin I can now design exactly what I need from scratch or rebuild any kick I already love.
What hooked me right away is how visual everything is. I see every part of the kick laid out in front of me: the sub, the click, the pitch curve, the decay. When I tweak the envelope or add harmonics, I watch the waveform change in real time. It makes sound design feel less mysterious and more like sculpting.
The AI import feature is something I use constantly. I’ll drag in a kick from a reference track or a sample pack, and KICK 3 analyzes it and rebuilds it as a synth layer I can edit. That means I can take any kick I like and make it punchier, deeper, or tuned to my track’s key without losing the character I wanted in the first place.
Features:
- Five-Layer Sound Design
KICK 3 gives me up to five layers per kick, and each one can be either a synth sub or a sample click. This layering system is what lets me build kicks that have both weight and definition.
I’ll usually start with a deep sub layer, then add a punchy click on top, and maybe throw in a third layer with some mid-range texture. Being able to balance all five independently means I can shape the kick to fit any mix without it getting buried or muddy.
- AI Sample Import & Analysis
This is the feature that sold me. I drag any kick sample into the plugin, and KICK 3 breaks it down and recreates it using synthesis. Now I have full control over pitch, decay, and harmonics, even if the original sample was just a static audio file.
I’ve used this to rebuild kicks from tracks I reference, and it’s become one of my favorite shortcuts for getting professional low-end fast.
- Harmonics Generator
I can add up to nine harmonics to the sub layer, and each one can be tuned and shaped separately. This is how I add warmth or grit to a kick without making it sound overprocessed. When I want a kick that feels fuller in the low-mids or has a bit of edge, I’ll dial in a couple of harmonics and adjust their decay. It’s a simple way to make a kick feel richer without layering more samples.
- Dual FX Buses + Master Bus
KICK 3 has two FX buses plus a master section, and each bus has two effect slots. I can load distortion, compression, reverb, delay, filtering, even stuff like ring mod or the “Brassify” effect for harmonic coloring.
Having 15 effect types built in means I don’t need to route the kick through a bunch of external plugins just to add character. I shape the entire sound inside KICK 3, which keeps my workflow clean and my CPU happy.
- Drum Replacement Mode
I’ve used this feature to replace weak kicks in recorded drum loops or live takes. KICK 3 listens to incoming audio, detects transients based on a threshold I set, and triggers my custom kick in sync with the original. It’s been useful when I’m working with live drum recordings that need more low-end punch, or when I want to swap out a kick in a loop without chopping and resampling.
13. Minimal Audio Rift 2 (Distortion)

Rift 2 caught my attention because it doesn’t just add grit. It lets me shape distortion in ways that feel more like sound design than a quick saturation trick.
What makes this plugin stand out is how flexible it is with distortion and modulation. I can push 808s into warm saturation, wreck drums with feedback, or turn synths into evolving textures that move on their own. It’s one of those plugins where I keep finding new sounds every time I open it.
The interface gives me two modes. Play View keeps things simple when I’m working fast. Advanced View opens up everything, which can look busy at first, but it’s worth learning.
Features:
- Bipolar Distortion Engine
Rift uses a unique engine that treats different parts of the waveform separately. That means I can get distortion that sounds more complex and musical compared to basic saturation plugins. It gives me textures that feel alive instead of flat, especially when I’m working with bass or leads. I’ve pulled off some really interesting harmonic movement just by tweaking the distortion type and blend.
- 30 Distortion Algorithms
I get 30 different distortion types to choose from, including wave shapers, bit crushers, and fold-back effects. Each one has its own character, so I’m not stuck with one flavor.
When I want crispy highs on drums or warm thickness on vocals, I can dial in exactly what fits. Sometimes I combine multiple algorithms across different stages to build layered sounds that wouldn’t be possible with a single-mode distortion.
- Tunable Feedback Engine
The feedback control is where things get creative. I can tune the feedback to musical notes or sync it to my project tempo, which turns it into a rhythmic or tonal effect. It’s not just noise, it’s something I can actually compose with.
When I’m designing pads or experimental sounds, this feature gives me animated movement that feels intentional. The ping-pong stereo mode makes it even wider and more interesting in the mix.
- Morphing Filters & Multi-Band Processing
Rift includes 24 filter types that can morph and shift, plus I can route everything through a multi-band crossover. That means I can distort only the highs while leaving the bass clean, or add feedback to the mids without muddying the low end.
It’s perfect when I need control over what frequencies get affected. I use this all the time on drums and synths where I want aggression without losing clarity.
- Curve Sequencer Modulation
The modulation system lets me draw curves and assign them to almost any parameter. I can create moving filter sweeps, evolving distortion levels, or rhythmic feedback patterns that change over time.
The randomization feature helps me discover new variations without starting from scratch. It keeps my sounds dynamic and less static, which is exactly what I need in electronic tracks where energy and movement matter.
Rift 2 is one of those plugins that works just as well for subtle warmth as it does for total destruction. I reach for it when I want distortion that does more than just add drive.
14. Beatsurfing RANDOM (Sub Generator)

RANDOM has this weird pull to it that’s hard to explain until you actually open it up and start twisting things. It’s not your typical bass synth or even a normal subtractive plugin. It feels more like a sound experiment that somehow got packaged into something usable.
I would recommend RANDOM when you want textures that feel alive and unpredictable. The core idea is that you’re not just adjusting filters and oscillators. You’re moving through sound states using an X-Y field and letting the plugin morph between totally different timbres in real time. Some of the results are harsh and metallic. Others feel weirdly organic, almost liquid.
The interface centers around this “RANDOM WHEEL” that switches between two different engines, a synth mode and a resonator mode. Each one behaves completely differently, and the wheel itself acts like a gateway to exploring new sonic territory. I’ve pulled up presets that sounded like broken machinery, then moved the wheel slightly and ended up with something warm and almost melodic.
Features:
- Synth & Resonator Engine Modes
RANDOM gives you two separate sound engines that you switch between using the Random Wheel. The synth engine works more like a traditional tone generator, but the resonator engine is where things get interesting.
It uses feedback loops and modulated delay lines to create complex, evolving textures that feel more like sound design than synthesis. I use the resonator mode when I want something that shifts and breathes on its own.
- Matter Tables & X-Y Morphing
The plugin uses these “matter tables” that let you morph sound across a two-dimensional field. You drag a point around the X-Y grid and the tone changes in ways that feel almost unpredictable.
It’s based on some kind of neural network behavior that makes the transitions smooth but never boring. I’ve spent entire sessions just dragging that cursor around and recording the results because every movement gives you something different.
- Deviance & Random Wheel Control
The Deviance knob controls how much randomization happens when you spin the wheel or load a new preset. Low deviance keeps things closer to what you started with. High deviance throws you into completely new territory. I like setting it somewhere in the middle when I want controlled chaos, enough surprise to keep things fresh but not so much that I lose the vibe I’m working toward.
- STRESS, SPIKE, BLEED & FLUID Controls
These four controls shape the character of your sound in really specific ways. STRESS adjusts the decay and length of the synth engine, which is great for making short plucks or stretched-out drones. SPIKE adds aggression and brightness, pushing the tone from warm to sharp.
BLEED and FLUID affect the resonator, controlling how much the sound spills over into itself and how fluid the texture feels. These controls give you a lot of range without needing to dig through menus.
- Eight Modulated Delay Lines
RANDOM has eight delay lines built into the resonator engine, and they’re all modulated independently. This creates dense, layered textures that feel thick and immersive.
When you combine the delays with the feedback loops, you get sounds that shift and evolve in ways that feel almost alive. I use this when I want bass tones that don’t just sit there but move and change throughout the track.
15. IK Multimedia MODO Bass 2 (Bass Guitar Collection)

What makes MODO Bass 2 plugin different is that it doesn’t use samples at all. Instead, it uses physical modeling to create bass sounds from scratch by recreating how strings vibrate, how pickups capture that sound, and how your playing style changes the tone.
This approach gives you control over details that sample libraries can’t touch. You can change string gauge, swap pickups, convert any bass to fretless, or even turn a 4-string into a 6-string. The 22 bass models cover everything from vintage Precision and Jazz basses to upright double basses, and each one responds like the real thing.
I keep coming back to MODO Bass 2 because it saves me from programming stiff MIDI bass lines. The new Patterns section has thousands of professionally played grooves I can drop in and tweak, which speeds up my workflow when I need a realistic bass part fast.
Features:
- Physically Modeled Bass Instruments
As mentioned, MODO Bass 2 includes 22 different bass models, with 8 new additions in this version. You get classic electric basses, two fretless options, and two upright basses for jazz and rockabilly styles. Every bass is built using modal synthesis that models string behavior, body resonance, and pickup response in real time.
This means the tone reacts naturally to how you play, not just what notes you play.
- Realistic Playing Style Controls
The Playstyle section lets me choose between finger, pick, and slap techniques, then adjust attack strength, articulation, and dynamics. These aren’t just different samples. The modeling engine actually changes how the strings respond based on my playing choice.
When I switch from fingerstyle to pick, the tone gets brighter and more aggressive without loading a different instrument. It feels more like playing a real bass than triggering audio clips.
- Built-In Patterns Browser
This is my favorite part. The Patterns section gives me access to thousands of bass grooves played by real session bassists. I can filter by genre, time signature, playing style, or song section to find exactly what fits my track.
Once I find a pattern I like, I can drag it into my DAW and edit it. It’s perfect when I need authentic bass movement but don’t want to spend an hour programming velocity and timing by hand.
- Deep Tone Shaping & Effects
Rig MODO Bass 2 includes a full signal chain with seven stompbox slots, amp simulation (valve or solid-state), and cabinet modeling. For upright basses, I can blend room mics, adjust piezo pickup levels, and shape the acoustic space.
The fretless conversion feature works on any bass model and adds realistic fretless character with natural sliding and mwah. All this tone control happens before the signal even hits my DAW, which keeps my routing simple.
It works well for producers who want realistic bass without the hassle of recording live takes or managing huge sample libraries. It’s light on disk space, flexible with tone, and the Patterns feature makes it easy to write bass lines that actually groove.
16. Arturia B-3 V (Organ)

What makes B-3 V different from most organ plugins is that it doesn’t use samples at all. Arturia built this one using physical modeling, which means every sound gets constructed in real time based on how the original Hammond worked.
I can push the drawbars, crank the Leslie speaker, and overdrive the preamp just like the real thing. But I also get modern tools like LFOs, step sequencers, and a full effects chain that weren’t possible on a 400-pound vintage organ.
The tone feels alive. There’s key click, tonewheel leakage, and harmonic percussion that responds the way a real B-3 does. When I need anything from church gospel to gritty rock leads, this plugin covers it without sounding flat or digital.
Features:
- Physical Modeling Engine (TAE®)
B-3 V uses Arturia’s TAE technology to model the tonewheels, drawbars, and even the little imperfections that give a Hammond its character. Instead of loading gigabytes of samples, the plugin builds the sound from scratch. That means I get a more flexible, responsive instrument that reacts to how I play. The tone stays clear even when I’m layering effects or pushing the preamp into overdrive.
- Dual Manuals with 9 Drawbars Each
Just like the original, B-3 V gives me two full keyboards with nine drawbars on each. I can mix harmonic content on the fly and shape the tone in real time. The drawbars respond smoothly, and I can save different setups as presets. It’s perfect for building anything from soft jazz pads to punchy lead lines that cut through a mix.
- Rotary Speaker and Preamp Drive
The Leslie speaker emulation is one of my favorite parts. I can switch between slow chorale mode, fast tremolo, and stop, and it all sounds convincing. The tube preamp adds warmth and grit when I need it. Together, they give me that classic swirling, overdriven organ sound that works great in rock, soul, and R&B tracks.
- Drawbar Modulator and Sound Design Tools
This is where B-3 V goes beyond the hardware. I can use LFOs, envelopes, and even a step sequencer to modulate the drawbars automatically. It opens up sound design possibilities that weren’t available on the original organ. When I want movement, texture, or something more experimental, these tools let me get creative without needing external plugins.
- Built-In Effects Chain
B-3 V includes reverb, chorus, wah, delay, compression, and more, all inside the plugin. I don’t need to route it through a bunch of other effects to get a polished sound. The effects feel natural and work well with the organ tone. Whether I’m going for a clean church sound or a heavy rock vibe, I can dial it in fast.
17. Surge XT

What surprised me most about Surge XT wasn’t that it’s free. It was that this synth genuinely competes with paid options I’ve used for years.
Surge XT is an open-source hybrid synthesizer that handles wavetable, FM, virtual analog, and even physical modeling synthesis. The sheer range of sounds I can pull from it is kind of wild. I’ve made everything from warm analog pads to razor-sharp digital leads without ever feeling limited by the engine.
It comes with over 2,700 presets out of the box, which gives me a huge head start when I’m sketching ideas. The sounds lean toward the “synth-y” side, but that’s exactly what I need when I’m working on electronic music or sound design.
Features:
- Dual Scene Architecture
Surge XT lets me stack two independent synth layers in one patch. Each scene has its own oscillators, filters, and effects, so I can build complex textures or split sounds across my keyboard. I use this feature constantly when I want thick pads or layered leads that feel full without loading multiple plugin instances. It saves CPU and keeps my project organized.
- 12 Oscillator Types & Deep Modulation
I get 12 different oscillator algorithms to choose from, including classic analog waveforms, wavetables, FM operators, and even a Karplus-Strong string model. Each oscillator supports up to 16-voice unison, which is perfect for wide, detuned sounds.
The modulation system is where Surge XT really flexes. I have access to 12 LFOs, multi-segment envelope generators with up to 128 nodes, and even a formula modulator that uses Lua scripting. I can route modulation to almost any parameter, which opens up movement and expression I don’t get in simpler synths.
- Effect Slots with Effect Types
It gives me 16 effect slots split across scene inserts, sends, and global slots. The 27 effect types include EQs, distortion, chorus, flanger, phaser, reverb, delay, vocoder, and even the full AirWindows collection. I love that I can shape and finish sounds inside the plugin without reaching for external effects. It keeps my workflow fast and my ideas focused.
- MPE & Microtuning Support
Surge XT supports MPE and microtuning via Scala and MTS-ESP, which is rare for a free plugin. I don’t use these features every day, but when I want expressive control or experimental tunings, it’s nice to know they’re built in.
It’s one of those plugins I keep coming back to because it doesn’t feel like a compromise. It’s free, it’s deep, and it sounds professional.
18. Waves StudioRack

What hooked me about StudioRack is how much smarter my mixing feels when I group plugins together instead of scattering them across ten insert slots. It’s free, which actually blew my mind the first time I downloaded it. It works as a proper plugin chainer that keeps everything organized in one window.
I started using it to build quick channel strips, EQ into compression into saturation, but then I realized it does way more. The macro controls let you link knobs from different plugins to one master dial, so you can shape an entire vocal sound with just a couple of moves. This makes StudioRack one of those essential FL Studio plugins that improves your entire mixing workflow, not just one specific task. That kind of control saves you so much time when you are bouncing between tracks in FL Studio.
StudioRack also handles third-party VST3 plugins now, which means you are not stuck using only Waves stuff. You can combine my favorite Waves EQ with a compressor from another brand and save the whole chain as a single preset. That flexibility chang how you build your mix templates.
Features:
- Plugin Chain Management
I can load up to 8 plugins in one StudioRack instance and treat the whole thing like a single effect. Every chain I build can be saved and recalled instantly, which makes it easy to reuse my go-to vocal or drum bus setups across different projects. I love not having to rebuild the same processing chains every single session.
- Macro Control Mapping
This is where StudioRack really shines for me. I can map up to 8 macros per chain, and each macro can control multiple parameters across different plugins at once. For example, I’ll link an EQ boost, a compressor threshold, and a saturation drive to one knob, then tweak the entire character of a sound with a single move. It feels like I’m designing my own custom effect.
- Parallel & Multiband Processing
StudioRack lets me split my signal into parallel paths or multiband sections without messy routing. I use parallel racks all the time for things like New York compression, where I blend heavy squashed drums with the dry signal.
The multiband split is perfect when I want different processing on lows versus highs, like saturating the bass without touching the mids. Both options live right inside the plugin, so my mixer stays clean.
- Third-Party Plugin Hosting
Since the V14 update, I can drop in VST3 plugins from any developer I want. That means I’m not locked into the Waves ecosystem, I can mix and match tools however I like. I’ll combine a Waves CLA-2A with a third-party reverb and save the whole thing as one preset. It makes StudioRack feel more like a true hub for my entire plugin collection.
- Preset Library & Professional Chains
StudioRack ships with over 170 chain presets made by pros like Tony Maserati. I browse these when I need a starting point or want to see how top engineers stack their plugins. Even if I don’t use them exactly as-is, they’re great for learning how to structure my own chains. I’ve built some of my favorite vocal chains by tweaking one of these presets and then saving my own version.
19. Matt Tytel Vital

Vital stands out because it’s a professional wavetable synth that you can download for free and still get incredible results.
I remember opening Vital for the first time and being blown away by how much visual feedback it gives you while you’re designing sounds. Every knob twist, every modulation change shows up on screen in real time with animated waveforms and spectrograms. It made learning sound design feel way less confusing because I could actually see what my tweaks were doing to the sound.
The spectral warping tools take wavetable synthesis beyond simple morphing. I can stretch harmonics, smear frequencies, or completely randomize the overtone structure of a wavetable. That freedom opens up textures I’ve never heard in other synths, especially for pads and evolving leads.
Features:
- Spectral Warping Engine
Vital’s spectral warping is what makes it different from other wavetable synths. I can grab the harmonic content of a wavetable and stretch it, skew it, or smear it in ways that create completely new timbres.
This goes way beyond just scanning through wavetable positions. When I’m designing bass sounds or atmospheric textures, these warp controls give me movement and complexity that feels alive. It’s one of those features I didn’t know I needed until I started using it, and now I can’t imagine going back.
- Drag-and-Drop Modulation System
Setting up modulation in Vital is as simple as dragging a line from an LFO or envelope to any knob I want to control. The visual routing makes it easy to see what’s modulating what, and I can preview how the modulation will sound before I commit.
I love that I can use up to 8 LFOs, 6 envelopes, and even apply audio-rate modulation for FM-style complexity. The mod remap tool lets me reshape modulation curves, so I can make subtle tweaks or wild changes depending on the sound I’m after.
- Real-Time Visual Feedback
Every time I adjust an oscillator, filter, or effect in Vital, the interface shows me exactly what’s happening. The animated waveforms, oscilloscope, and spectrogram update instantly as I tweak parameters.
This visual layer helped me understand sound design faster than any tutorial could. When I’m building a synth lead or layering pads, being able to see the harmonic content and modulation changes keeps me focused and speeds up my workflow.
- Three Oscillators Plus Sampler
Vital gives me three wavetable oscillators and a sampler module to work with. Each oscillator can be routed to different filters or effects, and I can even use FM and ring modulation between them.
The wavetable editor lets me build custom wavetables from scratch or import my own samples. I’ve spent hours just experimenting with different oscillator combinations and routing options. The sampler is great for adding one-shots or textures on top of the wavetable layers, giving me even more creative options in a single patch.
- Built-In Effects and Filters
The effects section in Vital covers everything I need without reaching for external plugins. I get chorus, delay, distortion, phaser, reverb, EQ, and even a multiband compressor, all inside the synth.
The two independent filters per voice offer tons of modes and can be blended smoothly. What I really appreciate is that every effect parameter can be modulated just like the oscillators. I can automate filter cutoffs, delay feedback, or reverb mix using LFOs and envelopes, which makes my patches feel dynamic and alive.
Vital works as a VST, VST3, AU, and standalone app on Mac, Windows, and Linux. The free version gives you a solid sound engine and enough presets to start making music right away. Upgrading to Plus or Pro unlocks more wavetables, presets, and some advanced features, but the free tier is already powerful enough for serious production work.
20. Caelum Audio Tape Cassette 2

What makes Tape Cassette 2 stand out is how it nails that worn-out cassette deck sound without costing anything. Most tape plugins chase expensive studio reels, but this one goes straight for the imperfect warmth of old cassettes.
I use this when I want my tracks to feel nostalgic or slightly broken in the best way. The plugin adds real character through noise, wobble, and saturation that actually sounds like it came from a Type I cassette. It’s perfect for lo-fi beats, indie textures, or just warming up digital sounds that feel too clean.
What surprised me most is how far I can push it. The saturation doesn’t just add subtle color. When I crank it up with the oversampling turned on, it gives me aggressive distortion that still sounds musical.
Features:
- Type I Cassette Impulse Response
This IR captures the actual frequency response of a real cassette deck. When I flip it on, my tracks instantly lose that brittle digital edge and pick up the rounded, slightly muffled tone of tape. It’s not dramatic, but it makes everything sit together in a way that feels more human. I reach for this when I want tracks to sound like they’re playing through an old boombox.
- Dynamic Saturation Engine
The saturation here uses hysteresis modeling, which means it responds differently depending on how hard you hit it. I can dial it anywhere from ±24 dB, and the plugin reacts like real tape, adding warmth at lower levels and grit when pushed.
The oversampling options up to 16× keep things clean even when I’m driving the input hot. This is my go-to for adding weight to thin synths or making vocals feel warmer without muddying them.
- Wow and Flutter Controls
These separate controls let me add pitch instability from 0 to 100%. Wow gives slow wavering, flutter adds faster warble. When I use both together lightly, it creates movement that makes static sounds feel alive. Push them harder and things start sounding delightfully broken.
I love using this on pads and ambient textures where a little instability adds emotion.
- Real Sampled Tape Noise
The noise comes from actual Type I cassette recordings, not synthesized hiss. I can blend it in from –80 dB all the way to 0 dB. Even a tiny amount makes digital recordings feel more lived-in. When I’m making lo-fi tracks, I push this higher to get that classic tape hiss that glues everything together. It’s especially good on the master bus for an overall vintage vibe.
- Low-Pass Filter & VU Meters
The filter rolls off highs from 5 kHz to 22 kHz, mimicking how cassettes lose top end over time. I use this to tame harsh cymbals or make modern samples sit better in retro mixes. The VU meters help me watch my levels, especially when I’m stacking saturation.
The auto-gain feature keeps my output consistent, which saves me from constant level adjustments.
21. Steinberg Taped Vibes

Taped Vibes is a free electric piano plugin from Steinberg that runs inside HALion or HALion Sonic. It’s based on a Wurlitzer 200A that was sampled three different ways: clean DI, through a Roland Space Echo tape loop, and through a vintage preamp.
I like how this gives me three distinct tones in one instrument. The DI version sounds smooth and classic. The tape-processed version brings in that warm, wobbly character with subtle dropouts. The preamp path adds grit and crunch when I want something more aggressive.
The plugin works great for lofi, soul, jazz, and R&B tracks where I need that buttery electric piano sound. It’s also solid for adding texture to pop and electronic music.
Features:
- Three Sampled Signal Chains
This is what makes Taped Vibes different from basic electric piano plugins. I can blend between the clean DI recording, the Space Echo tape version, and the vintage preamp sound. Each one has its own vibe. The tape version gives me that nostalgic warmth with tape saturation and wobble. The preamp adds overdrive and character when I push it.
- Built-In Effects Section
The effects inside Taped Vibes include modulation options like chorus, flanger, and phaser. There’s also delay and reverb for creating ambient or spacey sounds. I use these to shape the tone without loading external plugins.
- Randomizer Function
When I hit the randomizer, it changes all the main settings at once. This creates instant new presets and helps me find inspiration fast. Sometimes the results are wild and need tweaking, but it’s a quick way to break out of using the same sounds.
- Character Control
The Character knob lets me adjust how much vibe and texture the plugin adds. It blends the different sampled paths together so I can dial in the exact tone I want.
Taped Vibes requires HALion 7 or HALion Sonic 7 to run. It works on both Windows and Mac in VST3, AU, and AAX formats. The library size is around 430 MB.
22. Waves Free Plugin Pack (Plugin Bundle)

Image Credit: Waves
What really surprised me about the Waves Free Plugin Pack is how complete it feels for something you pay nothing for. Most free bundles give you demos or basic tools, but this one hands you seven solid plugins that top engineers actually use. You get saturation, compression, EQ, reverb, a synth, and even guitar amp modeling all in one download.
I like that Waves isn’t holding back features or locking you into upgrades later. These are full versions with free updates included. Once you register with your Waves account, the whole pack is yours to keep.
The variety here covers a lot of ground. If I need warmth on a vocal, I’ll reach for Lil Tube. When I want realistic space, IR Live’s convolution reverb delivers. AudioTrack works great as a quick channel strip when I don’t want to load three separate plugins. Flow Motion gives me FM synthesis for weird textures and pads, and GTR Solo adds grit to almost anything I run through it.
Features:
- Lil Tube (Analog Saturation)
This one became my quick fix for adding warmth without much effort. I just dial in a bit of tube saturation and suddenly drums sound fuller, bass sits better in the mix, and vocals get that nice analog character. It’s simple but effective, especially when stock plugins feel too clean or digital.
- IR Live Convolution Reverb
IR Live uses real recordings of actual spaces to create reverb, which makes tracks feel like they were recorded in a real room or hall. I use this when I want natural-sounding ambience instead of the obvious digital reverb you hear everywhere. It’s perfect for adding depth to vocals or creating space around instruments without washing out the mix.
- V-EQ3 & V-Comp (Vintage Processing)
These two give me that classic console sound without spending thousands on hardware. V-EQ3 is a three-band EQ modeled after old analog desks, so it sounds musical even when you push it. V-Comp is based on Neve-style compression and handles everything smoothly. I use both when I want character and color, not just clean correction.
- AudioTrack (All-in-One Channel Strip)
AudioTrack combines EQ, compression, and a gate in one window, which saves me time when I’m working fast. Instead of loading multiple plugins on every track, I open this and shape the sound in one place. It’s great for quick mixing sessions or when I need to process a bunch of tracks without slowing down my workflow.
- Flow Motion (FM Synth)
Flow Motion is a hybrid FM synth that lets me create sounds I can’t get from sample-based instruments. I use it for weird textures, evolving pads, sharp leads, and anything that needs movement or grit. The modulation options give me plenty of room to experiment, and it’s become my go-to when I want something unusual in a track.
Frequently Asked Questions
People often ask about specific plugins for melody work, free instruments that work well in FL Studio, how to find quality plugin bundles without spending money, and what tools popular producers actually use when making beats.
What are some must-have plugins for producing melodies in FL Studio?
Minimal Audio Current 2 sits at the top of my melody workflow because it gives me wavetable control that feels both powerful and musical. The sound design options run deep, but I never feel lost trying to dial in a lead or pad sound. When I need melodies that cut through dense arrangements, Current 2 delivers clarity without sounding harsh or digital.
VCV Rack 2 completely changed how I approach melodic experimentation. It’s a modular environment that runs as a plugin, which means I can patch together custom synthesizer chains without buying hardware. The learning curve exists, but once I understood basic signal flow, I started creating melodic textures I couldn’t get anywhere else.
Kontakt 8 became essential once I realized how many high-quality instrument libraries run on it. I use it for realistic strings, pianos, ethnic instruments, and detailed orchestral sounds that bring emotional depth to my melodies. The browser improvements in version 8 make finding the right sound much faster than before.
Key Features:
- Wavetable Flexibility in Current 2:
I can morph between different waveforms in real time, which creates evolving melodic lines that never sound static. The modulation routing feels intuitive once you spend time with it.
- Modular Routing in VCV Rack 2:
Building custom signal paths lets me design melodic generators that react in unexpected ways. I’ve created self-playing melody systems that inspire new musical directions.
- Massive Library Support in Kontakt 8:
Having access to thousands of sampled instruments means I’m never stuck with basic synth sounds when my melody needs organic character.
- Visual Feedback:
All three plugins show me what’s happening to my sound through clear visual displays
Which free instruments VSTs are favored by the FL Studio community?
The FL Studio community loves FLEX, which comes bundled with the software. It handles everything from simple bass tones to complex pad textures without requiring additional downloads.
Vital is a king of freebies. It gets mentioned in every FL Studio forum I visit. It’s completely free and provide amazing value. I’ve made entire tracks using only Vital for all my melodic and bass elements.
Spitfire LABS gives the community access to professionally recorded instrument samples without any cost. Each instrument pack focuses on a specific sound, like soft piano, strings, or atmospheric pads. I grab new LABS releases whenever Spitfire drops them because they always add something useful to my palette.
Key Features:
- Built-in FLEX Integration:
Since FLEX ships with FL Studio, it already works perfectly with the DAW’s workflow. I don’t waste time troubleshooting compatibility issues.
- Vital’s Wavetable Engine:
The visual wavetable editor shows me exactly what’s happening to my sound as I manipulate it. Modulation options rival synths that cost hundreds of dollars.
- LABS Instant Inspiration:
Each LABS instrument loads with a distinct character already dialed in. I can open one and start writing immediately without spending twenty minutes on sound design.
- Zero Cost Barrier:
None of these instruments require payment, which makes them perfect for producers just starting out or anyone working on a tight budget.
- Active Community Support:
Popular free plugins have huge user bases, which means I can find tutorials, presets, and troubleshooting help whenever I need it.
These free FL Studio plugins prove that you don’t need a massive budget to create professional-sounding productions – just smart tool choices and good workflow habits.
Which plugins do prominent artists typically use when creating tracks in FL Studio?
Most professional producers combine FL Studio’s native tools with a few key third-party plugins. I’ve noticed that Kontakt 8 appears in almost every professional setup because it hosts the high-end sample libraries that big-budget productions require. When I hear realistic orchestral elements or detailed ethnic instruments in major releases, Kontakt usually powered those sounds.
Reverb plugins like Eventide Temperance Pro show up frequently in professional chains. The spatial quality it creates goes beyond what stock reverbs deliver. I hear its character in polished pop and electronic productions where the reverb tail needs to sound expensive without washing out the mix.
Granular processors like GrainDust help producers create signature textures that make their sound recognizable. When I listen to forward-thinking electronic music, those glitchy, time-stretched, cloud-like textures often come from granular synthesis. It’s become a defining sound in experimental hip-hop and ambient electronic music.
Hello, I’m Viliam, I started this audio plugin focused blog to keep you updated on the latest trends, news and everything plugin related. I’ll put the most emphasis on the topics covering best VST, AU and AAX plugins. If you find some great plugin suggestions for us to include on our site, feel free to let me know, so I can take a look!