Sound design plugins have become some of the most valuable tools in modern music production. They let you shape, twist, and completely transform sounds in ways that were impossible just a few years ago. Whether you’re building textures for electronic music, creating vocal effects, or designing something totally new, the right plugin can turn a simple idea into something unique.
The best plugins for sound designers combine creative effects, synthesis tools, and processing chains that push your audio beyond traditional mixing and into full sonic experimentation.
I’ve spent time with dozens of these tools, and the ones that made this list all share something important: they help you find sounds you didn’t know you were looking for. Some focus on granular manipulation, others on modulation and morphing, and a few bring completely fresh approaches like AI-powered transformations or modal filtering.
This collection covers synthesizers that let you build from scratch, effect processors that reshape existing audio, and hybrid tools that blur the line between the two. You’ll find options for distortion that works differently than anything you’ve used, vocoders that feel modern, frequency shifters, ring modulators, and even a drum synth built around metal percussion.
I’ve also included a free option so you can start exploring without spending anything. Each tool here opens up a different creative path, and together they give you a solid foundation for any sound design challenge you run into.
1. Polyverse Supermodal (Modal Filter & Resonator)
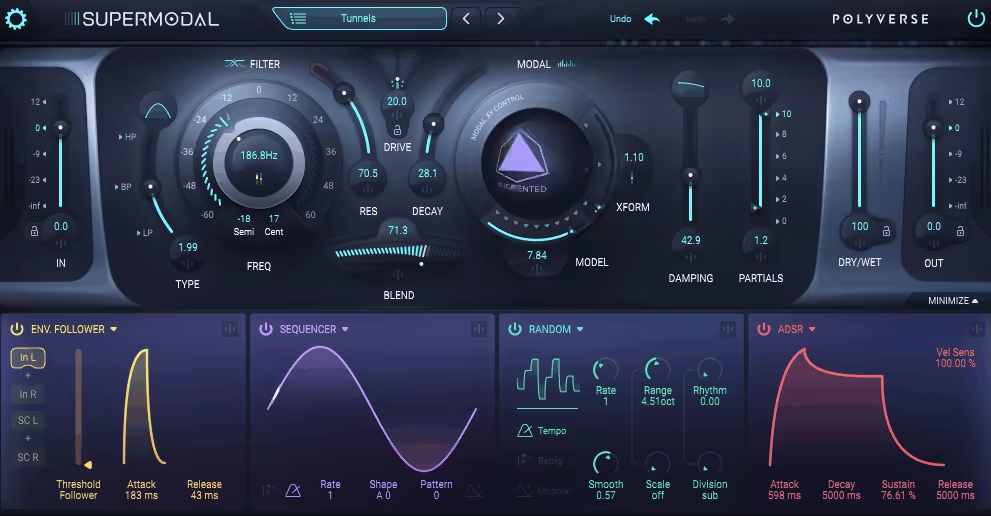
If you’ve ever wanted a filter that doesn’t just cut frequencies but actually reshapes your sounds into something musical, Supermodal is what you’re looking for.
What makes this plugin different is its modal filter engine. Instead of just filtering audio the normal way, it uses hundreds of precise bandpass filters to model how real objects resonate when they vibrate. You can make drums sound like bells, turn white noise into vocal formants, or transform a basic synth pad into something that feels physical and alive.
I use Supermodal when I need sounds to break out of their usual character. The dual-filter setup gives you a classic state-variable filter on one side and the modal resonator on the other, and you can blend between them however you want. That blend control is honestly one of my favorite parts because it lets you add just a hint of body or go completely wild with the effect.
Features:
- 27 Modal Resonator Modes
Supermodal gives you 9 models with 3 variations each, covering everything from vocal sounds to metallic textures to mathematically modeled resonances.
I’ve used the vocal formants to add human-like qualities to pads, and the bell modes work great when you want percussive loops to carry a melody. You get flangers, phasers, physical body simulations, and even abstract waveform resonators all in one place.
- State-Variable Filter with Drive
The SVF side smoothly morphs between low-pass, band-pass, and high-pass while adding warm nonlinear drive. When you push the resonance past 100%, it self-oscillates and becomes a tone generator on its own. I like using this in parallel with the modal side because you can keep some of the original filtering character while the resonator does its thing. The drive adds fatness without sounding digital or harsh.
- Deep Modulation System
You get 4 modulation slots with sources like ADSR envelopes, step sequencers, random generators, and envelope followers. What’s cool is you can cross-modulate, meaning one modulator can affect another. The animated XY morph pad is where things get really fun because you can modulate that movement and watch your sound evolve in real time
2. Serum 2 (Design Anything You Want)

I feel a bit awkward always including Serum 2 in every list, but honestly, not having Serum 2 in best sound desing plugins? That would be a huge mistake. Serum 2 isn’t just for creating sounds – you can design entire tracks from scratch, including drums. And yes, nobody will have a clue that those drums came from Serum 2. That’s just how powerful and versatile it is.
Serum 2 takes everything producers loved about the original and blasts it into another dimension. I’m talking about real sonic freedom here. You get five different oscillator types now, including wavetable, multisample, sample, granular, and spectral engines all under one roof.
What grabs me most is how natural it feels to jump between these engines. One minute I’m sculpting a classic wavetable lead, the next I’m loading SFZ multisamples for realistic piano textures or using the granular engine with up to 256 grains per voice to build evolving cinematic pads. It’s rare to find this much variety in a single plugin without the workflow getting messy.
The modulation system is where Serum 2 really shines for me. You now get 10 LFOs instead of 4, plus advanced options like Chaos LFOs based on Lorenz attractors and a Path LFO where you literally draw motion on an XY pad.
When you combine that with 8 macro controls and a flexible modulation matrix, you can automate nearly every parameter in ways that feel musical instead of random.
Features:
- Multi-Engine Oscillators
Serum 2 doesn’t lock you into one synthesis method. The Multisample engine supports SFZ format, so you can import orchestral sounds or guitars and process them like synth sources. The Sample oscillator gives you advanced looping with snap-loop detection and real-time slicing.
The Spectral oscillator lets you resynthesize sounds based on their frequency spectrum, perfect for creating complex evolving tones. Each engine opens up totally different creative paths.
- Dual Warp Modes & Enhanced Wavetable Engine
You can apply two warp types at once on each oscillator, like FM plus distortion or phase distortion with ring modulation. The new smooth interpolation mode makes wavetable transitions silky clean.
With true FM, phase distortion from filters, and multiple distortion warping options, you get harmonic flexibility that goes way beyond basic wavetable synthesis.
- Internal Mixer & Dual FX Buses
The dedicated mixer page changed how I approach sound design in Serum. You get independent volume, pan, and routing for each oscillator, sub, and noise source. Two separate effect buses plus a master FX chain mean you can process different elements with completely different effects.
The mid/side and low/high splitters let you route signals into effects based on frequency or stereo position, giving you studio-level processing inside the synth.
- Built-In Sequencer & Arpeggiator
The clip sequencer lets you draw step patterns and automation directly inside Serum 2, storing chords, melodies, and modulation per patch. The arpeggiator comes with 12 pattern slots and multiple modes including custom patterns.
You can switch sequence slots by pressing MIDI keys, making it perfect for live performance or quick idea sketching without touching your DAW.
3. Minimal Audio Current 2 (Design Your Dreams)

Well, when I included Serum 2 in the list, it would be shame to not include Current 2. Especially when it comes with unique effects with completely different approach to majority of the plugins out there. When I need sounds that don’t exist anywhere else, Current 2 is sound design plugin I turn to first.
What makes this synth different is how it puts five separate synthesis engines side by side and lets you blend them however you want. You get two spectral wavetable oscillators, a granular sampler, an additive sub oscillator, and a time-stretching sampler all working together. That mix gives you room to build everything from soft pads to wild experimental textures.
The Play View interface keeps things simple when you’re designing sounds. You can tweak four macro controls using the dual XY pad, which makes it easy to morph your sound live or while you’re tracking. I love that you can solo or mute any engine instantly without digging through menus.
Current 2 also connects to Minimal Audio’s Stream platform right inside the plugin. You can browse and download presets, wavetables, and samples without ever leaving your DAW. The factory library comes loaded with over 400 presets, 170 wavetables, and 800 samples, so you have plenty to work with right away.
Features:
- Multi-Engine Sound Design
Current 2 runs five different synthesis engines at once, and you control how much of each one you hear. The two wavetable oscillators come with over 40 warp effects each, which lets you shape harmonic content in ways most synths can’t touch.
The granular sampler gives you access to 250+ grain types, perfect when you want glitchy movement or organic textures. You can modulate engines against each other using FM and AM routing, which opens up complex tones fast.
- Integrated Stream Content Library
The Stream feature is built directly into Current 2, so you can pull new content whenever you need fresh ideas. You don’t have to hunt down third-party preset packs or wavetable collections. Everything loads inside the plugin, and you can preview sounds before you download them
The community content keeps growing, which means you always have something new to explore. It’s one of my favorite ways to break out of creative blocks.
- Wave Shifter Effect & Advanced Modulation
The new Wave Shifter effect combines frequency shifting with ring modulation, and it gives you metallic, inharmonic sounds that feel totally unique. You get oscillator-style controls like FM and soft sync, which makes this effect way more than a basic modulator.
Current 2 also includes nine modulation slots with support for envelopes, LFOs, curve sequencers, and more. You can connect unlimited modulators to any parameter, which gives you full control over evolving patches.
4. Minimal Audio Evoke (Beyond Vocals)

What caught my attention about Evoke plugin is how it treats vocals like raw material instead of just something to tune or polish.
This plugin uses vocal resynthesis to break down your voice into its core parts, pitch, timbre, formants, then rebuilds it from scratch. That means you’re not just tweaking what’s already there. You’re reshaping the entire character of the sound. I’ve used it on lead vocals that needed a futuristic edge, and it delivered textures I couldn’t get from any standard vocoder or pitch plugin.
Evoke also includes 15 character modes that shift the personality of your vocal instantly. You can go from natural choral sounds to glitchy, robotic, or liquid textures without rewiring anything. The interface stays clean, so you’re not digging through menus when inspiration hits.
What I love:
- Multi-Voice Harmonization & Scale Detection
One of the most useful parts is the four-voice harmony engine. You feed it a single vocal take, set your scale, and Evoke generates harmonies that actually fit your track. Each voice gets its own level and pan control, so you can shape the stereo field however you want. I’ve used this to build thick vocal stacks in pop tracks without recording multiple takes or manually tuning each layer..
- Flexible Effects Rack
Evoke comes with eight studio-grade effects that load into 12 freely assignable slots. You get distortion, reverb, frequency shift, and more, all inside one window. This setup is perfect when you want creative vocal FX without opening five separate plugins.
I like how the effects integrate with the resynthesis engine, it feels like they’re designed to work together instead of being tacked on.
- Deep Modulation & MIDI Control
The modulation system includes LFOs, curve sequencers, envelope followers, and macros. You can route them with drag-and-drop or use the matrix for more complex setups. MIDI mode lets you control pitch and harmony with your keyboard, turning Evoke into a vocal synth.
I’ve used this for lead lines that sound human but move like a synthesizer, especially in electronic and hyperpop projects.
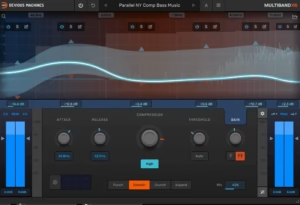
5. Devious Machines Infiltrator 2 (Lots of Sound Design Presets)

When I need unpredictable energy and rhythm injected into flat sounds, Infiltrator 2 is my go-to multi-effect plugin.
What I appreciate most is how quickly you can transform boring audio into something wild and moving. I’m talking about pulsating gates, spectral manipulation, sequenced distortions, and rhythmic filters that sync perfectly with your track’s tempo. The plugin comes packed with over 1,500 presets designed by professionals, so you’re never starting from scratch.
I use Infiltrator 2 when I want to break away from typical processing chains. It stacks up to 54 different effects including filters, delays, reverbs, and even time-manipulation tools like reverse and granular stretching. Everything runs through a 32-step sequencer that lets you turn effects on and off per step, creating constantly evolving patterns that feel alive.
You get:
- Massive Preset Library
You get 1,500+ presets right out of the box, which is rare for a creative effects tool. These aren’t generic either. They’re crafted by sound designers and artists like Mr Bill and Black Sun Empire, so you’re working with professional-grade starting points.
I can load a preset, tweak one or two macros, and have a custom sound in seconds. The newest Rhythmic Gates expansion adds 119 volume-shaping presets perfect for stutter house, techno, and drum and bass.
- Sequencer and Real-Time Modulation Control
The 32-step sequencer is where things get interesting. You can activate or mute any of your 10 effect modules on each step, building rhythmic patterns that evolve bar after bar.
Each module has two tempo-synced envelopes for deeper modulation, and you can randomize patterns, apply swing, or snap pitch to scales. This makes wobbles, gates, and filter sweeps feel musical instead of robotic.
- Effects Including Spectral and Time Tools
Infiltrator 2 offers 54 effect modules spanning filters, distortions, spectral FFT effects, modulation, delay, reverb, and more. The spectral effects like Shift, Twist, and Mirror let you manipulate frequencies in ways standard EQs can’t touch.
Time effects like Reverse and Varispeed give you glitchy, experimental textures. I use these when I want to design sounds that feel futuristic or broken in interesting ways.
6. Beatsurfing Random METAL (Unique Drum Synth)

Random METAL is a great contender for sound design plugins list as it throws out the usual drum synth rulebook and gives you 25+ distinct percussive engines that generate sounds from scratch instead of cycling through samples.
What I appreciate is how fast you can land on something usable. The RANDOM button reshapes your sound instantly, and you control how extreme the changes get with a deviance slider. One click might give you a subtle shift in tone. Another might turn a metallic clang into something closer to a shaker or bell.
It’s built around exploration, not precision. You’re not loading kicks and snares here. You’re creating metallic hits, abstract textures, and percussive chaos that feels alive. Beatsurfing developed this with producers Phazz and Herrmutt Lobby, and you can tell they wanted something that rewards experimentation over perfection.
Things worth mentioning:
- 25+ Percussive Engines & Randomization Random
METAL gives you access to over 25 unique synthesis engines called “percussive matter.” Each one generates a different type of metallic or tonal percussion. You’re not stuck with one flavor of cymbal or hi-hat.
The randomization engine is the centerpiece. Hit the button and the sound morphs based on how much deviance you set. Low deviance tweaks the tone slightly. High deviance completely reimagines it. I use this when I need something unexpected but don’t want to spend an hour tweaking knobs.
- Expressive XY Pad for Real-Time Morphing
The XY pad maps to hundreds of parameters depending on which engine you’re using. You can morph your sound in real time by dragging your finger or mouse across the pad. This makes Random METAL feel more like a performance tool than a static drum machine. I automate the XY pad in my DAW to create evolving percussion that changes texture throughout a track.
- Dual Playback Modes: Pads & Chromatic
You get two ways to trigger sounds. Pad Mode works like a drum machine with 12 pads you can assign different percussive hits to. Chromatic Mode lets you play those same sounds across a keyboard, which turns them into tuned percussion. I switch to Chromatic when I want melodic metallic textures or pitched rhythmic elements that follow my chord progression.
7. Neutone Morpho (AI Realtime Morphing)

Neutone Morpho uses machine learning to reshape audio in real time, turning any input into something completely different while keeping the original sound’s shape and feel intact. Vocals, drums, field recordings, synths, whatever you have becomes raw material for transformation. The plugin resynthesizes your input into entirely new timbral styles without losing the expressive details like dynamics or subtle inflections.
And here’s where it gets wild: you can train your own custom models. No coding, no expensive GPU setup. Just drag and drop your sounds into Neutone’s Cocoon service and create a morph target based on your own samples. Your voice, your instrument, your choice.
- AI-Powered Tone Morphing with Pre-Trained Models
Neutone Morpho comes loaded with pre-trained AI models that define different tone styles like choir, percussion, or radio transmission. When you run audio through these models, the plugin captures even the smallest details from your input and transforms them into the character of the model.
I love how it doesn’t just slap a filter on top. It actually rebuilds the sound while keeping your performance intact.
- Custom Model Training via Cocoon
This is the feature that sets Morpho apart. You can train your own models using Neutone’s Cocoon service without needing any machine learning experience. Upload your samples, let it train, and you own the model completely
- Macro and Micro Control Modes
Morpho gives you two ways to interact with the sound. Macro Mode offers four customizable knobs for broad tonal shifts, including controls like “Serendipity” for randomness and “Reactivity” for sensitivity. Micro View exposes up to six latent variables for detailed sonic sculpting.
The randomize function in Micro mode is perfect when you want to stumble into unexpected textures
- Built-In Effects and Low Latency Processing
The plugin includes effects like pitch shifter, feedback delay, compressor, filter, noise gate, and limiter, so you’re not stuck routing to other plugins for basic shaping. Processing latency stays incredibly low, which makes it usable during live performance or real-time recording sessions. It works smoothly in all major DAWs including Ableton Live, Logic Pro, Bitwig, and Cubase.
Morpho on my end seems very CPU intensive, especially with bunch of other plugins and massive project, so try it out first if it works smooth for you!
8. Baby Audio Atoms (Unique Synth)

What drew me to Atoms right away is how it breaks from the usual synth formula. Baby Audio built Atoms around physical modeling using a mass-spring network, which means the sound comes from simulating actual vibrating objects instead of traditional oscillators.
When you play a note, a virtual bow excites these connected springs and masses, creating textures that feel genuinely alive. The tones shift and breathe in ways that standard synths just don’t capture naturally. I find myself reaching for Atoms whenever I need something organic but still futuristic.
The interface stays simple even though the tech underneath is complex. You get six main controls that shape how the physical system behaves.
Chaos adds unpredictable movement, Order damps the vibrations, and Force controls how hard the bow strikes. It’s intuitive once you start twisting knobs and hearing how the sound responds.
- Mass-Spring Physical Modeling Engine
The core of Atoms is a simulated network of masses connected by springs. A virtual bow strikes this network, creating sound through actual physical motion rather than typical oscillators.
This approach gives you textures that range from metallic strings to shimmering pads, sounds you’d struggle to create with subtractive or wavetable synths. The real-time visualizer shows you exactly how the masses move as you play, which helps you understand what each parameter does to the physical behavior.
- Six Core Parameters with Motion Control
Atoms gives you six main controls that directly shape the physical system: Chaos, Order, Force, Overtones, Drive, and Filter. Each one affects how the mass-spring network vibrates and resonates.
What makes this special is that all six parameters can be automated or modulated using LFOs, random drift, or MPE (MIDI Polyphonic Expression). This means each note can behave differently, giving you expressive control that feels less programmed and more performed.
- Four Physical Profiles and Randomization Tools
You can switch between four distinct physical profiles that change how the mass-spring network is structured. These profiles (Standard, Alternative, Lo-Fi, and Inharmonic) give you completely different timbral starting points. When you need fresh ideas fast, the randomization engine generates new presets instantly, while the Recycle button creates variations that stay in the same sonic family.
9. Beatsurfing CHEat Code

CHEat Code caught my attention because it doesn’t follow the usual multi-effects playbook. Beatsurfing built this plugin with Grammy-winning producer Che Pope, and it shows in how unpredictable and inspiring it feels to use.
What makes this tool different is how freely you can experiment with signal flow. You get 16 specialized effect modules that you can stack, reroute, and morph between serial and parallel processing. That routing flexibility alone opens up sound design territory that most FX chains can’t reach.
I use CHEat Code when I want to push sounds into unusual spaces quickly. The modules range from traditional effects like chorus and reverb to wild tools like Bubble Grain, Shuffler, and Reverser. Each one feels hand-crafted for a specific kind of transformation.
Features:
- 16 Effect Modules With Radical Range
You get everything from granular delays to multi-band slicers to rhythmic sequencers. Bubble Grain and Grain Delay handle textured, evolving echoes. Shuffler slices and reorganizes audio across three bands in real time, which is perfect for glitchy rhythmic breaks.
The Reverser module lets you flip audio backward, apply half-time effects, or create rhythmic glitches. Then you have staples like flanger, detune, tap delay, and reverb mixed in. It’s a toolkit that covers subtle warmth and total chaos.
- Flexible Serial and Parallel Routing
Most multi-effects force you into one signal path. CHEat Code lets you blend between series and parallel processing with a mix control. You can morph smoothly between a stacked chain and a layered, parallel setup, which gives you way more control over how effects interact. I love this when building dense textures or evolving FX throws.
- Performance Widget and Macro Control
The performance area lets you trigger momentary effect throws, which is great for live automation or sudden transitions. You also get four advanced macros that can control multiple parameters at once, and in version 1.2.1, those macros can now be modulated with envelope followers or LFOs. It keeps the plugin expressive without overwhelming you with too many knobs.
10. Tracktion Novum by Dawesome

Most samplers just play back your files, but Novum breaks them apart into six independent layers and lets you reshape each one individually.
It’s built around granular synthesis, but with a twist. Instead of just chopping audio into tiny grains, Novum uses a spectral import system that separates different sonic elements from your source material. You can manipulate tone, texture, and dynamics in ways that feel more like sculpting than traditional sound design.
What really hooked me is the “sound clay” idea. You import one sample and Novum gives you six pieces of moldable audio. You can drag timbres and envelopes between layers, lock certain characteristics while browsing presets, and blend completely different sonic qualities together.
Here is what you get:
- Six-Layer Spectral Decomposition
Novum splits your sample into six separate layers that represent different timbral parts of the original sound. I can shape each layer independently, which means I’m not stuck with the original character of the sample.
You might load a vocal and end up with a pad, or take a drum hit and build a synth lead. The decomposition gives you control over tone color in a way that feels totally different from standard sampling.
- Advanced Granular Engine with Homogenize
The granular side is where things get interesting for texture work. All six layers can run through the granular engine, and you can sync grain playback to your DAW tempo for rhythmic effects.
What I really appreciate is the Homogenize function, which smooths out the typical grainy roughness you get with granular synthesis. This gives you velvety, polished textures instead of the spotty sound most granular synths produce.
- Timbre Flower & Cross-Synthesis
The Timbre Flower is a visual spectral tool that lets you paint and reshape tone color in an intuitive way. It’s not just EQ, it’s structural spectral shaping that changes the fundamental character of your sound.
You can also drag tone colors from one sample onto another layer, creating hybrid sounds that blend characteristics you’d never get otherwise. The lock function is perfect when you want to keep a specific timbre while exploring different presets.
11. Output Portal (Granular Tool)

Portal by Output completely changed how I think about granular processing. Even though it’s older plugin, Portal is definitely sound design plugin that keeps things surprisingly musical while still giving you wild creative control.
You can break your audio into tiny grains and rebuild them into something fresh. Feed it vocals, drums, synths, or anything else and watch it transform into pads, textures, or glitchy effects. The plugin generates up to 16 grains at once, which you can shape, pitch, reverse, and stretch in ways that feel more like playing an instrument than tweaking an effect.
I really appreciate the scale-locked pitch modulation. This keeps your granular experiments from sounding totally random or off-key. You can push things into weird territory while maintaining some harmonic sense, which makes Portal way more useful in actual tracks.
The X/Y pad and two macro knobs make live performance feel natural. I can morph sounds in real time without menu diving, and the results always surprise me in good ways.
Features:
- Granular Engine with Musical Results
Portal’s core strength is how it handles grains. You get full control over grain size, density, position, and pitch, plus you can sync everything to your DAW tempo or let it run free.
The reverse playback option adds instant glitch potential, and the time-stretching lets you slow audio down or warp it without losing clarity. I’ve used this to turn simple drum loops into evolving ambient beds that still felt connected to the original rhythm.
- Presets
Over 250 presets cover everything from vocal processing to sound design, giving you solid starting points. The interface feels playful but organized, and built-in tooltips make learning each parameter easy.
- Built-In Effects Section
Portal includes seven effect types: bit reducer, chorus, distortion, filter, phaser, reverb with freeze, and stereo delay. Each effect has its own wet/dry mix and level controls, so you can layer processing without leaving the plugin.
- Dual Modulation System
Two multistage envelopes give you deep control over how parameters change over time. You can rename the macro knobs and map them to whatever you want, making the plugin feel custom-built for your workflow.
The humanize function adds subtle variation so your patterns don’t sound robotic or looped. This keeps textures feeling alive, especially on longer pads or transitions.
The reverb freeze is perfect for building ambient swells, and the delay lets you create rhythmic granular patterns that lock to tempo.
- Performance Controls & Visual Feedback
The circular visualizer responds to your grain settings in real time, which helps you understand what’s happening under the hood.
12. GForce Software Halogen FM (FM Synth)

FM synthesis has always intimidated me. The algorithms, the operators, the endless routing options that require a degree in sound engineering just to get a bell sound. Halogen FM flips that completely.
What hooked me right away is the Spark Core, a generative engine that creates full FM patches instantly with one button press. You’re not waiting through trial and error or copying settings from a tutorial.
You hit Spark, and suddenly you have a working patch that actually sounds musical. From there, you can tweak six macro knobs to shape timbre, envelopes, modulation, effects, and the mix between operators.
Despite having only two operators, Halogen FM sounds surprisingly rich. GForce designed these operators based on a rare Japanese FM synth, so the tonal character feels different from typical FM plugins. You can dive into full operator editing when you want control, but the macro system keeps things playful and instinctive.
Main features:
- Spark Core for Instant Patch Generation
The Spark button generates fresh FM sounds in seconds using smart randomization. Unlike AI tools, this uses traditional parameter randomization tuned for musical results. When I need inspiration or want to escape predictable sounds, I just keep hitting Spark until something clicks.
You can also randomize individual modules like operators or effects instead of the whole patch, which gives you more creative control without losing your starting point.
- Six Macro Knobs for Fast Sound Shaping
Timbre, EG1, EG2, Modulation, FX, and Mix macros let you sculpt complex FM tones without touching operator math. I love how quickly you can go from a soft pad to a sharp pluck just by adjusting these controls.
- Expressive Performance Features
Halogen supports polyphonic aftertouch and poly pitch-bend, which makes playing FM leads and pads feel alive. You get both polyphonic and monophonic modes depending on what you’re creating. Built-in reverb adds space without needing extra plugins.
- Over 320 Presets with Searchable Browser
The preset library covers pads, bells, plucks, textures, and experimental sounds. The browser includes filtering and search so you can find what you need fast. The interface scales to fit your screen, which helps when you’re working on smaller displays or want more visual space.
13. Minimal Audio Rift 2 (New approach to Distortion)

What pulled me toward Rift 2 is how it treats distortion like a full creative environment instead of just a drive knob. Most distortion plugins give you one or two flavors and call it a day. Rift 2 gives you 30 distortion types, multi-band processing, and a whole modulation system that turns simple saturation into something alive and animated.
I’ve used it on synth leads, drums, vocals, and even entire busses. The multi-polar engine splits your audio into positive and negative waveform halves and processes them separately, which creates harmonic movement you can’t get from standard distortion. It sounds technical, but in practice it just means richer, more textured results.
What really sets Rift 2 apart is how deep you can go without losing control. The interface switches between Play View and Advanced View, so you can stay simple when you’re exploring presets or dive into six-stage distortion chains when you want to build something wild.
Features:
- Multi-Polar Distortion with 30 Algorithms
Rift 2 doesn’t just add grit. It reshapes your sound from the inside out. The bi-polar processing lets you apply different distortion types to the top and bottom halves of your waveform, which creates harmonic complexity that feels musical instead of harsh.
I love using this on synth plucks to add bite without making them sound broken. You can stack up to six distortion stages, so you can layer soft saturation with aggressive clipping or bit-crushing for textures that evolve as they play.
- Tunable Feedback Module
The feedback section is one of my favorite parts. Instead of just feeding the signal back into itself, Rift 2 lets you tune the feedback to musical notes or scales. This turns feedback from noise into melody. You can also distort the feedback itself, which makes it explode into wild, evolving textures.
- Multi-Band Crossover & Morphing Filters
Rift 2 gives you multi-band routing, so you can distort your highs aggressively while keeping your lows clean, or vice versa. This is huge for bass design or full mix processing. The 24 filter types include morphing, vowel, phaser, and harmonic options, and you can place them before or after distortion. The morph knob lets you sweep between filter types in real time, which is perfect for adding movement to static sounds.
- Deep Modulation System with Curve Sequencers
Rift 2 has four modulators: an envelope follower, a morphing LFO, and two curve sequencers. The curve sequencers are where things get really fun. You can draw custom modulation shapes, randomize them, and assign them to almost any parameter.
I use them to animate filter sweeps, feedback intensity, or distortion mix so my sounds shift and evolve over time. The two macro knobs let you control multiple parameters at once, which makes live performance or quick tweaking way easier.
14. Moog Moogerfooger MF-102S RingMod (Ring Modulator)

When I need sounds that sit somewhere between vintage analog warmth and full-on sonic chaos, I turn to the MF-102S from Moog. This plugin brings Moog’s legendary ring modulator pedal into your DAW, and honestly, it does a lot more than just make robotic voices.
What stands out most is how playable it feels. The ring modulator, carrier oscillator, and dual-waveform LFO work together in ways that let you shape everything from gentle tremolo wobbles to metallic, bell-like tones that cut through any mix. You’re not locked into one type of sound, which is exactly why I keep coming back to it.
The stereo functionality is a huge upgrade from the original hardware. You can pan the carrier oscillator out of phase or even reverse it, giving you spatial movement that makes boring loops feel alive. I’ve used this on pads and vocal chops where I wanted the modulation to travel across the stereo field instead of sitting flat in the center.
Features:
- Ring Modulator with Wide Carrier Range
The carrier oscillator covers a really wide frequency range, which means you control how extreme the effect gets. Low carrier frequencies give you smooth tremolo-style movement. Push it higher and you start getting those classic metallic, clangorous tones that ring modulators are known for.
The Mix knob lets you blend between your dry signal and the modulated sound, so you’re never stuck with something too harsh unless that’s what you want.
- Dual-Waveform LFO for Movement
The LFO offers both sine and square waveforms, and the rate goes from 0.1 Hz all the way up to 25 Hz. I love using slower rates for evolving textures and faster rates when I want rhythmic, choppy modulation. You can also switch the LFO polarity between bipolar and unipolar, which changes how deeply it affects the carrier.
This kind of control makes the plugin feel more like a modular synth than a simple effect.
- CV Modulation and Plugin Interconnectivity
You can modulate almost every parameter using virtual CV inputs, including carrier frequency, LFO rate, and mix amount. Each CV input has its own attenuator for fine control.
What really gets me excited is that you can route CV between multiple Moogerfooger plugin instances, letting you build modular-style effect chains without needing hardware. It’s perfect when you want your sound design to feel unpredictable and alive.
15. Arturia Efx REFRACT

What caught my attention with Efx REFRACT is how it transforms single sounds into something massive and alive without loading multiple plugins or routing tricks.
Arturia built this plugin around a super unison engine that splits your signal into up to eight stereo voices, then spreads them apart with detuning, modulation, and per-voice effects. The result is instant width and depth that feels organic rather than processed. I use it when I need a thin synth line to fill more space or when I want vocals to sound layered without recording multiple takes.
What I appreciate most is how the five Mode FX options let you shape each voice differently before they recombine. You can choose bandpass filters, comb filters, bitcrusher, distortion, or a harmonizer with 12 chord presets. This means you’re not just widening the sound, you’re actually changing its texture and character at the same time.
Features:
- Super Unison Engine with Up to 8 Voices
You get control over how many stereo voices REFRACT generates from your input. The Refraction Amount knob determines how much those voices detune and modulate against each other.
Low settings give you subtle thickness, while higher amounts create wild, chorus-like motion or experimental textures. I’ve used this on mono bass lines to make them feel wider without losing focus in the center.
- Five Mode FX Per Voice
Each duplicated voice passes through one of five effect types before blending back together. The distortion mode includes four different algorithms, so you can pick soft saturation or aggressive clipping.
The harmonizer mode offers pitch-shifted harmony across the voices, which works great on vocals or leads. Bitcrusher and comb filter modes are perfect when you want glitchy or metallic textures.
- Built-In LFO Modulation
The LFO can modulate parameters like Refraction Amount to create movement over time. You can adjust the rate and wave shape to get slow sweeps or fast choppy changes. This keeps your sound evolving rather than static, which I find helpful in buildups or ambient sections where you need constant motion without automation.
16. Baby Audio Humanoid (Modern Vocoder)
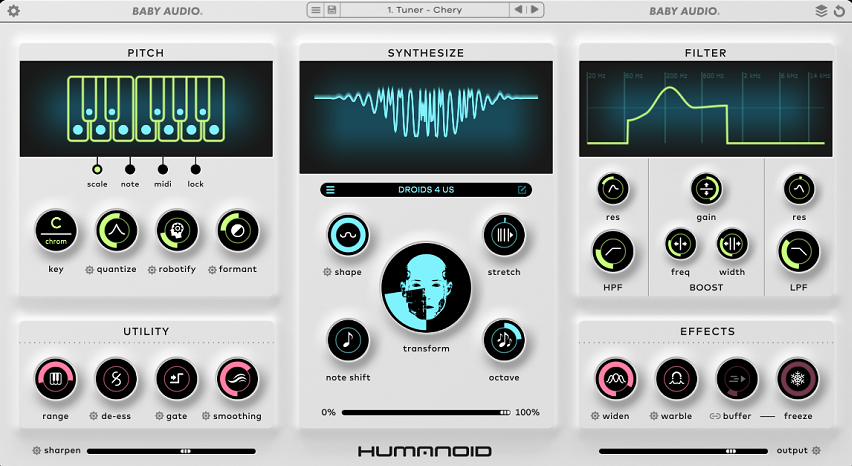
Humanoid caught my attention because it doesn’t feel like your typical pitch correction plugin. It’s more like a vocal synthesizer that treats your voice as raw material for something completely new.
What I appreciate most is how deep you can go with transformation. You’re not just snapping vocals to a grid. You can morph a sung line into wavetable-based textures, build robotic harmonies, or create vocal drones that barely sound human anymore. The FFT-based re-tuning engine keeps things smooth even when you’re pushing extreme settings.
I also love that it gives you three pitch modes to work with. Scale mode locks your vocal to a chosen key. Note mode freezes it to one or two pitches for drone effects. MIDI mode is where things get wild because you can literally play your voice like an instrument and stack 5-note polyphonic harmonies from a single vocal take.
Main features I found:
- Wavetable Resynthesis Core
Humanoid comes with 64 built-in wavetables plus the option to import your own. The Transform knob lets you blend between the original tuned voice and a fully resynthesized waveform.
When I crank it all the way up, the vocal becomes a synth lead or pad. Shape and Stretch parameters add extra character by distorting or modulating the wavetable, which opens up tons of creative possibilities for sci-fi vocals or experimental textures.
- MIDI Control & Harmony
Generation In MIDI mode, you can control pitch via your keyboard or automation. This turns Humanoid into a vocoder-style tool where you play harmonies or chords using your vocal as the carrier. MIDI pitch-bend is supported up to two semitones, so you can add expressive bends to robotic vocal lines. I use this all the time for hyper-pop or futuristic vocal stacks.
Creative Effects & Spectral Filter The built-in effects section includes Widen for stereo spread, Warble for spectral vibrato, and Freeze for tempo-synced stutters. The filter works post-FFT, so you get sharp spectral cuts that regular filters can’t do. There’s also a de-esser and gate built in to clean up processed vocals before they hit your mix.
- Low-Latency Performance Mode
Humanoid added a low-latency mode in v1.1, which makes it usable for live performance or real-time tracking. You also get 180+ factory presets designed for robotic voices, harmonies, and weird vocal textures, so you can start experimenting right away without diving into every parameter.
17. Tonsturm FRQ Shift (Frequency Shifter)

This one does something different than most pitch plugins. It shifts every frequency in your audio by the same amount instead of maintaining harmonic relationships.
That means you can take a normal sound and push it into strange, metallic, or totally alien territory. I use it when I want textures that feel futuristic or just need something that doesn’t sound like anything else in the mix.
FRQ Shift gives you two independent frequency shifter engines that you can blend together. Each engine can be modulated, fed back into itself, and routed through extra effects like delays or resonators. It sounds technical, but once you start turning knobs, the creative possibilities become obvious fast.
Features:
- Dual Shifter Engines With Crossfade
You get two separate frequency shifters running at the same time, and you can crossfade between them smoothly. This lets you blend two completely different shift amounts or behaviors without stopping playback or switching presets.
The processing stays clean and artifact-free, even when you’re shifting aggressively, so your transients stay punchy. I love this when building evolving pads or atmospheric backdrops that need movement without sounding broken.
- Feedback Matrix With Insertable Effects
FRQ Shift includes four effects you can drop into the feedback path: delay, resonator, filter, and a second shifter. This feedback routing creates rich, evolving textures that go way beyond a basic shift. You can dial in subtle modulation or push it into full chaos. It’s perfect for sci-fi sound design, glitchy percussion, or drones that morph over time.
- Built-In Modulation System
The plugin has LFOs, an envelope follower, and easy parameter assignment similar to what you’d find on a synth. You can modulate shift amounts, feedback levels, filters, or almost anything else to make the effect feel alive.
I assign modulators to multiple parameters and let them interact, which creates textures that keep changing without me touching anything. There’s even a randomizer if you want quick inspiration.
- High-Precision Control & Stereo Enhancement
You get precise control over shift amounts, plus high and low-cut filters to shape what frequencies enter the shifter. This makes it useful for both extreme sound design and subtle stereo widening. When I need a synth to feel wider without traditional stereo tools, I reach for FRQ Shift with light settings. It adds color and space without making things feel processed or fake.
18. Lunacy Audio HAZE (Free Plugin)

Finding a truly useful free sound design plugin feels rare, but Haze from Lunacy Audio changed how I think about modulation effects. It blends chorus, phasing, algorithmic reverb, and spectral dispersion into one clean interface that actually sounds expensive.
What makes Haze different is how it treats modulation and space as one connected thing instead of separate effects. You’re not just adding chorus or reverb. You’re building moving textures that feel alive.
I keep reaching for Haze when I want to push a basic sound into something atmospheric. Pads become shimmering clouds. Vocals get that dreamy, washed-out character. Even simple guitar chords turn into wide, evolving layers that sit perfectly in cinematic or ambient tracks.
Features:
- Diffusion Network with Decay, Density & Spread
These three controls handle most of the magic. Decay sets how long the tail lasts, from quick reflections to long washes. Density shapes how layered and clouded those reflections get. Spread controls stereo width and smooths out resonances. I love how tweaking just these three knobs can completely reshape a sound from subtle movement to full ambient haze.
- Motion & Spectral Dispersion Engine
The Motion control adds modulation and flutter, giving you everything from gentle warble to tape-style wobble.
Then there’s the Smear control, which blurs harmonics and adds resonance. When you dial it in with the center frequency and Q, you get shimmering, upward-tuned textures that feel more like sound design than basic modulation. It’s perfect when you want something that evolves instead of staying static.
- Hybrid Chorus, Phase & Reverb in One
Haze markets itself as all three effects combined, and that’s exactly how it behaves. You can keep things light for gentle stereo motion or push it hard for lush, atmospheric layers. The interface stays simple with just a handful of knobs, but the sonic results are way bigger than you’d expect from a free plugin. You can dial in big changes fast, which keeps the creative flow going without getting stuck in menus.
19. Minimal Audio Wave Shifter

Wave Shifter caught my attention because it takes frequency manipulation way beyond what most modulation plugins do. It combines frequency shifting, ring modulation, and amplitude modulation with deep FM synthesis and soft-sync controls. The result? You can turn a simple synth line into something metallic, glitchy, or completely unrecognizable.
What really sets it apart is how much control you get. The morphing LFO lets you create intricate rhythms and evolving harmonic movements that change over time. Plus, the feedback system adds resonant textures that can shimmer or scream depending on how you dial it in.
Wave Shifter works as a VST, Audio Units, VST 3, and AAX plugin on both Mac and Windows. It’s also part of Minimal Audio’s $15-a-month All Access subscription if you want their full software lineup.
Things to know:
- Three Processing Modes for Different Textures
You get three distinct ways to process your sound. Freq Shift moves all frequencies up or down uniformly, which creates weird harmonic shifts. Ring Mod multiplies your input with an internal oscillator for inharmonic, metallic tones.
Amp Mod does something similar but keeps your original signal blended in. Switching between these modes completely changes the character of your sound, and I love how each one opens up different creative directions.
- Deep FM and Soft Sync Engine
This is where things get wild. The internal oscillator can be FM-modulated by noise, your input signal, or other operators. Soft sync forces the oscillator to reset based on your input’s waveform, giving you distorted, metallic textures that sound futuristic. I use this when I want sounds that feel broken or glitched in a controlled way.
- Feedback Loop with Filtering
The feedback system feeds the shifted signal back into itself, creating resonant delays and comb-filtering effects. You can set feedback time in seconds or sync it to your project tempo. There’s even a band-pass filter in the feedback path so you can sculpt which frequencies resonate. It’s perfect for building shimmering pads or chaotic rhythmic textures.
Morphing LFO with Randomization The LFO morphs between sine, triangle, square, and ramp shapes, and you can randomize both the rate and stereo channels. This creates evolving modulation that never feels static. I use the stereo offset feature to get wide, moving textures that shift across the stereo field.
FAQ
Sound design can feel confusing when you’re starting out, so I’ve put together answers to the most common questions I get about what sound designers actually do, the skills you’ll need, where you can work, and which plugin types help you create better sounds.
What is the role of a Sound Designer?
A sound designer creates and shapes audio for different types of media. As a sound designer, you might work on music tracks, video games, films, TV shows, or even apps and websites.
The job involves recording original sounds, editing audio files, and using tools like synthesizers and effects plugins to build unique sonic textures. I think of sound designers as audio architects. You’re building the sonic atmosphere that makes a project feel unique and compelling.
What skills do sound designers need?
You need a good ear for detail and the ability to hear small differences in frequency, tone, and texture. Technical skills matter too, like knowing your way around a DAW, understanding signal flow, and being comfortable with plugins like the ones I mentioned earlier.
Music theory knowledge helps, especially when you’re designing melodic elements or working with harmonic content. You should also understand basic mixing concepts like EQ, compression, and spatial effects.
Creativity is just as important as the technical stuff. The best sound designers I know can imagine a sound in their head and figure out how to build it.
Where do sound designers work?
Sound designers work in recording studios, game development companies, film production houses, and advertising agencies. Many work as freelancers from home studios, which gives you flexibility and control over your schedule.
The entertainment industry employs a lot of sound designers. Video games need thousands of sound effects, films need custom audio for every scene, and music producers hire sound designers to create signature sounds and presets.
You can also find work in app development, VR experiences, podcast production, and even theme parks.
Is sound design hard to learn?
Sound design has a learning curve, but it’s not impossible. The technical side takes time because you need to understand synthesis, sampling, effects processing, and audio editing workflows.
I’d say the hardest part is training your ear to recognize what makes a sound feel right. That comes with practice and lots of experimentation.
Start with one or two plugins and really learn them inside out. Tools like Serum 2 or Minimal Audio Current 2 are great starting points because they have visual feedback that helps you understand what each parameter does.
What types of plugins are great for Sound Design?
Synthesizers and sound generators are essential because they let you build sounds from scratch using oscillators, filters, and modulation. Wavetable synths give you massive flexibility for creating evolving textures. On the flip side, effect plugins like ring modulation, frequency shifting, resonators and comb filtering, distortion, multi effects, granular FX, randomizers, are considered to be great for sound design.
My favorite sound design tools are Moodal by Tritik and Supermodal by Polyverse (both resonators) and then of course MeldaProduction plugins – these are sound design paradise tools, I just didn’t add any of them because if I would add one, I would then need to all all plugins from them hah, just to list a few – MFreqShifterMB, MRingModMB, MCombFilterMB, these are my go to.
Lastly, samplers are perfect when you want to manipulate recordings or vocals into experimental textures. They let you stretch, pitch, chop, and reshape audio in ways that feel impossible with traditional tools!
Hello, I’m Viliam, I started this audio plugin focused blog to keep you updated on the latest trends, news and everything plugin related. I’ll put the most emphasis on the topics covering best VST, AU and AAX plugins. If you find some great plugin suggestions for us to include on our site, feel free to let me know, so I can take a look!