The best mastering plugins combine precise control with smart workflows, letting you shape your final sound without needing years of training. Some focus on limiting and loudness, others handle dynamics or tone shaping, and a few bundle everything into one interface.
Whether you’re working on electronic music, hip hop, rock, or anything in between, having the right mastering tools makes a noticeable difference in how your music translates across different playback systems.
This list covers both paid and free options. The paid plugins bring features like advanced metering, surgical EQ, transparent limiting, and creative processing that can elevate your masters to a competitive level.
The free ones are surprisingly capable too, offering solid dynamics control, mastering-grade EQ, and useful metering without costing anything. I’ve included plugins that work across different workflows, from all-in-one mastering chains to individual processors you can stack and customize yourself!
1. LANDR Mastering Plugin PRO
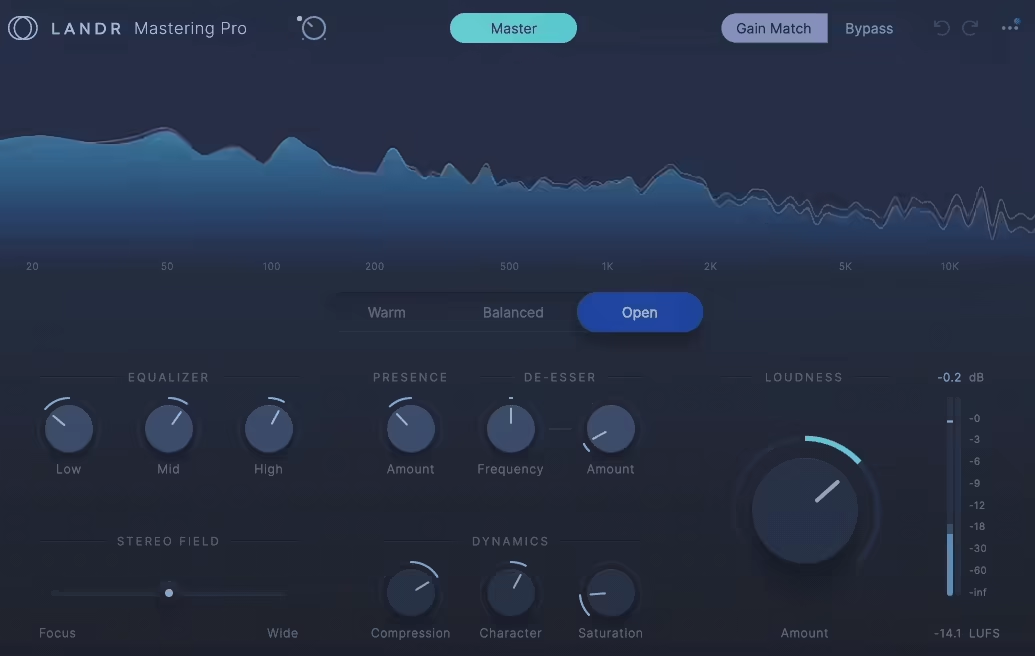
LANDR’s PRO plugin brings AI-powered mastering straight into your DAW, which saves me from bouncing files and waiting around. It runs the same engine LANDR built for their online service, except now I can hear changes happen live while I’m still working on my mix.
What I appreciate most is how it reads my track and offers three mastering styles: Warm, Balanced, and Open. Each style shapes the tone and dynamics differently, so I get options without starting from scratch. The plugin analyzes things like frequency balance and dynamics, then applies processing that fits what it hears.
I also like the real-time spectral display that shows me how the original mix compares to the mastered output. It makes decisions feel less like guesswork. The controls are simple enough that I don’t get lost, but detailed enough to shape the master how I want.
Features:
- AI Analysis & Mastering Styles
After the plugin scans my track, it gives me three starting points based on what it detects. I can pick Warm for a fuller low end, Balanced for an even spread, or Open for more air and space. From there, I tweak using the built-in controls.
It feels like having a rough draft already done, which speeds things up when I’m working on tight deadlines.
- Processing Controls
The plugin includes three-band EQ, compression with character control, saturation, presence boost, de-esser, and stereo width adjustment.
I use the EQ to fix small frequency issues, the compression to tighten dynamics, and the saturation when I want extra warmth. The presence slider helps vocals cut through, and the de-esser tames harsh highs. The stereo field tool lets me widen or narrow the image depending on the genre.
- Loudness & Metering
There’s a loudness slider with real-time LUFS metering, so I can control how loud my master hits without clipping. I find this super helpful for hitting streaming platform targets. The meters also show output levels, which keeps me aware of where my signal sits before it leaves the plugin.
2. iZotope Ozone Series

Image of standard iZotope Ozone 12 Advanced Version
As you have noticed, I didn’t mention specific version of Ozone here (currently it’s 12) because they release new stuff just too often so I don’t want to make this article to become obsolete too soon! But back to the content..
When I need a complete mastering toolbox in one place, Ozone is what I open first. iZotope’s Ozone mastering series has been the industry standard for years, and the latest version keeps earning that reputation with modules that feel both smart and flexible.
What stands out to me is how Ozone balances power with usability. I can lean on the AI-powered Master Assistant to get a solid starting point in seconds, or I can dig deep into individual modules when I want surgical control. It’s the kind of plugin that grows with you as your skills improve.
Ozone 12 Advanced includes 20 editable mastering modules that can be loaded either within the main Ozone plugin or as individual plugins in your DAW. It also comes with three add-on plugins and a Stem Focus workflow for detailed control over multi-track stems.
The modular routing allows you to build fully customized mastering chains while keeping everything organized within a single interface, and the suite includes tools for dynamic EQ, compression, spectral shaping, stereo imaging, harmonic enhancement, limiting, and more.
Here, I listed just a few of them, list would be too long if I go all-in:
- Clarity Module & Stem Focus
The Clarity module uses real-time spectral analysis to brighten or tame the top end without sounding harsh. It’s one of my favorite additions because it smooths out the high frequencies in a way that feels natural.
In the Advanced edition, Stem Focus lets me process individual stems like vocals, drums, or bass even in a stereo mix. I can apply EQ or dynamics to just the vocal without touching the rest of the track, which saves me from going back to remix.
- Transient / Sustain Mode
Most modules in Ozone support separate control of transients and sustain, which gives me more precision than a standard EQ or compressor. I can add punch to the attack of a snare while leaving the body alone, or smooth out sustain without killing the transient energy. It’s a simple feature that makes a noticeable difference in how dynamic my masters feel.
- Maximizer with Upward Compression
The Maximizer includes multiple IRC limiter algorithms plus a true peak limiter and soft clipper. What I appreciate most is the upward compression slider, which lifts quieter sections without crushing the dynamics. It feels like parallel compression built right into the limiter, and it helps me hit streaming loudness targets without flattening everything.
- Master Rebalance & Stabilizer
Master Rebalance lets me adjust vocals, bass, and drums even in a finished stereo file, which is helpful for last-minute corrections. The Stabilizer module works as an adaptive EQ that automatically smooths harsh resonances or tonal imbalances
This is the most comprehensive plugin when it comes to presets designed specifically for mastering music. There are various Ozone editions – Elements, Standard and Advanced, you can compare each at this page.
3. bx_masterdesk PRO by Brainworx

bx_masterdesk PRO feels like someone took a high-end mastering studio and condensed it into one thoughtful plugin. Where the Classic version gives you simplicity, PRO opens up real control without losing that “just turn knobs and it sounds good” magic.
I keep coming back to this plugin because it strikes a rare balance. It’s fast enough for quick client revisions but detailed enough for proper mastering work. The analog-modeled compression, 3-band parametric EQ, and stereo imaging tools make it way more than just a fancy limiter with presets.
What separates PRO from the free version is depth. You get surgical EQ bands, resonance filters for problem frequencies, and stereo panorama controls that let you reshape how a mix sits in space. It’s built for people who want one cohesive mastering chain instead of stacking ten separate plugins.
Features:
- 3-Band Parametric EQ & Resonance Filters
This is the biggest upgrade from the Classic version. Each band has independent gain and Q controls, so I can actually correct problem areas instead of just coloring the overall tone. The resonance filters are perfect for removing mud or harshness without broad EQ cuts. I use them on vocals that ring too much or basslines that bloom in the wrong spot.
- Analog Dynamics Engine with TMT
The compression here doesn’t just squash peaks. Tolerance Modeling Technology mimics the component variance in real analog gear, so each instance sounds slightly different. I can switch between analog and digital modes depending on whether I want warmth or precision. GLUE mode is my go-to when a mix needs binding without heavy processing.
- Advanced Stereo Management Tools
bx_masterdesk PRO gives me more stereo control than most dedicated imaging plugins. The Mono Maker collapses low frequencies to mono for better bass translation on club systems. Stereo Enhance widens the sides without making the mix feel hollow.
The M/S panorama tool lets me adjust how mid and side channels balance, which is perfect for fixing poorly imaged home studio mixes.
- Clipper, Limiter & XL Harmonics
I love having a hard clipper before the limiter. It shaves transients transparently so the limiter doesn’t have to work as hard. The limiter itself has a Turbo mode for louder masters that still breathe. XL Harmonics adds 3rd and 5th harmonic saturation for thickness without harsh distortion, especially useful on thin digital mixes.
The best thing? You can try it out for yourself for free and see if it fits your mastering needs.
4. Shadow Hills Mastering Compressor Class A

This plugin recreates one of the rarest compressors ever made. Shadow Hills only built 50 Class A hardware units back in 2012, and now Brainworx brings that sound into your DAW with the exact same dual-stage design and transformer colors.
What really sets Compressor Class A apart is the two-stage compression architecture. The optical stage smooths things out first, then the discrete Class A VCA adds punch and drive. I can dial in gentle glue or push it harder for aggressive coloration depending on what my master needs.
The three transformer options change the entire character. Nickel brightens the top end, Iron adds warm mids with classic analog flavor, and Steel brings more grit and harmonic distortion. Switching between them is like having three different mastering chains ready to go.
- Dual-Stage Compression Design
The optical compressor hits first and handles the smooth, transparent part of the dynamics. Then the Class A VCA stage adds character and punch that I can push as far as I want. This setup lets me shape dynamics in ways a single-stage compressor just can’t match. I get control and color at the same time.
- Switchable Output Transformers
Nickel, Iron, and Steel transformers each bring their own sonic signature. Nickel works great when I need air and sparkle on top. Iron is my default for rich, balanced analog warmth. Steel gets pulled out when I want the compressor to really stamp its personality on the master. Just flipping this switch completely reshapes the tone without touching any other settings.
- Mid/Side Processing & Mono Maker
The M/S mode lets me compress the center and sides separately, which is perfect for keeping vocals solid while opening up the stereo field. The Mono Maker tool collapses low frequencies to mono, tightening up the bass and kick without messing with the rest of the mix. I use this on almost every master to avoid phase issues and keep the low end focused.
- TMT & Advanced Controls
Tolerance Modeling Technology simulates the tiny differences between analog components, so the sound feels less perfect and more alive. The Parallel Mix knob blends dry and compressed signal for New York-style compression.
Stereo Width and side-chain filtering give me even more control over how the compressor responds. These extras turn it into way more than just a compressor emulation.
5. Waves Abbey Road TG Mastering Chain

This plugin brings the EMI TG12410 Transfer Console straight from Abbey Road Studios into my DAW, and it’s one of the most flexible mastering chains I’ve used.
What makes TG Mastering Chain stand out is the modular design. I can rearrange the processing stages however I want, which is rare in mastering plugins. It’s not locked into one fixed signal path like most channel strips.
The TG12410 was used to master classic records from the early 70s onward, and Waves worked closely with Abbey Road engineers to capture that sound. I get both vintage warmth and modern control in one tool.
- Modular Signal Chain with Five Processing Stages
I can reorder and bypass four of the five modules: Tone (EQ), Compressor/Limiter, Filter, V.A.L Stereo Spread, plus fixed Input and Output stages. This flexibility lets me build the exact chain my track needs.
Sometimes I want EQ after compression, other times before. Being able to swap modules around without loading separate plugins keeps my workflow fast and focused.
- Two Compressor/Limiter Modes
The plugin gives me two compression flavors. “Original” mode uses a Zener-diode limiter that adds grit and character, perfect when I want aggressive, colored limiting. “Modern” mode is cleaner and VCA-based, better for transparent loudness. Both modes include 48 dB/oct linear-phase sidechain filters, so I can control exactly what frequencies trigger the compressor.
- 4-Band EQ and Filter Module
The Tone module offers five selectable frequencies per band, designed for musical shaping rather than surgical cuts. I use it for broad tonal adjustments. The separate Filter module adds high-pass, low-pass, and a Presence bell, giving me extra sculpting options beyond the main EQ.
- Stereo Spread and M/S Processing
The V.A.L. spreader widens or narrows the stereo image, modeled after the TG12416 hardware. I can process in Stereo, Duo, or M/S modes, which is helpful when I need to adjust width without losing mono compatibility.
The plugin also includes a separate Meter Bridge with PPM, VU, and phase meters for precise monitoring across all instances.
6. IK Multimedia Lurssen Mastering Console

What stands out about Lurssen Mastering Console is that it doesn’t try to be a toolkit. It’s a complete mastering chain modeled after the exact workflow used by Grammy-winning engineer Gavin Lurssen at his LA studio.
When I first opened it, I expected another modular suite where I’d spend an hour tweaking compressors and EQs. Instead, I got something closer to hiring a mastering engineer. The plugin presents around 40 Style presets that cover rock, hip-hop, pop, and more, each one built from the ground up by the Lurssen team.
I like how restricted it feels in the best way. There’s a five-band fixed-frequency EQ, an input drive control, and this brilliant PUSH knob that shifts all EQ bands at once to add weight or clarity across the whole mix. It keeps me from overthinking and helps me focus on the sound rather than individual parameters.
The plugin also includes tube and solid-state processing modeled from real Lurssen gear, plus VU metering and a Digital Delivery Mastering mode that preps tracks for Apple’s specs. I can use it as a plugin or standalone, and the iOS version syncs with desktop, which is perfect when I want to check a master on my phone.
Features:
- Style Presets & PUSH Control
The 40 Style templates give me a strong starting point without guessing. I pick a genre-appropriate Style, adjust the input drive, and tweak the PUSH knob to taste. That PUSH control is something I haven’t found anywhere else.
It lets me emphasize or pull back the entire EQ curve musically, which adds cohesion without hunting through individual bands. It’s especially useful when I need more body in a vocal mix or want to brighten up a dull recording.
- Authentic Signal Chain Modeling
Lurssen Mastering Console replicates the actual chain used in Lurssen’s studio, including tube EQs, solid-state compressors, limiters, and de-essers. This isn’t a generic mastering plugin. It’s built to sound like the real thing, and I hear that warmth and glue immediately.
- Digital Delivery Mastering Mode
The DDM feature ensures my master meets Apple’s “Mastered for iTunes” peak standards. It prevents clipping after AAC encoding, which is critical for streaming platforms. I turn this on for every digital release now because it saves me from unexpected loudness issues post-upload.
7. Slate Digital FG-X 2

When I need to push a track’s loudness without crushing the life out of it, FG-X 2 VST becomes my go-to mastering tool.
What makes this plugin different is how it separates compression from limiting. The FG-Comp module handles transparent dynamics control while FG-Level intelligently applies saturation and limiting based on what’s actually happening in the frequency spectrum. I’m not just slamming a ceiling on everything and hoping it sounds okay.
I also appreciate the four processing modes (Clear, Tight, Punchy, and Loud) because they let me match the limiter behavior to whatever genre I’m working on. Clear keeps things open for acoustic material. Punchy works great when I want drums to stay aggressive. Loud is where I go when a track needs maximum competitive volume.
What you get:
- Intelligent Limiting with Saturation
FG-Level doesn’t just limit peaks. It analyzes the incoming signal and decides whether to apply saturation or brickwall limiting depending on frequency content. This keeps my mix sounding full instead of flat.
When I push it hard, I get loudness that still breathes instead of that crushed, lifeless sound that happens with basic limiters.
- Transient Control (LoPunch & Detail)
The LoPunch knob boosts low-frequency punch before the limiter hits, so kicks stay strong even at high loudness levels. Detail does the same thing for high frequencies, bringing out snare snap and cymbal clarity
- LUFS Metering & True-Peak Limiting
FG-X 2 includes comprehensive metering with LUFS, RMS, and true-peak readouts. I can set a target loudness range and the plugin shows me exactly how far off I am. The true-peak limiter with oversampling helps me meet broadcast and streaming standards without clipping on format conversion
8. Maor Appelbaum Mastering & Hendyamps THE OVEN

THE OVEN grabbed my attention right away because it doesn’t feel like your typical saturator or EQ. It’s a color box built by mastering engineer Maor Appelbaum and hardware designer Chris Henderson that combines tube and solid-state saturation in one creative package.
What I like most is how approachable it makes tonal shaping. Instead of dealing with dry technical language, I’m turning knobs labeled COOK, BAKE, BROIL, and SIZZLE. It sounds playful, but the results are serious.
I can add warmth to a dull vocal, thicken up a thin mix bus, or bring energy to a mastering chain without things getting harsh.
THE OVEN works across the board. I’ve used it on individual tracks, stems, group channels, and full masters. The three Burners let me saturate low, mid, and high frequencies separately, which gives me way more control than a single saturation knob ever could.
Main features I found:
- COOK Control & Drive Modes
The COOK knob adds tube character, and I can shape how it behaves using two switches. BAKE keeps things open and dynamic, while BROIL adds more compression and harmonic density. The ELEC/GAS switch changes the tube voicing, giving me two different flavors of saturation. I love having options like this because every source needs something a little different.
- Three-Band Burner System
Each Burner targets a different frequency range, and I can switch between two Burn Types (A/B) to change which frequencies get affected. The Top Burner even has a Bunsen mode that adds more high-end richness and a Burned mode for lo-fi distortion.
This setup lets me dial in saturation exactly where I need it without muddying up the rest of the mix.
- Sizzle & Stereo Tools
The SIZZLE control adds air and high-frequency saturation with two tonal flavors to choose from. THE OVEN also includes TMT (Tolerance Modeling Technology) for analog-style channel variation, a Mono Maker to tighten low end, and stereo width control.
These extras make it feel like more than just a saturation plugin. I’m bit discouraged by the presets, about 95% of the presets there are made for mixing, so the plugin with “mastering” in the title should definitely have more.
9. United Plugins MasterMind

MasterMind feels different from other mastering tools because it works more like a smart assistant than a static processor. United Plugins built this mastering VST plugin around intelligent optimization algorithms trained on professionally mastered tracks, so it can make your mix sound fuller and more polished without needing a dozen separate plugins.
What caught my attention first was how fast I could get radio-ready results. The Optimizer module analyzes your mix and applies psychoacoustic enhancements that make everything feel bigger and richer. I don’t have to guess at settings because it adapts to what my track actually needs.
The Match EQ feature is incredibly useful when I want my master to sit in the same tonal space as a reference track. I just load a professional song, let MasterMind analyze its spectrum, and adjust how much of that character I want to apply. It’s helped me keep album tracks consistent without manually tweaking curves for hours.
Main features:
- Intelligent Optimizer Engine
This is the heart of MasterMind. The Optimizer studies your mix and applies smart processing that adds depth and clarity without making things sound over-processed. I use it when I need quick improvements that still sound natural.
It’s trained on real mastered tracks, so it knows what “finished” actually sounds like.
- Match EQ with Reference Tracks
Loading a reference and matching its spectral shape changed how I approach tonal balance. MasterMind shows me exactly where my mix differs from the reference, then lets me dial in how much matching I want This keeps me from guessing and helps my tracks fit the sonic expectations of their genre.
- Built-In Limiter with Saturation
The limiter section goes beyond just catching peaks. It includes tube-style saturation based on classic American analog gear, plus adjustable threshold and ceiling controls. When I push it, my masters get louder but still keep warmth and character. The visual meter shows signal levels at three processing stages, so I always know what’s happening to my audio.
Stereo Width and Shelving EQ A single knob controls stereo width, which makes it easy to shape spatial feel during mastering. The 2-band shelving EQ with low and high controls gives me enough tone shaping for most masters, and the interface supports up to 16× oversampling to keep everything clean even when adding saturation.
For this one, I had a trial and I was not able to load the presets, so I can’t judge on that, but I heard it had some good presets for mastering.
10. FabFilter Pro-L 2
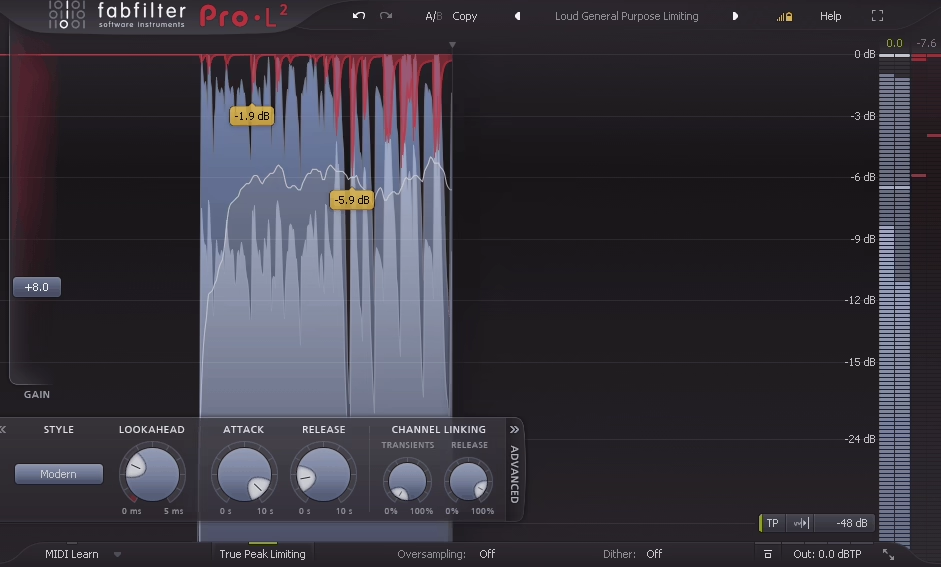
Pro-L 2 sits at the end of nearly every mastering chain I build, and there’s a good reason for it. This limiter delivers transparent loudness that doesn’t crush the life out of your mix, even when you’re pushing levels hard.
What I appreciate most is how eight different limiting algorithms let me shape the response depending on what the track needs.
Modern mode keeps things clean and open. Aggressive grabs extra loudness without killing punch. Safe mode rescues me when low-end heavy material starts to distort under pressure.
The true-peak limiting catches intersample peaks that other limiters miss. When I’m preparing tracks for Spotify or Apple Music, knowing my file won’t clip on consumer devices gives me real confidence.
Features:
- Eight Limiting Algorithms
Each algorithm handles gain reduction differently instead of just adding color. Modern keeps transients intact with adaptive timing. Aggressive pushes loudness forward without softening your drums. Bus works great on group channels.
Safe mode solves problems with bass-heavy or resonant material that causes distortion. I switch between them depending on the genre and how the mix responds.
- Advanced Loudness Metering
Pro-L 2 shows LUFS measurements for streaming platforms right inside the plugin. I can see momentary, short-term, and integrated loudness all at once, plus true-peak readings that follow broadcast standards like EBU R128 and ITU-R BS.1770-4.
The target system tells me exactly how far above or below platform specs I’m sitting, which saves me from bouncing between metering plugins.
- Oversampling Up to 32×
High oversampling modes reduce aliasing and intersample distortion when limiting gets aggressive. I use 16× or 32× oversampling on final masters where I need ultraclean peaks. It uses more CPU, but the reduction in artifacts makes it worth running during the final bounce.
- Unity Gain & Audition Modes
Unity Gain lets me hear tonal changes without loudness fooling my ears. Audition mode plays only the gain reduction signal, so I can hear exactly what the limiter is doing and catch pumping or distortion before it becomes a problem.
11. TC Electronic MASTER X HD – Easy Multiband Dynamics

What makes MASTER X HD different is how it balances serious mastering power with shortcuts that actually save time. I’ve used plenty of multiband processors that either feel too simple or completely overwhelming. This one walks a middle path.
TC Electronic built this plugin around three frequency bands, and each band gets its own expander, compressor, and limiter. That level of control means I can tighten up muddy low end, add punch to the mids, and control harsh highs without affecting the rest of the mix. It’s way more flexible than a standard multiband compressor.
The target curve system is what hooked me. Instead of tweaking every threshold and ratio from scratch, I can pick a curve like “add air” or “bass emphasis” and dial in how much I want with one slider. When I’m working fast or just need a solid starting point, this feature is a lifesaver.
Full 3-Band Dynamics Per Frequency Range
Each of the three bands gives me separate expansion, compression, and limiting tools. I can expand the mids to bring out detail, compress the lows to control boom, and limit the highs to tame harshness. Having all three dynamics processors per band makes it easier to shape each part of the spectrum exactly how I need it without stacking multiple plugins.
- Target Curves for Quick Setup
The target curves are simple templates that apply dynamic shaping across all bands at once. I pick a curve that matches my goal, then adjust the Target Factor slider to control the intensity. It cuts down setup time while still giving me room to tweak individual bands later
- Soft-Clipping and Analog Color
MASTER X HD includes built-in soft-clipping that adds warmth and helps me push loudness without making the master sound flat or harsh. It’s subtle but noticeable, especially when I’m trying to get competitive loudness on streaming platforms.
The analog-style saturation gives the final mix a bit more character than pure digital limiting.
- Parallel Processing Mix Control
The mix knob lets me blend the processed signal with the dry signal. This makes parallel compression easy without routing tricks in my DAW. I can apply heavy dynamics but keep some of the original punch and life in the mix.
It’s a simple feature that makes a big difference when I want control without squashing everything. Great thing is that it comes with trial, so you can check that out.
12. UAD Manley Massive Passive

The Manley Massive Passive stands out because of how it shapes tone in ways that feel genuinely different from most software EQs I’ve tried. Universal Audio modeled this plugin after the legendary Manley hardware unit, and what makes it special is the parallel filter design instead of the usual stacked bands.
When I first used it, I noticed how adjusting one band seemed to affect the others in subtle ways. That’s because the four parametric EQ bands operate in parallel, not in series. The filters actually interact with each other, which gives you musical results that feel less predictable but way more organic.
There are two versions included: Standard and Mastering. The Standard version has continuous bandwidth control and wider gain range, which I use for more aggressive tone shaping during mixing. The Mastering version gives you 16-step bandwidth selection and a reduced gain range of ±11 dB, making it perfect for precise, repeatable mastering moves.
Features:
- Parallel Filter Topology
The biggest thing that hooked me is how the EQ bands interact. Because they run in parallel instead of stacking, turning up one frequency can shift how another band responds. It feels less mechanical than typical parametric EQs.
I’ve gotten some of my smoothest, most natural boosts by leaning into this behavior rather than fighting it.
- Tube & Transformer Saturation Modeling
Even when I’m making small EQ moves, there’s a warmth and weight to the sound that comes from the modeled tube distortion and transformer saturation. The plugin also simulates hysteresis behavior from the inductors, which adds subtle harmonic color
- High-Pass and Low-Pass Filters with Stepped Frequencies
The built-in HP and LP filters are super useful for cleaning up extremes without reaching for another plugin. They use stepped frequency selection, which means I can match settings across sessions easily. The Mastering version has different filter values optimized for final stage work, and I find them quite helpful for controlling sub energy or taming harshness.
Even though plugin is great for mastering, I must say the presets are all about mixing.
13. IK Multimedia Lurssen Mastering EQ

What got my attention about the Lurssen Mastering EQ is how it focuses on one thing and does it really well. This plugin is based on a classic stereo tube EQ that Lurssen Mastering has used for years in their Grammy-winning studio.
IK Multimedia released this mastering VST plugin in March 2025 as a follow-up to the Lurssen Mastering Console. The plugin emulates the 825 Tube EQ, which is known for adding warmth and musical color to tracks without making them sound harsh or digital. I find it useful when I want to shape the overall tone of a master without reaching for ten different plugins.
The tube modeling gives tracks a warm, analog character that works especially well on bright or sterile mixes. It smooths out harshness while bringing out musical details in a way that feels natural.
- Faithful Tube EQ Emulation
The plugin models every detail of the original hardware, from the tube circuit behavior to how it colors the sound. When I use it on a mix that feels too clean or harsh, the tube character adds body and smoothness without making everything muddy.
The modeling captures how the hardware reacts to different input levels, so pushing the EQ harder gives you more saturation and color. It feels like working with real studio gear.
- Stereo Processing & Tonal Control
This EQ is designed specifically for stereo mastering, which means it handles the full mix without breaking up the imaging or making things feel unbalanced. I can shape low end, mids, and highs while keeping everything glued together. The limited-production hardware this is based on became a benchmark in mastering studios because of how musical it sounds.
- Modern Controls with Analog Feel
IK added some digital controls that the original hardware didn’t have, which gives me more flexibility. I get the warmth and color of tubes but with the precision I need for modern mastering work. It’s available at an intro price of $49.99, which increases to $99.99 after the promotion ends.
14. Safari Pedals Noam’s Mastering Console

Safari Pedals took a different direction with this one. Instead of another pedal-style plugin, they recreated mastering engineer Noam Levinberg’s custom tube mastering desk and turned it into software.
What makes Mastering Console plugin interesting is that it’s based on a one-of-a-kind analog console that Safari HQ actually uses for real mastering sessions. The plugin gives me that analog warmth and final polish without needing actual hardware sitting on my desk.
I like how everything flows in a single chain. The tube saturation blends from clean to warm, the Baxandall EQ adds smooth tonal shaping, and the Mid-Side Matrix lets me control stereo width without things falling apart in mono. It feels purpose-built for mastering instead of just being a collection of random processors.
Features:
- Tube Saturation with Blend Control
The tube stage is probably my favorite part. I can dial in just a hint of warmth or push it harder for more color and harmonics.
The blend knob makes it easy to find the right amount without overdoing it. When I want that analog character on a digital mix, this is where I start.
- Baxandall EQ
This isn’t a surgical EQ. It’s a smooth shelving EQ designed for broad tonal moves on the low and high end. I use it when I need to add a little air on top or tighten up the bottom without making things sound harsh or brittle.
- Mid-Side Matrix for Stereo Control
The MS Matrix separates mid and side signals so I can process the center and edges independently. This is huge for widening a mix while keeping vocals and bass locked in the middle. It’s one of those features I didn’t think I needed until I had it
Clipper with Auto Gain The clipper adds loudness by shaving peaks, and the auto-gain keeps levels consistent so I’m not constantly riding the output fader. It’s a cleaner way to push volume compared to just slamming a limiter, especially when I need competitive loudness without squashing everything flat.
15. Plugin Alliance TOMO Audiolabs LISA

LISA took me by surprise the first time I used it. Most dynamic EQs react to your audio, but this one has six separate opto compressor cells, one for each band, which gives it a completely different feel from anything else I’ve tried.
What makes LISA mastering plugindifferent is how it was designed to mirror actual analog hardware. TOMO Audiolabs built the original as a mastering-grade piece of boutique gear, and Brainworx modeled it with serious attention to detail. The plugin version keeps that analog character but adds digital flexibility.
I reach for LISA when I need control that responds naturally to the music. It doesn’t just cut or boost, it adjusts based on what’s happening in the signal. That makes it great for mastering or mix bus work where you want movement without it sounding forced.
Here is what you get:
- Six Independent Opto-Dynamic Bands
Each band has its own optical compressor or expander built in. I can set each one to compress or expand, choose between standard or 10:1 ratios, and pick from slow, medium, or fast attack and release times.
This level of control per band is rare. When I’m working on a dense mix and need the low mids to duck slightly under the kick without touching everything else, this setup makes it possible without stacking multiple plugins.
- Parallel Processing Circuit
LISA processes all six bands in parallel instead of in series. This keeps everything transparent even when I’m making big moves
- TX Drive & TMT Modeling
The transformer saturation control adds warmth or edge depending on how far I push it. Brainworx’s Tolerance Modeling Technology (TMT) simulates the small differences between left and right channels that happen in real analog gear.
It’s subtle, but it adds a bit of width and realism that I notice most on stereo sources like overheads or synth pads.
16. Klevgrand Grand Finale

Grand Finale plugin caught my attention because it breaks away from the usual approach. Instead of loading up five or six separate plugins to finish a track, Klevgrand built everything into one smart chain that handles compression, EQ, stereo width, and limiting in a fixed order.
I reach for this plugin when I need fast results without second-guessing my routing. The parallel signal path is what makes it special for me. I can blend in compression and distortion on a separate layer, which adds warmth and presence without crushing my main mix.
The LUFS and RMS metering sits right on the interface. I don’t need to open another analyzer to check if my track hits streaming targets. Everything I need to see is already there, which keeps my workflow moving.
You get:
- Modular Chain with Parallel Processing
Grand Finale runs a fixed signal path that includes a compressor, multiband compressor, stereo processor, two-band EQ, and output limiter. What sets it apart is the parallel “Add” path where I can dial in extra compression and distortion separately.
This gives me control over thickness and grit without touching the main dynamics. I love how I can add weight to a mix without making it feel squashed.
- Multiband Compression & Algorithm Selection
The four-band compressor gives me control over each frequency range with its own knob. What I find useful is the ability to choose different compression algorithms per band, so I can shape the low end differently than the highs. It’s not as surgical as a full mastering suite, but for final polish it does exactly what I need.
- Built-In Loudness Metering
Having LUFS and RMS displayed together saves me time. I can see how loud my track will sound on streaming platforms without bouncing out and checking elsewhere. The output limiter handles final peaks, and while the threshold is fixed, the release control gives me enough flexibility for most tracks. It’s simple but gets the job done.
Lot’s of relevant mastering presets here, definitely check the trial.
Freebies
1. bx_mastering studio by Brainworx

What makes bx_mastering studio different is the tech behind it. It uses the same algorithms from mastering.studio, an online service that’s processed over 100,000 tracks. That kind of real-world use means the presets aren’t guessing. They’re trained on actual mixes across tons of genres.
I also appreciate how simple the workflow is. There’s no endless tweaking or second-guessing EQ curves. I just load my file, audition a few styles, and export. It’s perfect for quick demos, podcast episodes, or YouTube content when I need something polished fast.
Features:
- Standalone Desktop Application
The biggest thing I love is that bx_mastering studio runs completely on its own. I don’t need to launch my DAW, load a session, or route anything. I just open the app, drop in my mixdown, and start mastering. It’s great for producers, podcasters, and content creators who want fast results without the technical overhead.
- Machine-Guided Mastering Algorithms
bx_mastering studio pulls from the AI-driven processes used in the original mastering.studio platform. These aren’t random plugin chains. They’re shaped by data from thousands of professionally mastered tracks, so the presets adapt better to different genres and mix styles. I get clean, balanced results that don’t sound over-compressed or dull.
- HD Mastering Options Included
Even though it’s free, bx_mastering studio includes HD mastering presets that weren’t in the original online version. I can push my tracks to higher resolution without paying for an upgrade or subscription. For a free tool, that’s rare and really useful when I need something that translates well across streaming platforms and playback systems.
2. iZotope Ozone EQ

Ozone free EQ stands out because it’s not some watered-down freebie. This is pulled straight from iZotope’s Ozone 12 mastering suite, which means you’re getting legitimate professional-grade equalization without spending a cent.
What really got me hooked with this free mastering plugin is how it handles frequency work differently than basic EQs. The transient and sustain mode lets me carve out attack or body separately, which is something I used to need expensive dynamic EQs for. When I’m shaping kick drums or trying to add clarity to vocals without losing warmth, this feature saves the whole mix.
I also appreciate that it comes bundled with Komplete Start from Native Instruments. You download one package and get this EQ along with other useful tools, which makes getting started ridiculously simple.
- Transient / Sustain Processing
This is my favorite part. I can boost the snap of a snare’s attack while leaving the tail alone, or add weight to a bass guitar’s sustain without making the pluck muddy. It’s like having two EQs working on different parts of the same sound. Most free EQs can’t do this, and even some paid ones struggle with it.
- Mid/Side EQ Control
Being able to EQ the center and sides of my stereo image separately gives me so much more control during mastering. I can brighten the sides to widen a mix or tighten up low-end in the mids without touching my stereo bass elements. The Delta button also lets me solo what I’m actually changing, which stops me from making bad decisions that sound good in solo but mess up the full mix.
- Analog & Digital Modes with 8 Bands
Switching between analog-style warmth and clean digital precision means this EQ adapts to whatever I’m working on. The 8 adjustable bands give me enough room to handle broad strokes and surgical cuts in the same session. The resizable interface also helps when I’m working on a laptop versus my main monitor.
3. Analog Obsession OAQ
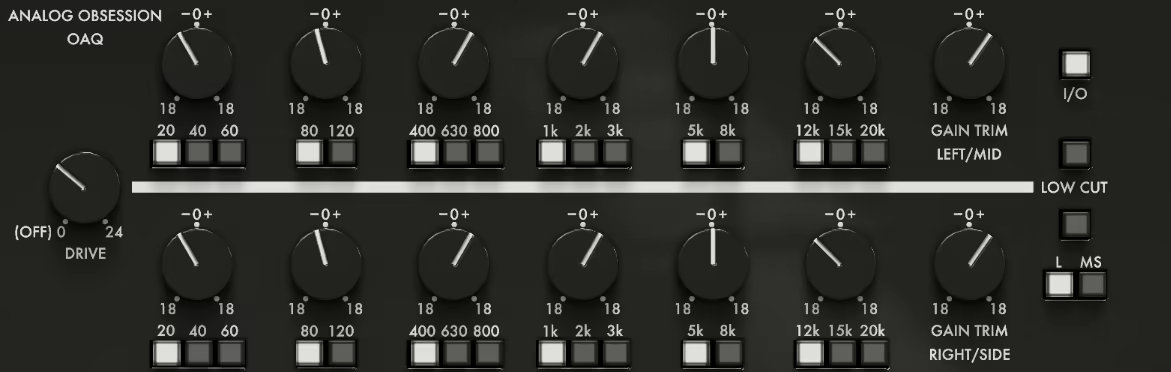
This EQ caught my attention because it bridges something most free EQs don’t: mastering-grade tone shaping with built-in mid/side processing and harmonic saturation. I’ve used plenty of budget plugins that claim “analog warmth,” but OAQ actually delivers weight and clarity without crashing my CPU.
What really sold me is how Analog Obsession designed it around simplicity. Instead of infinite frequency sweeps, you get six fixed bands with stepped choices, Low A/B, Mid A/B, High A/B – each offering a handful of musical frequencies. It feels like using classic hardware where you pick a setting and trust your ears instead of chasing numbers.
The drive control adds harmonic color when I need extra presence or glue, especially on stereo buses. Pair that with the switchable mid/side mode, and I can widen highs or tighten bass without touching a single routing trick in my DAW.
Features:
- Six Fixed EQ Bands with Musical Frequencies
OAQ gives me two bands per region: Low A (20/40/60 Hz), Low B (80/120 Hz), Mid A (400/630/800 Hz), Mid B (1k/2k/3k Hz), High A (5k/8k Hz), High B (12k/15k/20k Hz). Each band offers ±18 dB of gain, which is plenty for tonal moves without getting into repair territory. I like how the stepped frequencies keep me focused on shaping rather than endless scrolling.
- Built-In Mid/Side and Drive Control
The MS switch lets me process center and side channels separately without extra plugins. When I want to brighten sides or tighten the center low end, I just flip the switch and adjust. The drive knob (0-24 dB) activates saturation modeling, adding harmonics that make mixes feel fuller. It’s subtle but noticeable, especially on drums and vocals.
- Resizable Interface & Oversampling
I can drag the GUI from 50% to 200%, which helps on my laptop and my 4K monitor. When drive is active, the 4× oversampling option kicks in to reduce aliasing. It’s not always needed, but when I push the drive hard, oversampling keeps things clean. The interface is simple: no clutter, just the controls I need to make quick decisions and move on.
4. Outobugi Toner
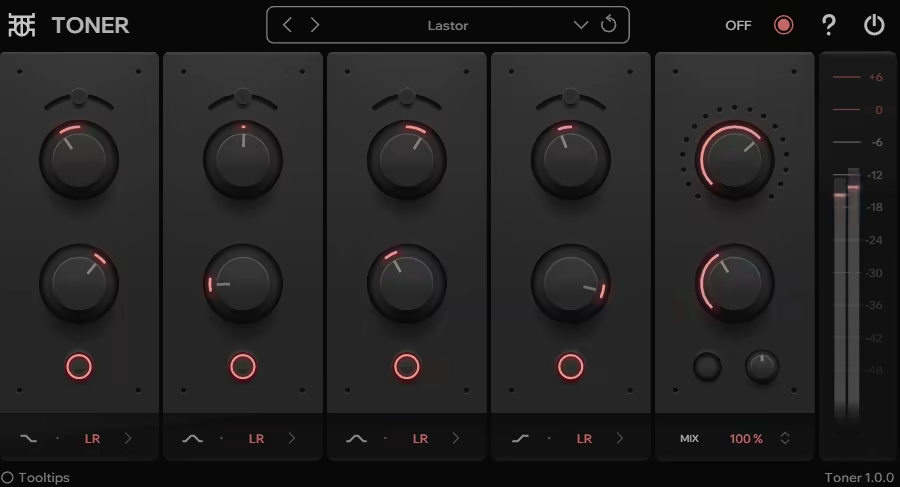
Another free EQ great for mastering. Toner is a four-band tone-shaping EQ from Finnish developer Outobugi, and it’s completely free for Windows users. What makes it interesting is that it’s not trying to be a surgical EQ. Instead, it focuses on adding warmth and clarity through a combination of EQ curves, saturation, and a unique de-emphasis feature.
I’ve found it works best on mix buses or during the mastering stage when you want to add character without making things sound over-processed. The saturation control gives you harmonic richness, and the de-emphasis feature lets you apply an inverted EQ curve after saturation to keep things balanced and clear.
The four bands include low and high shelving filters, plus two mid-range bell filters. Each band can be toggled between Left-Right or Mid-Side processing, which is really helpful when you want to shape the stereo image differently in the center versus the sides.
Features:
- Four-Band EQ with Saturation
The core of Toner is its four EQ bands paired with a saturation knob. The low and high bands work as shelves, while the two mid bands use bell curves. The saturation adds harmonic distortion that brings warmth and thickness to whatever you run through it. I like using it on vocal buses or acoustic instruments where I want a bit more presence without reaching for a separate saturator plugin.
- De-Emphasis Control
This is the feature that sets Toner apart from other free EQs. After you apply saturation, the de-emphasis knob lets you invert your EQ settings, which helps prevent masking and keeps your mix from getting muddy. It’s a smart way to add color while maintaining clarity, especially when you’re boosting multiple bands at once.
- Mid-Side and Mix Control
Each EQ band can be switched to Mid-Side mode, giving you control over the stereo field. There’s also a mix knob for parallel processing, so you can blend the processed signal with the dry signal. This makes it easy to dial in just the right amount of tone shaping without overdoing it. Delta mode lets you solo just the processed signal, which helps you hear exactly what the plugin is doing.
Toner is only available as a VST3 for Windows, so Mac users are out of luck for now. But if you’re on Windows and want a free mastering EQ with built-in saturation, this is worth downloading.
5. Analog Obsession ATTRACTOR
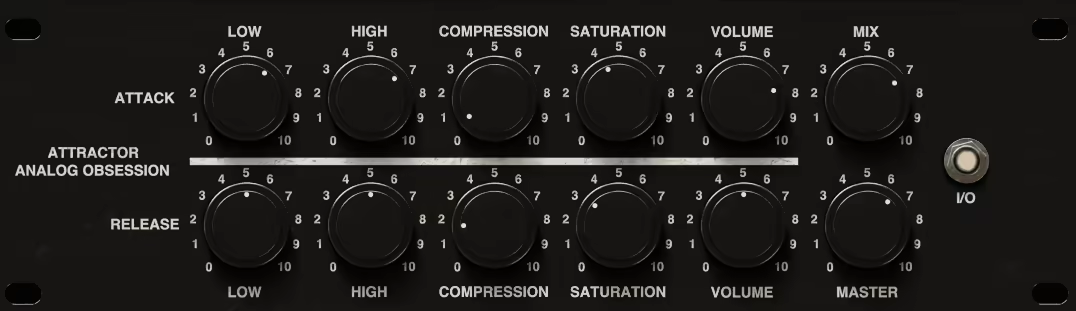
Instead of just squashing peaks, ATTRACTOR VST splits your audio into two parts and lets you shape the attack and sustain phases separately.
I find this approach refreshing when I want to bring out punch without losing the body of a sound. The interface is simple enough that I can dial in changes quickly, but the results feel precise and musical.
What makes ATTRACTOR different is how it treats the “life” of a sound. I can tighten up the snap of a snare while letting the tail breathe, or do the opposite and fatten the sustain without dulling the initial hit. It’s available free for both PC and Mac in VST3, AU, and AAX formats.
Features:
- Independent Attack & Sustain Controls
The attack knob lets me control how fast the transient comes through. When I need drums to punch harder, I push it up. When I want a softer, more blended feel, I pull it back. The sustain knob works on the body and tail of the sound. I use this to add weight or tighten up muddy low-end without touching the initial hit. Having both controls separated means I can shape dynamics with way more detail than a standard compressor gives me.
- Mid/Side Processing Mode
ATTRACTOR includes a Mid/Side switch that opens up stereo shaping options I didn’t expect from a free plugin. I can sharpen transients in the center while expanding sustain on the sides, which helps glue mixes together during mastering. It’s especially useful on drum buses or full mixes when I want width without losing focus.
- Density Control & Oversampling
The density knob adds harmonic saturation to the sustain phase, which thickens the body without affecting transient clarity. When I push it hard, I turn on the 2× or 4× oversampling to keep things clean and avoid digital harshness.
6. Analog Obsession BusterSE

BusterSE is one of those free plugins that makes you wonder why anyone charges for console compressors anymore. It’s modeled after classic SSL-style bus compression, and I’ve used it countless times when I need to add glue to a mix without spending a dime.
Analog Obsession makes all their plugins available for free through a donation model on Patreon. BusterSE gives you that smooth VCA compression sound that works great on drum buses, mix buses, or anywhere you want tracks to feel like they’re sitting together better.
The interface is simple enough that I don’t get lost tweaking, but it has enough control to shape exactly how the compression behaves. I like that it doesn’t try to do too much. It just does one thing really well.
Features:
- Classic Console Compression Character
BusterSE nails that SSL-style glue I reach for when individual tracks sound good but don’t feel connected. The VCA-style compression responds quickly without sounding aggressive, which keeps my drums punchy and my mix bus controlled.
I use it most on drum groups when I want everything to breathe together. The attack and release settings are musical, so even when I push it harder, things don’t start pumping in a bad way.
- Clean and Easy Interface
One reason I keep coming back to BusterSE is how straightforward the controls are. Threshold, ratio, attack, release, makeup gain. No confusing menus or hidden features that slow me down.
When I’m mastering or doing final bus processing, I don’t want to spend time figuring out a plugin. I just load BusterSE, dial in a few settings, and move on. It’s fast and it works every time.
- Zero Cost, Professional Sound
The fact that this plugin is completely free still surprises me. I’ve used paid console compressors that don’t sound as smooth or respond as well. Analog Obsession’s donation-based system means you can grab it without worrying about cost, and if you love it, you can support them later.
For anyone building a mastering chain on a budget, BusterSE is one of the first plugins I recommend. It adds polish and control without coloring the sound too much, which is exactly what I need in the final stages.
7. TDR Nova
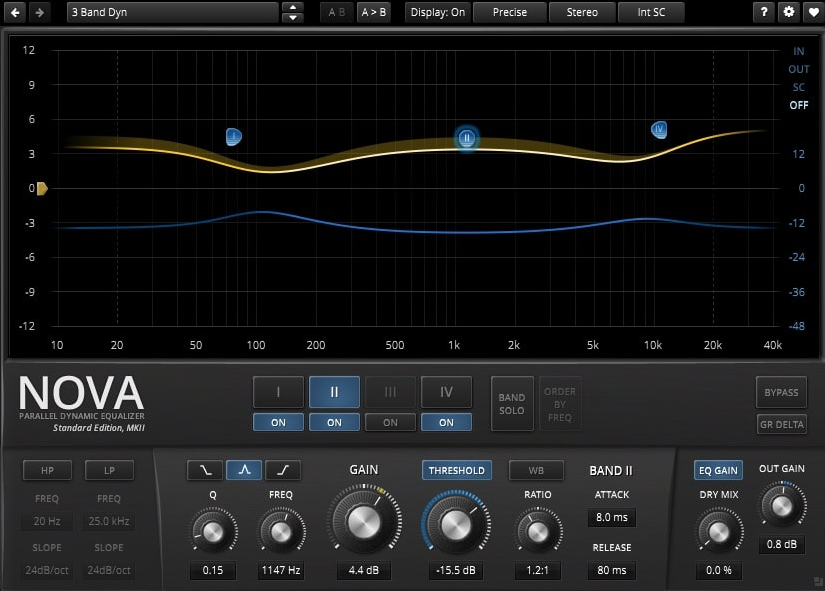
This one stands out because it does something most free plugins can’t quite pull off. It’s a parallel dynamic equalizer that lets me shape tone and control dynamics in the same tool.
The way TDR Nova blends traditional parametric EQ with per-band compression and expansion gives me options I’d normally need two or three plugins to cover. It keeps my workflow clean without sacrificing control.
The interface is visual and direct. I can drag EQ nodes around, watch the spectrum analyzer in real time, and tweak attack, release, threshold, and ratio for each band without opening a dozen menus. It’s one of those plugins that feels pro-level but doesn’t intimidate beginners.
Features:
- Four Dynamic EQ Bands
Each of the four bands can work as a static EQ or dynamically compress or expand based on the signal level. I set a threshold, adjust the ratio, and dial in attack and release times to make specific frequencies duck or boost only when needed. This is perfect for taming harsh sibilance, controlling boxy mids, or adding presence only to louder transients. I’ve solved resonance problems with Nova that traditional EQ couldn’t touch because it reacts to the music instead of sitting static.
- Wide-Band Processing
Nova includes a unique W-Band that processes everything not covered by the four EQ bands. I can control its gain separately, which gives me a creative way to shift the overall spectral balance without touching individual frequencies. It’s subtle but powerful when I want to add weight or air without cluttering up my EQ curve.
- External Sidechain & Filters
I can use external sidechain to drive Nova’s dynamics from another track, which opens up classic de-essing or frequency ducking setups. The high-pass and low-pass filters let me clean up lows or highs before the dynamic EQ bands engage, keeping my processing musical and focused.
Hello, I’m Viliam, I started this audio plugin focused blog to keep you updated on the latest trends, news and everything plugin related. I’ll put the most emphasis on the topics covering best VST, AU and AAX plugins. If you find some great plugin suggestions for us to include on our site, feel free to let me know, so I can take a look!