Here are some of the best plugins for Ableton Live, covering a range of categories.
Ableton Live already has great built-in tools, but adding the right third-party plugins can really change the way you work. No matter if you’re making beats, creating new sounds, or mixing your tracks, the plugins you use have a big impact on your workflow and your music.
I’ve tried out many plugins to find the ones that really improve my Ableton sessions. This list includes everything from AI-powered synths and percussion tools to tape emulators and acoustic drum libraries. Each plugin offers something special, like making your workflow easier, giving you a unique sound, or helping you fix problems you’ve struggled with before.
You’ll find plugins here at different prices and in different categories. Some fill gaps in Ableton’s built-in tools, while others can help you try out new sounds you might not have explored before.
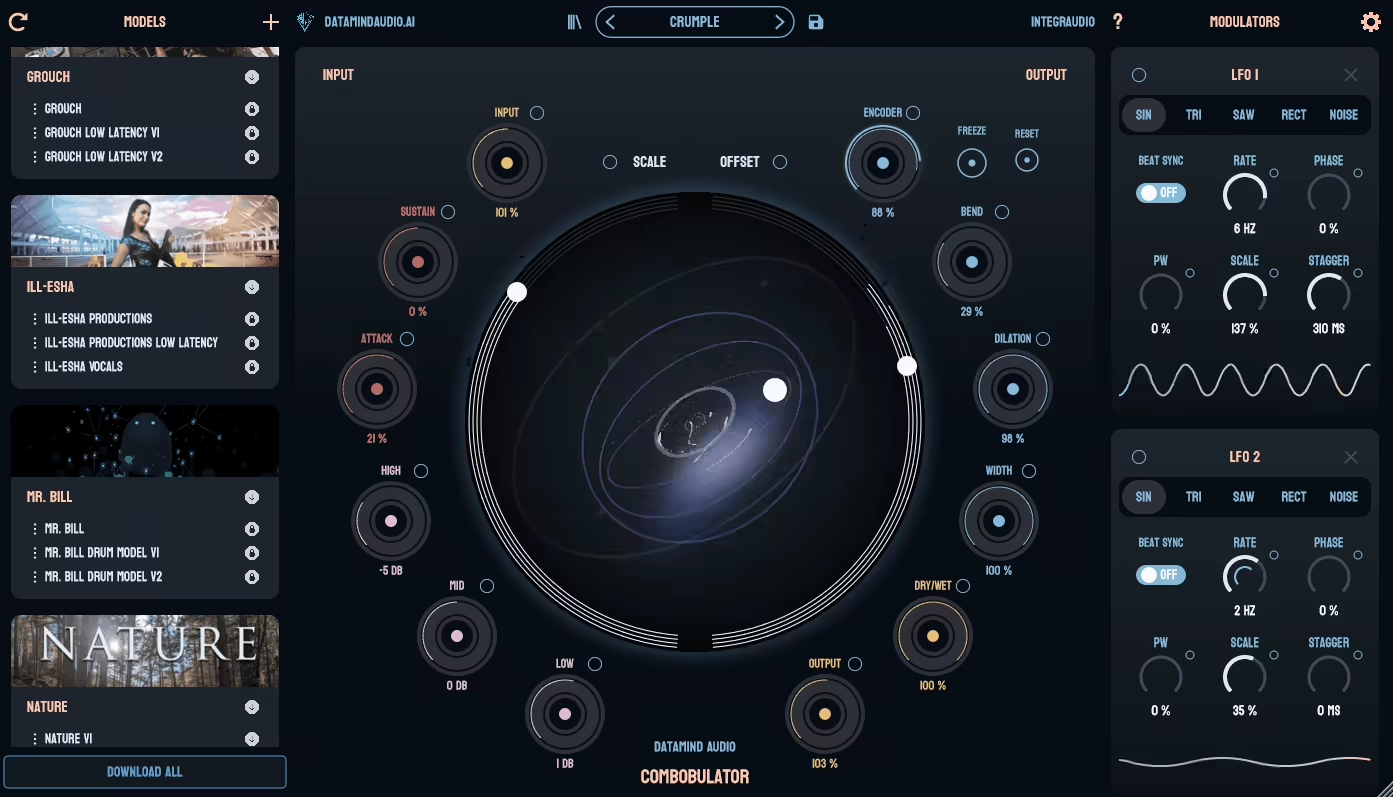
1. Datamind Audio Combobulator (Neural AI Synth)

Combobulator stands out from other synths in your Ableton rack because it doesn’t use oscillators or samples. Instead, it runs your audio through a neural network that creates new sounds based on what it learned from real artists.
You can give it any audio—vocals, drums, field recordings, anything—and it rebuilds that sound using an AI model called an Artist Brain. The result is something totally new, but it still keeps some of the feel of your original sound. It’s unpredictable in a good way, especially if you’re tired of the same presets or want textures you can’t find anywhere else.
It’s great for sound design and ambient music, especially when you want something weird, evolving, or completely different. DataMind also splits revenue evenly with the artists who train each Brain, which is pretty rare for AI plugins right now.
- Neural Synthesis Engine
Combobulator doesn’t play samples or use traditional oscillators. Instead, it processes your input through trained neural networks that recreate the sound in real time. You can load different Artist Brains to completely change the character of the output.
Some Artist Brains are glitchy and experimental, while others are more musical and tonal. Each one gives you a completely different set of sounds. I like to throw random loops into it just to see what happens. It feels like having a sound designer inside a plugin.
- Latent Space Modulation
The plugin provides controls such as Scale, Offset, and Width, which let you explore the ‘latent space’ within each Brain. These aren’t regular filter or envelope knobs, but they actually change how the AI understands and shapes the sound.
You can also map LFOs, envelopes, and MIDI triggers to these controls for evolving textures. The Width control moves the left and right channels separately, which creates some unique stereo effects.
- Ethically Trained AI Models
Every Artist Brain is made from audio provided by real sound designers and producers, and those artists get half the revenue when you buy their Brain. The plugin doesn’t use scraped data from the internet.
DataMind lists the contributors, shows what sounds each Brain was trained on, and keeps the process transparent. It’s the first AI plugin I’ve seen that actually pays the people who provided the training data.
This is a really unique plugin, and you should check it out since it comes with a trial version.
2. iZotope Trash (Design your Distortion)

If you want distortion that goes far beyond basic grit, Trash is the plugin I recommend. It’s my go-to whenever I want to totally reshape a sound or add some controlled chaos to a track.
iZotope Trash has two processing engines in one plugin. The Trash module handles distortion, while the Convolve module shapes your sound with over 600 impulse responses. You can use them on their own or together for some really creative results.
I’ve tried a lot of distortion plugins, but none feel as flexible as this one. You aren’t limited to just one type of distortion. There are over 60 options, from warm tape sounds to harsh digital effects, and you can blend up to four at once with the XY pad.
- Dual Engine Design with Morphing Control
The plugin has two main parts. Trash covers all your distortion needs with lots of algorithms. Convolve lets you use impulse responses to make your audio sound like it’s running through metal tubes, wooden boxes, or even underwater.
My favorite feature is the XY pad, which lets you blend up to four distortion types or impulse responses in real time. You aren’t limited to one sound. You can find a spot between tape warmth and bit-crushed chaos, or anywhere in between.
- Multiband Processing
Trash lets you split your signal into up to 3 frequency bands and process each band separately. I would recommend it when you want heavy bass distortion but need to keep your mids clean.
You can distort just the low end and leave the rest alone, or add brightness by only affecting the highs without making the bass muddy. This level of control is rare in distortion plugins and really helps when you want to shape a specific sound.
- Dynamic Modulation & Built-In Filtering
Trash has an envelope follower that makes the distortion react to your input signal. Instead of a static effect, the sound changes depending on how loud or quiet your audio is.
There’s also a resonant “Scream” filter for adding extra color after distortion, and an auto-gain limiter to keep levels in check. These features make Trash respond and move with your music, rather than just applying a static effect.
3. Klevgrand Walls (Reverb you will use)

Walls by Klevgrand feels experimental but never gets confusing or hard to use. A lot of reverbs either play it safe or get so wild that you can’t use them in a real mix. Walls hits that perfect middle ground, letting you create both clean, polished spaces and strange textures with one plugin.
It works really well on vocals that need a bit of room sound or on synth pads when you want them to blend into dreamy soundscapes. Since it has six different reverb models, you don’t have to keep changing plugins to match the mood you want. I also really like the modulation system. Instead of just putting your sound in a fixed space, you can make the reverb move and change along with your track.
- Six Reverb Models
Walls comes with Plate, Hall, Spring, Cosmic, Hex, and Binary reverb types. I usually use Plate and Hall for realistic spaces on vocals or acoustic instruments. Spring is great for that classic bounce, but you can also make it sound metallic and weird if you want.
Cosmic is good for deep, diffused soundscapes, especially in cinematic or ambient music. Hex is somewhere between delay and reverb, so it’s great for granular textures or experimental sounds. Binary is made to sound rough and stylized, which is perfect when you want something with character instead of realism.
- Up to 40 Simultaneous LFOs
This is the feature that really sets Walls apart from most other reverbs. It can run up to 40 LFOs at the same time, each with its own frequency control. There’s also an X/Y modulation pad so you can change parameters in real time.
You can use this to make the stereo width move, change the diffusion, or create spaces that evolve as your track plays. It makes reverb feel like a dynamic effect, not just something you set once and leave alone.
- Decay Time Range
You also get a huge range of decay times, from 100 milliseconds up to 30 seconds. Short decays are great for tight, controlled ambience on drums or vocals. Long decays help you create big, evolving textures on pads or for sound design.
I like having this much range because it means Walls can handle both subtle mixing and wild sound design in the same session.
- EQ & Filter
Walls has a 2-band EQ and a damping filter built in. You can shape the reverb’s tone without needing extra EQ plugins, whether you want to clean up low-end muddiness or make bright synths sound darker.
4. Beatsurfing RANDOM Metal (Unique Percussive Instrument)

Random METAL lets you create metallic and synthetic percussion sounds using 25 different synthesis engines. These engines cover everything from cymbals and shakers to sounds I can’t even describe. Just hit the RANDOM button, and all the settings change instantly, giving you a brand new percussive sound with one click.
Some sounds work right out of the box, while others need a bit of tweaking. Still, I’ve found sounds I never would have discovered just by browsing samples.
It’s perfect for adding metallic hits, unique textures, or experimental rhythms that help your tracks stand out.
- Percussive Synth Engines
Random METAL doesn’t use samples. Instead, it creates sounds from scratch with 25 synthesis engines chosen from over 100 experimental designs. Each engine offers a different metallic or percussive texture, from sharp cymbal sounds to soft shakers. You can switch engines to explore new sounds without leaving the plugin.
- RANDOM Button with Deviance Control
This is my favorite feature. When you press the RANDOM button, every setting changes to create a new sound right away. The deviance control lets you choose how subtle or wild the changes are, from gentle tweaks to total chaos.
If you’re stuck or need new percussion ideas quickly, this button saves you from spending hours searching through sample libraries.
- Dual Mode Operation
Random METAL works in two modes. Pad mode gives you 12 pads to trigger, just like a drum machine, which is great for making beats. Chromatic mode lets you play percussion sounds across your keyboard, so you can create melodic percussion patterns. You can switch between modes depending on whether you’re making drums or trying out melodic ideas.
- XY Pad for Expressive Control
The XY pad lets you change your sound in real time by adjusting several settings at once. You can control things like impact, decay, pitch, instability, and effects just by moving your mouse. This makes Random METAL feel more like an instrument you can play, not just a sound generator.
It’s easily one of the best plugins you can get for Ableton.
5. BFD Drums 3.5 (Acoustic Drums)

BFD 3.5 makes it feel like I’m in a real drum studio, even though I’m still in Ableton. Whenever I want drums that sound and react like a real kit, this is my go-to.
It’s easy to use but still deep, with 51 core kits included that cover everything from jazz to heavy metal. There are also 60 mix-ready presets that sound great right away. When I’m working quickly or just sketching ideas, these presets save me a lot of time.
What really sets BFD apart from other drum plugins is its smart resonance modeling. Toms ring out when other drums are played, and cymbals swell in a natural way. You can blend close, room, and overhead mics just like in a real studio session. Plus, you can adjust tuning, damping, and mic placement for each drum, so you get real studio-level control.
- Core Library & Mix-Ready Kits
BFD 3.5 comes with 51 acoustic kits that cover rock, metal, jazz, blues, and pop. With so many options, I almost never need another drum plugin when making a track. The 60 production-ready presets are already mixed and tuned, so you can just drop them in and start writing. If you want to focus on your song instead of adjusting snare tuning, these presets are ideal.
- Advanced Drum Modeling & Mic Control
The resonance modeling in 3.5 brings the drums to life. Toms react to the kick, cymbals fade out naturally, and the whole kit works together like a real instrument.
The mic panel lets you control each drum’s mic positions, so you can shape the tone, room sound, and bleed just how you like. I like bringing up the room mics for more space, or using the close mics for extra punch. This level of control used to only be possible in a real studio with an engineer.
- Built-In Grooves & MIDI Patterns
BFD comes with 82 groove palettes and hundreds of pre-made patterns. You can drag and drop them into Ableton for instant, realistic drum parts. When you need a quick starting point, these grooves help keep your tracks moving. They’re great for sketching out ideas or building a foundation before you tweak the details.
- Deep Customization & Routing
You can tune, damp, and process each drum with 48 built-in effects. There’s also multi-output routing, so you can send each drum to its own Ableton channel for mixing and processing.
When you are working on a busy mix, that routing flexibility is a must. You can compress the snare on its own, add reverb only to the toms, or layer kicks without having to export anything.
6. Audio Damage Quanta 2 (Practical Granular Synth)

What I like about Quanta 2 is that it doesn’t make you pick between pure granular sounds and classic synthesis. You get two virtual analog oscillators next to the granular engine, so you can mix familiar synth tones with textured grain clouds.
That flexibility is why I keep using it whenever I want something between a regular pad and total experimental chaos.
The workflow feels well thought out. You can load your own samples or use the built-in oscillators, then send everything through two multimode filters and built-in effects. You don’t have to switch between a bunch of plugins just to create a sound from start to finish.
- Granular Engine With Up to 100 Grains Per Voice
This is where Quanta 2 really shines. You can load almost any audio file, like WAV, AIFF, MP3, or FLAC, and the engine splits it into up to 100 grains at once. You can adjust the rate, length, pitch, direction, position, panning, and level of each grain.
With that much control, you can turn a simple vocal sample into a shimmering pad or a rhythmic stutter without needing any other tools. The auto pitch detection is a great bonus since it tries to match your sample’s root note for you, which saves time when making melodies.
- Hybrid Synthesis With Two Virtual Analog Oscillators
Quanta 2 doesn’t limit you to just granular sounds. The two morphable virtual analog oscillators with PWM let you blend classic waveforms into your granular textures. As someone who owns it, I use this when I want a lead sound that’s both clear and dynamic.
You can send the oscillators through the granular engine or keep them separate. This gives you control over whether your final sound feels more synthetic or more organic.
- Deep Modulation System
You get four flexible envelope generators, two advanced LFOs, a sample-and-hold module, and four macro knobs that you can assign to MIDI CC. You can modulate almost anything, like grain position, oscillator pitch, filter cutoff, or effect sends.
The modulation indicators on each control make it easy to see what’s being automated. This system helps turn static patches into evolving soundscapes that change over time without you having to adjust them by hand.
- Built-In Studio Effects
Quanta 2 comes with chorus, stereo delay, and reverb taken directly from Audio Damage’s own effect plugins. This lets you shape your sound entirely within one window. I don’t need extra reverb or delay plugins to finish a patch, which makes my sound design sessions faster. The effects are so good that I sometimes skip my usual plugins altogether.
7. Waves Clarity™ Vx Pro (AI Noise reducer)
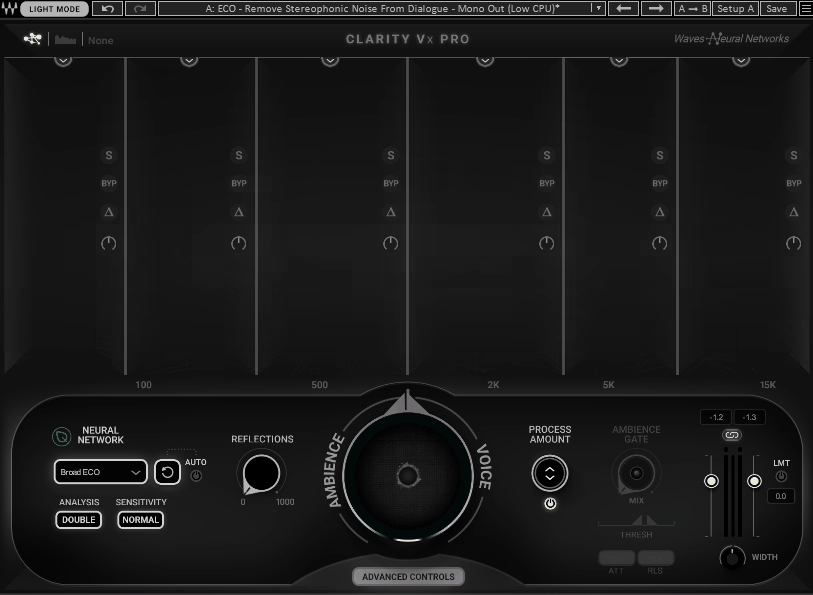
When you record vocals at home, you usually have to deal with room noise. Clarity Vx Pro uses neural networks trained on millions of vocal recordings to separate your voice from background noise as you record.
It removes fan hum, street noise, air conditioning buzz, and room tone, all while keeping your vocals sounding natural. You don’t have to export stems or wait for slow processing.
The workflow is simple. Just turn the main knob and watch the noise go away. If you need more control, Clarity Vx Pro lets you adjust up to six separate frequency bands on their own.
Real-Time Neural Network Processing
It does more than just cut frequencies or gate signals. The plugin learns what your voice sounds like and separates it from everything else in your recording.
Multi-Band Surgical Control
If the one-knob setup isn’t enough, you can switch to advanced mode and adjust each frequency band separately. Each band has its own processing amount, gain control, solo button, and bypass switch.
The “delta” listening feature lets you hear exactly what’s being removed, so you don’t take out too much. This control is great for fixing specific problems, like a fridge hum at 120 Hz or computer fan noise in the high mids.
Ambience Mode & Reflection Control
I didn’t expect to use the ambience mode much, but now I rely on it. You can set the plugin to remove the voice and keep only the room tone, which is great for building ambient layers or matching ADR to original recordings.
The Reflections control lets you add natural room reverb after noise reduction, so your vocal doesn’t sound too dry or processed. This helps your vocal sit in the mix instead of feeling pasted on top.
8. Datamind Audio Concatenator (Neural AI Synth #2)

Concatenator works differently from most synths. Rather than using oscillators or wavetables, it rebuilds your audio in real time with pieces of sounds you provide. For example, if you play a chord, hum a melody, or add a drum loop, Concatenator quickly recreates that audio using small fragments from your sample library.
The result is sounds you can’t get from regular synthesis or even granular effects. This method is powerful because it matches your input. The plugin analyzes pitch, dynamics, and spectral content, then selects matching grains from your samples to recreate what you’re playing.
You can turn any group of recordings into a playable instrument that reacts to whatever you play.
- Real-Time Audio Mosaicing
You load a folder of samples—these can be field recordings, drum hits, or vocal chops—and Concatenator uses them as building blocks. When you send in audio through a mic, MIDI keyboard, or audio track, it breaks down your input and rebuilds it with fragments from your samples.
There’s no limit on how many samples you can load, only your system’s RAM. I’ve thrown entire sample packs at it and watched it create textures I couldn’t imagine making manually. The way it picks and arranges fragments based on what you’re playing feels almost like collaboration.
- Deep Modulation Control Over Sample Selection
Here’s where it gets interesting. You have several LFOs, envelope followers, and MIDI-controlled modulators that do more than just change filters or pitch. You can actually control how the algorithm picks samples, adjusting things like spectral matching, grain variation, fragment stickiness, and selection probability.
If you want smoother transitions, increase the stickiness. For more chaotic textures, raise the variation and reset probability. This level of control lets you turn one sample pool into many different sounds, depending on how you set up the modulation.
- Low-Latency Performance for Live Input
Concatenator keeps latency below 50ms in good conditions, so you can play it live with a MIDI controller or use it as a real-time effect on vocals or instruments.
I’ve used it to change synth lines in real time during arrangement sessions, and the response is quick enough that lag isn’t a problem. Just remember that larger sample libraries and older computers might cause some delay, so test your setup before playing live.
- Unpredictable Creative Output
With concatenative synthesis, you rarely get the same result twice. For example, if you feed it a vocal, you might get a lush pad one time and a stuttering texture the next.
Pitch tracking is more accurate with rhythmic and percussive sounds than with melodic ones, so if you want clean harmonic results, you’ll need to be patient and make adjustments. But if you’re into experimental sound design, ambient textures, or transforming ordinary samples into something new, that unpredictability is what makes it exciting.
9. Baby Audio TAIP (Tape Emulation)
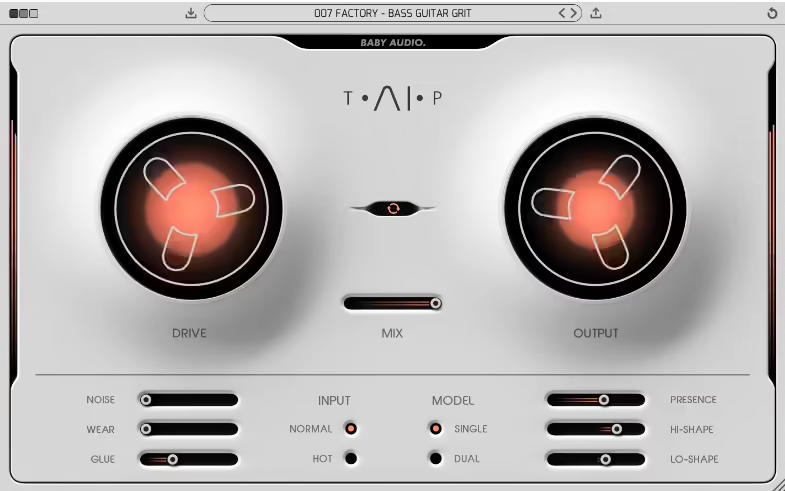
Baby Audio used real tape recordings to train an AI system that captures the true behavior of magnetic tape. This process led to the creation of TAIP.
TAIP includes 135 presets made by professional producers, so you have a good starting point for any sound you want. The controls are easy to use after a few minutes. Drive adds input saturation, Glue gives you tape-style compression, and Wear brings in wow, flutter, and a softer high end.
If I want my digital tracks to sound more lively and less sterile, TAIP is one of the first plugins I use.
- AI-Powered Tape Modeling
TAIP’s neural network was trained by comparing clean audio to tape-recorded versions. This lets you get the subtle qualities of real tape without needing the hardware in your studio.
The AI captures harmonic color, natural compression, high-end roll-off, and the slight instability that gives tape its organic sound. It works especially well on drum buses and synth groups when you want everything to blend naturally.
- Single vs. Dual Emulation Modes
You can use TAIP in Single mode to simulate one tape machine, or switch to Dual mode to chain two emulations together. Dual mode gives a thicker, denser sound that’s great when you want more analog weight.
Choose Single mode for clear warmth, and use Dual mode if you want your mix to sound like it went through a full analog chain. The difference stands out right away, especially on bass-heavy tracks.
- Flexible Tone Shaping Controls
The Lo-Shape and Hi-Shape controls let you add saturation to certain frequency ranges. This makes TAIP flexible, so you can warm up the low end without making the highs muddy, or add presence without making things harsh.
The Wear control adds tape degradation effects, and the Noise knob lets you add adjustable tape hiss.
I recommend using TAIP for adding subtle warmth to vocals, heavy saturation to drums, or even lo-fi effects on a synth loop.
10. Native Instruments Kontakt 8 (Sampler)
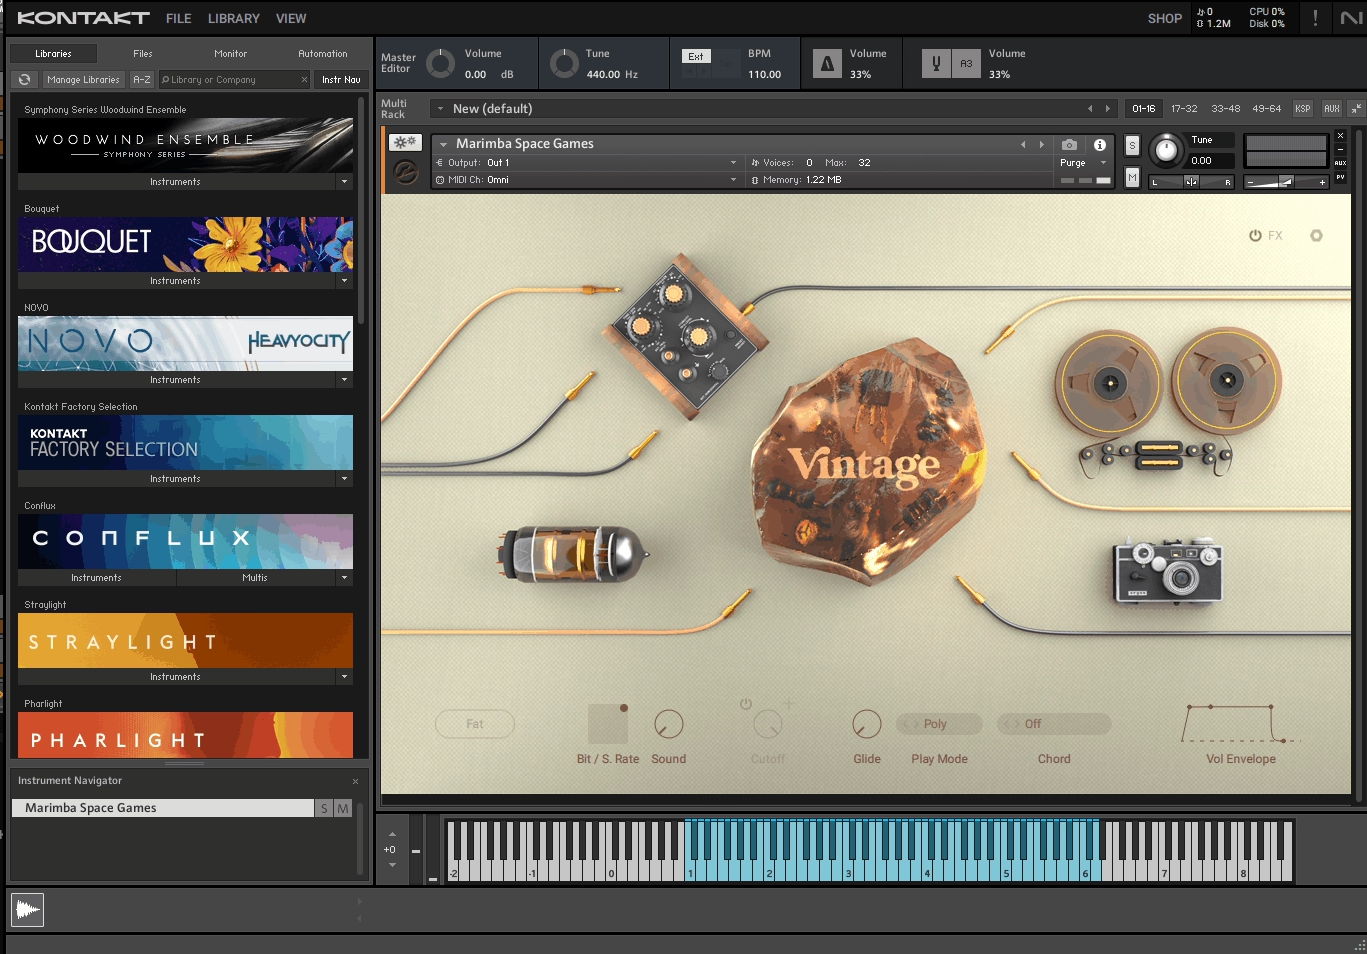
Kontakt 8 does a lot more than you might expect from a sampler. It started as a simple sample playback engine, but now it feels like a full production environment. You can build instruments, sketch melodies, work with loops, and explore sound design all within the plugin.
I use Kontakt when I want realistic orchestral strings, cinematic textures, or unique hybrid sounds that mix samples with synthesis. Now that it includes wavetable, FM, and phase modulation synthesis along with traditional sampling, it feels more like a creative instrument than just a library player.
One thing that stands out is how well Kontakt handles large sample libraries without slowing down your computer. You can load huge orchestral patches with several mic positions, send each section to its own output, and still have room for other tracks. It’s made for serious projects where detail and flexibility are important.
- Hybrid Synthesis Engine with Conflux
Kontakt 8 adds Conflux, a feature that combines sampling with wavetable, FM, and phase-modulation synthesis in one instrument. You can layer acoustic samples with evolving synthetic textures, which is great for cinematic pads or experimental sound design.
You no longer have to use only static samples. There are deep modulation options, including dual LFOs, flexible envelopes, and routing, so you can add movement to every sound. This is ideal if you want sounds that feel both organic and futuristic.
- Built-In Creative Tools (Chords, Phrases, Leap)
One of my favorite new features is the Chords and Phrases generator. It helps you come up with musical ideas without having to program MIDI by hand. You can create chord progressions, lock them to a key, randomize variations, and trigger them right away.
Leap is another standout feature. It’s like having a sampler within the sampler. You can load loops or one-shots, play them across your keyboard, and use real-time effects like stutter, pitch shifts, and speed changes. This is really helpful for quick beat ideas or live performances.
- Redesigned Browser and Library Management
The new tab-based browser in Kontakt 8 makes it much faster to find sounds. You can filter by brand, sound type, character, or mood, and try out instruments without long waits.
- Professional Routing and Effects Suite
Kontakt lets you use multi-output routing, per-voice effects, and detailed sample mapping, which is important for complex arrangements. You can send different mic positions to separate mixer channels, add reverb or distortion to each voice, and shape every layer on its own.
The built-in effects rack has delays, reverbs, distortions, modulation effects, and amp simulation. This control makes Kontakt a top choice for film scoring, game audio, and any project where sound detail and realism are important.
11. ujam BRAAASS (Still Valid Symphonic Brass)

I was genuinely surprised when I first tried this plugin. I didn’t expect phrase-based brass to be so practical, but BRAAASS gives you quick access to Hans Zimmer’s own brass recordings. There’s no need to deal with complicated MIDI programming or hire a live ensemble. What stands out for me is how quickly I can sketch out cinematic ideas. Just trigger a phrase, adjust the intensity, and your track instantly has that big Hollywood brass sound you hear in trailers and blockbuster movies.
With 78 different styles and 468 unique phrases, you get everything from bold fanfares to gentle swells. This means you’re never limited to just one type of sound.
I really like the dual-layer system. It lets you control the low and high brass separately, so you can shape deep tubas and trombones on their own, apart from the brighter trumpets and horns.
The crossfade between the layers is set to your mod wheel by default, so you can control the sound in real time without switching between different MIDI clips.
- Phrase-Based Brass Library from Hans Zimmer’s Studio
These recordings come straight from a legendary composer’s archive. Each phrase was tested in real film sessions, so the quality and feel are professional from the start. I don’t have to worry about layering samples or searching for round-robins.
Just load a style, play a chord, and the brass reacts like a real section.
- Independent Low & High Brass Layers with Crossfade Control
This feature really helps when I need to balance power and clarity. You can bring out the low brass for huge, powerful hits or raise the high brass for sharp fanfares. The crossfade control lets you blend between them smoothly, and you can automate it to build tension in your music. It’s much more flexible than using a single-layer brass preset.
- Built-In Finisher & FX Engine for Sound Design
BRAAASS does more than just orchestral sounds. The Finisher dial can turn your brass into ambient textures, distorted hits, or rhythmic pulses that work in hip-hop, trap, or experimental music. It’s fun to use it to transform classic brass into aggressive, synth-like sounds or cinematic drones. The effects chain has filters, saturation, modulation, reverb, and delay, so you can shape your sound without leaving the plugin.
- Tempo Sync and Quick Chord Triggering
Each phrase automatically matches your DAW’s tempo, so everything stays tight when you’re working quickly. There’s no need to program articulations or stress about timing. Just play a chord and the phrase fits right in. Key-switching lets you trigger variations instantly, and the latch or hold options let you sustain brass swells without keeping your fingers on the keys.
12. Beatsurfing CHEat Code (Generous Multi FX)

CHEat Code takes risks. It was made with Che Pope, a Grammy-winning producer, and you can really hear that expert touch in the way it shapes sound.
What stands out about CHEat Code VST is how much it can do in a single window. You get 16 effect modules that you can stack, re-route, and combine in ways most plugins don’t allow. With one routing control, I can run effects in series, parallel, or anywhere between.
The workflow is quick. If you need to change a sound fast during a session, CHEat Code gets it done without needing to open several plugins. I used it on drums, vocals, synths, and samples, and it worked just as well on each one.
- 16 Unique Effect Modules for Real Change
This isn’t just about basic delays and reverbs. CHEat Code offers granular processors like Bubble Grain and Grain Delay, rhythmic tools such as Slicer and Shuffler, distortion modules like Shaper, and DownSampler for gritty, bit-crushed sounds.
You also get Sequence Delay, Fractal Delay, pitch modulation, stereo animation with Spin, and classic effects like Chorus and Flanger. With all these options, you can add a little color or completely change your sound, all in one plugin. Normally, you’d need three or more plugins to build these kinds of effect chains.
- Flexible Routing System
The routing knob is a standout feature. Rather than picking just series or parallel processing, you can blend between the two. This lets you control how your effects work together. You can split frequencies, layer clean and processed sounds, or make unique signal paths that you can’t get with standard effect chains.
- Performance Widget and Macro Controls
CHEat Code comes with a Performance Widget for live automation and quick effect changes, along with four macro knobs that control several settings at once. This makes complex sound design something you can actually play and perform.
When I’m making creative fills or building tension before a drop, these controls let me automate changes without having to click through lots of settings. It helps keep the creative flow going.
13. Swivel Audio HitStrip (Channel strip for electronic musicians)
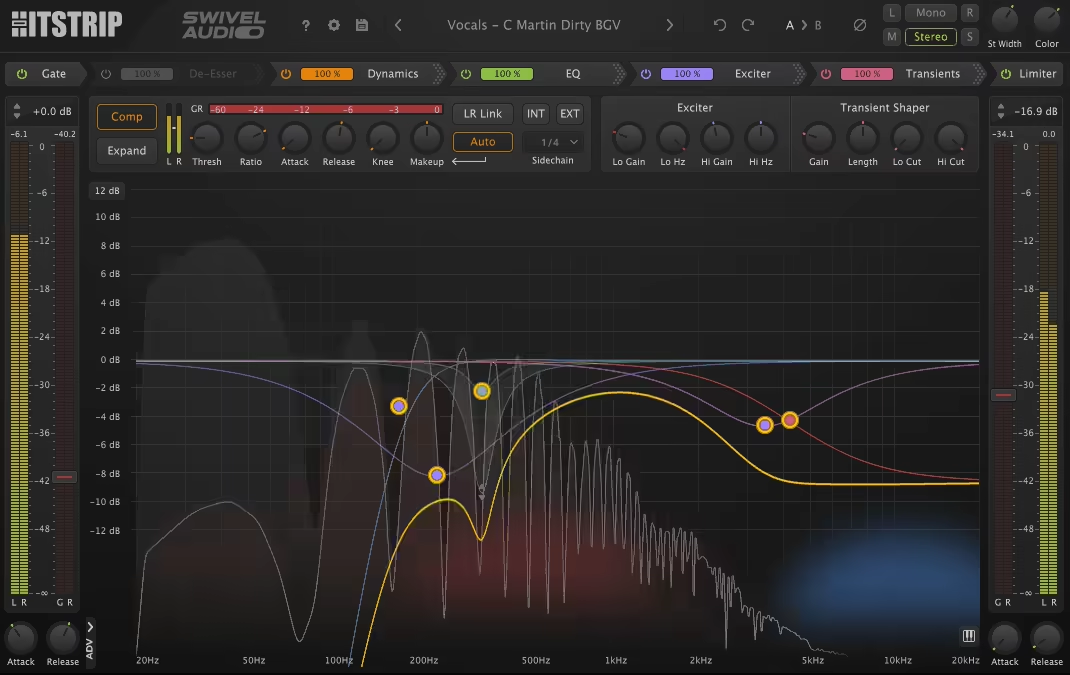
If you make electronic music and get frustrated using lots of plugins on each track, HitStrip solves that right away. Grammy-winning engineer DJ Swivel designed it to do the work of five or six plugins, all in one simple window.
HitStrip gives you 9 effect modules, and you can arrange them in more than 61,000 ways. It might seem like a lot, but it really means you get a ton of control. You get a gate, de-esser, dynamics, three EQ styles, exciter, transient designer, stereo width, and a limiter, all set up for you.
The interface is all on one page. You never have to search through tabs or menus. Everything is in front of you, so you can focus on making music instead of looking for controls.
- Three Different EQ Styles for Different Jobs
HitStrip gives you three EQ types. Dynamic EQ controls problem frequencies that show up now and then. Transient EQ shapes the punch and attack of drums and synths. Tonal EQ helps with the body and sustain of your sounds.
Each EQ does a specific job, so you don’t have to make one EQ do it all. If I want more bite on a kick drum, I use Transient EQ. When I need to tame harsh synth sounds without losing the whole frequency, Dynamic EQ works great.
Full Dynamics Section
The dynamics module lets you control how your sounds move and breathe. You can use compression to glue things together, expansion to highlight quiet details, or gating to remove noise between hits. It works especially well on vocals, drums, and bass. Side-chain options let you duck sounds against each other, which is really helpful in electronic music. I recommend it for making space for kicks in busy basslines.
Tape Saturation and Exciter
Digital music can sometimes sound cold or sterile. HitStrip helps by adding a saturation module for tape-style warmth and a two-band exciter to bring out harmonics. You can use a lot for strong color or keep it subtle to glue your mix together.
The saturation feature alone makes soft synths and samples sound more lively. When I want my pads to fit better in a mix without just making them louder, I add a bit of saturation and it always helps.
Low CPU Usage
One of the best parts of HitStrip is that it uses very little CPU. You can run it on many tracks without slowing down your computer. In tests, HitStrip handled 50 instances better than other plugins.
Hello, I’m Viliam, I started this audio plugin focused blog to keep you updated on the latest trends, news and everything plugin related. I’ll put the most emphasis on the topics covering best VST, AU and AAX plugins. If you find some great plugin suggestions for us to include on our site, feel free to let me know, so I can take a look!