Here I listed the best synth plugins for sound design and music production in 2026.
Sometimes, you need more than just another preset pack or a basic subtractive synth. You want tools that give you real sonic depth, whether that’s FM synthesis for cutting through a mix, granular engines for evolving textures, or semi-modular setups that encourage experimentation, which can make a big difference.
This list includes many strong options, such as Absynth 6, Serum 2, Pigments 7, Phase Plant, opsix native, and others. If you want to design metallic FM basses, morph wavetable leads, layer granular atmospheres, or build expressive MPE patches that respond to your playing, you’ll find a synth here that offers that creative control.
These plugins range from powerful wavetable synths and user-friendly FM engines to resynthesis tools and semi-modular setups. They let you shape sound with precision or explore new sonic territory.
You can create evolving, lively tones in the studio or on stage, without using the same presets as everyone else. If you want your productions to stand out with unique textures, rich harmonics, and sounds that feel truly your own, these synth plugins are great choices for modern sound design and music production.
1. Native Instruments Absynth 6 (Semi-Modular)

Native Instruments has revived one of the most unique synths in music production. Absynth 6 feels more like a sound lab than a regular plugin, letting you create sounds that evolve, breathe, and drift.
The best part is that Absynth 6 VST was completely rebuilt with Brian Clevinger, its original creator. This update wasn’t rushed. It offers deep granular synthesis, spectral filters, and MPE support, all in a semi-modular setup that encourages exploration.
If you’re after quick, punchy basslines or clean leads, this might not be for you. But if you want evolving textures that change and develop, Absynth 6 is one of the best tools available.
Absynth 6 costs $199, or $99 if you’re upgrading from Absynth 2 or later. Native Instruments stopped version 5 in September 2022, so its return matters to anyone who works with cinematic or ambient sound design. There’s also a full-featured demo, so you can try it out before buying.
You get:
- Three-Channel Semi-Modular Engine
Absynth lets you use three separate sound channels, each with its own synthesis method. For example, one can use granular processing, another FM, and the third wavetable modulation. You aren’t limited to one style per patch, so you can create complex layers. This flexibility makes sound design much more creative and less restrictive.
- Multi-Stage Envelopes With Up to 68 Breakpoints
Absynth 6 stands out with its envelope design. You can create envelopes that last for minutes, using many breakpoints to shape how your sound changes over time. These controls go far beyond standard ADSR. You can loop parts, change curves, and automate almost any parameter. One note can keep changing throughout a track without repeating.
- Granular Synthesis & Spectral Filters
Absynth’s granular oscillator can process both samples and generated waveforms, letting you control grain density, size, and pitch. When you combine this with spectral and comb filters, you get unique, organic textures. This setup is great for creating stretched atmospheres, frozen sounds, and unusual transitions unlike anything else.
- MPE & Polyphonic Aftertouch Support
Absynth 6 now works with MPE controllers like the ROLI Seaboard or Expressive E Osmose, so you can control pitch and tone for each note. With an MPE controller, you can adjust each note using pressure, tilt, and slide. This makes your sounds much more expressive and responsive to your playing style.
- Aetherizer Effect & Integrated Sound Design Tools
The Aetherizer is a granular reverb that changes how sound moves through time, not just space. It can transform your original sound, making it feel completely new. Absynth’s effects are built into the synthesis engine, so you can use them on each channel and create unique textures that standard effects can’t achieve.
2. Arturia Pigments 7 (Wavetable, Sample, Granular, Modal, Harmonic, Virtual Analog)

Pigments 7 is awavetable VST synth plugin that makes complex sound design easy to understand without oversimplifying. It offers six different synthesis engines that work together in a logical way, instead of just piling on features that feel confusing.
I can blend a wavetable oscillator with a granular engine and add harmonic synthesis for extra shimmer, and everything stays organized. The color-coded interface makes it easy to see what’s going on, even when I’m layering several engines and sending modulation to many targets.
I would say what separates Pigments from other hybrid synths is how visual everything is. When I drag a modulation source onto a parameter, I can see exactly how much it affects the sound. There’s no guessing, no hidden menus, just clear feedback that speeds up my workflow.
- Dual Engine Architecture with Utility Layer
Pigments lets you use two main synthesis engines simultaneously, plus a utility engine for extra oscillators or noise. This goes beyond just layering sounds; it’s about creating textures with intention. For example, I might use the wavetable engine for the main part of a lead and add the modal engine for a percussive attack or metallic resonance.
The utility engine fills in the gaps with simple waveforms or sampled noise. This is helpful when I want a subtle layer that doesn’t compete with the main sounds.
- Drag-and-Drop Modulation System
The modulation workflow in Pigments is one of the easiest I’ve tried. You just pick a modulation source and drag it to the parameter you want to control. The plugin shows the modulation range with clear visuals, so you always know how much movement you’re adding.
I can put several modulators on one target and see how they work together. This makes it much faster to design evolving pads or rhythmic textures compared to traditional matrix systems.
- Wavetable Engine with Visual Scanning
The wavetable engine lets you smoothly morph sounds while keeping everything under control. You can watch the spectral shape change as you move through wavetables, which helps you understand the tone in real time. It handles modulation well and avoids the digital artifacts that some other wavetable synths have. It’s great for modern leads and evolving pads that need to sound clear in a mix.
- Sample & Granular Processing
Pigments’ sample engine is designed for practical use, not just experiments. You can load your own audio, use it as a regular sampled oscillator, or switch to granular mode for textured layers. The granular controls for grain size, position, and spray are simple to use and don’t use much CPU, even with complex patches.
- Function Generators and Advanced Modulators
Beyond basic LFOs and envelopes, Pigments also includes function generators that let you draw your own modulation shapes. mic patterns, stepped sequences, or smooth curves that sync to your DAW tempo. The random modulators have controllable probability settings, which means you get variation that still feels musical.
These tools are great when you want movement that’s organized, not just random changes.
3. KORG opsix native (Subtractive, Semi-Modular, Analog, Waveshaping, Additive, FM)

What I like about KORG opsix native is how it changes the usual approach to FM synthesis. Unlike most frequency modulation synths, you don’t have to figure out complicated carrier-to-modulator ratios or deal with confusing math.
With opsix native, you have six operators that can each take on different roles. One might create a waveform, while another filters, shapes, or adds effects to it. This flexibility makes FM synthesis much more fun and creative.
I find Opsix native especially helpful when I want sounds that change smoothly. Unlike older FM synths, you don’t get harsh jumps between harmonics. The continuous ratio control lets you move through different tones without the sharp “digital snap” that many classic FM patches have.
- Six Operator Modes for Different Sound Roles
Each of the six operators can work in different modes, like classic FM, filter, waveshaper, ring modulator, or additive. So, instead of just layering sounds, you can send them through different processors within the FM network. I’ve used filter operators in the middle of the chain to smooth out harsh sounds before they reach the output, which most FM synths can’t do.
- Algorithm Morphing and Custom Routing
With opsix native, you can change between algorithms in real time, making the signal flow part of your performance. You can also create your own custom routing and clearly see where feedback paths go. This makes it much easier to understand what’s happening inside. You can even create unique bass sounds by changing the algorithm structure as you play.
- Operator Mixer with Six Large Faders
Here, the operator mixer gives you six large faders that control each operator’s output level. Adjusting these dramatically shifts the character of your sound. You can bring carriers forward, dial back modulators, or blend in filtered operators for hybrid textures. It’s one of the most immediate ways to reshape a patch without diving into menus!
- Built-In Effects and Modulation Depth
opsix native comes with 30 different effects and a flexible modulation matrix that connects velocity, aftertouch, and macros to almost any setting. I’ve used aftertouch to change the algorithm routing while playing, which makes leads sound more dynamic. The effects are strong enough that I don’t often need extra processing.
- Hundreds of Factory Presets Across Multiple Styles
There are hundreds of factory sounds, from clean bells to heavy basses and metallic percussion. These presets are a good way to see how opsix uses different synthesis methods. You can learn a lot about waveshaping and additive modes by adjusting presets instead of just reading the manual.
4. Minimal Audio Current 2 (Wavetable, Granular, Sample-based)

If you’re working on bass-heavy tracks or layered leads, try using Current’s dual wavetable engines with its granular engine. This setup lets you create sounds that move from clean to grainy textures. With five sound engines running at once, you can make patches that evolve in ways a single-oscillator synth can’t.
One of the best parts is how much you can explore without feeling overwhelmed. The interface gives you quick access to performance controls with dual XY pads, and you can dig into spectral morphing and modulation routing when you want more detailed control.
Current 2 uses five sound engines at once: two wavetable oscillators, a granular engine, a sampler, and a sub oscillator. Each one has its own sound, and you can mix them any way you like with the built-in mixer. I often solo each engine during a session to hear what every layer is doing before blending them together.
- Spectral Wavetable Processing with 40+ Warp Effects
The wavetable section offers more than just scanning through waves. It includes spectral morphing and over 40 warp effects, such as formant shifts, sync options, and bit reduction, all built into the oscillator stage.
You can drag your own audio samples into Current, and it will turn them into playable wavetables using different analysis modes. This makes it simple to turn field recordings or vocals into musical synth sounds.
- Unlimited Modulation Routing
Current 2 has nine modulator slots for envelopes, LFOs, curves, and followers. In this version, there are no more connection limits, so you can route one modulator to as many parameters as you want. I like dragging modulators directly onto knobs, and the visual feedback clearly shows what’s changing and by how much.
- Integrated Effects Rack with Wave Shifter
Current 2 includes nine full effects that are fully integrated. My favorite is the Wave Shifter, which combines frequency shifting with FM and ring modulation controls. This lets you shape the sound in ways that standard distortion can’t. You can also modulate every effect parameter, so things like reverb tails or delay feedback can change along with your patch.
Built-In Arpeggiator and Chord Tools
Current has a built-in arpeggiator with over 40 patterns and a chord generator, so you don’t need to route MIDI from outside. You can play complex sequences and harmonies from single notes, which helps speed up your workflow when sketching ideas or playing live.
5. LANDR Synth X (Wavetable)

LANDR Synth X offers strong wavetable features with an interface that’s easy to use. I like that you can explore its depth when you want, but you never have to dig through menus just to get a good sound going.
What stands out most for me is the custom wavetable import. You can add your own audio files and turn them into wavetables, so things like field recordings or vocal samples can become the base of your synth patch. Most synths only let you use their built-in sounds, so this freedom really opens up new creative options.
I also like how the randomization feature works. Instead of just picking a random preset, it changes wavetable positions, modulation routes, filter settings, and effects all together. If I need inspiration, one click gives me a new sound I can adjust as I like.
- Custom Wavetable Import
You can bring in your own audio files and turn them into wavetables in Synth X. This means you can use anything from vocal clips to sounds from your environment as the base for your patches. Not many mid-range synths offer this, so it’s a great way to make sounds that are truly your own. If you want unique tones, this is a good place to begin.
- One-Click Randomization
Randomization might seem like a basic feature, but in this synth, it’s very useful. The Randomize All button instantly creates new sounds by changing wavetable positions, modulation, filters, and effects all at once. It’s great when you want quick inspiration without adjusting every setting yourself. This is especially handy when you need fresh ideas fast.
- Flexible Modulation Matrix
Synth X has a central modulation matrix where you can connect LFOs, envelopes, and other sources to almost any control. You aren’t stuck with just simple knob assignments. This lets you make tempo-synced wavetable changes, layered sounds, and expressive effects, all while seeing exactly what is controlling each part.
- Built-In Effects Chain
Synth X includes reverb, delay, saturation, and chorus built directly into the engine (not many, though). But these aren’t just finishing touches. They interact with the core sound-shaping, so you can finalize the spatial character and harmonic color inside the plugin before routing elsewhere.
- 400+ Factory Presets & 100+ Wavetables
The presets cover styles like ambient, EDM, DnB, pop, and cinematic music, so you get ready-to-use sounds right away. Many of them fit into mixes with little extra work, which helps you stay productive when you’re on a deadline.
6. Roland Zenology Pro (Huge amount of presets)

The first thing that caught my attention with Roland Zenology Pro wasn’t the synthesis engine or the effects. It was seeing over 4,000 synth presets and 109 drum kits available right away, no extra downloads needed.
If you’ve ever needed a sound fast and didn’t want to spend 15 minutes building it from scratch, Zenology Pro solves that problem better than almost any plugin I’ve used.
Zenology Pro uses Roland’s ZEN-Core Synthesis System, which combines virtual analog oscillators, PCM samples, and hybrid modulation in one flexible engine. You get classic Roland sounds and modern design options, all in a huge library that keeps expanding.
Unlike other synths with lots of presets, you’re not limited to what comes with Zenology Pro. Roland regularly adds Wave Expansions and Model Expansions through Roland Cloud. Some bundles, like the ZENOLOGY Pro Collection, even include classic hardware recreations such as the JUNO-106, JUPITER-8, JD-800, JX-8P, and SH-101.
- 4,000+ Presets & Expandable Library
Like I mentioned earlier, you get instant access to over 4,000 synth sounds and more than 100 drum kits as soon as you install it. Whether you need a certain vibe, a retro brass sound, a modern pluck, or a cinematic pad, you’ll find something useful in less than a minute.
The browser lets you tag, search, and organize sounds by genre, character, or instrument type. With Roland Cloud expansions, you can grow your library to over 10,000 sounds, so you’ll almost never run out of choices.
- Partial-Based Architecture
Zenology Pro has a four-partial tone structure, with each partial having its own oscillator, filter, amplifier, and two LFOs. This lets you layer up to four independent synth voices in one patch, each with its own waveforms, filters, and modulation.
This is great for building complex leads or evolving pads because you’re not just layering sounds, but also adding movement and texture. One partial can handle the main body, another adds brightness, a third brings rhythm, and the fourth can add noise or effects.
- Step LFO with 37 Curve Shapes
Most synths offer basic LFO shapes like saw, square, or triangle. Zenology Pro has a Step LFO with 37 curve options for each step, turning modulation into a kind of micro-sequencing.
You can sync it to your DAW tempo and program complex rhythmic movement that feels like part of the arrangement, not just wobble or vibrato. I would use this for gated pads, stuttering leads, and rhythmic filter sweeps that lock to the grid without needing separate MIDI automation.
- 90+ Effects Including Roland Classics
Zenology Pro ships with over 90 effects, including models of the JUNO-106 chorus, SDD-320 Dimension D, and CE-1 chorus. These aren’t generic reverbs and delays; they’re recreations of the effects that defined Roland’s hardware sound. The Dimension D alone can turn a flat pad into something wide and lush, and the DJ-FX looper adds stutter, gate, and loop effects inside the synth itself. You can stack multiple effects per partial, which gives you serious sound-shaping power.
- Model Expansions for Classic Hardware
If you get the ZENOLOGY Pro Collection, you’ll have five Model Expansions that recreate the JUNO-106, JUPITER-8, JD-800, JX-8P, and SH-101. These are not just preset packs—they fully recreate the original synth engines, including the filters, oscillators, and hardware behavior. I use the JUNO-106 expansion often for warm bass and string pads, and the JUPITER-8 is great for fat leads and vintage brass.
7. Xfer Records Serum 2 (Wavetable, Sample, Granular)

Xfer Records released the Serum 2 wavetable synth plugin in March 2025, and it completely changed my expectations for what a wavetable synth can do. The original Serum was great, but this update goes beyond adding features and really reimagines what a single synth is capable of.
Serum 2 offers five different oscillator types in one easy-to-use interface. You no longer need to switch between multiple plugins. Wavetable, multisample, sample, granular, and spectral synthesis are all included, and they work together seamlessly.
The workflow remains clear and visual. I can see exactly what’s happening to my sound at every step, so I spend more time creating and less time guessing. When blending a granular texture with a wavetable lead or layering samples into a bass patch, this clarity really helps.
- 5 Oscillator Types in One Engine
This is probably the biggest change from the original. You still get wavetable synthesis, but now you can also load multisamples, single samples, use granular processing, or try out spectral synthesis.
Each mode uses the same modulation system, so once you learn the basics, you can experiment with all five types without having to relearn anything. You can build patches that start with a sample, add granular movement, and finish with a wavetable layer, all in one place.
- Granular Oscillator with Tight Control
Serum 2’s granular engine does more than just create ambient sounds. You can control grain size, density, and position, and everything can sync to your project’s tempo. I recommend using this to add rhythmic texture to bass patches or to make evolving pads that stay in time with your track.
The grains keep their phase in sync, so you avoid the pitch instability that can make some granular synths sound unpredictable. This means you can use it in pop, EDM, and hip-hop without it feeling out of place.
- Advanced Modulation with 12 Dedicated Modulators
You have up to 12 modulation sources, including LFOs, envelopes, and macro controls. Each one lets you set custom breakpoints, so you can draw your own curves instead of using only preset shapes.
- Built-In Clip Sequencer
The clip sequencer lets you automate nearly any parameter in the synth. You can sequence filter sweeps, wavetable positions, or effect depths without using your DAW’s automation. It syncs to tempo and works with the arpeggiator. If you want movement that changes over 16 or 32 steps, you can build it right in Serum 2 instead of programming MIDI clips.
- Free Upgrade for Serum 1 Owners
If you already own the original Serum, you get Serum 2 for free. That’s a rare offer in plugin development, and it made switching over easy for me.
8. GForce Halogen FM (FM)

What drew me to Halogen FM is how it totally changes the usual FM synth experience. Instead of looking at confusing operator graphs and algorithm charts that feel like math homework, you get a visual interface that makes sense right away.
GForce made this plugin for anyone who wants the beauty of FM synthesis without needing to be an expert. The 4-operator FM engine offers a lot of depth, but the layout lets you focus on shaping sounds instead of figuring out puzzles. I can make bell tones, glassy pads, and punchy digital bass sounds faster here than with any other FM synth I’ve used. FM8 is great, but for me, this one is on another level.
The interface feels quite playful. When you turn the knobs, you instantly hear how the frequencies change. Exploring FM textures here feels creative, not technical.
- 4-Operator FM Engine With Visual Feedback
Halogen FM has 4 operators you can see and shape right on the screen. Each one shows its waveform and modulation routing in real time, so you know exactly what’s happening as you adjust ratios and levels. You’ll be surprised at how quickly you can build complex sounds without getting lost in menus. This visual approach makes FM synthesis much less intimidating for producers.
- Generative Spark Core
The Spark feature is my favorite creative tool in this plugin. With one button, it creates new FM patches based on the settings you choose. It’s not just random noise, but gives you smart variations that keep the musical feel you want. When I’m stuck or need inspiration, I’ll try 10 or 15 Spark variations until I find something that works.
- Japanese FM Heritage Sound Design
GForce clearly looked at classic Japanese FM synthesizers when designing this engine. You get the metallic, glassy, bell-like sounds that made 80s and 90s FM synths famous, just with modern clarity and punch.
The presets include everything from DX-style electric pianos to strong digital bass and evolving ambient textures. You can use these sounds in pop songs, and they fit well with analog synths without clashing.
- Intuitive Modulation Routing
Halogen FM doesn’t use confusing algorithm numbers. Instead, it shows you clear operator connections you can click and adjust. You drag modulation paths between operators and instantly hear the changes. This visual routing makes trying out different FM setups fun. I’ve found sounds I never would have tried in a traditional FM synth because I wasn’t afraid to experiment.
- Built-In Effects Tailored for FM
The built-in effects are picked to work well with FM sounds. You get chorus, delay, and reverb that bring out the digital character instead of hiding it. The distortion adds grit and warmth to sharp FM harmonics, helping them fit into modern mixes.
You probably won’t need to use extra effects because these are tuned just right for the sounds you make.
9. Dawesome Abyss by Tracktion (Visual, FM)

Most synths have you build sounds step by step, but Abyss VST lets you paint them. You use color gradients instead of oscillators, and each color stands for a different timbre. I just drag a few dots across the gradient bar, and suddenly I have a rich, evolving pad or a dark, atmospheric drone—no need to program everything from scratch.
This plugin is great when you need cinematic textures quickly, or if you want something unique and organic that stands out from typical preset packs.
Tone Color Gradient Engine
Abyss offers more than 2,000 tone colors. Each is a complete timbre, not just a simple waveform. You place them on a gradient bar, and the synth morphs between them in real time. This acts as your oscillator and main sound source. I’ve spent time experimenting with different color combinations because the process is so visual and immediate. Instead of scrolling through menus or adjusting wave tables, you’re actually painting sound.
- Simple FM Controls
Abyss has FM synthesis with only three sliders: level, depth, and character. That’s all you need. You don’t have to know about operators or routing. The FM layer blends right into your color gradient, so you get that classic FM sound without the usual complexity.
- Visual Sound Surfing
Instead of clicking through preset lists, you browse sounds by color and shape on a visual grid. This makes finding new sounds feel more like exploring than searching. You can discover favorite patches just by moving around the interface and seeing what stands out.
- 13 Modulation Sources with Creative Routing
You have 2 ADSRs and 3 LFOs, with two LFOs able to act as step sequencers. You can draw your own LFO curves and even modulate the modulation depth. Full MPE support lets expressive controllers add per-note movement, keeping every sound dynamic and evolving.
- Built-In Effects Suite
Abyss comes with shimmer, delay, reverb, and phaser effects that blend naturally with the sound. There’s also a brick wall limiter to keep things under control when you push the engine.
10. Expressive E Noisy 2 (MPE Soft)
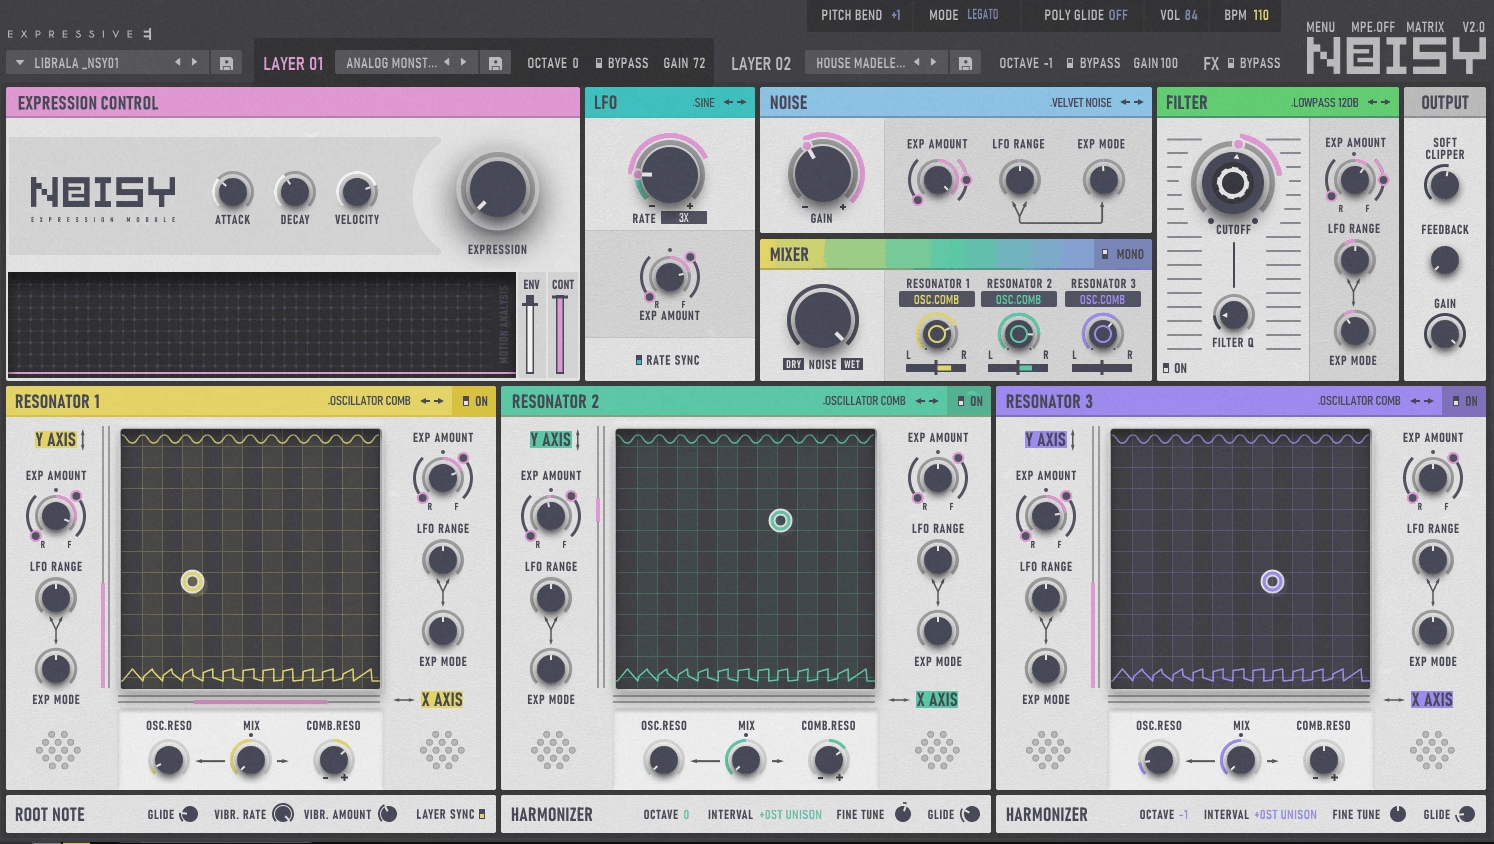
Expressive E Noisy 2 creates sound using acoustic and analog resonators that respond to your touch in real time, rather than just layering oscillators and filters.
This synth stands out because MPE integration is built into every part of its design. With pressure, you control more than just volume or filter cutoff. You can shape the harmonic structure and spectral content of each note on its own, making the sounds feel lively and responsive.
I also like that Noisy 2 VST synth comes with 1200 presets ready to use. Five hundred are made for MPE controllers, and the other 700 work well with regular keyboards.
- MPE-Centered Workflow
Noisy 2 was designed specifically for expressive controllers like Seaboard, Osmose, and Roli devices. Pressing harder on a key, sliding your finger, or using aftertouch lets you control the resonance intensity, harmonic emphasis, and spectral balance of each note directly.
Each note in a chord can change in its own way depending on how you play, which most synths can’t offer.
- Resonator-Based Sound Engine
Noisy 2 uses resonators instead of traditional oscillators to create complex harmonic sounds. In the Layer view, you can stack up to three types of resonators, each adding its own rich, changing texture.
These resonators act more like real objects vibrating than repeating digital waveforms, so the sounds feel natural and pleasantly unpredictable.
- Physical Modeling Architecture
This synth combines physical modeling with spectral shaping, so the sounds act more like real acoustic instruments instead of just synthetic tones.
It’s a great choice if you want sounds that blend qualities of natural instruments with electronic design.
- Built-In Expressive Effects
The effects section is thoughtfully designed. Noisy 2 offers spatial reverb and delay that change based on how you play. When you use pressure or slide gestures, the effects respond, making everything feel connected and musical rather than overly processed.
- Bi-Timbral Design
You can use two separate sound layers at the same time, each with its own resonator and modulation settings. This lets you create complex sounds or split your keyboard into two expressive areas without needing extra plugins.
11. FabFilter Twin 3 (Subtractive, Analog)

The Twin 3 plugin seems like FabFilter used all their experience from making mixing plugins to create a synth that is easy to understand and use.
There are four analog-style oscillators that sound rich and lively, along with up to four filters that can be smooth or gritty. The modulation system offers 100 slots with drag-and-drop routing, and the visual, color-coded layout keeps things easy to follow.
The new interface makes a big difference. Twin 2 was crowded, but Twin 3 only shows what you need and makes everything clear. You can resize the window, move panels, and see modulation happening in real time on the controls.
- Four High-Quality Oscillators With Analog Character
Each oscillator has features like analog drift, hard sync, phase sync, and PWM. You can ring modulate pairs of oscillators to quickly get metallic or bell-like sounds. The drift adds gentle movement, so pads and leads never sound flat, even without extra modulation.
- Four Independent Filters With Multiple Slopes
You have classic filter types like low-pass, high-pass, and band-pass, as well as EQ-style bell and shelf modes. The 6 dB/octave slope gives a gentle filter that’s perfect for warm sounds. If you increase the drive, the filters go from clean to gritty. You can also modulate cutoff and peak offset for all four filters at the same time.
- 100-Slot Drag-and-Drop Modulation Matrix
With Twin 3, you can assign any modulator to any parameter just by dragging. It includes 16-step XLFOs, envelope generators with adjustable curves, envelope followers, XY controllers, and MIDI sources. The interface uses arrows and moving bars to show what is being modulated, so it stays clear even with lots of options.
- Built-In Effects With Full Modulation
The effects section has drive, compressor, reverb, delay, chorus, phaser, and flanger. You can modulate every effect parameter, so you might automate delay feedback with an LFO or link reverb wetness to velocity. This makes the effects a real part of your sound design, not just an extra touch.
- Up to 64-Voice Polyphony With Per-Oscillator Mode
You can play up to 64 voices at once, and the per-oscillator polyphony mode lets each note trigger a different oscillator in order. This creates changing layers and unique voicing effects without extra work.
- Full-Featured Preset Browser
Twin 3 offers text search, tag filtering, favorites, and can import presets from Twin 1 and 2. This makes it easy to browse hundreds of sounds, which is helpful when you want to try new tones during a session.
12. UAD Opal (Morphing)

UAD Opal VST brings together analog warmth and wavetable flexibility in a way that doesn’t feel like you’re giving anything up. No matter how much you tweak the settings, it always sounds musical.
The morphing engine smoothly moves from one tone to another instead of just switching settings. This is great for pads that evolve, leads that change as you play, or lively textures. I was surprised by how fast you can get sounds ready for a track. With built-in UA effects like vintage spring reverb, tape delay, and compression, I don’t need to add a bunch of extra plugins to make it fit in the mix.
- Analog Meets Wavetable Oscillators
Opal has three main oscillators and a noise generator. Each one can smoothly change between analog waveforms or move through wavetables.
I like that you aren’t stuck with just one way of working. You can create classic analog sounds with smooth PWM morphing, or explore digital wavetables while still keeping a warm tone. The feedback FM between oscillators 1 and 2 adds more complexity if you want rougher, more aggressive sounds.
- Morphing Filter System
The filters are a highlight for me. Opal gives you two multimode filters that can smoothly move between lowpass, bandpass, highpass, and notch. What’s unique is the non-integer slope control. Instead of only choosing 2-pole or 4-pole, you can set something like 2.2 poles for more detailed shaping. This makes filter sweeps sound natural instead of choppy or digital.
- Multi-Segment Function Generators
Opal has two Multi-Seg modules, each with up to 32 segments you can shape however you want. I use them as complex envelopes, step sequencers, or for evolving modulation, depending on the track. They connect right into the modulation matrix, so you can send them to pitch, filter morph, wavetable position, or effect depth. It’s unusual to find this much modulation in a synth that’s still easy to use.
- Integrated UAD Effects Suite
The built-in effects feel like a real part of the instrument, not just an extra. You get vintage spring reverb, tape delay, modulation effects, and 1176-style compression, all included in the signal path. I almost never need extra processing because Opal’s presets already sound polished and ready to use. The effects work with the synth engine instead of just being added on at the end.
- Production-Ready Preset Library
Opal comes with hundreds of carefully chosen presets for bass, leads, pads, evolving textures, and cinematic sounds. The presets use the morphing features and effects, so you can add them to a mix and they fit right in.
13. Kilohearts Phase Plant (Semi-Modular, Wavetable, Sample-based, Analog)

Phase Plant stands out because of its semi-modular design, letting you combine wavetables, samples, analog-style oscillators, and noise generators in a single patch. You can layer a sampled transient, a synthesized body, and noise without needing several plugins. Everything runs through one flexible signal path that you control from beginning to end.
The routing works more like a small production studio than a regular synth. You can add generators, place effects anywhere in the chain, and modulate nearly any parameter using an easy drag-and-drop system that stays tidy, even with complex patches.
- Multiple Generator Types in One Patch
Phase Plant offers wavetable oscillators, sample playback, analog-style waveforms, noise sources, and a harmonics module for shaping partial-based sounds. You don’t have to pick just one synthesis type for each patch.
You might use a wavetable for the main sound, add a sampled attack for punch, and layer filtered noise for extra texture. Each generator has two warp slots for FM, phase modulation, and wave shaping, so you can change sounds quickly without extra modules.
- Transparent Modulation System
For me, Phase Plant’s modulation workflow is a highlight. You just drag a modulator onto any parameter, and it shows you what you can control as you move your mouse. There’s no need to search through menus. Phase Plant includes ADSR envelopes with curve shaping, multi-mode LFOs, random modulators, sequencer-style modulators, and XY controllers.
All your routings appear in a central modulation matrix, so you can see everything at a glance. When I want evolving pads or rhythmic changes, I can set up detailed per-voice modulation in just a few seconds.
- Effects as Sound Design Tools
In Phase Plant, you can place effects anywhere in the signal chain, not just at the end like in most synths. It comes with built-in processors such as distortion, filters, delay, reverb, compression, EQ, and bitcrushing. You can also modulate effect settings like feedback, cutoff, and rate using the same modulators as your oscillators. You can use this to make sounds feel more lively and dynamic.
- Sampler Integration
The sampler isn’t an add-on; it’s a full generator. You can import multi-sample packs, set up zone mapping, adjust loop points, and modulate playback position just like any other source.
This lets you mix recorded sounds with synthesis easily, which is great for hybrid sound design or adding natural textures to electronic patches.
- Harmonics Module for Spectral Control
This generator creates sounds from individual partials, with controls for tilting, skewing, stacking, and detuning harmonics. While it isn’t full additive synthesis, it lets you shape timbre precisely, which works well for rich pads and evolving textures. If you want something between pure synthesis and sampled sounds, the harmonics module offers unique tones you won’t find elsewhere.
14. Klevgrand Tomofon (Resynthesis, Wavetable-style morphing)
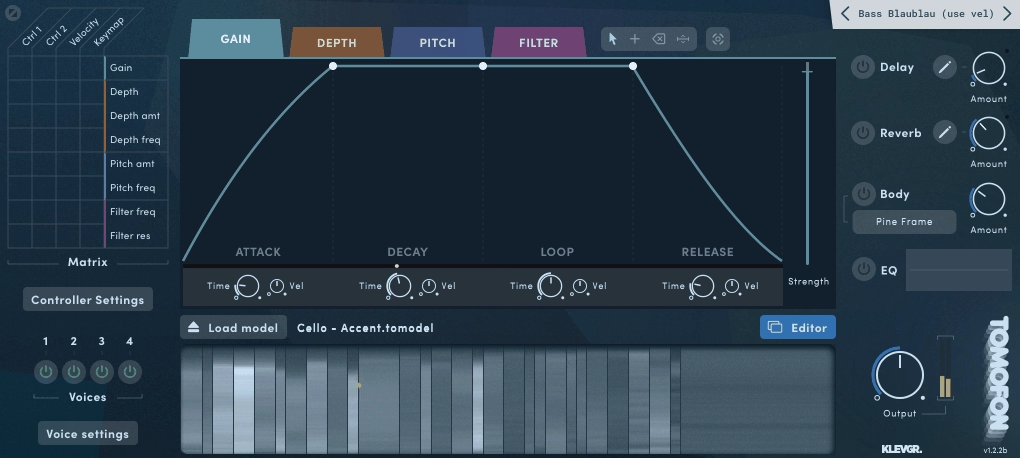
Tomofon isn’t your usual wavetable synth. It comes with a library of pre-made waves to use, but it also lets you turn your own audio files into fully playable instruments.
Just drag in a sample, and Tomofon analyzes it, breaks it into thousands of spectral waves, and spreads them across the keyboard. The result keeps the character of your original sound but acts like a synth.
It feels unusual, expressive, and much more organic than most wavetable synths I’ve tried.
To me, Tomofon is a mix between a sampler and a synth. Instead of just playing back audio, you can actually move through it. Its Audio Model format keeps things smooth and musical, even when you change the sound a lot.
- Audio Model Engine
Tomofon can turn any audio file into a playable instrument by pulling out thousands of individual waves and sorting them by pitch. This goes beyond simple sampling; it’s resynthesis (just like Image Line Harmor). The engine spreads these waves across different zones, so you can play melodies, chords, and textures that retain the feel of the original sound while changing in ways a regular sampler can’t.
- Morph Control for Spectral Movement
The Morph knob is where Tomofon really shines. It lets you smoothly transition through different spectral versions of your sound in real time. Instead of switching between fixed wavetable spots, you blend harmonics and shift the tone. This works great for pads and leads that change as you play. You can also use LFOs or envelopes to add even more movement.
- Real-Time Audio Capture
Tomofon can record live audio and turn it into a synth sound right away. Just connect an input, press record, and it analyzes what you play. You can use this to make synth patches from vocal hums or turn everyday sounds into music. It’s one of the quickest ways I’ve found to make unique textures.
- Spectral Density & Noise Separation
The plugin splits your sound into harmonic and noise parts, so you can control how clean or rough it is. You can focus on the melodic side for pure tones or add more noise for a textured, atmospheric feel. This makes Tomofon useful for everything from smooth keys to experimental sound design.
- Modulation Routing Tied to Synthesis Core
Tomofon’s LFOs and envelopes do more than just move filters; they actually shape the resynthesis engine. You can modulate things like morph position, spectral balance, and harmonic focus, meaning your modulation changes how the sound is made, not just how it’s filtered. It makes every patch feel lively and dynamic.
Frequently Asked Questions
Knowing the different types of synthesis helps you choose the right plugin and shape your sounds on purpose. These questions explain the main engines in modern synths and what sets each one apart.
What is FM synthesis good for?
FM synthesis is great for making metallic, bell-like sounds, strong basses, and complex textures. It gives you sharp, bright tones that stand out in a mix without needing lots of layers or effects.
I find FM particularly useful when I need something that feels synthetic but has acoustic character. Electric pianos, plucked strings, metallic pads, and punchy leads all come alive with FM modulation.
FM is also great for sound design when you want movement and rich harmonics that feel alive. You can add a little vibrato or create wild, changing textures with just a few adjustments.
What does FM mean in synthesis?
FM means frequency modulation. One oscillator, called the modulator, changes the pitch of another oscillator, the carrier, very quickly. This creates new harmonics instead of just mixing waveforms.
This process creates sidebands, which are extra frequencies not found in the original sound. These sidebands give FM its bright and complex character.
What are the principles of FM synthesis?
FM synthesis uses modulators to change the frequency of carrier oscillators. The modulator changes the carrier’s pitch very quickly, creating new harmonics.
The modulation index sets how strong the effect is. Low values make gentle changes in tone, while high values create dense, metallic sounds.
You can also combine operators, or oscillators, in different ways. Some setups give you clean, simple sounds. Others let you build layered, changing textures with several modulators and carriers.
What is the difference between wavetable and FM synthesis?
Wavetable synthesis uses waveforms stored in tables that you move through over time. You blend between these shapes to create movement and changes in tone.
FM synthesis creates harmonics by having oscillators interact in real time. Instead of moving through shapes, you change frequencies to make new sounds. Wavetable synthesis feels more visual and direct, while FM is more about math and gives you more ways to shape bright, bold tones.
How does a wavetable synthesis work?
A wavetable is a set of single-cycle waveforms lined up in order. You use a control to move through them, smoothly blending between different sounds.
Each spot in the table gives you a different sound. If you change the position with an LFO, envelope, or other tool, you get moving textures that feel natural and lively.
What’s the difference between additive and subtractive synthesis?
Additive synthesis creates sounds by layering sine waves at different pitches and volumes. You add harmonics one by one to shape your tone.
Subtractive synthesis begins with a rich waveform, like a saw or square wave, and uses filters to take away certain frequencies. Instead of building up, you’re shaping the sound by removing parts.
Additive synthesis lets you control each harmonic exactly, but it can be slow. Subtractive synthesis is quicker and easier to use, especially for classic analog sounds.
How does granular synthesis work?
Granular synthesis cuts audio into tiny pieces called grains, usually 1 to 100 milliseconds long. These grains are rearranged, layered, pitched, and spread out to make new textures.
You can adjust the size, number, pitch, and position of the grains to shape the sound. Lots of grains make rich, changing pads, while fewer grains sound glitchy and rhythmic.
Granular synthesis is perfect for making ambient textures, cinematic soundscapes, and experimental sounds that feel lively and unpredictable.
What does semi-modular mean in synth?
Semi-modular synths have a set signal path that works right away, but you can also change the routing to go beyond the default setup. This gives you easy playability and more options for modulation when you want them.
You’re not starting from scratch like a full modular system. The synth already sounds good out of the box, but you can dive deeper by routing envelopes, LFOs, or other sources to unconventional destinations.
How does physical modeling synthesis work?
Physical modeling uses math to copy how real instruments vibrate and resonate. Instead of playing samples or making waveforms, it figures out how air moves in a tube or how a string vibrates as you play.
As a result, you get a realistic, dynamic response that reacts to velocity, breath, and playing style. Parameters such as tube length, reed stiffness, and string tension let you design instruments that don’t exist in the real world.
Frequently Asked Questions:
[sp_easyaccordion id=”10027″]
Hello, I’m Viliam, I started this audio plugin focused blog to keep you updated on the latest trends, news and everything plugin related. I’ll put the most emphasis on the topics covering best VST, AU and AAX plugins. If you find some great plugin suggestions for us to include on our site, feel free to let me know, so I can take a look!