Clipper plugins are quickly becoming a go-to tool in modern music production, with more producers using them every day. Once seen as niche, clippers are now found in almost every genre, from hip-hop and trap to EDM and pop. Unlike traditional limiters, clippers manage peaks in a unique way, giving you new options for loudness, warmth, and character that other tools can’t provide.
The best clipper plugins give you control over your mix’s dynamics while adding punch and presence without the pumping or squashing you might hear from a limiter. Some clippers focus purely on transparent peak control, while others add saturation, harmonics, or grit that shape your sound in creative ways. Whether you’re trying to get competitive loudness on a master or just want to tame transients on a snare, having the right clipper in your toolkit makes a real difference.
This guide looks at both paid and free clipper plugins, so you can find one that fits your workflow and budget. You’ll also learn how clippers work, how they differ from limiters, and get practical tips for using them in your music without overdoing it.
1. Yum Audio Crispy Clip
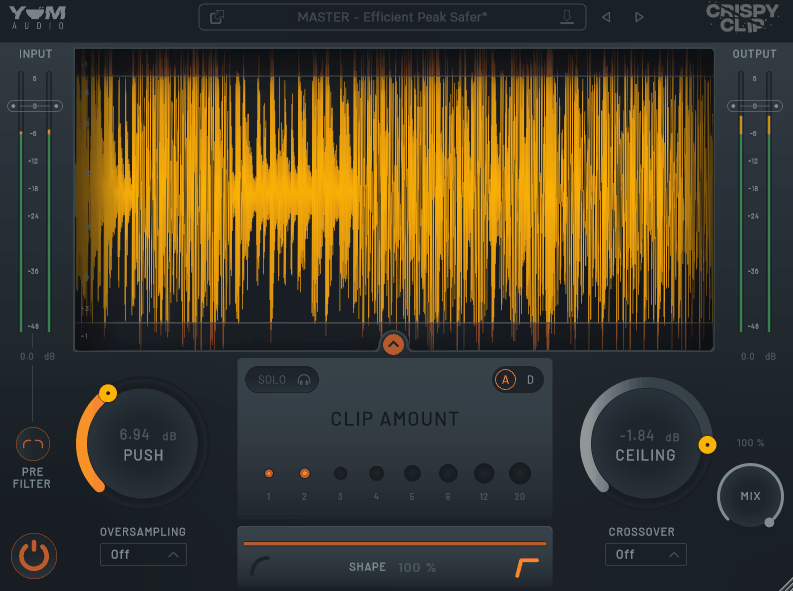
This precision clipping and dynamic-shaping tool helps you achieve clean loudness, detailed control, and creative tonal options with a simple workflow. Its standout feature is the easy way you can switch between soft and hard clipping styles using the Shape parameter.
With Crispy Clip, you can fine-tune how your peaks are handled, from subtle saturation to strong, punchy clipping, all with one control. The plugin feels polished and modern, offering more tonal flexibility than basic single-mode clippers.
The plugin includes a Mix control so you can blend processed and dry signals for parallel clipping. This helps you keep your transients while pushing your sound harder. The Crossover control adds precision by letting you focus clipping on a specific frequency range before or after blending.
- Lots of professional mixing and mastering presets.
- Shape your sound from soft to hard clipping.
The Shape parameter defines how the clipper behaves, letting you seamlessly transition between soft, smooth clipping and hard, sharper clipping. This gives you a wide tonal range without switching modes or loading presets.
- Mix control for easy parallel clipping.
Blend clipped and unclipped signals right in the plugin. This makes parallel transient shaping simple and keeps your workflow quick.
- Crossover control for frequency-focused processing.
Crispy Clip lets you control clipping within chosen frequency ranges using the Crossover control. This gives you tonal shaping options similar to a simple multiband workflow, without needing a full multiband processor.
- Supports up to 16x oversampling.
The oversampling system improves accuracy and reduces aliasing at higher drive levels. It also keeps the clipping curve smooth and refined, even with heavy processing.
- Clear and refined visual feedback.
The interface shows clear information and stays clean and minimal. It is designed for quick adjustments and real-time feedback on your audio.
- Supports a wide range of plugin formats.
Available for both macOS and Windows, with broad plugin format support.
2. PluginBoutique Dual Clip

This clipping plugin VST gives you both hard and soft clipping in an easy-to-use format. The hard clipper quickly cuts peaks, which helps add loudness or grit to drums. The soft clipper works more like analog distortion, giving your sound a warm, full feel like vintage gear.
Turn up the Drive to boost your signal, then use the Curve control to shift the clipping effect toward low or high frequencies. This way, you can warm up a bassline without affecting the highs, or add bite to a snare without making the low end muddy.
Features:
- Dual Clipping Modes
DualClip gives you both hard and soft clipping in one plugin, so you don’t need extra tools. Hard mode is fast and direct, great for drums and controlling transients. Soft mode adds warmth and fullness, much like analog hardware. You can switch modes instantly to match your track.
- Frequency-Focused Curve Control
The Curve knob lets you pick where the clipping happens in the frequency range. Turn it one way to focus on the low end, which is good for bass and kicks. Turn it the other way to target the highs, adding clarity or edge to vocals and synths.
- Smooth Control for Clean Release
The Smooth control adjusts the clipper’s release time to make the sound less harsh. Turning it up makes the clipping softer and less noticeable. This helps when you want more loudness without obvious distortion. It keeps your sound clean while still controlling peaks.
- Simple Interface
DualClip is easy to use. It has Drive, Curve, Smooth, and a mode switch. You can hear what each control does right away, so you don’t need to read a manual. This makes the plugin quick to use when you’re mixing and want to stay creative.
3. Schwabe Digital Gold Clip Pack


This plugin does more than just clip audio. It’s a complete tool for loudness, tone shaping, and saturation, designed by Grammy-nominated engineer Ryan Schwabe for mixing and mastering.
The plugin is flexible but still easy to use. You can push levels, add weight, smooth out harshness, and shape your tone all in one place. There are two versions: Gold Clip for buses and mastering, and Gold Clip Track for individual tracks.
Gold Clip has three clipping models based on real mastering converters. Modern and Classic give you different types of analog color, while Hard keeps the sound clean until it clips. Each mode changes the feel, so you can choose between transparency and more character.
Features:
- Gold & Alchemy Processing
Gold adds harmonic richness and loudness without making things harsh. Alchemy shapes high frequencies with a tape-like sound, softening harsh sources and keeping brightness under control in a musical way.
When you use them together, your sound gets more body and polish before any clipping happens. Gold is great for making drums, vocals, and bass sound fuller, while Alchemy keeps the high end smooth when you make your mix louder.
- Parallel Mixer
Gold Clip has a parallel blend control, so you can mix the clipped and dry signals however you like. This helps you add punch without losing clarity. It also has an anti-overshoot system to stop sudden peaks from slipping through, which is useful for keeping your loudness under control.
- Mastering & Track Versions
The Gold Clip Pack includes two plugins with the same core processing. Gold Clip is made for transparent, precise, and clean gain on buses and the stereo master. Gold Clip Track is lighter and more flexible, perfect for adding saturation, color, or creative clipping to individual channels like snares, bass, synths, or vocals.
4. Softube Clipper

The Softube Clipper VST plugin lets you push your tracks harder without getting that harsh digital crunch that can make clipping sound wrong. I reach for it when I want more punch and presence, but still want everything to sound polished and controlled. It works well for both mixing and mastering, and fits into your process without making you change how you work. I own it myself and think it’s one of the best clipper plugins for mastering.
Softube Clipper comes in AU, VST, VST3, and AAX formats. It works on macOS Monterey 12, Ventura 13, Sonoma 14, and Windows 10 and 11. If your system is up to date, you should have no compatibility problems.
Features:
- Peak Management Without Harshness
The first thing I noticed was how clean the clipping sounds. Even when I cut peaks to get more loudness, it never feels harsh or brittle. You can add just enough clipping to tighten up drums or vocals without making your mix sound distorted. It’s great for styles where you want more volume but still need clarity.
- Blend Control for Natural Results
I really like the blend option because it lets you mix the clipped sound with the original. This way, you can add warmth and grit but still keep the natural feel of your track.
- Simple Interface That Keeps You Moving
Softube Clipper is simple to use. The controls are clear, so you can make quick choices without digging through menus or presets. I just add it to a channel, tweak a few knobs, and keep working. It helps me stay focused on the music instead of the plugin. When you want to boost loudness or add character to tracks, that simplicity really helps.
I own this plugin and think it’s one of the best clippers out there. Give the trial a try.
5. MMS NovaClip

NovaClip is made for aggressive music styles that need real loudness and punch. The plugin lets you control peak clipping easily, even if you’re not an audio expert. I can push my metal and rock mixes harder and still keep them clean for streaming. The simple interface helps me work faster and focus on results.
What stands out is how NovaClip handles transients. You get that consistent, in-your-face aggression that modern heavy music demands. I’ve used it on drum busses, guitar chains, and even full mixes when I need extra energy.
Features:
- Aggressive Clipping Algorithm
NovaClip’s clipping algorithm is made for metal and heavy genres. When I run drums or distorted guitars through it, the plugin adds thickness without making the sound muddy. Even when pushed hard, the clipping still sounds musical, which is rare for this kind of tool.
- Easy-to-Use Interface
The controls are simple, so you can start using it right away. I just set the clipping amount, adjust the output, and keep working. This simplicity is great when you’re mixing and need fast results. It’s ideal if you want strong results without extra hassle.
- Free Trial Available
You can try NovaClip free for 7 days, which gives you enough time to test it on your own projects. I always appreciate it when developers let you actually use the plugin in real sessions before buying. It removes the guesswork and lets you decide if it fits your workflow and sound.
NovaClip works best if you make modern metal, hardcore, or any genre where loudness and aggression matter. It’s a focused tool that does one thing really well, rather than trying to be everything.
6. Venn Audio V-Clip 2

V-Clip 2 is easily one of the best clipper VSTs out there. It works as a soft clipper, a multiband tool, and covers everything in between. The developer took a great clipper and rebuilt it from scratch, adding all the features you’d actually want.
What I like most is how much control you have without it feeling complicated. You can clip different frequency bands, add pre and post emphasis, split your signal into mid and side channels, and use up to 256x oversampling for extra precision. The interface is modular and resizable, so you can focus on the controls you need and hide the rest.
I’ve used V-Clip 2 for both mastering and creative sound design, and it handles both jobs easily. You aren’t stuck with just one kind of saturation. The plugin offers several asymmetric waveshaping options, so you can choose between gentle warmth or heavy clipping to fit your track.
In my opinion, it’s probably the best clipper plugin you can get for drums.
- Multiband Saturation & Mid-Side Processing
A big new feature in V-Clip 2 is multiband clipping. You can focus on certain frequency ranges instead of applying the same saturation to your whole mix. This is great for adding weight to your low end without affecting your highs. The mid-side mode adds even more flexibility, letting you process the center and sides separately for better width and clarity.
- Advanced Asymmetric Waveshaping
V-Clip 2 also adds new clipping features that go beyond just hard or soft clipping. You get asymmetric shapes that make your sound feel more musical and less digital. I use these when I want saturation that blends into the mix, especially on drums or bass where you want punch but not harshness.
- Modular/ Resizable Interface & Up to 256x Oversampling
The interface is clean and easy to adjust, so you can make the meters and controls you use most bigger. The 256x oversampling is more than you’ll need in most cases, but it’s useful for mastering or high-frequency sounds because it keeps your signal clean. You can also set the ceiling level exactly where you want, so you have full control over when clipping begins.
I really think it deserves its place on any list of the best clipper plugins.
7. AIR Soft Clipper

This soft clipper VST plugin is unique because it was made with MPC standalone users in mind, but it also works well in any DAW.
What I appreciate most about the AIR Soft Clipper is how simple it keeps things. You’re not wading through dozens of controls or presets. Instead, you get a clean interface focused on doing one thing really well: adding warmth and controlling peaks without making your mix sound crushed or digital.
The plugin gives you analog-style saturation without needing to learn complex routing or use heavy processing chains. I find it especially helpful on drums and bass when you want punch and presence but still need everything to fit well in the mix. It adds character without overpowering the sound.
Features you get:
- Soft Clipping Algorithm
The algorithm uses a gentle clipping curve that rounds off peaks rather than chopping them flat. This gives you warmth and fullness that feels more musical than aggressive. When I push it on a snare or kick, it thickens the sound and brings out harmonics I didn’t even know were there. It’s perfect for adding energy without harsh distortion.
- Broad Plugin Format Support
This clipper is flexible because it supports VST2, VST3, AU, AAX, and MPC standalone systems with version 2.14 or later. If you work on different setups or with other producers, you won’t have compatibility problems. I’ve used it in Logic, Ableton, and on my MPC without any issues.
- Simple Workflow
8. W.A. Production RedClip

The RedClip VST clipping plugin stands out because it’s more than just a basic clipper. It’s a multiband clipper made by award-winning audio engineer Emrah Celik, and you can tell a lot of care went into how it handles loudness.
I really like that it lets you control different frequency ranges on their own. Instead of treating your whole mix the same, you can clip just the low end for more thump or boost the highs for extra energy without making things harsh. This flexibility changes how you mix and master.
The plugin comes with factory presets that are actually useful. Whether you want a bit of warmth or a lot of loudness, there’s a preset that gets you close. I like that you don’t have to start from scratch each time.
Features:
- Multiband Separation
This is what makes RedClip stand out for me. You can split your signal into different frequency bands and apply as much clipping as you want to each one. For example, I can add punch to a kick drum without affecting the vocals, or boost the top end while keeping the bass clean. It sounds much more musical than just applying the same gain reduction everywhere.
- Versatile Use Cases
I use RedClip in different ways depending on the project. Sometimes I put it on individual drums to add character. Other times, I use it on the master bus during mastering to make things louder without losing clarity. The plugin works well in both cases, which makes it more useful than clippers that only fit one situation.
- Preset Library
RedClip has a lot of presets sorted by category. When I’m working quickly, I just pick one that’s close and adjust it as needed. The presets go from soft clipping to more extreme effects, so you have lots of options to try. It saves time and can inspire new ideas.
9. Kazrog kclip 3

KClip 3 works well on individual tracks, buses, or even the full master. What makes it stand out is the range of clipping options, all without making the plugin feel slow or confusing.
The eight clipping modes each have their own sound. You can choose anything from clean, controlled clipping to more saturated, colorful options, depending on what your track needs.
KClip 3 offers Smooth, Crisp, Tube, Tape, Germanium, Silicon, Broken Speaker, and Guitar Amp modes. Each one sounds different, so you can pick a transparent effect or something with more character.
It also comes with these features:
- Multiband and Mid-Side Processing
You can split your audio into up to four bands and use a different clipping mode for each. The mid-side mode lets you control how much the center and sides are clipped, which helps keep the stereo image balanced.
- Oversampling up to 32x
You can adjust both online and offline oversampling. I usually mix with a lower setting, then raise it when exporting to avoid aliasing and keep the sound clean.
- Integrated LUFS Metering
Built-in loudness metering makes it easy to see your master’s level without switching between windows.
- Resizable Interface and Real-Time Visualizer
The window resizes smoothly, and the visualizer shows real-time clipping. It’s a simple feature, but it helps you make better choices.
- Flexible Threshold Control
The plugin lets you set low thresholds and really push your audio if needed. It works for both gentle transient control and full loudness maximization.
10. Canvas Audio Cactus Clipper

Cactus Clipper keeps things simple by focusing on fast, musical clipping and saturation that you can adjust quickly, so your workflow stays smooth.
What I like most about Cactus is how straightforward it feels when you’re actually mixing. If you want clean loudness, it does that. If you want grit and attitude, it delivers. The analog-style clipping paired with its built-in saturation stage makes it easy to move between subtle rounding and full-on edge without ever losing control of your levels.
Since the input and output gains can link automatically, you don’t have to constantly adjust gain staging while making changes.
Here’s what I found about its features:
- Analog-Style Clipping and Drive
Cactus does more than just hard clipping. It combines analog-style clipping with an optional saturation stage. With the variable knee and extra drive circuit, you can get anything from warm, rounded edges to a more aggressive, punchy sound. This is helpful when you want clipping that adds character, not just controls peaks.
- Linked Input/Output Gain
One of my favorite workflow features is that input and output gain can link automatically. When you increase the input, it adjusts the output to match. This helps you hear the real effect of the processing, not just changes in volume.
- Intuitive Metering
The metering is simple but helpful. It clearly shows how much dynamic reduction you’re hitting, which makes dialing in clipping much faster, especially when you’re pushing harder and want to sanity-check your peaks.
Oversampling and Low CPU Load (Prickly)
It includes 4× oversampling for cleaner results while staying lightweight, making it perfect for stacking on individual tracks without eating your CPU.
11. SIR StandardCLIP

StandardCLIP is one of the top clipper plugins out there. It’s been around for eight years, and there’s a good reason it keeps showing up in so many professional mix chains.
What I like most is how flexible the clipping process is. You aren’t stuck with just one sound. You can push it for aggressive limiting or pull it back for a smoother, warmer feel. This range makes it useful whether you want to add some grit or just control peaks in a transparent way.
The plugin gives you a lot of control but doesn’t feel complicated. I like being able to shape exactly how the clipping works, not just turn a knob and hope for the best. The high-quality oversampling, up to 256x, keeps your sound clean even when you push the levels, which is important for loud mixes that still need to sound musical.
Features:
- Flexible Clipping Modes
You can adjust how aggressive or gentle the clipping sounds. I set it as a hard limiter when I need tight peak control, or make it softer when I want more of a saturated sound. Having this control is why I keep using it instead of switching between different plugins.
- Input and Output RMS Meters
StandardCLIP has RMS meters and a waveform display, so you can see exactly what’s happening to your signal. I don’t have to guess if I’m clipping too much or leaving too much headroom. The visual feedback makes it much easier to get the right amount of processing, especially when working quickly.
- Adds Odd Harmonics
Beyond loudness, you can use StandardCLIP as a dynamic tool to add odd harmonics to your signal. That means you’re not just controlling peaks, you’re shaping tone. I’ve used it to add more presence and bite to drums and synths without adding another saturation plugin to the chain. It works as both a utility and a creative effect, which makes it more versatile than most clippers.
Even though the UI doesn’t meet the modern standards, the sound is what matters. That said, StandardCLIP belongs on the list of the best clipper VSTs without doubt.
Freebies
1. Outobugi Clamp

It’s free, works as a VST3 on Windows, and does exactly what you need without any extra fuss.
Clamp VST stands out because it’s so easy to use. It has both soft and hard clipping, plus 4x oversampling to keep your sound clean when you push the levels. I use it on drums a lot, especially on kicks and snares that need more punch without getting messy.
The interface is very simple. There are no endless menus or complicated settings. Just choose your clipping mode, set the threshold, and you’re finished. This straightforward approach is great when you want to add energy quickly without overthinking.
Features:
- Dual Clipping Modes
Clamp offers both soft and hard clipping in one plugin. Soft clipping adds warmth and gentle saturation, which is great for drums or even your master bus when you want more fullness. Hard clipping is more aggressive and works well when you want to shape a sound or add strong punch to individual hits.
- 4x Oversampling
The built-in oversampling helps Clamp avoid sounding harsh or digital. When you use heavy clipping, oversampling cuts down on high-frequency artifacts that can make a mix sound cheap. This lets you push levels harder without worrying about harshness.
- Lightweight and Simple
Clamp is easy on your CPU, and the interface is as simple as possible. There are no hidden settings or manuals to read. Just load it, choose your mode, set the threshold, and get back to your session. It’s a tool that works well when you need quick results and want to keep your workflow smooth.
2. Venn Audio Free Clip 2

Free Clip 2 stands out because it keeps what worked in the original and makes it much easier to use in real projects.
I really like that Venn Audio updated their old clipper to something modern without making it complicated. Now you can zoom in on the waveform both ways, which might seem minor but actually helps a lot when you want to see how much you’re clipping a signal. I feel much more confident adjusting the clipping now.
The plugin can be resized and works on any platform, so it fits any screen setup you have. It’s included in Venn Audio’s Free Suite, which offers a good set of mixing tools with no hidden limits. I’ve tried it on drums, bass, and vocal buses, and it works well for all of them.
Features:
- Multiple Clipping Algorithms
Free Clip 2 offers several wave shaping options beyond just hard clipping. You can pick transparent clipping to catch peaks, or use softer, more saturated shapes to add character. I use the harder settings for drums and the softer ones for synths or vocals when I want warmth without clear distortion.
- Resizable Waveform Display
The zoomable waveform is the feature I use most. You can zoom in sideways to check timing or up and down to see how much of the signal is being clipped. This makes it easy to see what’s happening as you work, so you don’t have to rely only on your ears.
- Lightweight and Zero Fuss
This plugin won’t slow down your session or require any authorization steps. It’s totally free, with no limits, installs quickly, and uses barely any CPU.
3. Yum Audio Crispy Clip Light

If you want a free clipper plugin that does its job without any unnecessary extras, give Crispy Clip Light a try.
I appreciate that Yum Audio focused on the basics while still making it professional. You get Push and Ceiling controls, which are all you need to shape how the clipping works. Push increases your signal into the clipping point, and Ceiling decides where that point is. It’s simple, clear, and effective.
The interface won’t confuse you. Two knobs, clean meters, and you’re clipping in seconds. I’ve used it on drum buses, vocals, and even master chains when I need a bit of controlled distortion without loading something heavy. It handles both soft and hard clipping, so you can go subtle or aggressive, depending on your track’s needs.
Features:
- Push & Ceiling Controls
The Push knob lets you add gain into the clipper, which brings more energy and loudness. Ceiling sets the clipping threshold, so you decide where the signal starts to flatten. I use both controls together to balance punch and clarity. It’s easy to use without a manual, but still accurate enough for serious work.
- Soft & Hard Clipping Modes
You can choose soft clipping for a smoother sound or hard clipping for a stronger effect. Soft mode is great for vocals and melodies when you want warmth without harshness. Hard mode works well on drums and bass when you want more grit. It’s uncommon to find both options in a free plugin.
- Lightweight & CPU-Friendly
Crispy Clip Light runs smoothly and doesn’t use much CPU. I’ve used several instances in a session without any problems. It’s built on the full Crispy Clip plugin, so you get the same quality in a simpler form. It works on Mac and PC, and supports VST3, AU, and AAX formats in all major DAWs.
4. PeakEater (FREE Plugin)

PeakEater stood out to me because it offers the main features of pricey clippers for free. This open-source hard/soft clipper plugin works on Windows, Mac, and Linux.
What makes this plugin stand out is how it combines ideas from two respected clippers into one simple tool. You get multiple wave-shaping functions to handle peaks in different ways, which means you can push your track louder without worrying about peaks hitting the ceiling. I find it really useful when I need transparent loudness or want to add some controlled saturation.
You choose a clipping type, set the ceiling, and boost your signal. Because it focuses on the basics, it’s actually quicker to use than some paid plugins.
Features:
- Multiple Clipping Types
PeakEater lets you switch between different wave-shaping functions, so you’re not stuck with just one clipping sound. I can choose a harder clip for aggression or a softer shape for something more musical. This flexibility makes it work across different genres and sources, from drums to full mixes.
- Ceiling Control
The plugin clips everything above the ceiling level you set, which keeps your peaks under control. You can boost the overall volume safely without nasty peaks going over the maximum level. I use this all the time during mixing to add loudness without risking distortion or clipping in my DAW.
- Cross-Platform Compatibility
Many free plugins only work on one system, but PeakEater runs on Windows, Mac, and Linux. It supports VST3, AU, LV2, and CLAP formats, so you can use it in nearly any DAW. This makes it one of the most accessible free clippers out there.
- Inspired by Pro Tools
The developer made PeakEater by merging features from Kazrog KClip 3 and VennAudio Free Clip. If you’ve used those plugins, the workflow will feel familiar. It offers a taste of high-end clipping tools without the cost.
Frequently Asked Questions (FAQs)
[sp_easyaccordion id=”10002″]
Hello, I’m Viliam, I started this audio plugin focused blog to keep you updated on the latest trends, news and everything plugin related. I’ll put the most emphasis on the topics covering best VST, AU and AAX plugins. If you find some great plugin suggestions for us to include on our site, feel free to let me know, so I can take a look!