These are the best Analog Obsession plugins I recommend for mixing engineers and bedroom producers who want professional console-style processing without spending money on expensive plugin subscriptions.
Analog Obsession has built a reputation for delivering high-quality mixing tools that punch well above their weight class – especially considering most of them are completely free. These aren’t stripped-down versions of commercial plugins or barely usable freebies that clutter your plugin folder.
They’re legitimate workflow tools that solve real mixing problems: bus compression that adds cohesion without pumping, channel strips that shape sources quickly, EQs that make musical decisions feel obvious, and dynamics processors that stay smooth under pressure.
Each tool is designed around a clear purpose – BUSTERse handles bus compression with smart sidechain shaping, CHANNEV provides complete channel strip processing in one insert, SSQ delivers fast SSL-style EQ moves without menu diving. This purposeful design means faster decisions and fewer plugins stacked trying to achieve what one well-designed tool could handle. Let me show you which plugins I love the most:
1. Analog Obsession BUSTERse (Compressor)

BUSTERse is the kind of bus compressor you reach for when a mix feels like it’s made of good parts that still aren’t behaving like one record. It sits in that classic console bus compression lane where the goal isn’t “hear compression,” it’s to make the track feel more finished, more confident, and more controlled without draining the life out of it.
The reason people keep it in their template is simple: it can do the famous glue move quickly, but it also gives you extra control over why the glue is happening, which is usually the difference between “nice” and “why does this suddenly sound like a record?”
In real sessions, BUSTERse is most valuable when you’re already close. Your balances are good, your EQ is mostly right, but the mix still feels slightly jumpy, slightly separate, or a bit too clean. Insert BUSTERse and you can make the center feel more anchored, the groove feel more consistent, and the whole track feel like it has a frame around it.
- A sidechain filter section
One of the most common reasons mix bus compression goes wrong is that the kick and sub bully the detector, so every downbeat pulls the entire mix down and the result feels smaller.
BUSTERse’s sidechain filter section gives you a practical way to keep the low end powerful while still getting glue. I think this is where it really proves itself because you can keep your kick big and bass deep without the compressor turning into a pump generator.
Just as importantly, the same section lets you bias what the compressor “pays attention to,” which is a huge mixing advantage. Instead of the compressor reacting to everything equally, you can steer it toward the part of the spectrum that actually needs control, so the mix tightens in the right place without dulling or shrinking elsewhere.
- Transient focused sidechain
BUSTERse includes a transient sidechain approach that’s designed to make the compressor respond more to attacks and peaks rather than being overly influenced by sustain. You can tighten spiky transients and keep the groove stable while still letting the body of the sound breathe. This is especially useful on drum buses and mix buses where you want the snare and kick to feel more consistent, but you don’t want the room tone, cymbals, and sustain to get clamped into a smaller space.
Even better, this shaping can be targeted so you’re not just globally “more transient sensitive.” In real terms: You can tame harsh jumpy hits in the range that causes problems, without turning the entire mix into a rigid, overly controlled block.
- Turbo behavior that changes the “focus” of the compression
A very practical part of BUSTERse is the option to change how broadly the compressor affects the signal. Also, you’re not locked into one style of glue. Sometimes you want compression that mostly feels like it’s organizing the midrange, the part of the mix that can get messy and crowded. Other times you want the compressor to feel like it’s holding the entire spectrum in one frame so the mix behaves as a single object.
That switch lets you move between those intentions quickly, which matters because mix bus compression is always context dependent.
- External sidechain
External sidechain expands BUSTERse from “mix bus glue” into “mix management.” You can make the compressor react to a different signal, like a kick driving a drum room bus, or a vocal guiding a music bus, while still using the same filtering and transient shaping tools to decide how it reacts. I can say that this gives you cleaner ducking, more musical control, and fewer moments where sidechain compression sounds like an obvious trick.
- Mix bus cohesion when you’re already close
BUSTERse is strongest on the mix bus when the mix already sounds good but needs to feel more like a cohesive statement. It’s ideal for that moment where you bypass the plugin and the mix suddenly feels a bit more scattered, like elements are no longer “held” together. I think used gently, it can make the chorus lift feel more controlled, make verses feel steadier, and make the entire track feel like it’s living inside one consistent tone and dynamic behavior.
- Mastering adjacent glue before final limiting
For mastering adjacent use, BUSTERse can make sense as a subtle cohesion stage when the mix is already controlled and you’re aiming for a slightly more “record like” frame before final limiting. The key here is intent: you’re not using it to fix large dynamic problems, you’re using it to add that last bit of stability and glue that helps a track feel more consistent across sections.
2. Analog Obsession ATONE (Channel Strip)
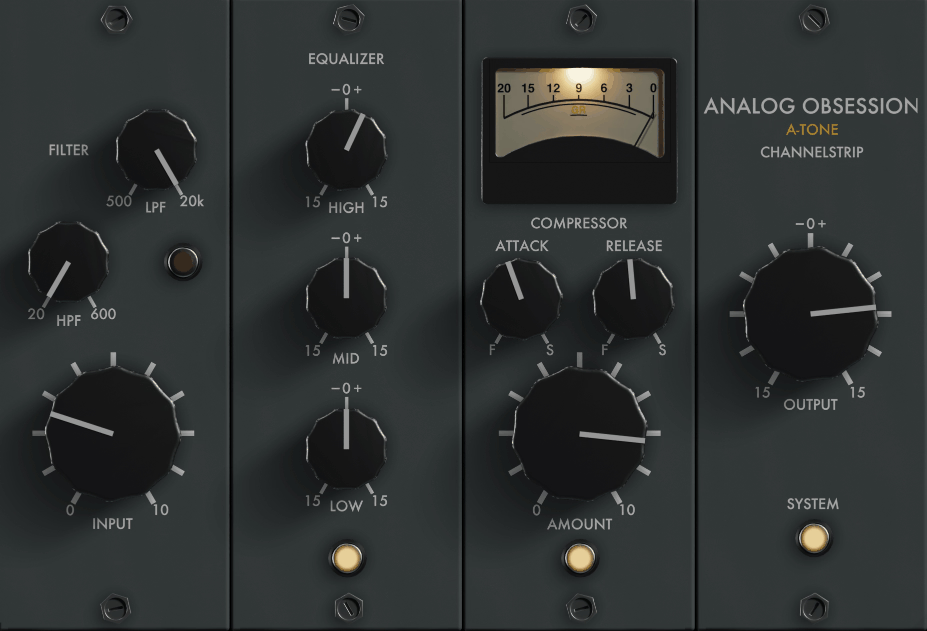
The plugin is built around three things that matter in everyday sessions: an A-Type style EQ that pushes tone in musical directions fast, filters that let you decide what energy even gets to live in the track, and a 436-style compressor character that’s more about attitude and stability than pristine modern control.
What makes ATONE VST plugin helpful is that it doesn’t feel like a generic all-in-one. It feels like a purposeful chain designed for that classic workflow: shape, control, commit. You can take something that’s too polite or too digital, add density, guide the frequency balance, and leave it sitting in the mix like it belongs there.
- A drive path that makes tracks feel physically closer
ATONE’s input drive behavior is valuable because it lets you introduce op-amp style grit and thickness as part of the channel strip identity, not as a separate “saturation plugin decision.” I can make sources feel less sterile, more forward, and more anchored without having to chase the effect with extra EQ or compression afterward.
- Filters that let you decide what the mix should even deal with
ATONE’s filtering isn’t just cleanup, it’s mix discipline. You can quickly remove energy that doesn’t serve the track like sub rumble, harsh top, fizzy edges so everything downstream behaves better. High pass filtering helps keep low end tight and intentional, and the low pass option is a surprisingly strong “finish” tool when a source is fighting the vocal or cymbals for attention. I think it’s also great for creative tone moves, pushing something back in the depth field by gently shaving the top instead of turning it down.
- An EQ that rewards broad, confident moves
The A-Type EQ approach is most valuable because it encourages decisions that sound musical immediately. Instead of living in tiny surgical notches, you can steer a track’s personality in a few moves, more body, more presence, more clarity, less mud, less bite, without the sound turning into “EQ’d audio.”
To me, this means speed and vibe: I can shape tone in a way that feels like mixing on hardware, where you commit to a direction and the track simply sits better.
- Compression that’s designed to be dialed by feel, not by math
ATONE’s compressor section is built around a 436-style concept with tweaks, and its big advantage is how quickly it gets you to the “right” amount of control.
The AMOUNT style workflow pushes you to mix by outcome: you turn it until the track feels more stable and finished, and you don’t get trapped in constant level compensation. I would recommend this approach because the moment you like what it’s doing, you’re not punished by a sudden level jump that forces you to second guess your ears.
- Routing behavior that makes it easy to keep the vibe even when you change your mind
A really practical part of ATONE is that you can keep the drive and character even when you’re bypassing EQ bands or experimenting with tone direction. You can separate “I like the analog thickness” from “I’m still deciding the exact EQ shape.” In a real mix, that matters because you often want to commit to character early, then refine tone later without losing the glue that made the track feel good in the first place.
- Vocals that feel closer, more stable, and more finished
ATONE is a strong choice on vocals when you want them to feel closer, more stable, and more finished without turning them brittle. You can use the drive to add density, shape the midrange so the vocal speaks clearly in the track, and apply compression that feels more like “contained performance” than “processed vocal.” This is especially helpful when a vocal is recorded clean and honest but needs that last bit of record tone to sit confidently.
- Electric guitars with edge and shape, not just volume
It’s excellent on electric guitars and guitar buses when the problem is not volume but edge and shape. Guitars often fight vocals in the upper mids, ATONE helps you guide that energy into a more mix friendly contour while keeping the guitars energetic. If guitars feel fizzy or overly sharp, I think the filters and EQ let you make them feel more expensive and controlled without turning them dull.
- Bass that’s both felt and readable
On bass and synth bass, ATONE is useful when you need bass to be both felt and readable. A little harmonic density helps bass translate, and tasteful filtering keeps the low end from becoming a compressor trigger that destabilizes the entire mix. I can say it’s a great “make it sit like a record” tool when bass is correct but not confident.
- Keys, synths, and pads that behave like they belong
ATONE also works beautifully on keys, synths, and pads that feel too clean or overly wide and disconnected. You can use it to bring them into a consistent frame, less “floating layer,” more “part of the production.” This is one of the underrated uses of channel strips: not fixing problems, but making parts behave like they were recorded through the same world.
3. Analog Obsession FetCB (FET Compressor)
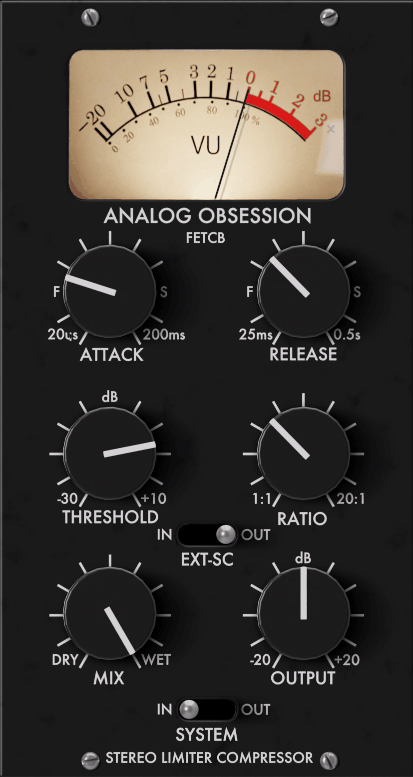
FetCB is a free FET style compressor/limiter from Analog Obsession that doesn’t try to be the thousandth 1176 clone. Instead, FetCB offers a fast, punchy, and character rich dynamics tool with enough flexibility to feel useful on a wide range of sources.
It comes from a hardware concept the developer once worked on, but in plugin form it’s been reimagined with a threshold control, wider ratio range, and intuitive behavior that makes it feel more like a modern producer’s FET compressor than a straight vintage copy.
What makes this Analog Obsession Plugin genuinely practical is that it can act as either a subtle dynamics stabilizer or a more aggressive punch machine, depending on how you set it up. I think it’s not just “a free compressor,” it’s one that rewards attention by giving you dynamic control that feels musical, vibrant, and surprisingly smooth, especially for a free tool.
- Dynamic behavior that stays musical
FetCB’s compression range and responsive behavior mean you’re less likely to hear “compression artifacts” and more likely to hear controlled energy and punch. Instruments retain their character while still getting the tame the peaks treatment that helps them integrate better into dense mixes.
- Fast attack and release range
The option to dial in very fast attack and release gives FetCB a ton of expressive range. You can use it for tightening drums, evening out vocal dynamics on the fly, or adding subtle aggression without worrying about a sluggish response. That speed gives your mixes rhythmic punch that sits well with electronic or live recorded material alike.
- Musical coloration and character
Though not overtly “vintage warmth,” FetCB adds subtle harmonic richness as you use it, especially when pushed, that can make elements feel more settled and vivid. I think this quality helps modern productions that sometimes feel too digital or clean, giving them a more analog style energy without unwanted artifacts.
- Free tool with professional results
- Drums and percussion punch
Drums and percussion are where FetCB immediately shows usefulness: its speed and punchy behavior let kicks and snares assert themselves with a tighter feel, while control over release smoothing brings hats and cymbals into a cohesive groove. On a drum bus, I would recommend this because it translates to a kit that sounds energized but unified.
4. Analog Obsession SSQ (SSL Equalizer)
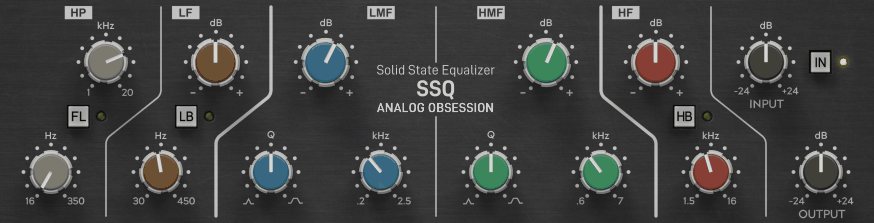
Analog Obsession’s take on the classic SSL style channel EQ, and what makes it worth using is that it’s built around the EQ moves you actually make in real sessions, not every possible EQ move that could theoretically exist.
It’s a practical, no nonsense equalizer that gives you the key tonal behaviors engineers reach for when they want speed, clarity, and control without digging through complicated menus or micro adjustments. I think what it does best is let you quickly shape tone in a way that feels familiar and musical, especially when you’re balancing instruments that live in crowded frequency spaces.
In everyday mixing, SSQ free equalizer plugin shines because it knows what it wants to do and it does it clearly: tighten mud, add presence, clean up low end, and push elements into their own space. It doesn’t try to impress with ten thousand bands or weird modes, it uses a set of EQ tools that actually get used in real sessions, and it lets you use them without thinking a lot about whether you’re in the right technical mode.
- Clarity with character
With SSQ, the main payoff is clarity with character and simplicity. This is the kind of EQ that makes instruments sound purposeful rather than just “less wrong.” On instruments that are too muddy or lacking definition, SSQ lets you carve space in a way that’s obvious but not harsh. On elements that feel squashed or lifeless, its midrange behavior can bring presence and punch back without forcing me to boost high frequencies unnecessarily.
- Midrange behavior that solves mix congestion
Midrange control is where most mixes actually get messy. SSQ’s mid bands help you bring instruments forward or let them blend back in a way that feels natural. You can fix mix congestion, such as guitars and vocals masking each other, with confidence, not guesswork. To me, this is where the EQ really earns its place because the midrange is where everything fights for attention.
- Presence shaping without harshness
Boosting high mids or high frequencies with some EQs can easily make things feel harsh or “airless.” SSQ’s high frequency behavior gives you presence and openness without pushing harshness forward. That’s especially useful on vocals, overheads, and synth pads where you want clarity but not brittleness. I would recommend using this on sources that need to cut through without getting sharp.
- Low end control that keeps weight
SSQ’s low frequency controls are effective at tightening up the bass without turning it into thinness. Instead of a blunt “cut the bottom,” SSQ helps you control muddiness while keeping weight where it matters. I think that’s a practical advantage for bass, kick, and full mix contexts where you need space down low but can’t afford to lose the foundation.
- Fast workflow that keeps you mixing
Everything in SSQ is laid out so you can make decisions quickly, and that matters. When you’re mixing multiple tracks and you want to shape tone confidently without stopping to read documentation, SSQ responds in a way that feels familiar and predictable. You can say this saves time and keeps me in the creative flow instead of fighting the tool.
- Vocals with intentional focus
On vocals, SSQ helps you with the two big struggles: placing the voice in the mix without mud around it, and adding presence in a way that feels smooth. By cleaning up low mids and adding midrange clarity, you can give vocals more intentional focus so they’re neither shadowed by guitars nor too piercing. I think this is where a good channel EQ shows its value because vocals need both clarity and body.
- Guitars and keys that find their space
Guitars and keys benefit from SSQ because these instruments often live in overlapping frequency bands. A slight low mid reduction can give guitars space from vocals, while a thoughtful presence boost brings out chord detail without pushing unwanted harshness. I would recommend this on any guitar or key part that feels like it’s fighting instead of supporting.
5. Analog Obsession POORTEC (EQ)
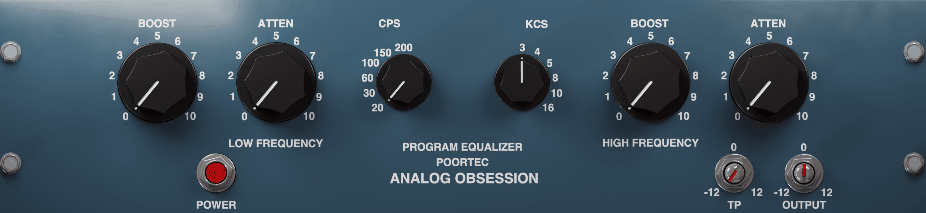
POORTEC is a free EQ plugin from Analog Obsession that’s built around a very simple idea: give you hands on, practical tonal shaping that actually improves a track’s presence, balance, and clarity without overcomplicating anything. It isn’t trying to be a super precise surgical tool or a flashy multi band processor with 12 bells and whistles. Instead, POORTEC VST focuses on the kinds of EQ decisions you make dozens of times in real mixes, gain where you want it, cut where you don’t, and color that actually feels musical.
In everyday mixing work, this plugin stands out because it doesn’t get in the way. It gives you tone control that’s comfortable and predictable, with a set of bands that cover the most impactful areas of the frequency spectrum.
Whether you’re polishing raw recordings, fixing tonal conflicts, or quickly adjusting instruments that feel out of place, you get effective results that you can hear right away. It’s the kind of EQ you can drop onto a track and actually use without hesitation.
- Consistent tonal behavior across sources
The EQ behaves in a way that doesn’t wildly change depending on the source. A boost in the upper mids is a boost in the upper mids whether you’re on vocals, guitars, or synths. That reliability means you get predictable results, you learn how it behaves and then you can use it confidently in different contexts.
- Musical coloration without overbearing character
While this isn’t a saturation plugin, its equalization has subtle musical flavor, not in a way that’s overwhelming, but in a way that hugs the frequencies you care about. This means when you boost or cut, the tone feels supportive, not combed or clinical. It helps instruments feel like they belong, warm where warmth is needed, clear where clarity is needed.
- Vocals that sit with clarity
Vocals are one of the best places to appreciate this EQ. If a vocal sounds dull, you can add presence and air without making it sharp. If it’s muddy or too resonant at certain notes, a few dB of cut in the right midrange band will clear it up and let the vocal sit ahead of the mix. The result is more intelligible and confident vocals without overprocessing.
- Bass that stays solid and controlled
When applied to bass and low end, you can tighten the bottom in a mix. You can reduce boomy energy without making the bass disappear, and emphasize the right low frequencies so the bass feels solid and controlled rather than fuzzy or uncontrolled. That’s a practical advantage in full mixes where muddiness steals clarity.
6. Analog Obsession UREQ (EQ 3)
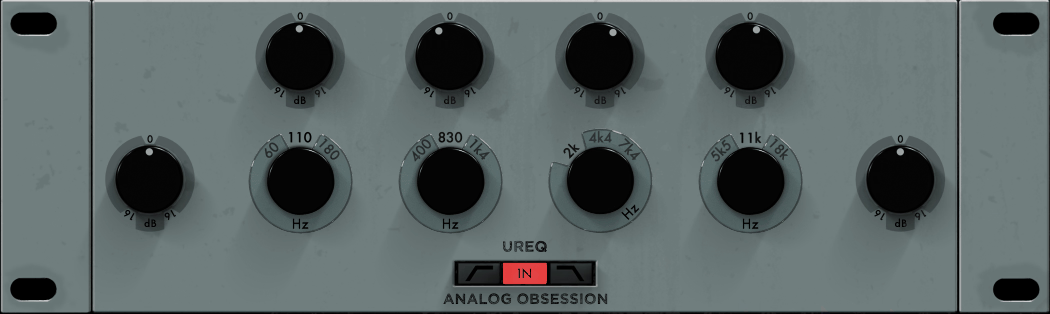
UREQ is a no frills, musical EQ plugin that gives you practical tonal shaping without complexity or unnecessary bells and whistles. It’s built around a simple but effective 4 band design with fixed frequency selections and a gain compensated input stage that makes it easy to add or cut energy without chasing output level mismatches.
I think what makes UREQ genuinely useful is that it isn’t about microscopic notches, it’s about quick, audible changes that make tracks sit better in the mix. The controls are intuitive, and the overall sound has a subtle, pleasant analogue leaning character thanks to the input stage, which means it can add a bit of weight or warmth as you work.
- Fast tone fixes
UREQ shines when you need fast tone fixes that actually translate across systems. The EQ bands are spaced to target the crucial balance areas, low weight, mid presence, upper presence, and air, so I can bring definition to a part or clear out congestion without overthinking. Because the input stage is gain compensated, boosting doesn’t feel like “louder is better,” I get real tonal impact without unbalancing my mix.
- Musical filters in boost and cut
The filters feel musical in both boost and cut, meaning you can shape tone without making a source sound synthetic or thin. I would recommend this because it doesn’t flatten dynamics or introduce harsh artifacts when you make broader moves. It’s the sort of EQ that makes a guitar sit with vocals or helps a vocal sit over a full arrangement without fighting for space.
- Vocals with clarity and body
On vocals, you can carve out muddiness and add presence without making the vocal thin or brittle. you are not tweaking microscopic resonance, your adjusting broad tonal behavior that makes the vocal sit forward and intelligible. To me, this is the kind of move that actually improves a mix instead of just changing numbers.
- Buses that behave consistently
Even on buses and groups, a subtle move can tidy overall balance, tighten low end, open up mids, or add clarity, so that sections like rhythm guitars or synth pads behave consistently with the rest of the track. I would recommend this on any group that feels like it’s fighting instead of supporting.
- Light on CPU and easy to use
Because it’s light on CPU and intuitive to use, it works well in both early mix stages and later polish passes.
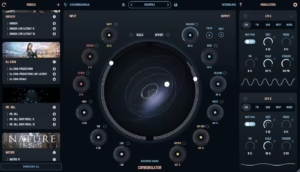
7. Analog Obsession COMPER (Musical Compressor)
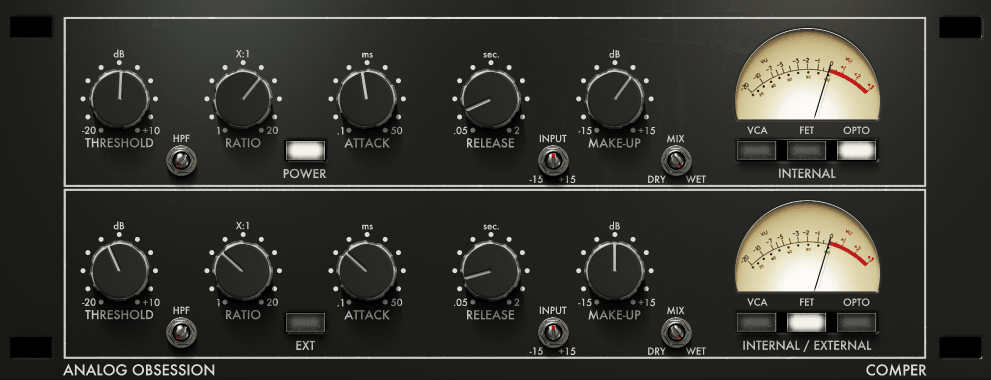
COMPER plugin is another Analog Obsession plugin that delivers practical, musical dynamics control with character and flexibility. It doesn’t pretend to be the most transparent or the most feature dense compressor on the planet, instead, COMPER focuses on doing the core job of compression in a way that’s usable on real mixes, from individual tracks to buses.
What sets it apart is its blend of punch, presence, and musical responsiveness: it can tighten dynamics, glue parts together, and add a sense of energy and cohesiveness that helps mixes feel more focused.
In everyday use, I think COMPER isn’t something you load and forget. It’s something you work with, you adjust it to taste, let it interact with the performance, and use its characteristics to help elements sit better without wrestling them into submission. Whether it’s getting vocals to hold a steady level, giving drums more consistency, or tightening a bus without losing life, it brings a controlled yet expressive compression style into your workflow.
- Responsive compression that syncs with performance
COMPER’s dynamic behavior gives you compression that listens to the music, not just the meter. This means on lively material, drums, vocals, guitars, the compressor smooths peaks without turning everything into a flat, lifeless blob. I can say the practical advantage is more musical control: you are shaping energy, not just limiting it.
- Characterful response that adds body
COMPER adds a sense of weight and presence that helps parts feel like they belong in the context of the mix. On bass, it can make notes feel more consistent without muddying the low end. On highs, it can help tame peaks without dulling sparkle. Taht means you get rich, balanced tone while still maintaining clarity.
- Musical dynamics that enhance groove
Because COMPER responds in a way that aligns with rhythm, it can actually enhance groove rather than fight it.
On drum buses and rhythm groups, this results in tighter feels and more expressive movement through sections, without having to automate every hit. I would recommend this for sessions where rhythm and pocket matter.
- Drums that feel tight and unified
Drums and percussion are a strong suit for COMPER. It tightens transient peaks, enhances the body of individual hits, and keeps kits sounding unified without aggressive pumping. On a drum bus, it brings the kit together so parts interact cleanly and maintain rhythmic clarity, which is exactly what you want when you need the rhythm section to feel locked in without overprocessing.
- Bass with evenness and focus
With bass and low end, COMPER adds evenness and focus. Bass parts often have notes that vary widely in level or attack, COMPER evens those out so the bass feels stable and focused across the track. That translates to a low end that feels present and consistent without dominating other elements.
- Dynamic coherence without dullness
The key sonic advantage of COMPER is its ability to add dynamic coherence without dulling transients. On percussive material like drums and percussion, it can make hits feel tight and forward, giving kick and snare more presence while smoothing out inconsistencies that make a rhythm feel sloppy.
On voices and melodic instruments, it helps even out performance peaks so that softer parts are more audible and louder parts don’t overshadow the mix, all while keeping the character of the performance intact.
8. Analog Obsession OAQ (M/S Equalizer)
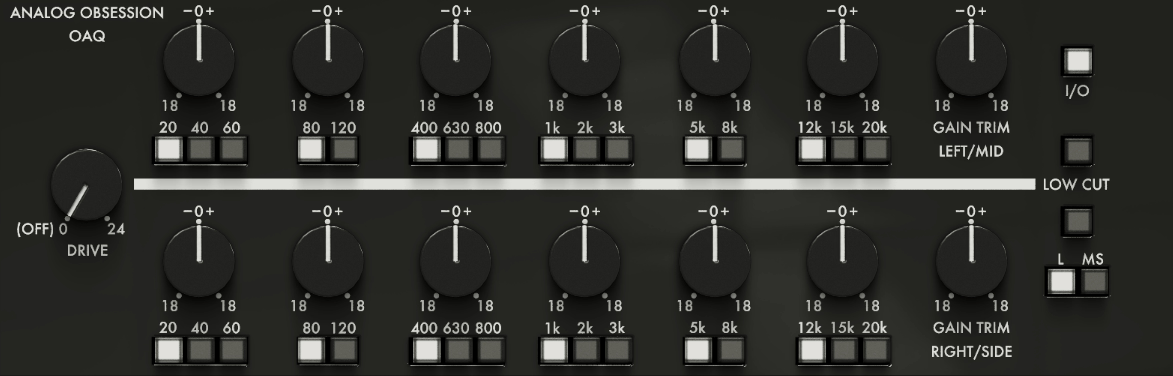
What makes it genuinely useful in practice is that it behaves like a “tone finishing” EQ. I reach for it when the mix is already close, but I want it to feel more expensive, more stable, and more intentional with fewer decisions. If your default EQ is a surgical parametric, OAQ is the opposite mindset: broad, meaningful adjustments that improve the mix picture quickly.
OAQ plugin by Analog Obsession giving you endless frequency sweeps and tiny Q decisions, it gives you carefully chosen frequency points that map to real mix problems and real mastering moves, low end foundation, low mid cleanup, mid presence, upper mid bite control, and top end openness. The workflow nudges you toward confident, musical moves that are easy to hear and hard to mess up.
- Fixed frequencies that speed up decisions
The biggest advantage is that it removes the “hunt and peck” part of EQ. The frequency choices are the ones you actually reach for when you’re balancing a full mix: sub weight, bass punch, low mid mud, mid presence, upper mid edge, and high air. I think the result is faster progress and fewer mistakes, because you’re not tempted into endless micro adjustments that don’t matter in context.
- Two low bands for sub weight versus bass punch
In practical mixing and mastering, “more low end” can mean two very different things: more deep foundation or more punch and body. It gives me separate low band options so I can add weight without clouding the kick, or add punch without bloating the sub. To me, that’s a real workflow advantage when the low end feels either thin or uncontrolled but I don’t want to destabilize the entire mix.
- Mid bands that target congestion and presence
The mid selections land in the zones where most mixes either get boxy or lose definition. You can pull out low mid buildup that masks vocals and snares, or I can add mid presence that helps the song read on small speakers, without doing the classic parametric EQ dance of sweeping around for “the exact frequency.” I would recommend this because it’s not about precision, it’s about reliably improving the mix picture.
- High bands designed for openness without sharpness
Top end EQ is where a lot of mixes get wrecked, because adding air can also add harshness. The high options are aimed at adding lift and openness in a way that stays musical. You can brighten a dull mix or add space to a dense arrangement while keeping cymbals and vocal sibilance from turning into a problem. For me, this is where fixed frequencies really help because they’re chosen to avoid the harsh zones.
- Mid/Side capability for width control
When your mix feels wide but messy, or centered but dull, Mid/Side EQ is the cleanest fix. It lets you tighten the center like kick, bass, vocal while keeping the sides airy and spacious, or tame harshness in the sides without making the whole track darker.
- Drive that adds density without aggressive boosting
A common mastering mistake is boosting highs or lows too much because the track feels flat. The drive gives you another path: add harmonic thickness so the mix feels more confident at the same loudness, then use smaller EQ moves for balance. This means a fuller sound with less aggressive boosting, which usually translates better and stays less fatiguing.
- Bus EQ for group cohesion
It’s also useful on buses when you want a group to sound like one thing. For example, on a drum bus I can add controlled punch without making the cymbals brittle, or reduce low mid thickness so the kick reads more clearly. On a music bus, everything except drums and vocal, you can carve a bit of midrange so the vocal has room, then add a touch of air to keep the arrangement feeling open. I would recommend this for any bus that needs to sound unified.
- Density for tracks that feel sterile
It’s also useful when your mix feels a bit sterile. It includes a drive stage that lets me add density and harmonic weight in a controlled way, which can make a track feel less clinical and more “record like” without needing a separate saturation chain. I think in real work, this is often the difference between “balanced” and “finished.”
9. Analog Obsession LOADES (De-Esser)
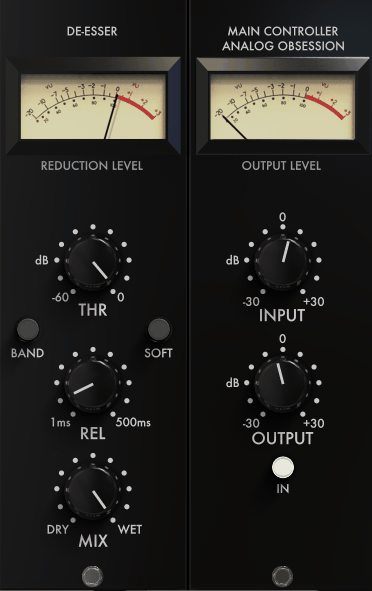
Most de-essers try to be everything: multi band processors, surgical frequency hunters, complicated detection modes that require a manual to understand. LOADES plugin goes the opposite direction. It’s a de-esser that does one job cleanly and doesn’t turn into a mini science project, and I feel that’s exactly what makes it worth using. It’s built around a deliberately minimal control set, and that’s the point: it’s for moments where I hear “too much S / T / CH” or too much brittle top, and you just want it handled smoothly without side effects.
What makes LOADES different from most vocal de-essers is that it’s essentially two things in one: a straight de-esser for vocal sibilance, and a high frequency tamer you can park on bright material like cymbals, overheads, harsh synths, even a full mix when the top end is fatiguing but you don’t want to dull everything with an EQ shelf.
That “tamer” use is where it stands out in practice, because it’s not only reacting to obvious sibilant spikes, it can be used to keep the entire high band under control in a more natural way than simply cutting highs.
- Vocals that stay natural instead of clamped
On vocals, LOADES is best when you want de-essing that stays natural instead of “clamped.” You set the threshold so it’s only working when the consonants jump out, then set release so the top end returns smoothly instead of snapping back. I think if you can hear the processing, it’s usually because release is too fast or threshold is too low for the performance.
- Cymbals and overheads without harshness
On cymbals and overheads, LOADES is more useful than a typical vocal first de-esser because I can treat it like a harshness governor. You are not hunting for a perfect frequency, just setting threshold so the spiky moments stop dominating, and using release to keep the sheen intact. I can say this is especially valuable on drum overheads that have great room tone but painful cymbal crashes.
- Mix bus fatigue control
On a mix bus, this is not an “always on mastering de-esser,” but it’s genuinely handy when a mix is basically finished and the only problem is that the top end gets sharp in choruses or fatiguing at volume. In that scenario, LOADES can reduce the bite dynamically while leaving the mix tone largely unchanged, something a static EQ cut can’t do as cleanly. I think this is where LOADES really proves its versatility beyond just vocal work.
- Bright synths and harsh sources
On bright synths or harsh sources, LOADES works like a dynamic brightness limiter that only acts when things get too hot. I can keep the character of a bright synth lead or aggressive hi hat pattern while preventing it from piercing through the mix in an unpleasant way. To me, this is a much more musical solution than just cutting highs with EQ and losing the energy.
10. Analog Obsession CHANNEV (Channel Strip 2)
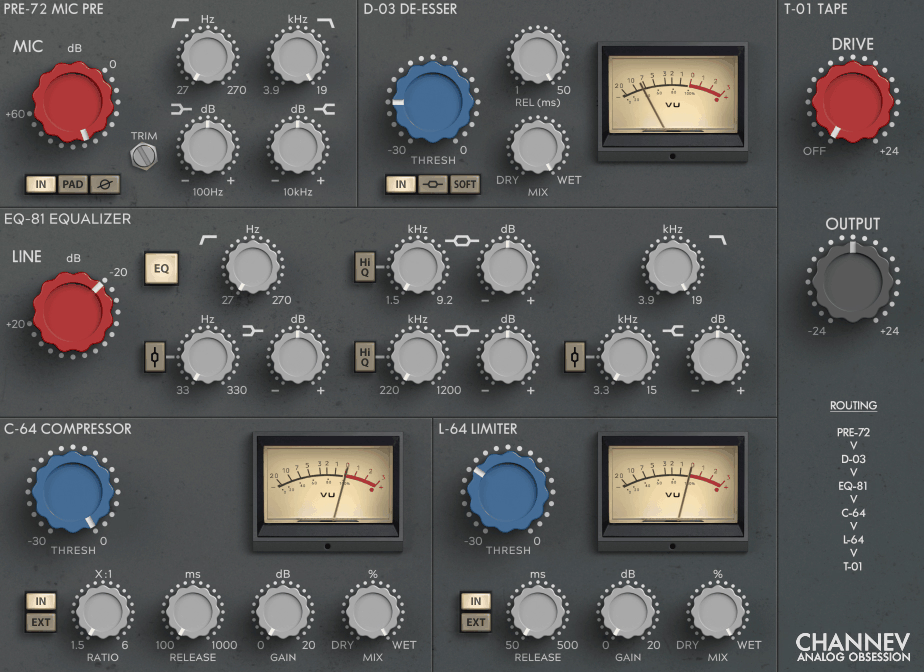
CHANNEV is the “commit to a signal path” channel strip in the Analog Obsession lineup. Instead of being one great EQ or one great compressor, CHANNEV is built to let you take a plain track and move it toward console style shape, control, and finish in one place, preamp tone up front, fast cleanup and smoothing, then dynamics, then the option to add a last bit of “tape like” thickness at the end.
The honest value here is workflow: it’s a full front end plus mix channel in plugin form. If you’re the type who normally stacks three to six plugins to get a vocal or instrument to sit, CHANNEV channel strip plugin is designed to get you to the same destination with fewer moving parts and fewer chances to over process.
- Preamp and line amp stages for early density
CHANNEV’s front end and line stage aren’t just “gain knobs.” you can add density and presence in a way that often reduces how much EQ and compression you need later. In practical terms, it helps a vocal or instrument feel like it belongs in the record sooner, so you spend less time wrestling with the same track through multiple processors. I think this is where the console workflow really shows itself.
- Built in de esser that lets you push clarity
The built in de esser matters because it solves a common mixing trap: I want more intelligibility and excitement, but the “S” and “T” energy gets painful fast. You can keep presence and articulation while controlling the spikes that make vocals and bright instruments feel abrasive. To me, it also works well as a general high end smoother when overheads, synths, or guitars get pokey.
- EQ designed for shaping, not repairs
CHANNEV’s EQ section is designed for broad, musical moves that change the “position” of a source in the mix. You can add body, pull clutter, and create presence in a way that feels like you ‘re shaping a sound on a console channel instead of doing surgical corrections. I would say recommend this approach because it’s the kind of EQ that helps sources occupy a clear role quickly.
- Compressor plus limiter for stable tracks
The compression stage is there for the main job, keeping levels and energy consistent, while the limiter stage is there to catch the last peaks that still poke out and change perceived loudness. This means practical control: vocals stay intelligible through dense parts, bass stays consistent note to note, and drums stop randomly jumping forward, without me riding faders every eight bars.
- Tape saturation for record like finish
The tape stage is useful when the track still feels too clean after tone and control.
You can add subtle thickening and smoothing that makes a source feel more “record like,” especially when you are stacking many tracks and you want them to feel cohesive rather than overly separated.
- Drums that feel unified
On drums, especially kick, snare, or a drum bus, it’s useful when the kit sounds good but feels too “cleanly separated.” A bit of front end tone, some controlled EQ shaping, and moderate compression can make hits feel more unified and finished.
- Guitars and keys that fit quickly
On guitars and keys, CHANNEV is a fast “fit it into the mix” tool. You can remove low mid buildup that competes with vocals, add controlled presence so parts speak clearly, and use gentle compression to keep chord energy steady through arrangement changes.
11. Analog Obsession ATTRACTOR (Dynamic Processor)
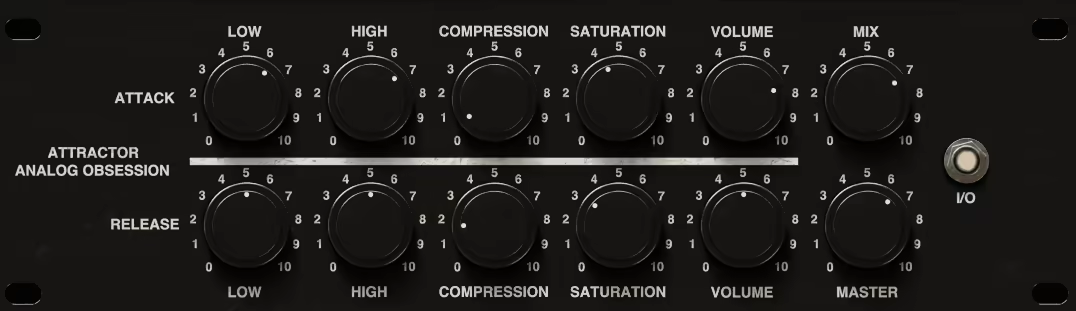
Most transient shapers force you into one decision: more attack or less attack, more sustain or less sustain, and then you fight the side effects. ATTRACTOR takes a more mix realistic approach: it lets you treat a sound as two different events, the hit and the tail, and then you shape each one like it’s its own signal.
That’s the whole point of this plugin, and I think it’s why it can solve problems that “one knob transient” tools can’t.
If your drums are punchy but messy, or guitars are exciting but spiky, or your vocal consonants are sharp while the body feels dull, it gives you a way to fix the exact part that’s wrong instead of changing the whole sound.
- Independent control of hit and tail
This is the main reason to use ATTRACTOR. Being able to process the attack and release/sustain parts separately means I can stop making compromises. You can make the attack cleaner and more controlled while keeping the sustain lively, or you can thicken the sustain without making the transient clicky and sharp. In addition, you get punch and smoothness at the same time, instead of choosing one.
- Tone shaping tied to the transient split
This Analog Obsession plugin includes simple low and high tone controls that can be applied in a way that actually matches how we hear “hit” versus “body.”
- Compression that’s quick to set
The compression behavior is built to be decision light. I’m not babysitting a full set of timing parameters, its timing is handled for me, so I can focus on what I want: more control, more consistency, less spikiness, more glue. I would recommend this because it means speed and reliability: I can dial it until the source “behaves” without getting trapped in technical tuning.
- Level control for each part
Having separate level control over the hit and the tail is more useful than it sounds. It lets you do practical mix fixes like pulling back a spiky attack without turning down the whole instrument, or lifting sustain so a part feels more present without needing extra compression or EQ. I can say this means balance inside the sound, which often reduces the need for automation and extra processors.
- Room mics without harshness
This is a strong use case: overheads often have transient spikes that make cymbals feel harsh, but if I compress the whole signal I kill the life. It lets you calm the harsh front edge while preserving the tail, so cymbals feel smoother without getting dull or “smaller.”
- Vocals with smooth consonants and full body
When a vocal has a pokey edge on S/T/K sounds but the main tone feels slightly flat, ATTRACTOR can help because you can treat the “front” differently than the “body.” That gives you a path to smoother vocals without turning them lifeless or dark.
- Control that sounds natural
It’s best when you need control that still sounds natural. Instead of compressing the entire signal and hoping the transients behave, you can tighten the front edge while letting the sustain breathe, or do the opposite: soften the hit while keeping the body full.
In practice, that means you can make a snare feel more consistent without flattening its ring, make a kick feel more solid without turning the whole low end into a pump, or make a vocal feel less pokey without dulling the tone.
Hello, I’m Viliam, I started this audio plugin focused blog to keep you updated on the latest trends, news and everything plugin related. I’ll put the most emphasis on the topics covering best VST, AU and AAX plugins. If you find some great plugin suggestions for us to include on our site, feel free to let me know, so I can take a look!