Look, Waves Clarity Vx Pro isn’t going to be the right plugin for everyone, and that’s perfectly fine. What matters is figuring out if it’s the right one for you and your specific workflow.
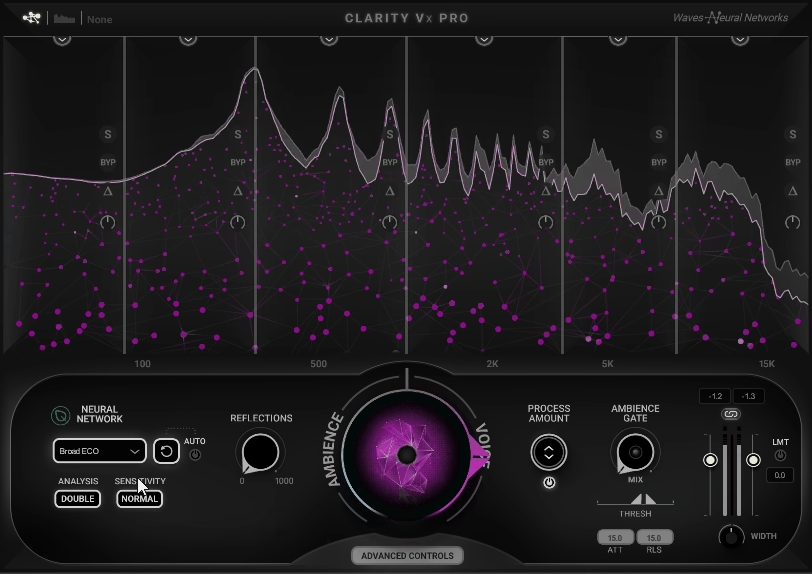
This is a real-time noise reduction plugin that uses neural networks to separate voice from background noise. The interesting part is that the neural networks have been pre-trained on millions of hours of voice recordings, so there’s no learning phase where you capture noise profiles. You just open it, twist the main knob, and it starts working immediately.
Here’s what you really need to consider though. The standard Clarity Vx (regular version) uses the exact same neural network engine as the Pro version, which means the core audio quality is identical between them. The Pro version just adds more tweaking options when you run into complicated situations. For basic noise reduction work, the standard version might be all you actually need.
What Separates Pro From Standard
The standard version keeps things simple with one main knob and two neural network profiles. That simplicity works great for a lot of people.
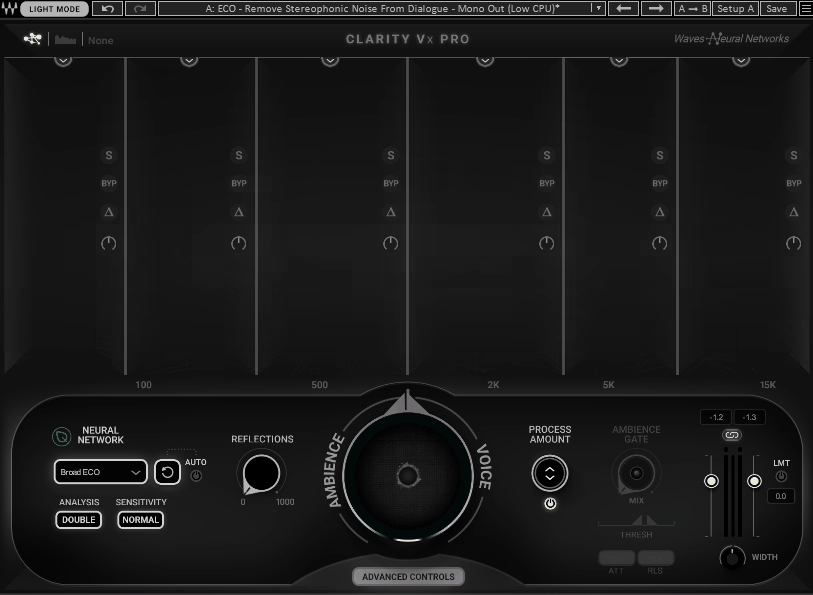
Now, when it comes to Clarity Vx Pro, it adds four neural network profiles total, multiband processing across four independent frequency bands, and various advanced controls that let you shape how the processing responds. You also get ambience extraction capabilities, which becomes relevant if you do ADR matching work.
The multiband processing turned out to be more useful than I initially thought. Those four separate frequency bands each get independent control, and you can adjust where the crossover points sit. Each band includes solo, bypass, and delta monitoring. That delta function is particularly helpful because it lets you isolate and hear only what’s being removed from a specific frequency range.
What makes the system workable is how all the band faders connect to the main control knob. Adjusting the main knob scales everything proportionally, so I set up my frequency balance once and then just use that central knob for overall intensity adjustments. This approach has been really helpful when dealing with low-frequency traffic rumble or mid-range air conditioning noise.
Each band also has Pure Gain control offering 24 dB of boost or infinite cut, which comes in handy when problem noise lives in a narrow frequency range.
Understanding The Neural Network Options
The Pro version includes four different neural network profiles, each trained for specific scenarios. Broad 1 keeps multiple voices intact when they’re in the recording together. I would reach for this when working on interview material where both speakers need to stay clear. Broad 2 focuses on isolating the main voice while removing secondary voices and ambient sounds. When you are dealing with a primary speaker in a crowded environment, this one does the job.
Broad 1 HF targets high-frequency isolation, though honestly I don’t find myself using it often. Broad ECO runs much more efficiently on CPU and was optimized for dialogue rather than sung vocals. This profile handles most podcast and video dialogue work without pushing my system hard. I would usually start here and only switch profiles if the results aren’t working out.
The Controls Worth Knowing About
The Reflections control changes the release time of the neural network process across a range of 0 to 1000 milliseconds. Sometimes I’m working with dialogue that was recorded in a space with nice acoustics, and removing every trace of the room makes it sound unnatural. This parameter lets me dial back in some of those natural reflections after removing the noise.
The Ambience Gate determines how hard the plugin works during silent moments between words. The key detail here is that it’s voice-sensitive instead of volume-sensitive, so it responds to detected voice activity rather than just signal level.
This means it cleans up those quiet gaps without chopping into the actual speech.
The Neural Network reset button clears the network’s history from a certain timeline point forward while keeping what it learned before that. You can actually automate this function, but it needs to happen between clips rather than mid-speech or it creates audible clicks. There’s also an Auto Reset option that triggers automatically after 200 milliseconds of silence. Whether you use this depends on what kind of material you’re processing.
The Ambience Keeping feature does something genuinely interesting. Instead of turning the knob right to remove noise, you turn it left to remove voice while keeping ambience. This matters for ADR workflows when you need authentic location sound to layer under studio-recorded dialogue. I’ve also found uses for it when extracting background atmospheres from location recordings or creating instrumental versions of mixed material.
CPU Usage Reality
Let’s talk about system resources, because this matters. Clarity Vx Pro demands significant CPU power. My system runs i7 9700K processor, and I can handle several instances without issues, but loading it on every track in a big session will push things to the limit. Pro Tools users especially have reported CPU overload errors at 512 buffer size when running multiple instances, and yeah, I’ve run into this myself.
Broad ECO uses dramatically less CPU than the other profiles. If your work centers on spoken dialogue, this profile handles most situations well while keeping your system happy. For podcast and video projects, it’s often the smart starting point. I would typically begin with Broad ECO and only switch if the results need something different.
The plugin creates 2048 samples of latency at 44.1-48 kHz sample rates, jumping to 4096 samples at 88.2-96 kHz and higher. This latency makes it unsuitable for live tracking where you need real-time monitoring, but for post-production work it doesn’t create problems.
Performance On Challenging Material
Persistent background noise like air conditioning, computer fans, traffic, or steady hum gets handled cleanly. The voice keeps its natural quality even when I’m removing substantial amounts of noise. Compared to traditional EQ-based noise reduction approaches, the difference is obvious.
Extremely problematic material with severe interference becomes less predictable. Sometimes with heavily damaged audio, the plugin removes most noise but leaves artifacts that vary slightly between processing passes. These artifacts manifest as a sort of ghost version of the voice underneath the cleaned audio, especially when pushing the processing aggressively. I’ve noticed this particularly when the main knob goes past 75% or so.
Drone noise from air conditioners or machinery creates challenges for most noise reduction tools because those frequencies shift constantly. Clarity Vx Pro handles this better than some alternatives I’ve tested, though you still need to watch for stray frequencies that slip through. It’s not perfect, but it gets closer to usable results than other options.
Intermittent noises like chair squeaks, footsteps, or random clicks don’t get handled as reliably. The neural network was trained on steady-state noise patterns, and random transients don’t fit that model cleanly. Usually you will need additional tools or manual editing for these problems.
The Repeatability Issue
Something worth mentioning that caught me off guard initially: the processing doesn’t always produce identical results when you play from different timeline positions. The neural network builds up a history as it processes, and that history influences how it makes decisions going forward. This adaptive behavior usually improves results, but it means you can’t count on perfect repeatability every single time.
For actual project work, you can adapt by rendering sections once you find settings that work. Most DAWs let you process offline and commit the audio, which solves repeatability concerns and also reduces CPU load during mixing. This has just become part of how I work with the plugin now.
Practical Uses I’ve Found
The plugin handles removing headphone bleed from vocal tracks effectively, which comes up constantly with home recordings. It can deal with acoustic guitar bleed in vocal mics too, though you need to watch for artifacts. The multiband controls become particularly valuable here because you can target just the frequency ranges where bleed is concentrated without affecting the vocal tone.
For location recording cleanup, you can use it on rain noise, motorcycle sounds, overhead airplane noise, and clothing rustling. Obviously, more extreme noise means more compromise between removal and natural voice quality.
Podcast and video dialogue is where this plugin truly stand out. The real-time processing means you hear cleaned results immediately while editing, without bouncing audio back and forth between applications. This saves you considerable amount of time.
How It Fits Into My Workflow
The plugin offers full automation for all parameters, which becomes essential when dealing with changing noise conditions. If dialogue shifts from a quiet interior to a noisy street, I can automate the amount control to match the changing noise floor. This has become automatic for me at this point.
One approach that’s worked well is routing multiple dialogue tracks to a group bus with a single instance of Clarity Vx Pro on that bus. I keep the amount control visible below my dialogue tracks for quick adjustments without opening multiple plugin windows. This also helps manage CPU since I’m only running one instance instead of five or six separate ones.
The plugin runs in real time inside my DAW, eliminating the need to export audio, process it elsewhere, and re-import. This integration makes it practical for regular use rather than a specialized tool reserved for emergencies.
Compatibility Details
NLE support officially covers Premiere Pro, though I’ve had it work in DaVinci Resolve as well. It doesn’t appear properly in the iZotope RX standalone editor, it just shows up as Waves Shell – unsupported when scanning for plugins. This frustrates me because I prefer doing restoration work inside RX when possible.
The plugin comes in both mono and stereo versions. Stereo processing offers Single and Double modes. Single mode sums both channels before processing, cutting CPU usage. Double mode processes each channel separately for more precise results but uses more CPU. I would typically stick with Single mode unless you specifically need the extra precision that Double mode provides.
Choosing Between Standard And Pro
The standard Clarity Vx delivers the same neural network processing and identical core audio quality as the Pro version. It uses a simplified single-knob interface and provides two neural network profiles instead of four. For straightforward dialogue cleanup, podcasts, or YouTube videos, it handles most work well.
The Pro version makes sense when you need multiband processing for precise control, when you’re dealing with complex noise profiles requiring detailed adjustment, or when you need ambience extraction for ADR workflows. If you’re doing professional post-production with regularly challenging audio, the additional controls justify choosing the Pro version.
Personally, I use the Pro version because I encounter difficult material often enough that I need those extra tools. But I know plenty of people running the standard version who’ve never felt limited by what it offers.
Beyond The Plugin Itself
Consider the CPU requirements carefully. If your system is older or already running near capacity, you might need to bounce tracks during work rather than running multiple real-time instances. This adds workflow steps, though it’s still faster than offline-only noise reduction tools.
The learning curve stays minimal for basic operation but gets steeper if you want to use all the advanced features effectively. The multiband controls, Reflections parameter, and Ambience Gate all required experimentation for me to understand how they affect different material. I’d suggest spending time with the manual and just testing various settings to see what they actually do.
Where It Comes Up Short
This isn’t a magic solution for every noise problem, and I want to be clear about that. Extreme noise requires realistic expectations about what’s achievable. Very aggressive processing creates artifacts, and there’s no getting around it. You need to find the right balance between noise removal and acceptable voice quality for your specific situation. Some recordings are simply damaged beyond what any tool can fix.
The repeatability quirks mean you can’t just set it and walk away completely. I need to listen critically and verify it’s behaving as expected. For some users, especially those working in larger sessions, the CPU demands make it impractical to use on every track. I’ve had sessions where I simply couldn’t run enough instances.
The lack of support inside iZotope RX standalone limits options if you prefer doing all restoration work in that environment. You’ll need to work within your DAW instead, which shifts your workflow somewhat.
The Value You Get
For professional post-production work, video editors handling location audio, and situations where you regularly receive less-than-ideal recordings, Vx Pro version genuinely saves time. It handles common noise problems effectively enough that you can move through work faster. That time savings has real value.
For occasional use or infrequent noise problems, the standard Clarity Vx probably makes better sense. The Pro version’s advanced features matter most when you encounter difficult material regularly and need every available tool to address it.
The plugin delivers on its core promises. It removes noise while preserving voice quality, runs in real time, and integrates into existing workflows. Whether that’s worth your investment depends entirely on how often you face these problems and how much time you currently spend solving them manually. For my work, it’s been valuable, but your situation will determine if that’s true for you too.
Hello, I’m Viliam, I started this audio plugin focused blog to keep you updated on the latest trends, news and everything plugin related. I’ll put the most emphasis on the topics covering best VST, AU and AAX plugins. If you find some great plugin suggestions for us to include on our site, feel free to let me know, so I can take a look!