I’ve always found convolution reverbs frustrating in one specific way. You get these incredible recordings of actual spaces, but you’re completely locked into whatever characteristics those recordings have. If I need a longer decay, you’re stuck hunting for a different preset. Want to adjust room size? You better hope there’s another IR in the library that’s close to what you need.
NUGEN Paragon is a VST reverb pluginthat breaks that limitation by analyzing impulse responses and building mathematical models that can be resynthesized in real time. What you end up with are authentic-sounding spaces that respond to parameter changes the way an algorithmic reverb would.
How the Technology Actually Works
The plugin uses additive resynthesis of impulse responses, which came from research at the University of York. Let’s say when I adjust parameters like decay time or room size, Paragon recalculates the impulse response rather than stretching or compressing the existing one. This happens fast enough (usually under 100 milliseconds) that I barely notice it interrupting my workflow.
I’ve tried traditional convolution reverbs plugins that apply time-stretching to modify decay, and it always introduces these metallic artifacts that destroy the natural character. Paragon avoids this entirely by regenerating the IR from its analyzed model. The difference is immediately audible when I start pushing parameters, and I think that’s where this plugin really shows its value.
The Impulse Response Library
49 IRs ship with the plugin, all captured as B-format Ambisonic recordings. This format allows processing into any channel configuration from mono through 7.1.2, which means you can use it for everything from basic stereo through Dolby Atmos beds.
The library covers standard territory like halls, churches, chambers, and rooms in various sizes and brightness levels. More interesting to me are the specialty captures: car interiors, hotel corridors, libraries, telephone effects, stairwells, van interiors. I’ve found these specific spaces genuinely useful for sound design work where I need to match particular acoustic environments.
Three presets labeled Add Presence, Add Warmth, and Add Width function more as subtle enhancement tools than obvious reverb effects. I’d say they’re useful for adding dimension without obvious spatial processing.
You cannot import third-party impulse responses. The analysis and modeling process is specific to how these IRs were prepared, so the plugin won’t accept external files. If you’ve built a personal IR collection over time, this might matter to you.
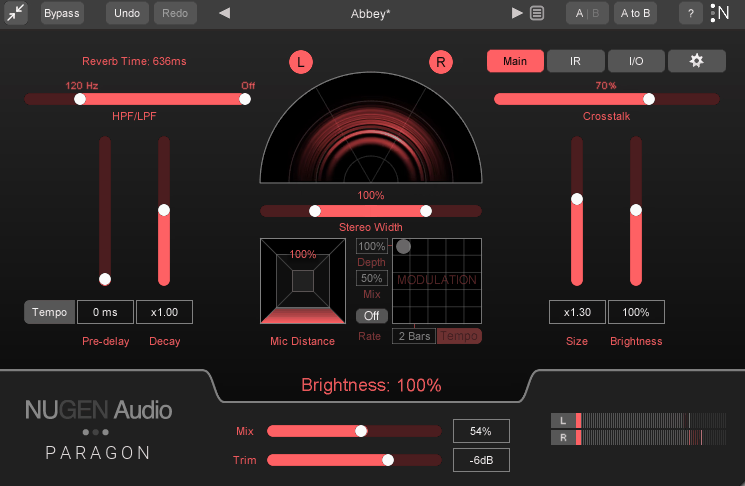
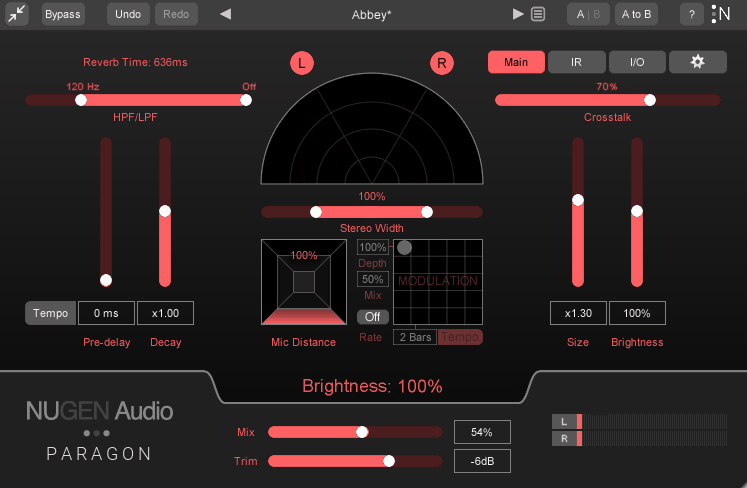
Main Interface Layout
A circular scope dominates the main screen, showing reverb distribution across output channels. Brightness indicates signal level, colors differentiate wet from dry. I’ll admit it took me a bit to understand what I was looking at, but once you get it, it provides useful feedback, particularly in multichannel configurations.
Core controls sit around the scope. Pre-delay and Decay sliders on the left, Size and Brightness on the right. Both decay and size can scale up to 5x their original values. High-pass and low-pass filters run across the top on a single slider control.
The Crosstalk parameter determines how signals bleed between adjacent channels. At zero, you get multi-mono behavior where each input only generates reverb for its corresponding output. Increase it and signals spread naturally across the sound field. In my stereo work, I would typically keep moderate crosstalk to create normal reverb behavior. In surround setups, being able to control this per-channel becomes crucial for maintaining clarity where you need it while allowing natural spread elsewhere.
Frequency-Dependent Control
The IR panel displays two views: a spectrogram showing frequency content over time, and a frequency response graph below. Both are interactive, and this is where you will spend most of your time when you really want to dial in a specific sound.
The significant feature here is adjustable decay time at different frequencies. You can set up curves so low frequencies ring longer while highs decay quickly, or any other combination. This goes beyond standard EQ because you’re modifying how the reverb behaves over time, not just filtering the output.
Up to four bands can be placed, each with adjustable Q, frequency, and either gain amount (for amplitude) or time multiplier (for decay curves). The interface works like parametric EQ – I double-click to add bands, drag to adjust positions. Pretty straightforward if you’ve worked with any EQ plugin.
A Complexity slider adjusts how densely the IR is resynthesized. Higher values produce richer, more detailed reverb but require more processing power and longer recalculation times. Lower values give simpler tails that are easier on CPU. I usually start around 50-60% and adjust based on how my system handles it and what the source material needs.
In addition, test sounds are available: acoustic guitar, kick drum, harmonica, plus short and long vocal samples. These loop continuously, allowing me to audition reverb settings against consistent source material. I find this helpful when I’m setting up a space and want to hear how it reacts to different types of content.
Individual Channel Parameters
The I/O page breaks out controls for each output channel independently. Trim, high-pass/low-pass filters, pre-delay, decay multiplier, and crosstalk (both incoming and outgoing) can all be set differently per channel.
This matters most when you’re working in surround. Maybe you want center channel dialogue to stay relatively dry while surrounds carry the full reverb load. Or maybe you need height channels with shorter decay than floor-level speakers to avoid muddiness. You can configure all of that here, which gives me a lot of control over the final sound.
One thing that tripped me up: these per-channel settings aren’t reflected on the main page. It means if you set pre-delay on an individual channel, there’s no indication on the main screen that anything differs from the global setting. I spent a few minutes confused about why my settings weren’t responding as expected before I realized what was happening.
Sound Quality Across Different Uses
The spaces sound convincing. That’s the baseline expectation for convolution, but what matters to me is whether that quality holds up when I start modifying parameters. It does, and I think that’s genuinely impressive.
I can push decay times significantly longer, expand room sizes, and reshape frequency response without introducing obvious artifacts or processing signatures. The reverb maintains coherence even when I take settings far from the original IR.
Frequency-dependent decay opens up useful mixing moves that I wouldn’t be able to do with regular convolution. On vocals, I can sustain low-mid reverb while keeping highs tight, which maintains clarity. On drums, extended low-end decay with faster high-frequency rolloff adds weight without losing transient definition. These adjustments work better than post-reverb EQ because I’m shaping the behavior rather than filtering the result.
In multichannel formats (I tested in 5.1), the reverb distributes naturally across the sound field. Crosstalk controls provide enough precision that you can shape the spatial image without the reverb feeling artificially segmented between speakers.
Where It Falls Short
No support for importing custom IRs. The analysis and resynthesis system requires specially prepared impulse responses, so third-party libraries won’t work. This limits what you can do compared to platforms that accept any IR file.
The GUI has some inconsistencies that bug me. Color customization doesn’t persist across sessions unless you save it with individual presets. Meter colors on the main page don’t reflect customization I’ve done on the I/O page. The lack of visual feedback when per-channel parameters differ from global settings causes the confusion I mentioned earlier.
For stereo-only work, the full version is probably more capability than you need. Paragon ST offers the same core technology optimized for two channels at a lower price point, which I’d recommend for that use case.
Who This Makes Sense For
Post-production and immersive audio work are the primary use cases where I think this really shines. The 7.1.2 channel support and Dolby Atmos compatibility address needs that most reverbs don’t cover. If you’re already using other NUGEN tools like Halo Upmix, you have a complete surround reverb solution.
Music production where authentic space matters benefits from the combination of realistic IRs and parameter flexibility. I mean, acoustic material, singer-songwriter productions, jazz, classical – anywhere believable room sound enhances the mix rather than competing with it.
Sound designers get access to specific acoustic environments (IRs) that are difficult to recreate otherwise like car interiors, specific room types, telephone effects.
If you work primarily in stereo, I’d suggest looking at Paragon ST instead. Same technology, optimized for two channels, more appropriate pricing for that application.
Does It Deliver?
Paragon provides something specific: convolution reverb quality with algorithmic-style parameter control, achieved through genuine technical innovation rather than workarounds. The sound quality meets what you’d expect from professional tools and the feature set supports real workflows.
The value proposition depends entirely on whether you need what it does. For immersive audio work or situations requiring precise control over authentic spaces, it fills a gap that other tools don’t address. For basic stereo reverb needs, you might find cheaper alternatives that serve just as well.
The plugin does what it claims without compromise. Whether that capability justifies the investment comes down to your specific requirements and how you work. I’ve kept it in my setup because it solves problems I actually have, and that’s really what matters when you’re deciding if something’s worth adding to your toolkit.
What’s best is that Paragon comes with a free trial, so you don’t risk anything and if you love it, you just buy it!
Hello, I’m Viliam, I started this audio plugin focused blog to keep you updated on the latest trends, news and everything plugin related. I’ll put the most emphasis on the topics covering best VST, AU and AAX plugins. If you find some great plugin suggestions for us to include on our site, feel free to let me know, so I can take a look!