At some point, every producer has the same realization: instruments give you the idea, but effects give you the emotion. I’ve opened old projects with great synth choices and solid performances, only to realize they felt flat simply because the processing wasn’t doing enough work. Effects are what turn raw audio into something that feels intentional, exciting, and finished.
What really changed my workflow was stopping the hunt for “the perfect plugin” and starting to think in effect types instead. Once you understand what distortion, modulation, saturation, or delay actually do to sound, choosing the right tool becomes almost automatic. You’re no longer guessing, you’re solving problems.
This article is meant to be a practical, big-picture guide to the core VST effect types that show up in almost every mix. I’m not here to sell magic tricks or secret chains. I just want to break down how these effects behave, where they shine, and how I personally use them in real projects. If you can think in effect categories, your mixes get faster, cleaner, and way more confident.
Let’s start with one of the most powerful and most misunderstood tools in the box!
Distortion
Distortion reshapes the waveform of a signal to add harmonics, density, and perceived loudness, ranging from subtle warmth to aggressive grit.
Distortion has a reputation for being loud, aggressive, and easy to mess up. For a long time, I avoided it unless I was working on guitars or heavy synths. Once I understood what it was actually doing, adding harmonics by reshaping the waveform, it became one of my go-to tone tools.
Used subtly, distortion isn’t about destruction at all. It’s about density and presence. A touch of drive can help a bass speak on small speakers, give drums more attitude, or make a vocal feel closer without just turning it up. That’s why modern distortion plugins often include soft clipping, tube or transistor modes, and waveshaping, letting you dial in character without blowing things apart.
What really makes distortion usable in a mix is control. Being able to push the input gain, then blend it back with a dry/wet mix, keeps the original dynamics intact. I also rely heavily on tone controls or filtering to keep high frequencies from getting harsh, especially on digital sources. And if a plugin offers oversampling, that’s a big plus for keeping things smooth at higher drive levels.
When distortion works, it doesn’t announce itself. You don’t hear “distortion,” you just hear a sound that suddenly feels more confident and alive.
Example plugins:
- FabFilter Saturn 2
- Soundtoys Decapitator

Trash 2 by iZotope Ozone is a HQ distortion plugin
Modulation
Modulation effects create movement by continuously altering pitch, phase, or timing over time, adding life and width to static sounds.
Modulation effects are all about movement. They take a static sound and give it life by gently shifting pitch, phase, or timing over time. I don’t use modulation to show off, I use it to stop things from feeling frozen.
Chorus is usually the first stop. By slightly detuning and modulating copies of the signal, it creates width and thickness that work beautifully on pads, clean guitars, and even background vocals. Used lightly, it doesn’t sound like an effect it just sounds bigger.
Phasers take a different approach, using moving phase cancellation to create a liquid, sweeping texture. I love them on synths and rhythmic elements when I want motion without obvious delay tails. Slow rates are key here; fast phasing can get distracting quickly.
Flangers are the most dramatic of the group. Their ultra-short delays and feedback create that unmistakable jet-like sweep. I treat flanging as a moment effect, great for transitions, drops, or ear-catching accents, but rarely something I leave on full-time.
Most of the time, modulation works best when you barely notice it. Slow speeds, low depth, and conservative mix levels turn these effects into invisible helpers that keep a track feeling alive.
Example plugins:
- Eventide Instant Flanger MK II
- IK Multimedia Triad Chorus
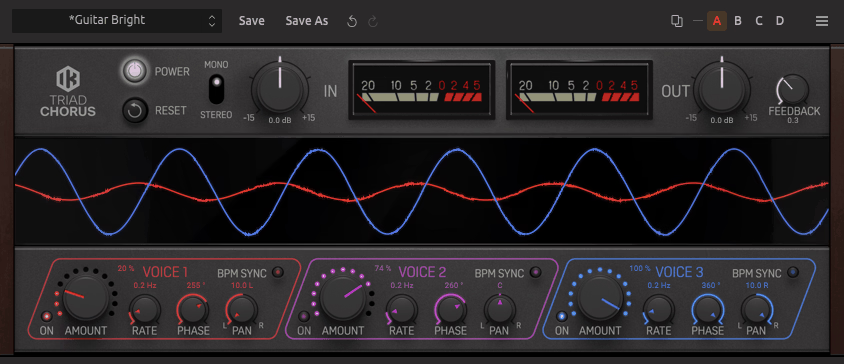
Triad Chorus by IK Multimedia
Saturation
Saturation adds gentle harmonic content by emulating analog-style nonlinearities, making sounds feel warmer, fuller, and more cohesive.
If there’s one effect I use on almost every project, it’s saturation. Not heavy distortion, just enough harmonic content to make things feel warm, dense, and connected. Saturation mimics the way analog gear behaves when pushed slightly, adding color without obvious damage.
What I love about saturation is how subtle it can be. A gentle tape or tube model can smooth transients, thicken the midrange, and make digital sources feel less sterile. You don’t really hear it working; you feel the mix settle into place.
I rely heavily on drive and output trim to avoid fooling myself with loudness. If a plugin lets me target specific frequency ranges, even better. High-frequency saturation can add presence without harsh EQ boosts, while low-end saturation can make bass feel fuller without muddying the mix.
One of my favorite habits is adding light saturation on buses instead of individual tracks. A drum bus or music bus with just a touch of harmonic color suddenly feels glued together, as it belongs in the same space.
Saturation is the kind of effect you only miss when it’s gone. When it’s right, everything just sounds finished.
Example plugins:
- Soundtoys Decapitator
- Waves Abbey Road Saturator

EQ
EQ shapes the tonal balance of a sound by boosting or cutting specific frequency ranges to create clarity, separation, and space in a mix.
EQ is the effect I probably use more than any other, yet it’s also the one that took me the longest to really understand. Early on, I treated EQ like a tone knob, boosting what sounds good, cutting what sounds bad.
Over time, I realized EQ is really about space management. It’s less about making something sound “better” on its own and more about making everything work together.
At its core, EQ lets you boost or attenuate specific frequency ranges, but the real power comes from subtraction. Cutting unnecessary lows or harsh highs often does more for clarity than boosting ever could.
A simple high-pass filter can instantly clean up a vocal or guitar by removing rumble that doesn’t contribute musically. Likewise, low-pass filtering helps tame overly bright synths or effects that clutter the top end.
Modern EQ plugins go way beyond static bands. I lean heavily on parametric EQs with adjustable Q values so I can be precise, and when available, dynamic EQ is a lifesaver. Being able to control a frequency only when it becomes a problem keeps things natural and musical.
Filtering deserves special mention because it’s often the fastest fix. Rolling off lows on non-bass elements creates headroom, improves compressor behavior, and tightens the entire mix. Sometimes the biggest improvement comes from removing frequencies rather than adding new ones.
When EQ is done right, you don’t notice it at all. You just notice that everything suddenly fits.
Example plugins:
- FabFilter Pro-Q 4
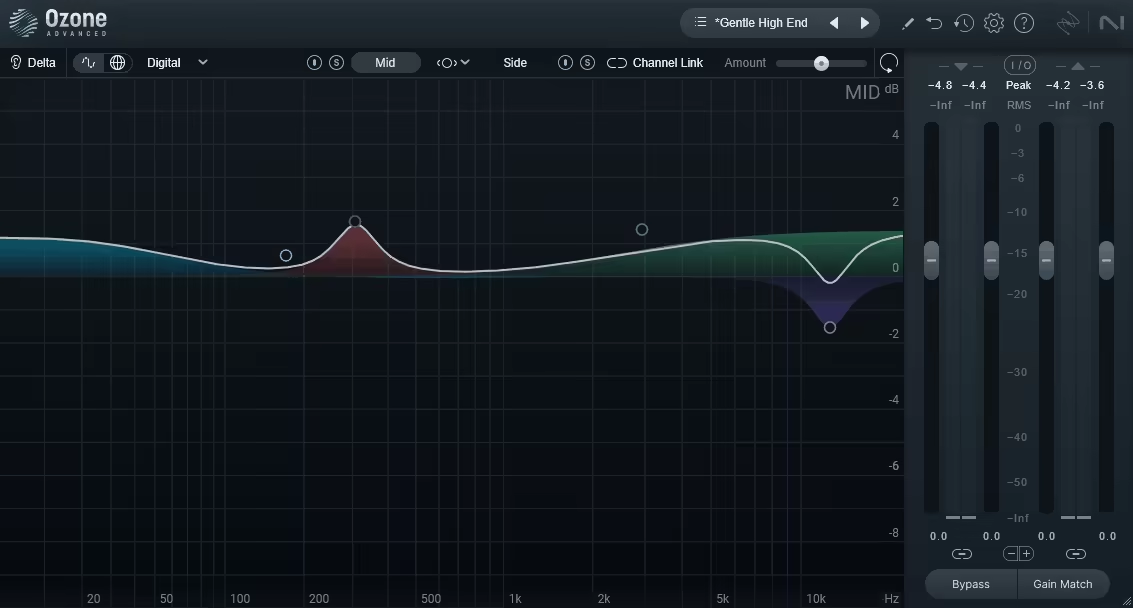
- iZotope Mastering EQ
Compression
Compression controls dynamic range by reducing the level of loud signals, helping sounds feel more consistent, punchy, and controlled.
Compression is one of those effects that feels complicated until it suddenly clicks. Once it does, it becomes indispensable. At a basic level, compression reduces dynamic range by turning down the loud parts and bringing up the quieter ones. In practice, it’s a tool for control, punching, and grooving.
I use compression constantly to keep performances consistent. Vocals sit better, bass stays locked in, and drums feel more focused. The interaction between threshold, ratio, attack, and release defines how transparent or aggressive the result feels. Slow attack times let transients through for punch, while faster settings smooth things out.
What really changed my workflow was learning that compression isn’t just corrective, it’s creative. A compressor with character can add weight, movement, and even color. Parallel compression, blended in subtly with a dry/wet control, is one of my favorite ways to add energy without flattening the life out of a track.
Limiting is essentially compression taken to the extreme. A limiter prevents peaks from crossing a ceiling, making it essential for buses, masters, and occasionally very dynamic tracks. I treat limiters as safety nets rather than tone shapers, using them to catch peaks and increase perceived loudness without obvious pumping.
Used carefully, compression and limiting don’t make things smaller; they make them feel solid and intentional.
Example plugins:
- Devious Machines Multiband X6
- FabFilter Pro-C 2

FabFilter Pro-C 2 is highly versatile compressor plugin for mixing and mastering applications
Pitch Manipulation
Pitch manipulation alters or corrects the pitch of audio for tuning, harmonies, thickening, or deliberate creative effects.
Pitch manipulation has come a long way from being a transparent repair tool. Today, it’s just as much a creative effect as it is a technical fix. I use pitch tools both to clean things up and to deliberately bend reality.
Pitch shifting changes the pitch of a signal without affecting timing, or vice versa. It’s great for thickening vocals, designing harmonies, or turning a simple sound into something unrecognizable. Subtle pitch shifts layered underneath the original signal can add width and depth without sounding artificial.
Pitch correction and auto-tuning are often misunderstood. Used gently, they’re almost invisible, simply guiding a performance back into tune while preserving its character. This is especially useful on vocals, but also on bass lines, leads, and even live instruments that drift slightly.
Of course, auto-tune doesn’t have to be subtle. Fast response times and hard correction create that unmistakable robotic effect, which has become a stylistic choice in modern pop, hip-hop, and electronic music. Whether transparent or obvious, the key is intent.
The best pitch tools offer control over speed, scale, formants, and tracking, letting you decide whether you’re fixing reality or redesigning it. When used thoughtfully, pitch manipulation becomes less about perfection and more about expression.
Example plugins:
- Soundtoys Little AlterBoy
- Waves Vocal Bender
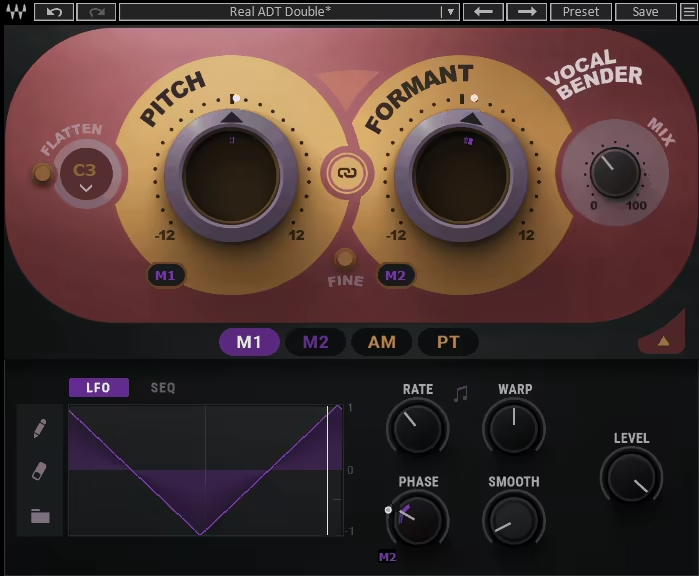
Modern pitch shifter plugin Waves Vocal Bender, dedicated for mixing vocals
Reverb
Reverb simulates acoustic spaces by recreating sound reflections, placing audio in a sense of depth and distance.
Reverb is how we place sounds into a world. Without it, everything feels unnaturally close, like it’s pressed up against your ears. With too much of it, things disappear into fog. Finding that balance took me years, and I still tweak reverb more than almost any other effect.
At its simplest, reverb simulates how sound reflects off surfaces in a space. That space can be anything from a tiny room to a massive hall, or something completely artificial. What matters most to me isn’t size, it’s depth and distance. A short, subtle reverb can push a sound just far enough back to make room for something else in front.
I pay a lot of attention to pre-delay because it determines whether a sound stays punchy or gets washed out. A little pre-delay lets the dry signal hit first, keeping vocals and drums clear before the tail blooms behind them. Decay time is just as important; long tails feel cinematic, short ones feel intimate.
Most of the time, I’m also filtering my reverb heavily. Rolling off lows and highs inside the reverb keeps the mix clean and stops low-end mud from building up. Reverb doesn’t need to be full-range to feel convincing.
When reverb is right, you don’t notice it you just believe the space.
Example plugins:
- FabFilter Pro-R 2
- Valhalla VintageVerb

VintageVerb by ValhallaDSP is one of the most comprehensive reverb plugins out there
Delay
Delay records and repeats audio over time, creating rhythmic echoes that enhance groove, movement, and interest.
Delay is one of the most musical effects out there. Unlike reverb, which blurs things together, delay creates distinct repeats that can interact with the rhythm of the track. I reach for delay when I want movement without pushing a sound too far back.
Timed delays synced to the tempo can add groove and energy, especially on vocals, guitars, and synths. A simple quarter- or eighth-note delay can make a part feel twice as interesting without cluttering the arrangement. What really matters is feedback too little, and the effect feels pointless; too much, and it takes over the mix.
I use delay time and mix level very conservatively. Often, the repeats are tucked so low that you only notice them when they’re muted. Filtering the delay signal is crucial too; cutting lows and highs helps the echoes sit behind the original sound instead of competing with it.
Delay is also great for creative transitions. Automating the feedback or delay time can create rises, throws, and momentary chaos that snap back into place. Used tastefully, delay adds excitement without ever feeling distracting.
Good delay doesn’t shout it answers.
Example plugins:
- Brainworx bx_pulsar
- Pulsar Audio Echorec

Noise Gate
A noise gate reduces or mutes signals below a set level, cleaning up unwanted noise between intentional sounds.
Noise gates don’t get much love, but they quietly solve problems that can ruin a mix. At a basic level, a gate reduces or mutes a signal when it falls below a certain threshold. That might sound boring, but it’s incredibly effective.
I use gates to clean up drum mics, tighten percussion, and remove background noise from vocals or guitars. When set correctly, a gate keeps the signal intact while eliminating unwanted hiss, hum, or room noise in between hits.
The feel of a gate depends heavily on attack, hold, and release. Fast settings create a tight, punchy result, while slower releases sound more natural. A poorly set gate can chop off transients or create unnatural pumping, so subtlety is key.
Gates can also be creative. Classic gated reverb on snares is an obvious example, but even simple rhythmic gating can add groove and movement to pads or effects. In those cases, the gate isn’t just removing sound, it’s shaping it.
Sometimes, silence is the strongest effect in the chain.
Example plugins:
- FabFilter Pro-G
- ReaGate by Reaper (FREE Plugin)

Free, yet advanced, that’s the ReaGate by Reaper
De-Essing
De-essing is frequency-selective compression designed to reduce harsh sibilant sounds without dulling the source.
De-essing is one of those effects you don’t really appreciate until it’s missing. Sibilance, harsh “s” and “sh” sounds can make vocals fatiguing and distracting, especially in modern, bright mixes. A de-esser is essentially a frequency-focused compressor designed to handle that problem gracefully.
Instead of compressing the whole signal, a de-esser reacts only when certain high-frequency ranges get too loud. The goal isn’t to dull the vocal; it’s to keep it smooth and comfortable to listen to. When de-essing is done right, you don’t hear the processing at all.
I always adjust frequency detection and threshold carefully, because every voice is different. Too aggressive, and the voice starts to lisp. Too gentle, and the harshness sneaks through. Some modern de-essers offer wideband and split-band modes, which give more control over how transparent the result feels.
De-essing isn’t just for vocals either. Hi-hats, cymbals, and overly bright synths can all benefit from targeted sibilance control.
A good de-esser doesn’t remove detail; it makes detail listenable.
Example plugins:
- Antares Vocal De-Esser
- iZotope Velvet
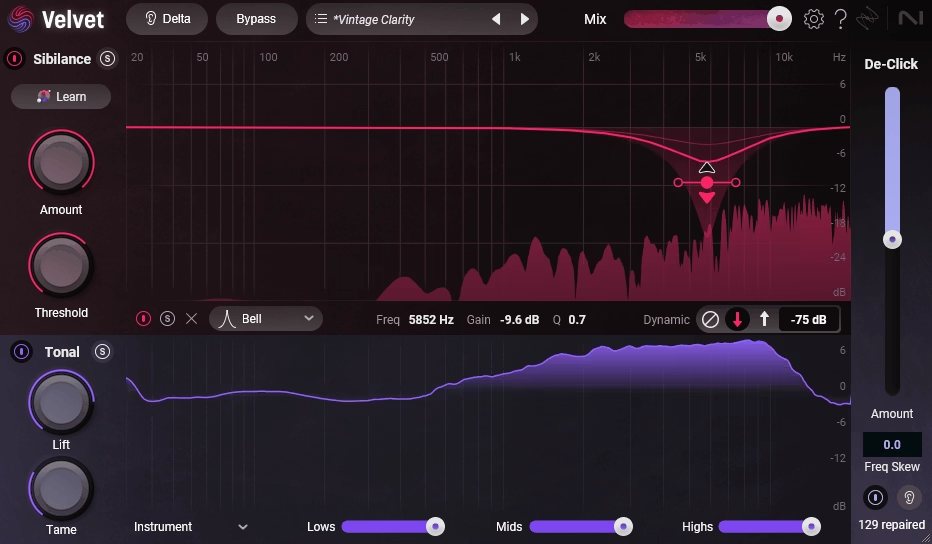
Velvet is one of the most recent and most advanced de-esser plugins you can try
Other Types
Specialized effects go beyond traditional mixing tools, focusing on transient shaping, stereo control, or experimental sound design.
Even though we covered the main effect categories you’ll use on almost every project, the VST world goes much deeper. There are plenty of specialized effects that don’t fit neatly into one box but can completely change how you approach sound design and mixing once you start using them intentionally.
Transient shapers are a great example. They let you shape attack and sustain without traditional compression, which is incredibly useful on drums and percussive material when you want punch without squashing dynamics. Multiband processors go a step further, allowing you to treat different frequency ranges independently, powerful, but best used with restraint.
Then there are stereo and spatial tools that focus purely on width, balance, and placement. Mid/side processors, stereo imagers, and mono makers help control how wide a mix feels and how it translates on different systems. Used subtly, these tools can make a mix feel bigger without falling apart in mono.
Creative effects deserve a mention too. Granular processors, glitch effects, resonators, filters, and spectral tools often live outside traditional mixing workflows, but they’re invaluable for sound design, transitions, and moments that need personality. These are the plugins that turn “correct” mixes into memorable ones.
The key with all of these is the same rule that applies to every effect: intent first, processing second. You don’t need them on every track, but when you know what they do, you know exactly when to reach for them.
Example plugins:
- Native Instruments Transient Master
- iZotope Ozone Imager
Last Words
If there’s one idea I hope sticks after all this, it’s this: great mixes come from decisions, not plugin hoarding. Once you start thinking in terms of effect types instead of brand names, everything gets simpler. You’re no longer asking “Which plugin should I use?” You’re asking, “What does this sound actually need?”
Every effect category we covered serves a specific purpose. EQ and filtering make space. Compression and limiting create control and impact. Saturation and distortion add character. Modulation, delay, and reverb bring movement and depth. Tools like noise gates and de-essers quietly keep things clean so the music can speak for itself. Pitch manipulation lets you decide how real or stylized a performance should feel.
What I’ve learned over time is that most professional mixes aren’t complicated; they’re intentional. A few well-chosen effects, used subtly and with a clear goal, will always beat a massive chain applied out of habit. Some of my favorite mixes look almost boring on screen, but they feel right the moment you hit play.
So the next time something isn’t working, don’t reach for another plugin just because it’s new or shiny. Step back, identify the problem, and choose the effect type that actually solves it. Do that consistently, and your mixes will start sounding more focused, confident, and finished, no matter what DAW or plugins you’re using.
At the end of the day, effects aren’t there to show off. They’re there to make the music feel good. And when that happens, nobody cares how you got there.
Hello, I’m Viliam, I started this audio plugin focused blog to keep you updated on the latest trends, news and everything plugin related. I’ll put the most emphasis on the topics covering best VST, AU and AAX plugins. If you find some great plugin suggestions for us to include on our site, feel free to let me know, so I can take a look!