What’s stopping your drums from hitting as hard as professional mixes – lack of expensive gear or missing the right processing tools?
The answer is usually processing tools, and these are the best drum mixing plugins I found for producers and engineers who need kicks that punch through dense arrangements, snares that crack with authority, and drum buses that feel glued without losing transient impact.
Drum mixing demands precision that general-purpose plugins can’t deliver. You’re not just balancing levels – you’re controlling transient attack independently from sustain body, adding sub-frequency reinforcement that stays musical rather than muddy, suppressing resonances without killing natural ring, shaping harmonics in specific frequency bands without brightening everything equally, and applying compression that glues the kit together without flattening the life out of performances.
Standard EQs, compressors, and transient shapers force compromises because they weren’t designed specifically for the complex spectral and dynamic behavior of drum recordings.
I will cover plugins built specifically for drum mixing workflows. The selection includes MIXLAND SUBLOOM for sub reinforcement, Arturia Mix DRUMS for complete channel processing, then Waves Curves Equator for resonance control, also plugins like UAD Empirical Labs EL8 Distressor for versatile compression + few more paid options including five capable free alternatives complete the lineup.
Each entry explains what the plugin accomplishes on drum sources, which specific problems it solves better than general tools, and when its workflow justifies a place in your drum mixing template. Let’s examine how these tools can help your drums sound better:
1. MIXLAND SUBLOOM
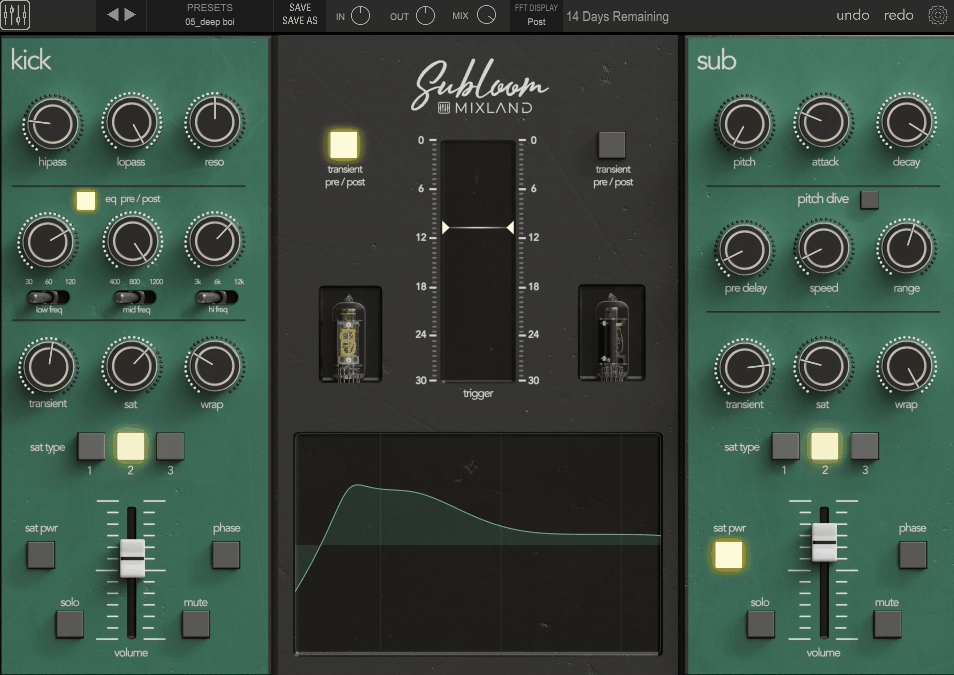
SUBLOOM treats drum mixing like a two-channel console where one side shapes your original drum signal and the other side generates a triggered sub layer that you blend in like a parallel channel.
What makes this plugin distinctive is that the point isn’t just “more bass” in a generic sense. The point is controlled low end that stays musical, with the kind of workflow you would normally build from multiple inserts now condensed into a single, purpose-built interface.
I think this console-style layout is what separates SUBLOOM from typical sub generators because it encourages you to think about the relationship between your original drum tone and the synthesized sub rather than just slapping low-end under everything.
To me personally, the real breakthrough is the Pitch Dive feature, which emulates the way real drum heads resonate and descend in pitch after impact. Instead of a static tone that sounds pasted on, you can create low end that blooms, then swoops down in a controlled way that stays locked to your groove. This is the difference between sub that feels like part of the drum and sub that sounds like a separate layer fighting for space.
- Two-Channel Console Layout for Clear Decision Making
SUBLOOM splits the processing into a Kick channel and a Sub channel, then gives you two faders to blend them. The Kick channel is where you dial the raw drum tone and transient. The Sub channel is where you create a tuned sine-style foundation that follows the drum hit.
This layout encourages a clean decision-making flow: first make the drum sound right, then decide how much sub reinforcement you actually need!
- Kick Channel Shaping With Musical Filtering and EQ
The Kick channel starts with high-pass and low-pass filtering, and it includes an additive resonance control that lets you emphasize a focused low-frequency “note” rather than boosting a wide area. Multiple reviews call out how usable this is for tuning the low end of a kick so it sits in key without turning muddy.
From there, SUBLOOM provides a three-band EQ voiced specifically for drums, with selectable frequency points per band and a clear visual curve. Some coverage describes it as aggressive British-style, while another review characterizes it as Neve-styled in intent. Either way, the practical reality is that it’s a targeted, mix-style EQ for shaping punch, boxiness, and click quickly without hunting for exact frequencies.
- Sub Channel Synthesis With Dynamic Triggering
When it comes to Sub channel, it’s a headline feature. It’s essentially a sinewave sub generator that is dynamically triggered by the drum input, letting you add a tuned fundamental the way engineers used to fake sub kick with tones, but with modern control and a dedicated workflow. You can set Pitch, then shape the contour with Attack and Decay, so the sub can be a short punch under the beater or a longer bloom that supports slower genres.
- Pitch Dive for Natural Drum Character
SUBLOOM’s signature feature is Pitch Dive, which emulates the way real drum heads can resonate and descend in pitch after impact. Instead of a static tone, you can create low end that blooms, then swoops down in a controlled way that stays locked to the track tempo. Controls cover speed, range, and decay, which lets you decide whether the pitch movement is subtle realism or an obvious effect.
Pitch Dive is also the reason SUBLOOM can feel more natural than simple sub generators. A static sine under a kick can sound pasted on and artificial. A controlled pitch descent can make the sub feel like it belongs to the drum hit, especially when the decay is tuned to the groove.
- Practical Application for Drum Mixing
SUBLOOM is most at home as an insert on kick, but it’s designed like a general drum console. The Kick channel gives you fast corrective and tone shaping. The Sub channel gives you controlled reinforcement that you can tune like an instrument. The combination is especially useful when the recorded kick lacks true sub, when a sampled kick needs to feel bigger without changing its mid punch, or when you want consistent low end across a song without manually layering different sub samples.
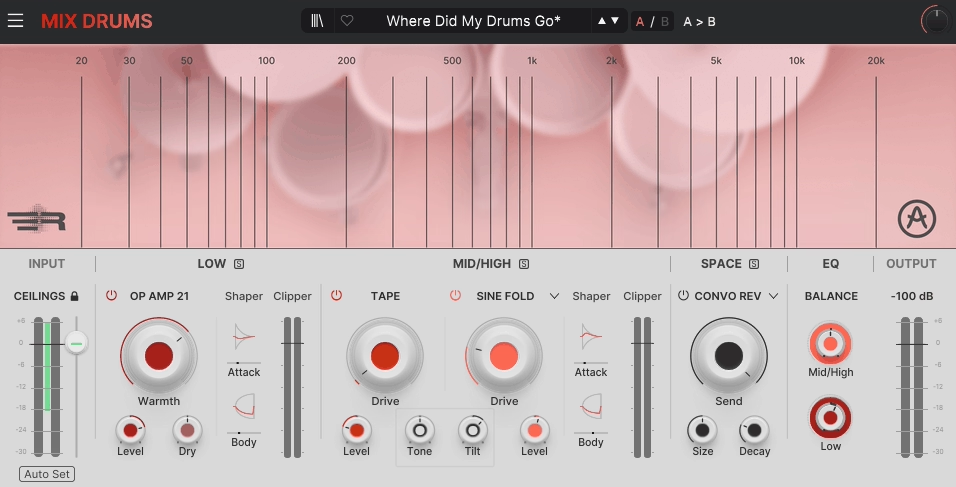
2. Arturia Mix DRUMS
Most drum processing plugins give you a compressor, maybe some EQ, and call it a day, which forces you into stacking multiple processors just to get drums that feel loud, punchy, and finished without destroying transients or turning everything into a distorted mess.
Mix DRUMS by Arturia is a different beast as it’s built to make drums feel louder and more finished without playing the usual game of stacking compressors and limiters, and the whole design centers on preserving peak level while increasing impact and perceived loudness using a chain built from clipping, saturation, distortion, transient shaping, phase-coherent parallel routing, spatial processing, and multiple EQ stages.
At first glance, the result is a single workflow that can take you from subtle tightening to obvious transformation while keeping levels controlled and predictable.
- Dual-Band Engine With Phase-Coherent Parallel Processing
Mix DRUMS splits the signal into LOW and MID/HIGH bands using a crossover you choose, from 30 Hz to 500 Hz, and it keeps the parallel paths phase coherent so you don’t lose punch to smearing when you blend processed and cleaner layers. This is the backbone of why it can sound aggressive without turning mushy, because the low end and the upper punch are being treated differently, then recombined with intention.
- LOW Module: Parallel Saturation Plus Transient Shaping
The LOW section runs a dry low path in parallel with a saturated one, then recombines them. The saturation stage is OP AMP 21, modeled as an operational amplifier gain stage with Warmth for distortion amount, Level for makeup gain, and Dry for blending in the parallel path. A key detail is that the “dry” low path shows up with its own gentle tape clipping character, so it stays controlled and musical even before you blend it back.
After the low paths recombine, you get a dedicated Transient Shaper with Attack Gain and Body Gain, each covering ±10 dB, plus Attack Time and Body Time from 5 ms to 200 ms. This is where you decide whether the kick and low tom energy hits harder, or whether it carries more sustained weight.
- MID/HIGH Module: Tape, Tone Shaping, and Distortion Control
The MID/HIGH section is where Mix DRUMS earns its “finished record” attitude. First, there’s Tape Drive based on the Mello Fi tape saturation character, with Drive and Level so you can add glue and soft edge rounding before any heavier distortion happens.
Then you get fast tonal steering with Tone and Tilt. Tone is a bidirectional mid push that boosts either lower mids centered at 700 Hz or upper mids centered at 2500 Hz, which is exactly the range where drums feel either boxy and thick or present and forward. Tilt comes after distortion and works as a brightness balance with a ±12 dB range, letting you brighten the whole band without turning cymbals into grit soup.
- SPACE: Multi-Mode Ambience With Dynamic Control
The SPACE section isn’t just “add reverb.” It’s a multi-mode ambience block with a Send amount for each space type, and it can be tempo-aware with straight, dotted, and triplet sync values where relevant.
You get an algorithmic Reverb with controls like Size and Decay, plus visualizer controls including Pre Delay that can also be synced, and parameters like Distance and Damping that help keep drum ambience from getting fizzy.
For deeper character, there’s Convolution Reverb, with 25 impulse responses across categories like Hall, Plate, Room, Spring, and Creative, plus Pre Delay and size shaping. This is where you can give drums a believable room or a deliberately colored special space without leaving the plugin.
Delay is covered too, including a standard Delay with time or sync-based rate and feedback, and a Tape Delay with controls like Drive, Width, and optional Ping Pong movement for stereo interest when you want drums to feel wider without just turning up reverb.
- Final EQ, Band Balance, and Noise as Texture
Finally, you get a corrective 3-band fully parametric EQ, with Balance knobs that let you adjust LOW and MID/HIGH levels after all the character work. The EQ bands show 20 Hz to 20 kHz frequency control, ±12 dB gain, and adjustable Q, with the high and low bands optionally set as shelving filters.
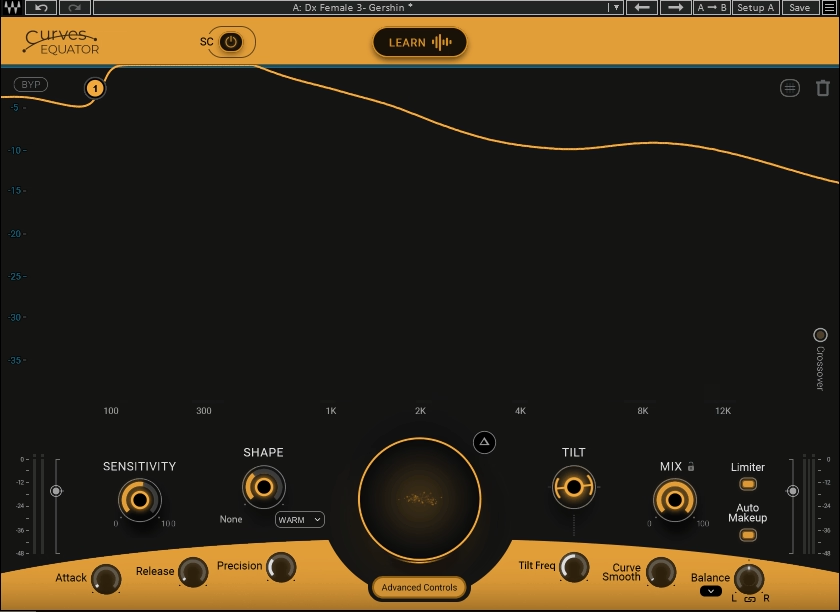
3. Waves Curves Equator
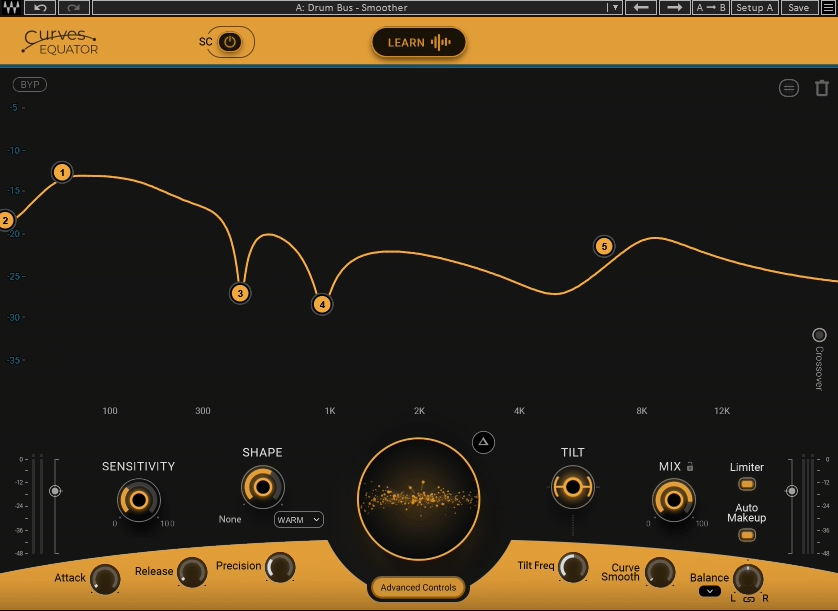
Curves Equator is a resonance suppression and unmasking tool that behaves like a dynamic EQ whose threshold is a curve. Instead of picking a few static bands and chasing whistles one by one, you shape an Equator Line that defines what parts of the spectrum are allowed to poke out, and the plugin dynamically pushes down what rises above that line.
On drums, that translates to fast control over snare ring, cymbal harshness, boxy room buildup, and those stubborn resonant spikes that make a kit feel sharp or cheap when you turn it up. I think this curve-based approach is far more intuitive than traditional multiband dynamics because you’re visually drawing the threshold shape rather than setting abstract frequency and ratio values.
- Adaptive and Captured Modes for Fast Setup
In Adaptive Mode, you start from a flat or factory curve and mold it into the response you want. This is the mode I would use for drum buses when you already know the problem area, like harsh upper mids in overheads or low-mid mud from rooms.
In Captured Mode, the plugin listens to a section of audio and creates a threshold curve that reflects the signal’s contours. This is especially useful on acoustic drums and cymbals because it can produce a curve that follows the overall spectral shape of the kit, then you use the main threshold control to push down resonances without flattening the life out of the sound. Capture can also Auto Apply when the curve stabilizes, which keeps the workflow fast. In fact, I’ve found that Captured Mode often gets me 90% of the way there in seconds, especially on overheads where I need broad spectral control.
- Delta Monitoring
The most important monitoring feature is Delta, which lets you audition only what’s being removed. This makes it easy to confirm you’re shaving harsh ring and brittle overtones, not deleting the crack and definition you actually need. I can only say that this feature has saved me countless times from over-processing drums to the point where they lose their character.
- Four-Band Control With Per-Band Cut
Curves Equator splits the spectrum into four bands using three adjustable crossovers. Default crossover points sit at 300 Hz, 2 kHz, and 8 kHz, which is a very drum-appropriate set of boundaries for kick and body, mid bite, and cymbal sheen. Each band has solo, so you can isolate what you’re doing in the low end or the top without guessing.
Inside each band you get a horizontal Band Cut control that adjusts how much reduction happens in that range. Band Cut works with the main threshold and can go up to 200% reduction per band, meaning you can double the strength in the harsh band while protecting the punch band from getting overprocessed. This is one of the most practical features for drums because it lets you be aggressive on cymbal harshness without thinning the low end or the crack.
- Dynamics Controls and Precision
Sensitivity controls the knee and ratio behavior of the dynamic reduction, deciding whether the action is gentle and forgiving or tighter and more corrective. Attack and Release set the speed of gain changes per band, with ranges of 0 to 1000 ms for each. Faster settings can catch sharp cymbal spikes and ringing quickly. Slower settings keep transients intact and focus more on sustained resonance.
Precision controls the depth and width of processing. Higher precision creates deeper, narrower actions that are great for resonant drums and metallic overtones. Lower precision targets broader buildups like room boom or low-mid congestion. When it comes to surgical work on specific problem frequencies, I would rather push Precision higher, but for general drum bus cleanup I would keep it lower for a more natural feel.
- Sidechain and Rider for Unmasking
A standout feature is sidechain capture, which lets the plugin build a threshold curve from a different signal, then apply an inverse-style carve to the track you’re processing. In drum mixing, this is an efficient way to make space between kick and bass, or between snare crack and dense instruments, without boosting anything. Rider enables attenuation only when the sidechain signal is present, which means the carve backs off automatically the moment the sidechain stops.
- Practical Application for Drum Mixing
Curves Equator is a great plugin for mixing drums when you want fast cleanup that stays musical. It’s excellent for overheads that get edgy, rooms that build low-mid fog, snares with narrow ringing overtones, and drum buses that feel harsh once you start pushing level.
4. UAD Empirical Labs EL8 Distressor
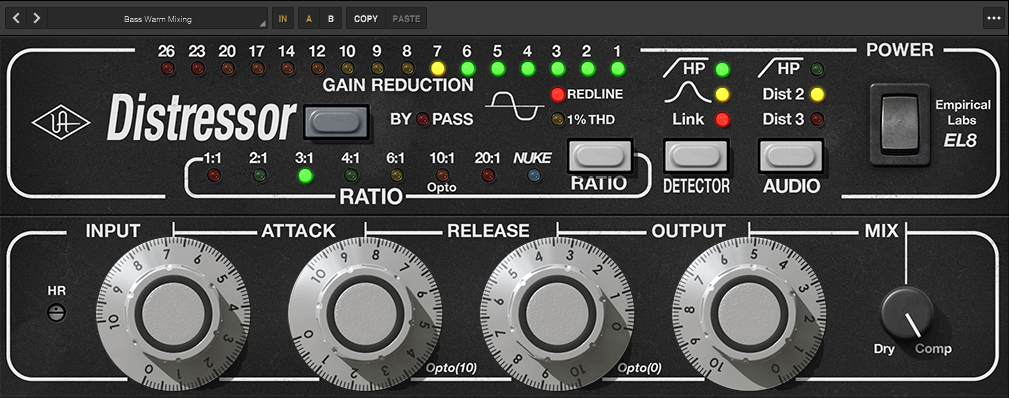
When you need a compressor that can handle everything from gentle leveling to aggressive smashing without switching plugins or rebuilding your signal chain, most dynamics processors force you to choose between clean control or character-driven aggression. The UAD Empirical Labs EL8 Distressor is a drum mixing workhorse because it covers three jobs in one unit: fast transient control, tone shaping through controlled distortion, and detector shaping that keeps low-end punch intact.
I would say this versatility is exactly why the Distressor appears on kick, snare, drum bus, and room mics in countless professional mixes. It can behave like a clean leveler, a gritty smash box, or a near-limiter depending on ratio and timing, which means you’re getting multiple compressor personalities in one plugin. In fact, I reach for the Distressor more often than any other drum compressor because I know it can handle whatever the source throws at it.
- Ratios That Feel Like Multiple Compressors
Distressor’s personality changes dramatically with ratio because each ratio selects a different compression curve, not just a simple numeric slope. 1:1 is effectively no compression but still runs audio through the unit’s tone path for warming and density. 2:1 and 3:1 behave with very gentle, parabolic-style knees, great when you want control without audible clamping.
4:1 and 6:1 step into firmer control that gradually approaches limiting and is a common zone for punchy drum work. 10:1 Opto switches to a different detector behavior intended to mimic older optical-style curves. 20:1 and NUKE move into brick-wall-style limiting, and NUKE in particular was developed with room mics in mind for explosive ambience control. I like how each ratio setting feels like a completely different compressor rather than just a mathematical adjustment.
- Detector Modes That Stop Low-End Pumping
A huge part of why Distressor works on drum buses is detector shaping. The unit includes high-pass filtering in the detector path specifically to prevent low frequencies from dominating the gain reduction and causing pumping. It also includes a second detector option often described as Band Emphasis, which makes the detector more sensitive to mid-band harshness, so spiky upper mids trigger compression more than the rest of the signal.
This is useful on aggressive cymbals, snare bite, and edgy room mics when you want the kit to stay forward without ripping your head off. You should definitely try Band Emphasis on drum buses that get harsh in the upper mids as it’s a game-changer for controlling aggression without killing energy.
- Distortion Modes for Harmonic Character
Distressor’s tone shaping isn’t an afterthought. Dist 2 emphasizes 2nd order harmonics with a tube-like character that can thicken kick and snare without turning harsh. Dist 3 leans into 3rd order harmonic emphasis with a more tape-like bite, which can add urgency to room mics and make a drum bus feel louder in the midrange without simply boosting EQ.
These modes are especially effective when the compressor is doing real work, because the harmonic content rises in a controlled, mix-friendly way instead of sounding like separate saturation slapped on afterward. I would say that Dist 3 on room mics is a great choice for making drums feel huge and aggressive without actual EQ boosts.
- Parallel Mixing and Practical Drum Applications
The UAD version includes Dry/Wet parallel mixing as a dedicated control, which is exactly what you want for drum bus parallel compression: you can smash hard for density, then blend back the uncompressed transient for punch. On kick and snare, I would typically use the 4:1 to 6:1 range when I want a forward, controlled hit that still feels alive.
On room mics, 20:1 or NUKE is the classic move when you want size and aggression. In fact, NUKE mode on room mics is practically a mixing cliché at this point, but it’s a cliché because it works so well. The reason it works is that those ratios behave like brick-wall limiting, keeping peaks pinned while the room tail rises dramatically.
5. SSL Native Drumstrip
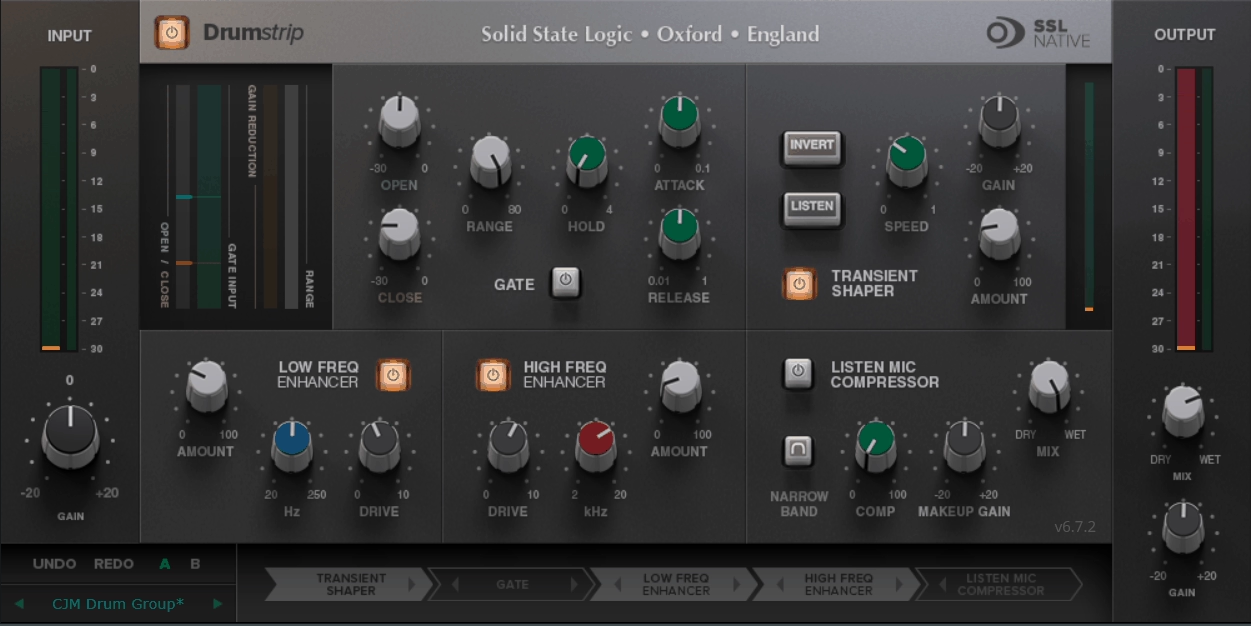
Most drum channel strips give you a gate, an EQ, and a compressor in a fixed order, which works fine when your drums are already clean and well-recorded but falls apart when you need to solve specific problems like spill control, transient shaping, or harmonic enhancement in a particular sequence.
SSL Native Drumstrip is a five-module drum channel strip designed for fast cleanup and controlled hype on individual drum mics and drum buses, and the strength is that every block is built around common drum problems: spill control, attack shaping, harmonic top and bottom enhancement, and the classic Listen Mic Compressor crush.
At first glance, what sets this plugin apart is that you get full process order control, so you can put the right tool first depending on whether you’re fixing bleed, building punch, or adding grit. I must say this flexibility is what makes Drumstrip feel like a professional mixing tool rather than just a preset channel strip.
- Five Modules With Flexible Processing Order
Drumstrip includes a dedicated Gate, a Transient Shaper, separate HF Enhancer and LF Enhancer, and an SSL Listen Mic Compressor with extra mix-focused controls. The plugin also provides peak and RMS metering on input and output, plus internal bypass for clean comparisons.
In addition, you can reorder all five processing blocks in any sequence. This matters on drums because the “right” order changes with the source. If you gate first, you clean spill before anything amplifies it.
- Gate for Spill Control and Natural Decay
The Gate is drum-tuned and gives you proper control, not just one threshold. You get Open Threshold and Close Threshold separately, which creates hysteresis so a drum can open cleanly and then decay naturally before the gate closes. You also get Attack, Hold, and Release timing controls, plus Range.
Range is important because it determines whether you’re doing hard gating or more natural spill reduction. At -80 dB, it behaves like a hard gate. Reduce the range and it becomes more like a downward expander, which is often the more realistic option on live drums because you can push room tone and cymbal spill down without creating an obvious chopped tail. I would recommend using this constantly on toms where you want to control bleed without making them sound gated and unnatural.
- Transient Shaper for Punch or Body
The Transient Shaper is built to change drum attack without relying on compression. It works by increasing the amplitude of the attack portion while leaving the decay largely unchanged, which is why it can make hits pop without the usual pumping.
Gain sets the detection level. Amount blends how much processed transient is added back to the dry signal. Speed sets how long the added attack takes to fall back to normal level. Invert flips the processed signal so it’s subtracted instead of added, which softens attack and increases perceived body.
In addition, there’s a Listen mode that lets you audition the shaped component to dial detection quickly. I must say that Invert mode is underrated for making snares feel fatter without losing clarity.
- HF and LF Enhancers for Harmonic Character
The HF Enhancer and LF Enhancer don’t behave like normal EQ boosts. They add a mix of 2nd and 3rd harmonics into the chosen region, which tends to read as more natural “excitement” and “weight” than just turning up an EQ shelf.
The HF Cutoff sets the frequency above which harmonics are generated, from 2 kHz to 20 kHz. The LF Turnover sets the frequency below which harmonics are generated, from 20 Hz to 250 Hz, which is why it’s so useful for adding perceived low end to kick, snare, and toms without making them overly boomy. Each enhancer has Drive and Amount, where Drive controls harmonic density and Amount blends the enhanced signal back.
- Listen Mic Compressor for Parallel Crush
The Listen Mic Compressor is the famous SSL console-style smash compressor adapted for Drumstrip. In this version, you get a narrowband EQ bypass option and a dedicated wet/dry Mix, so it’s much easier to use as parallel crush without setting up external routing.
Comp sets compression amount. Makeup compensates gain reduction and only affects the wet portion. Mix blends wet and dry. I think the Mix control is what makes this implementation so practical that you can absolutely destroy the signal with compression and then dial back the intensity by blending in the dry.
6. Wavesfactory Quantum
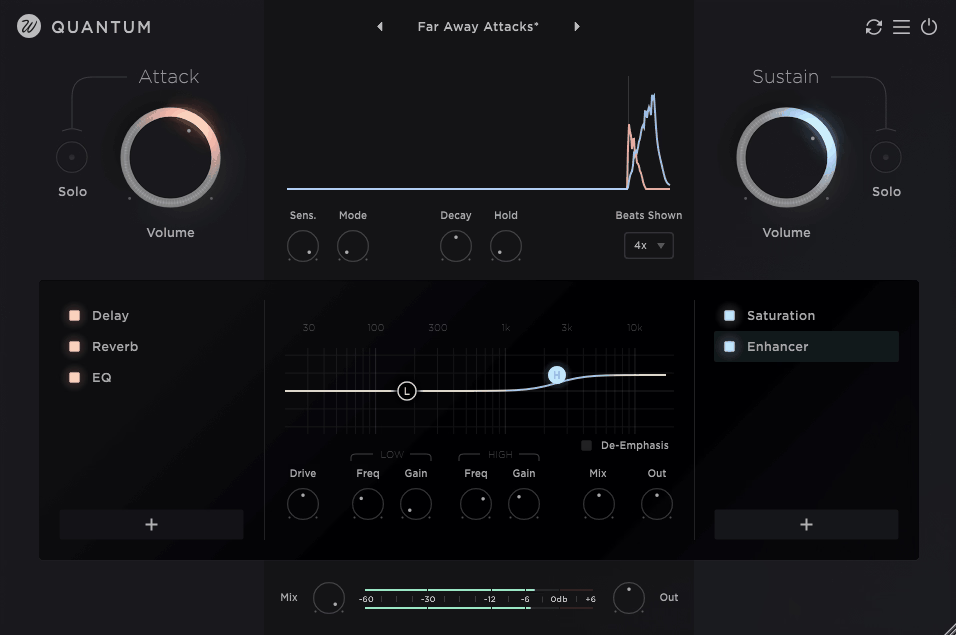
Most transient shapers give you a simple “more attack” or “less attack” knob that affects the entire signal at once, which works fine for basic punch control but falls apart when you need to process the transient and sustain portions completely differently without building complex parallel chains.
Wavesfactory Quantum is a transient toolkit that splits any drum signal into Attack and Sustain in real-time, then lets you process each part independently and recombine them.
You can control punch, body, and loudness perception without the usual tradeoff where “louder” means “more peaks” or “more limiter.”
I would say Quantum’s core workflow is refreshingly simple: you dial in clean transient separation, then decide what the attack should do and what the sustain should do. At the same time, the plugin gives you enough depth to get surgical when you need it.
- Attack and Sustain as Separate Processing Lanes
Quantum also gives you dedicated Attack Volume and Sustain Volume controls, each ranging from -96 dB to +12 dB, plus solo buttons for each lane. That means you can literally listen to only the transients or only the sustain while you tune detection and processing, which is one of the fastest ways to avoid overprocessing drums.
The biggest practical use on drums is perceived loudness control. If you want the kit to feel bigger without clipping the master, you can reduce Attack slightly and raise Sustain so the energy is redistributed from peaks into body. I mean, this is such a simple concept but quite powerful that you’re making drums feel louder without actually increasing peak levels. Quantum explicitly frames this as a use case for drums where a limiter isn’t ideal.
- Transient Detection Controls That Keep Separation Clean
Quantum’s separation depends on its detector, and I like how the plugin gives you the controls that actually matter. Sensitivity runs from -100% to 100% and determines how easily hits are classified as transients. Too much sensitivity means the plugin detects extra transients and can make the split sound twitchy. Too little sensitivity means it misses hits.
Decay runs from 0 ms to 500 ms and defines how long the transient region lasts before the signal becomes sustain. When it comes to drums, this is effectively how you decide whether the attack lane is only the initial click or includes some of the early body. Hold runs from 0 ms to 100 ms and sets a minimum time between transient detections, which prevents double triggers on flams or noisy material. This is especially useful on room mics and overheads.
Mode offers Drums, General, and Soft, changing the crossfade behavior between lanes to reduce clicks. Drums is the most immediate with instant attack, General adds a 5 ms attack crossfade, and Soft adds a 20 ms crossfade for smoother transitions.
- Two Independent Effect Chains for Creative Control
Quantum includes 16 built-in effects, and you can place them in the Attack chain, the Sustain chain, or both, then reorder them freely within each lane. In addition, you can only use one instance of each effect, which keeps parameter counts fixed for full automation reliability.
The included effects cover essentials for drum mixing: Compressor with auto-gain, Limiter with lookahead, Saturation, Lo-Fi, 5-band graphical EQ, Stereo tools with mid/side processing, plus Chorus, Flanger, Phaser, Tremolo, Vibrato, Delay, Algorithmic Reverb, and Convolution with IR import.
This is what makes Quantum more than a transient shaper. You’re not limited to “more attack” or “more sustain.” You can do things like EQ only the attack to add snap without making cymbals harsh, or put Pitch Shifter only on sustain to retune a drum while keeping punch intact. I like how both of those are explicitly described as intended use cases that it shows the developers actually understand mixing workflows.
- Practical Application for Drum Mixing
Quantum is a problem solver when you need separation of roles. If you want brighter, sharper transients without wrecking cymbals, you apply EQ boosts on the Attack lane only. If you want width without losing impact, you can keep attacks narrow and widen only the sustain with Stereo tools. Quantum even calls out “mono your attacks” and “widen sustain” as a direct workflow, which I think is brilliant for drum buses.
7. FabFilter Pro-Q 4
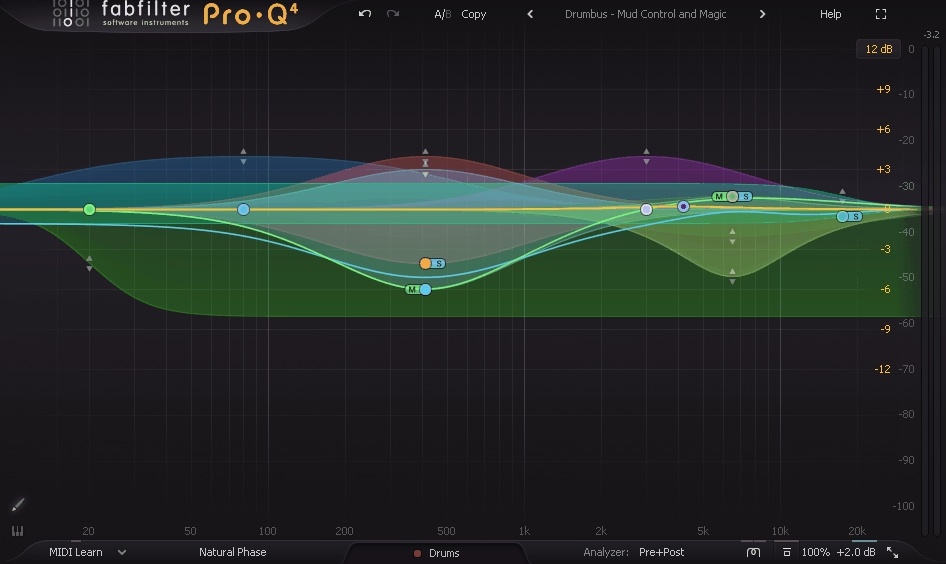
Most EQs force you to choose between surgical precision that sounds clinical or musical character that lacks the control you need for modern drum mixing, and this tradeoff becomes especially frustrating when you’re trying to solve problems like resonant snare ring, harsh cymbal spikes, or kick-bass masking without making everything sound flat and lifeless.
Pro-Q 4 is the kind of EQ you reach for on drums when you need to move fast without guessing, combining surgical equalization, dynamic control, and newer “smart” workflows that make it easier to solve real drum mix problems without turning the kit into a spectrally balanced but musically dead disaster.
Spectral Dynamics, EQ Sketch, Character modes with vintage-style saturation, and a much more powerful Instance List with collision detection are what finally make this feel like a complete drum mixing system rather than just a really good EQ.
In a big picture sense, drums are an EQ stress test because they have both extreme transients and dense sustained content, and Pro-Q 4’s biggest value is that it lets you treat those two behaviors differently.
- Dynamic EQ With Attack, Release, and Sidechain Control
Pro-Q 4 includes Dynamic EQ on every bell and shelf band, and the dynamic section is improved with adjustable Attack and Release plus optional sidechain filtering and external triggering. On drums, this is the difference between a static notch that makes the snare smaller all the time, and a dynamic cut that only tucks the snare ring when it actually jumps out.
I found that the sidechain filtering is especially useful on drum buses. You can shape what the detector “hears” so the dynamic band responds to the problem region instead of reacting to the kick fundamental or random peaks. That makes dynamic EQ feel intentional instead of twitchy, which is critical when you’re trying to control harshness without destroying the natural dynamics of the performance.
- Spectral Dynamics for Natural Resonance Control
When it comes to Spectral Dynamics, it’s one of the most drum-relevant additions. Instead of compressing the entire band when energy crosses threshold, spectral mode can reduce only the specific frequency components that spike, which is often exactly what you want with snare ring, cymbal harshness, and room resonances. In practice, it behaves closer to a “smart resonance suppressor” than classic dynamic EQ.
I have to say, for drum mixing this is a big deal because you can get a cleaner kit without the classic side effects of over-notching, like hollow snare tone or overheads that lose shimmer. Auto behavior can set threshold and timing intelligently, and you can still adjust details when you need surgical precision.
- EQ Sketch for Fast Ballpark Shaping
EQ Sketch lets you literally draw a broad EQ response curve and Pro-Q 4 turns that gesture into a set of bands. On drums, this is perfect for the first 30 seconds of a mix where you already know you want a high-pass, a bit of boxiness cleanup, and a gentle presence lift, but you don’t want to place five nodes manually. It’s not the final step but fast way to get a musical starting point before you start fine-tuning.
- Character Modes for Analog Warmth
Pro-Q 4 adds Character modes designed to introduce analog-style warmth and a more vintage feel, rather than being purely clinical. On drums, this can help when a kit is already tight but feels sterile. That being said, used subtly it can add density and smoothness without reaching for a separate saturator, especially on overheads, room mics, and the drum bus.
- Spectrum Grab and Collision Detection
The visual workflow is a major reason I use Pro-Q on drums. Pro-Q 4 keeps the powerful analyzer and adds Spectrum Grab, which lets you grab a peak directly from the spectrum and turn it into a controllable band immediately. That’s exactly how you hunt down a ringing overtone in a snare or a harsh cymbal spike when you don’t want to sweep by ear for a minute.
Then there’s the Instance List, which lets you jump between instances across your session from one interface, and includes collision detection to show frequency overlaps between tracks. In drum mixing this is huge for quickly spotting where kick and bass collide or where snare presence fights guitars, while you’re still in the “tone shaping” mindset. I’d recommend using this feature extensively when you’re balancing drums against bass and other low-end elements as it’s a game-changer for making informed EQ decisions rather than just guessing..
- Practical Application for Modern Drum Mixing
Pro-Q 4 earns a place in a 2026 drum mixing lineup because it solves the two biggest drum EQ problems at once: speed and control without side effects. Dynamic EQ with proper timing controls handles short problem moments. Spectral Dynamics handles resonances naturally. EQ Sketch and Spectrum Grab reduce friction when building initial drum tone.
8. Wavesfactory Spectre

Most enhancers and exciters give you a single knob that brightens or thickens your entire signal, which works fine for simple material but becomes a problem on drums where you need presence in specific frequency ranges without making everything harsh or muddy at the same time. Wavesfactory Spectre is a multiband enhancer built for one job: add harmonics exactly where you want them, without blindly brightening or thickening the whole drum signal.
It sits between EQ and saturation as you pick frequency bands like an EQ, but instead of only boosting level, Spectre generates controlled harmonic content in those regions. To be honest, this approach is exactly what drums need because clarity often comes from harmonics, not volume.
- Multiband Layout for Fast Workflow
Spectre uses up to five bands, and each band is a focused harmonic engine. You set a band’s frequency and width, then decide how much enhancement to add. Bands can be used as wide tone shapers or as narrow “spot enhancers” for a specific drum resonance area.
The interface is designed around direct manipulation, so you can place bands quickly and move them until the enhancement locks into the right part of the drum spectrum. Speed is a reason Spectre shows up on drum buses, where you want broad improvements without spending ten minutes sweeping for the right frequencies.
- Harmonic Shaping Per Band
Each band generates harmonics, and the effect is described as a harmonic enhancer rather than a simple saturator. The practical meaning is that you can choose to generate subtle overtones that make the drum more audible, or drive harder into more obvious saturation character, but still confined to the selected frequency region.
It’s a solid plugin for mixing drums because the parts you want to excite are often not the same parts you want to distort. You might want kick harmonics around the low-mids without fuzzing cymbals. You might want snare presence around 2 to 5 kHz without making the entire bus harsh.
- Complementary to Corrective EQ
Bands in Spectre behave like EQ bell bands in terms of placement and focus, but the result is more “forwardness” than “louder.” This makes it a good complement to corrective EQ. You use Pro-Q-style tools to remove mud and ring, then use Spectre to add back excitement and translation without undoing the cleanup.
On overheads, narrower high-band enhancement can add definition without pushing wide shelf noise. On snare, a mid-band can add crack and bite that stays audible after bus compression. On kick, a low-mid band can create the kind of knock that survives small speakers without needing massive EQ boosts. I like how this workflow keeps your corrective moves separate from your creative enhancement moves as it’s much easier to dial in a balanced sound this way.
- Mid/Side Processing for Spatial Control
Spectre supports Mid/Side processing, which is extremely relevant for drums. You can enhance the Sides to add width and shimmer to cymbals without making the center harsh, or enhance the Mid to bring snare and kick forward without widening the entire kit. On modern drum buses, this is one of the cleanest ways to increase perceived size without losing mono compatibility or making the center image unstable.
To be honest, Mid/Side enhancement is where Spectre really shines for me. Being able to add air and width to the sides of overheads while keeping the center focused and punchy is a game-changer for getting drums that feel big in stereo but still translate on mono playback systems.
- Practical Application for Drum Mixing
It’s strongest on drum bus, parallel drum processing, overheads, and snare, where a small amount of controlled harmonic content can add audible energy that survives later compression and limiting. I think used with restraint, it makes drums sound more expensive and professional, which is exactly what you want from a mixing plugin.
Freebies:
1. Kilohearts Transient Shaper
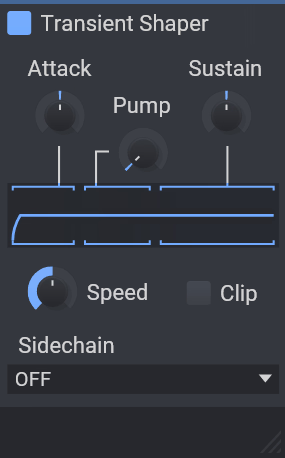
Most transient processors either give you overly simplified “punch” knobs that don’t do enough, or they bury you in parameters that require a manual to understand, and neither approach is helpful when you just need to make a kick hit harder or tighten up a loose snare without spending ten minutes tweaking settings.
Kilohearts Transient Shaper is a streamlined envelope shaping tool that gives you precise control over the attack and sustain of drum hits without relying on traditional compression mechanics, and it works by splitting the incoming signal into transient and body components and letting you adjust each independently.
At first glance, this makes it especially effective on drums where you want impact, tightness, or weight without coloring tone unpredictably. If you ask me, the simplicity is what makes this plugin so powerful that you’re not fighting compression ratios or attack times, you’re directly shaping the envelope behavior of the drum hit itself.
- Pump feature
Pump affects the immediate post-transient region, giving you a way to accentuate the moment right after the attack. This control increases perceived impact without simply turning up the transient itself. It’s useful when you want drums to feel heavier or more aggressive while keeping overall dynamic behavior under control. In fact, I’ve found Pump to be especially effective on kicks that need more “thump” without becoming boomy.
- Practical Behavior on Drum Sources
On kick drums, start with moderate Attack to bring out click if the kick doesn’t cut through. Use Pump to avoid bloated tails. Raise Sustain only if the kick feels too thin after shaping. On snares, Attack defines crack as too much can make it harsh, too little can make it dull. Adjust Sustain to balance body without cluttering the mix.
On drum loops and overheads, reducing Sustain often clarifies groove and space. You can then bring back some Attack if the loop feels lifeless. Applied to a drum bus, tiny amounts of Attack lift impact, and small Sustain tweaks align body without compression. When it comes to bus processing, the shaper often works best before or after a compressor to sculpt envelope in a way compressors alone can’t.
2. Nembrini Audio Noise Gate
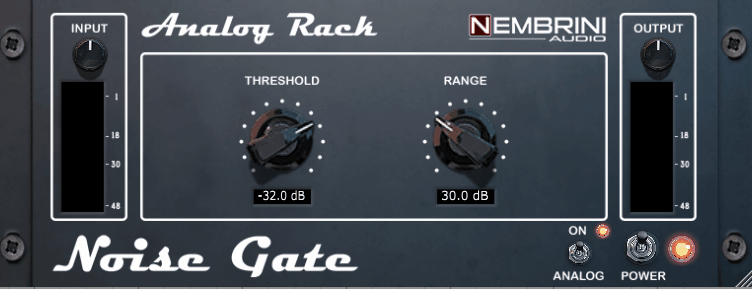
Nembrini Audio Noise Gate is a compact gate designed to do the classic job fast: mute noise and bleed when the signal falls below a threshold, then reopen cleanly when the hit comes back. The twist is that it’s not purely clinical but includes a tube preamp-style circuit that can add a subtle sense of analog coloration as audio passes through, which can be helpful on drum close mics that feel a little flat after heavy editing.
I think this approach is smart because you’re getting practical gating plus a bit of tone character in one plugin as well, which can indeed speed up workflow when you need both spill control and warmth. At a first glance, the control set is focused on the parameters that actually decide whether gating feels natural or chopped.
- Essential Controls for Natural Gating
You get Threshold to set when the gate opens, Range to set how far the signal is reduced when closed, and timing controls including Attack, Hold, and Release to shape how the gate moves around transients and decays. It also provides Input and Output level knobs so you can stage the detector properly and gain-match after the gate.
When it comes to real-world drum mixing, I’ve found that Range and Hold matter more than extreme Threshold settings. A slightly reduced range and sensible hold time often beats full silence gating because it keeps the kit sounding like a kit while still clearing room for the mix.
- Practical Application for Drum Mixing
On toms, the most important job is controlling cymbal spill without turning the decay into a hard cutoff. On snare bottom or snare close, this gate is useful for tightening hat bleed. For instance, you set Threshold so the snare reliably opens the gate, then use Attack fast enough to preserve crack and Release long enough to avoid zippering on ghost notes.
On kick-in mics, a gate is often about removing pedal noise and room spill between hits. Here, the key is making sure release isn’t so fast that it chops the low end. I mean, if you need an ultra-tight modern stop, use a stronger Range. If you want natural sustain, use less range and let the timing do the work.
3. Slate Digital Fresh Air
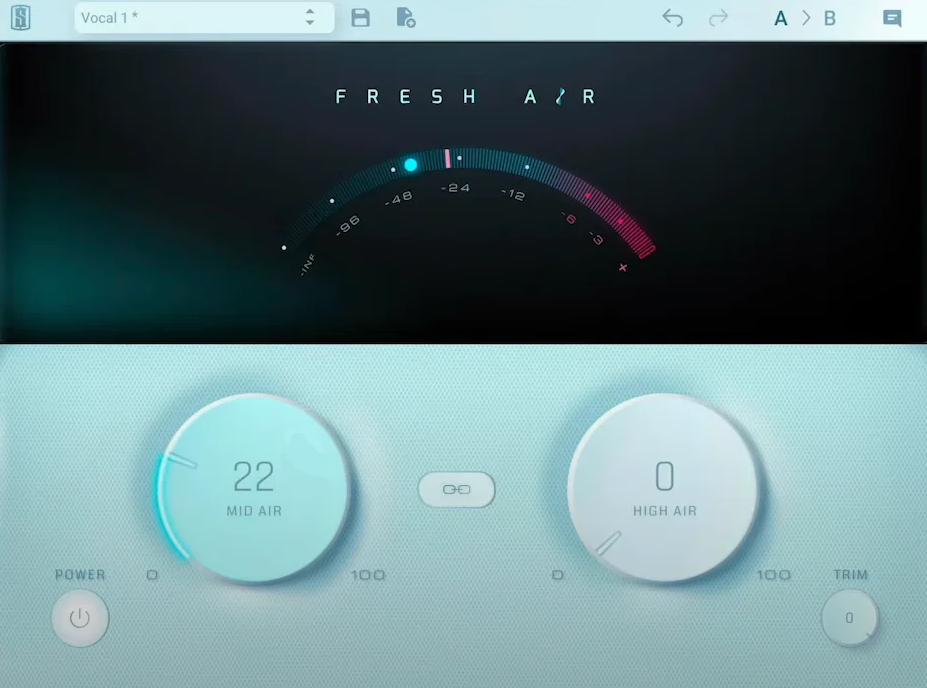
Slate Digital Fresh Air is a dynamic high-frequency processor that adds clarity and sheen with an intentionally minimal interface. It’s designed to deliver “air” without the brittle edge you often get from simply boosting a high shelf, because it behaves dynamically rather than applying a fixed boost all the time.
I think this dynamic behavior is what makes Fresh Air so useful on drums. You’re getting brightness and openness that reacts to the actual content of the signal rather than just cranking up all high frequencies equally. I feel like the simplicity of the interface is deceptive because despite having only two main knobs, it can dramatically improve how drums translate in a mix.
- Two Core Controls That Define the Sound
As I said, Fresh Air revolves around two knobs. Mid Air increases high-mid presence, which is the control that tends to make drums feel closer and more forward, especially snare crack, stick definition, and the upper harmonics that help a drum read through dense guitars and synths. I like how Mid Air adds articulation without the harsh, edgy quality you get from aggressive EQ boosts in the 2-5 kHz range.
High Air increases high-frequency air, which lifts shimmer and openness. This is usually most obvious on overheads, hats, room tone, and the sense of space around the kit. I encourage you to use High Air carefully because it’s easy to overdo as little goes a long way, especially on sources that already have plenty of top-end content.
There are two workflow controls that are easy to overlook but matter for mixing. Link locks Mid Air and High Air together so you can move both with one gesture, which is useful when you want an overall “open it up” move without constantly balancing two bands. Trim is essential because Fresh Air is a dynamic process and boosting the Air knobs can raise overall output.
- Practical Applications on Drums
On overheads and hi-hats, Fresh Air is extremely effective when the cymbals feel dull but you don’t want to boost harshness. High Air adds lift to the top end and room sparkle, while Mid Air can bring back stick definition and cymbal presence that helps the kit read as “expensive” rather than distant. The restraint is that the overheads already have lots of high-frequency energy and Fresh Air can make the hat edge feel exaggerated if you push it too far.
On snare top and snare bus, Mid Air is usually the more important control. It can add crack and articulation without forcing a narrow EQ boost that makes the snare sound papery. If you also need more “air” around the snare, a small amount of High Air can help the sense of space and brightness, but too much can shift attention away from the fundamental and make ghost notes feel thin.
On room mics and parallel drum chains, Fresh Air can add excitement and lift that helps the crush chain feel bigger, especially after heavy compression has pulled up sustain and ambience. Here, High Air can enhance the sense of size, while Mid Air can keep the room crush from becoming a dull midrange blob. I like that this is one of the easiest places to use more aggressive settings because you can blend the parallel return to taste.
4. Analog Obsession BUSTERse

Analog Obsession BUSTERse comes tuned for glue, punch, and controlled aggression on drum buses and parallel drum chains. Think classic console VCA compression behavior, then add two sidechain shaping blocks that let you decide exactly what the detector reacts to. The result is a compressor that can stay clean and cohesive at moderate gain reduction, or turn into a dense “mix bus clamp” when you push it.
I’d say the dual sidechain shaping is what really sets this apart from basic bus compressors. You’re getting surgical control over what triggers the compression, which is essential for keeping drum buses punchy rather than pumped. Maybe it’s the fact that BUSTERse is free that makes people overlook it, but I think it competes with paid options easily.
- Compressor Core With Drum-Friendly Range
BUSTERse gives you the familiar controls: Threshold, Attack, Release, Ratio, Makeup, and Mix. Ratios cover 1.5:1 through 10:1, which is a very drum-friendly range because it spans subtle bus glue to hard smack. Attack options run from 0.1 ms up to 30 ms, letting you either grab peaks fast or let the transient through for punch. Release options run from 0.1 s up to 1.2 s plus Auto.
The practical drum takeaway is simple: slower attack and medium release keeps snare crack and kick click intact while still tightening sustain. Faster attack and faster release turns it into a more assertive clamp that can make room mics and drum loops feel urgent, especially when blended in parallel with Mix.
- Transient Sidechain Section for Punch Control
The second sidechain block is the Transient section, built to change how the detector prioritizes transients. It includes controls like Tilt around roughly 1 kHz center and a Boost behavior that can emphasize specific transient ranges. There’s also a Mix control for the transient sidechain section itself, and in its default position the transient section is effectively off, then becomes active as you turn Mix up.
On drum bus work, this is a powerful lever. You can keep the kit glued while still letting the compressor “notice” the snare crack and kick beater, which is the difference between energetic glue and a flattened drum bus. Maybe it’s subtle at first, but when you start using this control you realize how much control you actually have over the compression character.
- Turbo and Transformer Style Color
Lastly, TURBO changes the behavior so the compressor affects the entire frequency range more evenly. Without Turbo, it focuses more on mid frequencies. On drums, Turbo tends to feel more full-range and modern, especially when the kick and toms need to glue with the rest of the kit. XFORMER engages a transformer-style circuit that adds subtle weight and tone shift.
I’d say it’s not a replacement for saturation, but it can add a slight hardware-style solidity when the kit feels too clean.
5. Xfer OTT
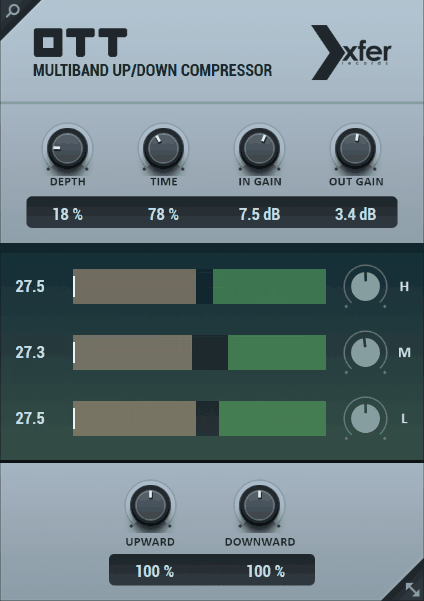
Xfer OTT is a three-band multiband dynamics processor that applies upward compression and downward compression at the same time, and that combination is why it can make drums sound instantly bigger and more aggressive by pushing quiet details up while also pushing loud peaks down, so the kit ends up with less dynamic range and much more “in your face” density than you would typically get from a normal compressor.
I like how OTT compressor cuts through the complexity of multiband compression and gives you one control that just works. I know few guys that just add the plugin in their inserts and that’s it!
Depth essentially acts as a dry/wet blend, which means you can dial in exactly how much effect you want without rebuilding your entire chain. In fact, this simplicity is what makes OTT so popular for drum processing, especially when you need fast results.
- What It Actually Does to Drums
On drum loops, room mics, and parallel drum buses, OTT is basically a density engine. It brings out ghost notes, room tone, cymbal wash, and low-level grit, while simultaneously clamping peaks so the whole thing feels louder and closer.
Used carefully, it can make a weak loop feel finished. Pushed hard, it becomes that unmistakable over-compressed, hyper-bright, hyper-forward sound that shows up all over modern electronic drums.
For the most part, I use OTT on parallel channels rather than directly on the main drum bus because it’s so aggressive. When it comes to room mics specifically, OTT can explode ambience and make the kit feel huge in a way that traditional compression just can’t match.
- Three-Band Display and Band Balancing
OTT splits the signal into Low, Mid, and High bands and shows each band’s activity in a very direct way. The UI visualizes how the input moves into the zones where upward or downward processing happens, which makes it easier to understand why your cymbals suddenly got loud or why your kick lost punch.
Each band has its own level control, so you can rebalance the tone after compression. For example, you can keep the low end stable while letting the highs get more excited, or do the opposite when the top gets too hyped. In addition, this band balancing is critical because OTT tends to exaggerate whatever’s already prominent in the source material.
- What to Watch For in Real Mixes
OTT can wreck drums just as fast as it can improve them. Because it uses upward compression, it will raise everything that sits below the threshold, including bleed, room noise, and cymbal hash. In addition, due to downward compression, it can flatten transients and make kicks and snares feel smaller if Time is too fast or if you run Depth too high.
In my opinion, if you want OTT to behave like a mixing tool instead of a special effect, treat it like parallel processing even when you insert it directly. Keep Depth modest, keep Upward and Downward at sensible amounts rather than maxed, and choose a Time setting that doesn’t shave the front edge off the drums.
Hello, I’m Viliam, I started this audio plugin focused blog to keep you updated on the latest trends, news and everything plugin related. I’ll put the most emphasis on the topics covering best VST, AU and AAX plugins. If you find some great plugin suggestions for us to include on our site, feel free to let me know, so I can take a look!