Here are the best mastering compressor plugins I definitely recommend you to try, and I’m being straight with you about what actually works.
Mastering compression sits in this weird zone where you need it to hold the mix together, but push too hard and everything flattens out. The tricky part is that sweet spot is different for every mix, and most plugins don’t make it obvious when you’ve found it or when you’ve gone too far.
I’m starting with Capitol Mastering Compressor, FabFilter Pro-C 3, Bettermaker Mastering Compressor, and Shadow Hills Mastering Compressor Class A. Then I’ll cover more paid options and wrap up with free plugins that actually hold up.
What I’ve learned using these is pretty straightforward. The useful ones let you hear what’s happening without constant A/B checking. They give you enough control to solve real problems like bass pumping the whole mix or cymbals triggering compression you don’t want, and they do it without making you build complicated sidechain setups. The ones that waste time either add color you can’t control, or they’re so minimal you’re just turning knobs hoping something clicks.
These plugins handle different situations. While some are built for precision with detailed detection controls, others keep it simple and get you finished faster. A few are free and work just as well as expensive options. Match the tool to what you’re actually doing, whether that’s gentle bus glue, controlling a dense mix, or hitting loudness targets without squashing. With that said, let’s get started!
1. Capitol Mastering Compressor
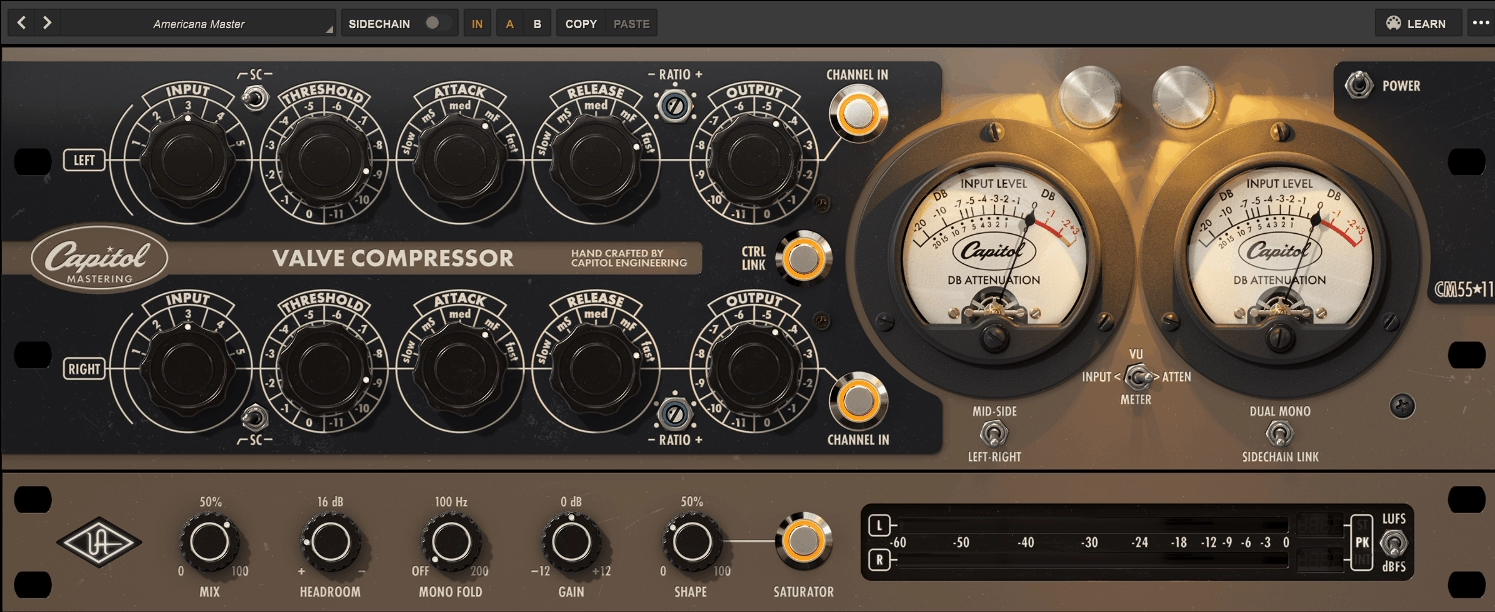
This is one of those compressors where the design philosophy actually makes sense for how mastering works in practice. You get a tool that handles compression obviously, but Universal Audio built it to cover the finishing tasks you’d normally need multiple plugins for.
I’ve found it useful on mix bus and drum groups as much as actual masters because the feature set goes beyond typical compression. The Capitol Mastering Compressor plugin gives you a rare tube design based on the CM5511 from Capitol Studios, and I think the combination of control precision and built in utilities is what keeps it practical when you’re trying to finish tracks quickly.
I would say this works best when you want everything in one place instead of building a long mastering chain. The workflow feels efficient because you’re adjusting compression, managing stereo width, adding saturation, and checking loudness without switching between multiple interfaces.
I like how the stepped controls make recall reliable, and the fact that you can run it as mid side without external routing means you can treat the center and sides differently right inside the compressor. In fact, this is the kind of plugin where the extras matter as much as the compression itself.
- Artist Presets from Working Engineers
Universal Audio includes presets from 6 artists: Evren Goknar, Niko Bolas, Nick Rives, Chandler Harrod, Gavin Lurssen, and Rik Simpson. These give you reference starting points that show how different engineers approach ratio choices, headroom settings, and sidechain positions. Having 6 curated collections from known mastering engineers gives you solid ground to start from before adjusting by ear.
- Plugin Only Processing Tools
Universal Audio added several controls that don’t exist on the original hardware, and these turn the compressor into a compact mastering processor. The Mix control runs from dry to fully wet for parallel compression inside one instance. Headroom has 7 stepped positions that adjust internal operating level so you can change how hard the circuit gets driven.
Mono Fold brings low frequencies toward mono below your chosen frequency, which is a standard mastering move that you’d normally handle with a separate plugin. In addition, there’s a saturator section with a Gain control offering 25 steps and a Shape mix that blends from 0 to 100 percent. This gives you harmonic density when a master needs more weight without loading another saturation plugin.
- Mid Side Operation with Flexible Linking
You can run this as standard left right or switch to mid side mode where the top channel controls the center and the bottom controls the sides. The CTRL LINK switch gives you 2 ways to operate, either linked for matched settings or unlinked for independent channel control. When you switch from unlinked to linked, it copies your settings to both channels automatically.
The SIDECHAIN LINK switch provides 2 dynamics behaviors as well. Dual mono lets each side compress independently, while linked stereo keeps both channels reacting together to prevent image shift. To me, this flexibility matters because I can tighten the center without affecting side information, or keep everything locked together when you need stereo stability.
- Three Position Sidechain Filter
Bass heavy material can make compressors pump unpredictably, so Universal Audio included a 3 position sidechain filter switch. You get Off plus 2 filter choices modeled from different hardware units. This changes what the detector hears without EQing your actual audio output.
When your low end is making the compressor breathe too much, flipping this switch usually fixes it faster than building a separate sidechain EQ chain. I like how it keeps the bass intact while controlling the compression behavior.
- Dual Metering with LUFS Support
The VU section shows 2 meter views for either input level or gain reduction. On the output side, you get a dedicated meter ladder with a switch for 2 metering modes, dBFS or LUFS. When you select LUFS, the plugin displays 3 loudness readouts: momentary, short term, and integrated. This keeps you from guessing loudness targets while you work, especially when you’re hitting specific streaming platform requirements or matching album levels.
- Stepped Controls Across All Parameters
The entire compressor uses hardware style stepped controls instead of continuous knobs. Input has 5 gain settings, Output has 24 stepped positions, Attack has 5 positions, Release has 5 positions, and you get 5 ratio settings ranging from gentle to more aggressive.
I can only say this approach helps when you’re trying to match settings across multiple masters or recall a previous session exactly. The fixed steps remove the guesswork, and you’re choosing behaviors rather than hunting for microscopic parameter changes. Universal Audio modeled the 3:1 and 4:1 ratios from two different CM5511 units, which gives you distinct compression characters even though they’re all part of the same device family.
2. FabFilter Pro-C 3
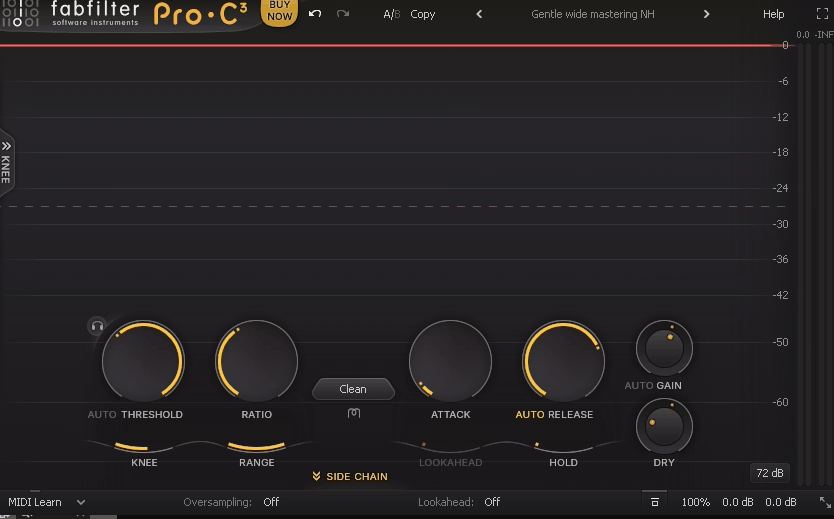
FabFilter Pro C 3 handles mastering compression better than Pro C 2 did, and the improvements show up where it actually counts. I’m talking about subtle gain reduction on full mixes where the compressor needs to stay invisible while doing real work.
The reason for an upgrade is simple: it behaves more predictably when you’re working at low ratios with long release times. Pro C 2 sometimes needed extra tweaking to avoid low end modulation or stereo image shifts, and Pro-C 3 compressor just handles that stuff cleaner from the start.
I would say this update makes sense if you’re already doing serious mastering work. If you’re using compression casually or want color and character, this probably isn’t worth the upgrade.
The plugin comes with 10 compression styles including refined versions of Clean, Classic, Opto, Bus, Punch, Mastering, Vocal, and Pumping. What matters isn’t just the number, it’s that each style now has a clearer dynamic identity especially when working with subtle gain reduction in the 0.5 dB to 2 dB range.
The Mastering and Bus styles feel more controlled at low ratios and long release times with noticeably reduced low end modulation on full range material. I like how internal timing curves feel smoother and less jumpy at extreme settings, making it easier to push compression slightly harder without the sound collapsing. In fact, transients are handled with more stability when using slower attacks combined with auto release.
- Great Presets
I would say the Pro-C3 have the edge when it comes to presets compared to other plugins. You will find presets almost on anything from drums, vocals, bass, guitars, mastering, mix bus, even synths and keys. In addition, you will also find the presets from Pro-C 2 as well!
- Improved Frequency Dependent Detection
One of the most important improvements is how frequency dependent detection is integrated more naturally into the workflow. The internal sidechain EQ is smoother to work with, and changes feel more predictable when shaping detector response.
The compressor reacts more intelligently when low frequencies dominate the signal, which is particularly noticeable on full mixes and bass heavy material. I think Pro C 2 could sometimes overreact unless carefully tuned, while Pro-C 3 handles this with less need for aggressive filtering. This makes it easier to keep low end punch intact while still controlling overall dynamics.
- Refined Metering and Visual Feedback
FabFilter refined the metering in a way that actually helps decision making rather than just looking impressive. Gain reduction visualization is clearer, envelope behavior is easier to read, and the relationship between input dynamics and compression response is more obvious at a glance. The real improvement is that visual feedback now aligns better with what you hear especially during subtle compression.
This reduces second guessing and speeds up critical decisions, which is essential in mastering environments where confidence matters more than experimentation. I would say you can work by ear without feeling like you’re missing information.
- Better Stereo Linking and Mid Side Behavior
Stereo linking behavior feels more refined with smoother mid and side interactions especially at low ratios. This makes Pro C 3 more suitable for mastering wide material without unintended image shifts. In addition, the plugin integrates cleanly in mastering chains alongside Pro Q and Pro L, maintaining consistent gain staging and predictable behavior.
Auto gain compensation is more reliable, making A/B comparisons easier without level bias creeping in. The plugin remains lightweight enough to be used multiple times across stems or buses without concern.
3. Bettermaker Mastering Compressor
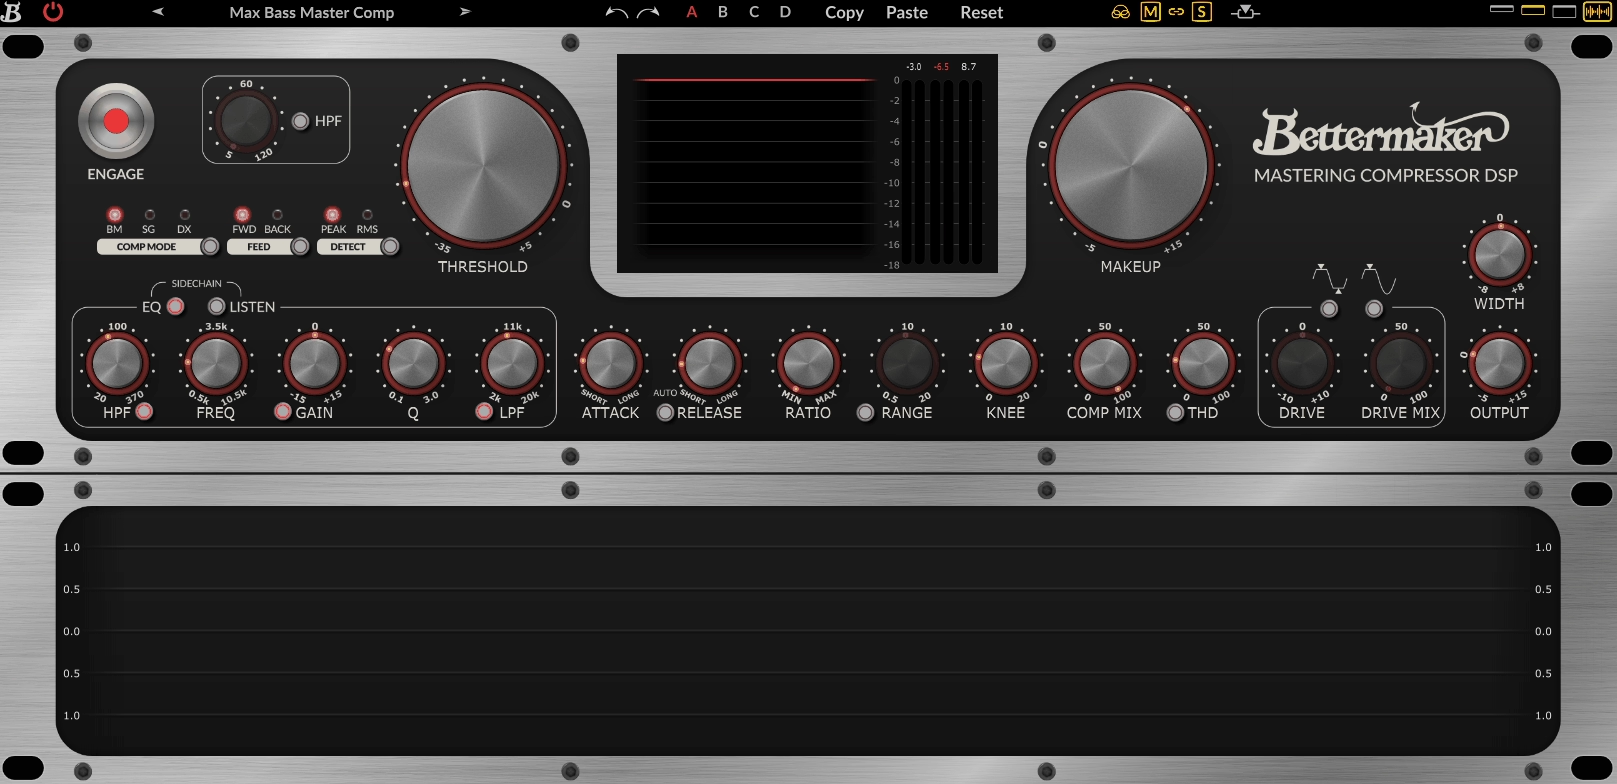
I would reach for this when I need more than one compression personality in a single plugin. The variety here is what sets it apart because you’re not locked into a single sonic approach.
Most mastering compressors give you one sound and expect you to work around it. Bettermaker Mastering Compressor plugin gives you multiple compression behaviors plus detailed sidechain control, which means you can handle different mixes without switching plugins constantly.
The reason why I like this compression plugin is flexibility. You get choices that actually change how compression feels, and I would say that matters more in mastering work than having a thousand presets that all sound similar.
The plugin offers 3 primary compression modes labeled BM, SG, and DX, and these aren’t just flavor variations. BM mode delivers transparent smooth compression with a longer attack and variable knee, which works well when you want full mix glue without obvious movement. I think this mode is where most mastering work happens because it stays controlled.
SG mode gives you punchier British style bus compression with more flexible attack and release behavior. It reacts more prominently to transients, so I use it on drum buses and energetic mixes where you want presence. DX mode is the most aggressive option with faster response based on classic American compression character. This works on individual stems like vocals or guitars when you need dynamic control with energy. In fact, switching between these 3 modes on the same material shows you completely different compression personalities.
- Factory Presets for Multiple Styles
The preset browser includes multiple factory presets tailored for different mastering and mix bus tasks across various music styles. You get starting points that cover the 3 compression modes and various sidechain settings.
- Stepped Controls
Attack and release use stepped controls instead of continuous knobs, which makes recall reliable across sessions. Ratio choices are expanded beyond what the original hardware offered, giving you more range between gentle and firm compression.
I like how this removes the frustration of trying to match a previous master exactly because you’re selecting from fixed positions rather than eyeballing knob placement. The Mix control supports parallel compression internally, so you can push harder and blend back dry signal without building extra routing.
- Dual Harmonic Coloration Circuits
You get 2 independent coloring circuits for adding harmonic content when a master needs warmth or edge. Gentle analog style saturation comes through THD, while the more aggressive option uses switchable diode clipping.
Each circuit can add even or odd harmonic character depending on your source material. This coloration is optional, and because you have parallel blending built in, you can mix just enough tone without clouding the master. I can only say this saves you from loading separate saturation plugins when I just need a touch of color.
- Visual Metering and A/B Comparison
- Comprehensive Sidechain Section
The sidechain section includes both HPF and broader EQ shaping so you control what drives compression. On bass heavy mixes, low end often makes compressors breathe unpredictably.
The sidechain filters let you keep your tone while making the compressor react to midrange and highs where musical movement lives. You also get switchable options between peak and RMS detection plus feed-forward and feed-back compressor behavior. These are subtle tweaks that control how quickly and musically the compressor responds.
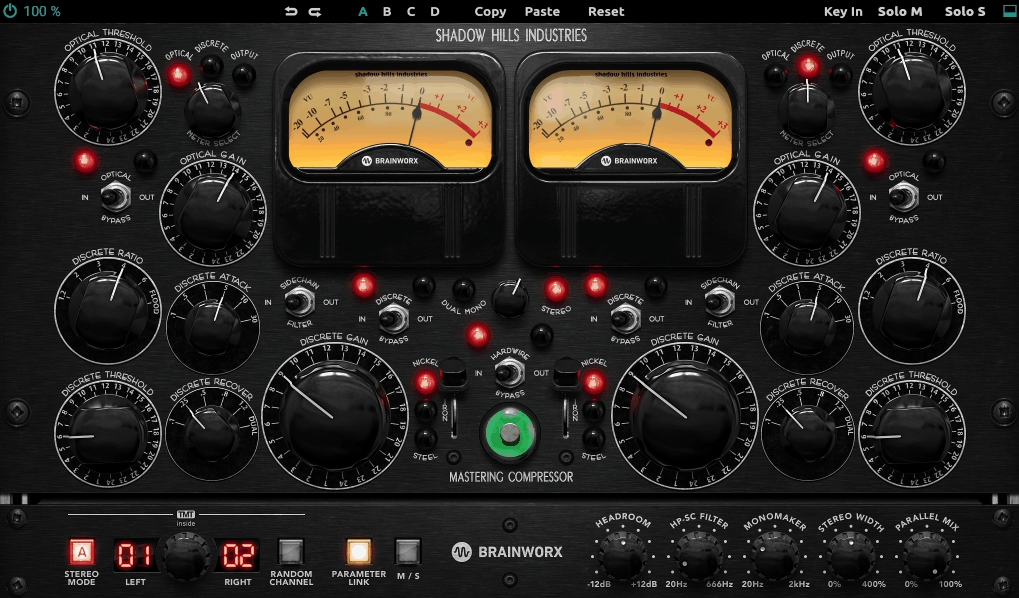
4. Shadow Hills Mastering Compressor Class A

Shadow Hills Mastering Compressor Class A combines control with character in ways that feel musical rather than artificial.
I started using this on my mix bus before moving it to actual mastering work, and I think that tells you something about its versatility. The workflow here rewards you for understanding what you want because this isn’t a one knob solution.
What keeps me using this is how the compression responds to different material. You get choices that change both dynamics and tone, which matters when you’re trying to finish tracks that need more than just transparent leveling.
The plugin gives you 2 distinct compression sections inside the same interface. The Class A compressor handles musical leveling that keeps your mix structure intact, while Inductor mode adds more colored, presence oriented behavior derived from Shadow Hills’ classic hardware design.
I like how this gives you stylistic range beyond a single compressor block. In mastering, Inductor mode can bring subtle energy without obvious pumping. On group buses, it makes sources feel more forward. In fact, having 2 core processing paths means you’re choosing compression personality, not just amount.
- Three Compression Style Modes
You get Classic, Modern, and Custom compression styles that change how the entire circuit responds. Classic tends to be smoother and more forgiving. Modern reacts with less inertia and grips more quickly. Custom sits somewhere between with mixed characteristics. These 3 distinguishable styles affect how attack, release, and threshold interact with your input signal, so you’re making tonal and feel choices together.
- Advanced Sidechain Detector
When it comes to sidechain section, it includes high pass filtering in the detector path so you can prevent deep sub energy from driving compression unpredictably. There’s also a shelving option that lets you emphasize or de-emphasize midrange content for detection. This means you can make the compressor respond more to vocals or upper mids without sacrificing low end weight. I can only say this approach is more focused than broad EQ bands because you’re shaping what the compressor listens to, not what the audio sounds like.
- Comprehensive Metering System
You get a gain reduction meter plus input and output meters that switch between peak and RMS view. In addition, this gives you both momentary snapshots and longer term feel for compression behavior.
5. Brainworx AMEK Mastering Compressor
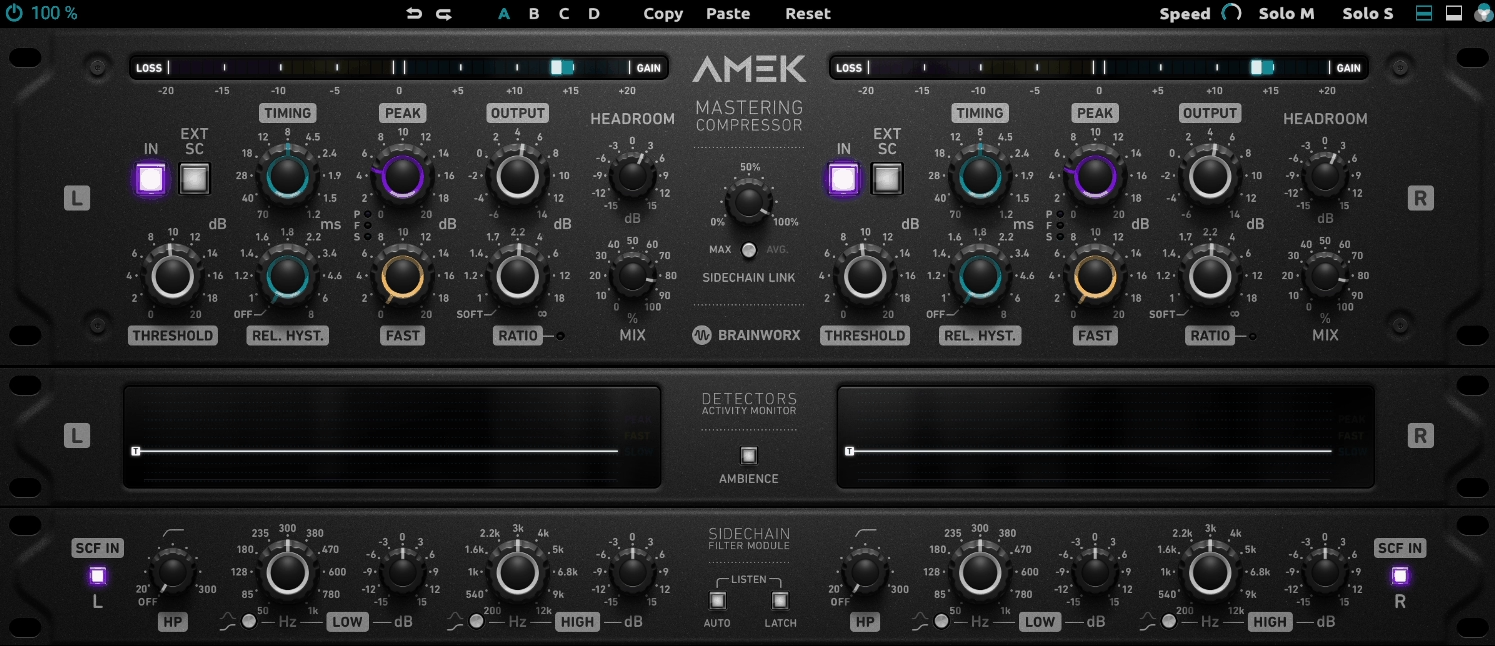
Brainworx AMEK Mastering Compressor plugin changes how you think about timing by letting you blend detector circuits instead of dialing millisecond values. I would say this feels less like guesswork once you understand what each detector does.
Instead of standard attack and release knobs, you get 3 detector circuits labeled slow, fast, and peak, and you decide how much each one influences gain reduction. Slow responds to overall energy, fast reacts to quick level shifts, and peak handles transient spikes. The plugin shows which detector is driving the action with a dedicated detector activity display, so you’re not guessing what’s happening.
I like how this changes the workflow. For mastering, you can get the mix feeling more stable without pushing into audible pumping. For mix bus work, it helps tighten the groove while keeping things lively. In fact, blending these 3 circuits often gets better results than spending twenty minutes tweaking traditional timing controls.
- Three Band Sidechain Filter with Listening Tools
The sidechain includes a 3 band filter so you can shape what the compressor reacts to. Low end energy won’t steer the whole compressor, and bright elements won’t make compression twitchy.
Auto Listen temporarily solos the sidechain signal while you adjust filters, and an Ambience function makes it easier to hear what the compressor is changing. I can only say these features make setup faster when you’re doing small mastering moves and need confidence you’re not missing something.
- Flexible Stereo Linking and Mid Side Processing
You get Mid/Side mode for processing center and sides separately, plus 2 link modes labeled MAX and AVG with continuously adjustable link amount. This means you can choose anything from fully independent to tightly linked behavior instead of just on/off linking.
Mono Maker tightens low frequencies in mono, and Stereo Width widens in a controlled way. In addition, Brainworx TMT offers 2 modes: one for analog style channel variance and one for tighter digital matching. I think having these utilities built in reduces plugin stacking in mastering chains.
- Four Internal Settings Per Preset
The plugin offers 4 internal settings slots labeled A, B, C, D stored with each preset, so a single preset can hold up to 4 variations. This is genuinely useful for mastering because you can keep a subtle version, a slightly firmer version, and an alternate sidechain setup inside one preset and switch between them quickly. You also get undo and redo with up to 32 steps, which becomes very practical when experimenting carefully on a master and wanting to back out of changes without losing earlier settings.
- VCA Clip and Headroom Controls
VCA Clip models soft clipping behavior at higher levels, and the Headroom control makes gain staging easier without constantly rebalancing other knobs. In mastering, VCA Clip works as a controlled way to round off peaks and add density before the limiter, especially when you’re trying to reduce how hard the limiter has to work. It’s optional and built into the same signal path, so you can evaluate compression and peak shaping together.
There’s a learning curve because the timing system isn’t the standard attack and release layout, so it can take a few sessions before it feels fast. The manufacturer highlights artist presets but doesn’t publish an official preset count, so you can’t reference a specific number for the library size.
6. Tone Projects Unisum Mastering Compressor
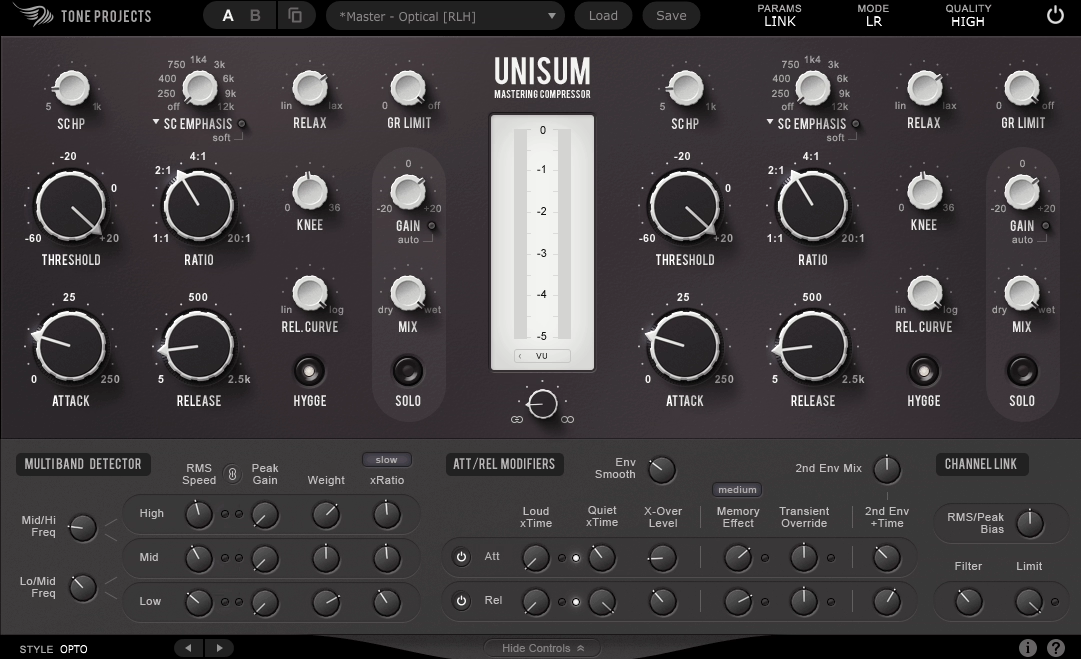
Tone Projects Unisum handles material that makes other mastering compressors fall apart. I’m talking about dense mixes where low end dominates, wide stereo images that shift unpredictably, or masters that need control without losing their energy.
The reason this works differently is how the detector listens to your mix. You’re not just setting threshold and ratio, you’re deciding which parts of the frequency spectrum should drive compression and how much. I would say this compressor rewards patience.
Once you understand the detector system, you can handle complex masters with one compressor instead of stacking multiple units hoping they cooperate.
You get 15 different Style options that change overall character and response. These aren’t just cosmetic variations, they act like curated starting points covering everything from smoother open responses to firmer aggressive control. Some styles lean toward familiar compressor behaviors like opto, vari mu, and FET, while others use cleaner RMS or Peak driven approaches.
I like how this lets you match the style to your material before getting into detailed tuning. A busy electronic master might need a style that controls transients without clamping the tail. A rock mix might benefit from midrange cohesion without dragging cymbals down. The point isn’t auditioning all 15 styles every time, it’s having a practical way to change compressor personality without swapping plugins.
- Three Band Detector with Dual Detection Per Band
The detector splits into 3 frequency bands, and each band offers 2 detector types: RMS and Peak. That gives you 6 detector paths influencing a single wideband compressor.
You’re not doing multiband compression with crossovers in the audio path, you’re shaping detection so the compressor reacts in a targeted way. I think this explains why Unisum can feel controlled without sounding obviously processed. You can keep low end from constantly pulling the whole compressor around while still maintaining a simple audio path.
- Envelope Tools for Maintaining Punch
Parallel secondary envelope smooths without making the compressor feel sluggish. Transient Override adjusts how the compressor behaves on loud transients. Memory Effect adds program dependency so movement feels more natural on real music rather than static.
In addition, controls like GR Limit and Relax type behavior help reduce over clamping. I can only say these features give you direct ways to keep punch and motion while controlling level, which solves the typical mastering problem where compression makes tracks feel smaller.
- HYGGE Coloration Circuit
The HYGGE stage adds controlled tone inspired by transformer and tube style behavior without turning the plugin into a distortion box. It’s there for when the mix is balanced but feels slightly too plain or clinical, and you want a small amount of extra body while you compress. I would say treat this like seasoning: try it, level match, and decide whether it improves the finished master.
- Flexible Channel Linking and Mid Side Mode
This mastering compressor plugin runs in 2 channel modes: standard stereo or mid side. You get continuously variable channel linking, so you can choose anything from fully independent movement to fully linked behavior. A very wide mix with lots of side information might feel better with more linking to avoid image movement.
A more centered mix can sometimes tolerate less linking while keeping natural width and motion. Having this control in the compressor rather than relying on guesswork is why people use Unisum as a main mastering tool.
- Three Quality Modes and Metering Options
You get 3 quality modes from low latency real time up to highest quality mode with heavier processing and oversampling. Work quickly while setting up, then switch to highest quality for final renders.
The plugin includes 3 gain reduction meter ballistics options listed as True GR, PPM, and VU, which matters because mastering compression is often subtle and different meter behaviors make it easier to read whether the compressor is doing the small amount of work you intended. The plugin also includes A/B preset switching for comparing 2 variations quickly, plus a Dry/Wet control for internal parallel compression.
7. Waves SSL G-Master Buss Compressor
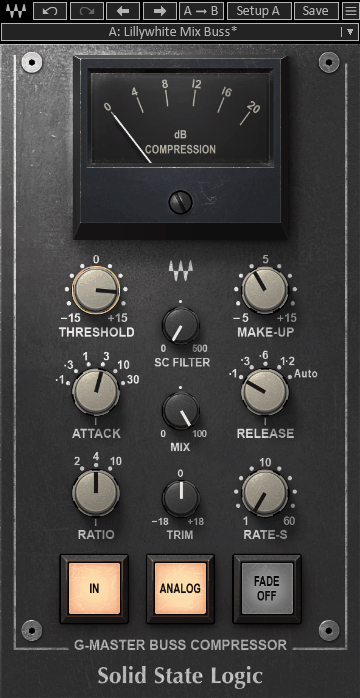
Most mastering compressors ask you to learn their workflow, but this one already feels familiar the moment you load it. I would recommend using G-Master Buss Compressor on mix buses and pre mastering chains because the control layout makes decisions fast instead of turning compression into a research project.
What works here is simplicity combined with updates that actually matter. You’re not fighting a vintage recreation that lacks modern tools, and you’re not drowning in parameters you’ll never use.
I would say the speed of this workflow is what keeps it relevant. You make a few clear choices, set your threshold, and you’re done. That matters more in mastering than people admit.
You get 6 attack positions, 5 release options including 4 fixed positions plus 1 Auto mode, and 3 ratio choices. This limited set is intentional because you’re meant to pick a sensible envelope shape and move on rather than fine tuning forever.
I like how these stepped controls give you repeatability, which helps when doing revisions or bouncing between songs in an EP. Most of the time you’re choosing one attack, one release, one ratio, then using threshold and makeup gain to decide compression amount.
- Preset Library from Multiple Engineers
You get top tier presets from Chris Lord Alge, Dave Aron, Dave Pensado, Steve Lillywhite, Thom Russo, Sean Sullivan along with presets inspired by other top-tier engineers.
- Sidechain Filter for Bass Heavy Material
The sidechain filter is specifically called out by Waves as a major update, and it solves a real mastering problem. Full mixes often have lots of weight in kick and bass, and without sidechain filtering, the compressor ends up reacting more to low end than overall track balance.
With the filter, you make the compressor listen less to subs and more to the body of the mix. I can only say this usually results in a more stable master that keeps its punch. Waves frames the filter as a way to dial in bus compression without unpleasant pumping, which is exactly how you should approach it.
- Built In Mix Control for Parallel Compression
The Mix control handles parallel compression without extra routing. In mastering, this is useful when you want density and stability while keeping original transients and movement. Instead of setting up extra buses and blends, you do it inside the plugin.
I think this is even more useful on drum bus work because you can push the compressor harder, then blend back dry signal until the groove feels right. It’s a single simple feature that reduces session clutter.
- Trim Control and Autofade Feature
The Trim control makes level matching faster without constantly touching output gain or changing threshold decisions. In addition, the plugin includes Autofade with rate control and a fade button that toggles through different states.
Autofade isn’t essential for mastering usually, but it’s useful for printing alternate endings, clean fades for instrumental versions, or quick client requested fade changes without drawing automation. I would say this saves time in practical situations.
- Analog Switch with Two Modes
The Analog switch toggles analog style behavior on or off, giving you 2 modes: analog emulation enabled or disabled. Sometimes you want the slightly more vintage feel, and sometimes you want the cleanest possible processing.
Freebies:
1. Analog Obsession BusterSE

Free doesn’t usually mean feature complete, but this plugin proves otherwise. Analog Obsession BusterSE delivers console style bus compression with sidechain control that most paid options charge you for, and I’ve found it handles mastering bus duties without compromising on the tools that actually matter.
You get direct control over what drives compression, which means less time fighting pumping and more time finishing masters. I would say the stepped controls keep decisions fast while the sidechain sections give you precision when you need it.
- Six Attack Steps and Five Release Options
Attack has 6 steps at 0.1, 0.3, 1, 3, 10, and 30 ms, covering everything from grabbing fast peaks to letting transients through for punch. Release offers 5 options at 0.1, 0.3, 0.6, 1.2 seconds, plus Auto.
You can lock the groove with fixed timing or lean on Auto for smoother program dependent behavior on full mixes. Ratios are stepped with 6 choices at 1.5, 2, 3, 4, 5, and 10, which is a good spread for mastering because you can stay low for subtle control or jump higher for more aggressive limiting style work. I like how these stepped choices make recall easy and keep you from endlessly nudging settings.
- Turbo and Xformer Behavior Switches
Turbo changes how broadly the compressor affects frequency range. It helps the compressor affect the whole signal range, while non Turbo behavior focuses more on mid frequencies to keep original hardware character.
Xformer switches the input and output stage to a transformer balanced path, changing impedance, character, and overall balance. In fact, Xformer can add a small amount of weight that benefits very clean chains, though it’s not a replacement for dedicated saturation.
- Dedicated Sidechain Filter Section
The sidechain includes a high pass filter from 20 to 500 Hz to keep kick and bass energy from dominating compression behavior. In addition, there’s a MID control around 1500 Hz with -6 to +6 dB, and an HF control around 10 kHz ranging from 0 to -10 dB.
You can nudge the detector to react more or less to presence range, and reduce how much high frequencies push gain reduction. I can only say this solves most mastering compression problems where cymbals or vocal sibilance make your bus compressor grab too much.
- Transient Sidechain Section for Peak Control
This isn’t a typical transient shaper, it’s a sidechain tool that changes what the compressor reacts to. BOOST runs from 0 to 10 dB and increases sensitivity to attack content while reducing decay emphasis in the detector.
A TILT control centered around 1 kHz runs -6 to +6 dB, letting you decide which frequency region gets emphasized. The transient section has its own Mix control and is effectively off at default position. I think this matters when you want the compressor catching spiky transients without pushing the whole mix down for too long.
- Built In Mix Control and External Sidechain
The Mix control goes from dry to wet for parallel compression without extra routing. When you want density and control but don’t want to lose transient definition, this handles it inside one plugin. The plugin also includes an EXT external sidechain option that lets you use an incoming sidechain signal with full filter and transient section control. I would say this is useful for stem based workflows or when processing mix bus groups before final print.
- Oversampling and Format Support
4x oversampling toggles by clicking the Analog Obsession label. This matters mainly when you’re using features that introduce non linear behavior like Xformer or when pushing harder than typical glue settings.
2. Variety of Sound Density mkII
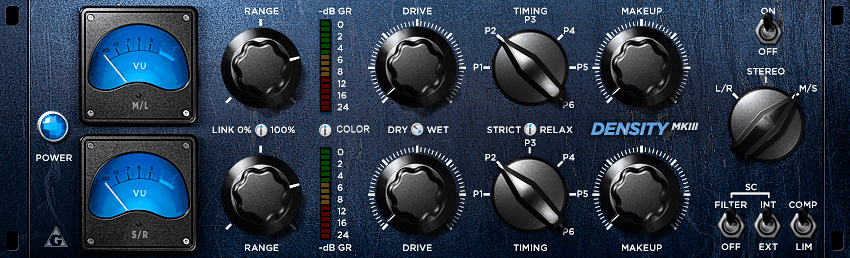
Sometimes you need a compressor that just glues without demanding your attention, and that’s where I turn to Variety of Sound Density mkII. The appeal isn’t fancy features or modeling claims, it’s how quickly you can get bus compression that feels musical instead of mechanical.
I would say this works because it encourages small moves through its control design. You’re making decisions by ear faster than you would with traditional threshold and ratio hunting, which matters when you’re trying to finish masters efficiently.
Here is what Density mkII offers:
- Factory Presets available
This mastering compressor plugin includes presets with names like Fairytale Vintage, LA Vox, Drums Polished Peaks, and NY MS, which hints at the range of intended use cases from vocal bus to drum bus to mid side work. However, users note that presets may not always change every knob setting in an obvious way depending on host behavior.
The sensible habit is building your own 2 or 3 personal starting points based on how you work, then saving those as DAW presets for consistent recall.
The biggest limitation is the timing workflow with 6 timing presets rather than fully adjustable attack and release controls, which feels less flexible for solving specific transient problems. Compatibility is a real constraint because the original release is Win32 VST only with no Mac version, so it’s not a universal solution across modern systems.
- Drive and Range Control Concept
Instead of standard threshold and ratio controls, the plugin uses Drive and Range as the main compression controls. Drive sets how easily the detector gets pushed into compression, while Range sets the maximum amount of gain reduction allowed.
I like how this makes you work by ear faster because you’re turning Drive up until the compressor starts working, then using Range to cap how deep it goes. In fact, this is exactly why people end up liking it on buses because you can dial in movement without accidentally over compressing the whole mix by 4 or 5 dB just because a chorus hits harder.
- Six Timing Programs Instead of Continuous Controls
The plugin relies on a TIMING control with 6 preset timing programs typically referred to as P1 through P6. If you’re used to setting exact attack and release values, this can feel limiting at first, but it’s also why the plugin is quick to use.
You pick the timing family that matches the groove and transient density, then fine tune how hard it works with Drive and Range. You get results quickly without accidentally pushing too hard.
- Two Processing Modes for Different Jobs
You get 2 processing modes commonly called COMP and LIM. COMP is generally the mode you reach for when you want glue and density without obvious clamping, while LIM is what you try when you need stricter control of peaks on a bus.
Variety of Sound notes using limiter mode to manage difficult dynamics while clarifying it’s not a brickwall design. I would say COMP stays more musical for mastering bus work, while LIM helps with drum buses that have inconsistent hits.
- Mid Side Dynamic Processing
The plugin supports mid side dynamic processing in a true two channel layout, which is rare for a free plugin. On the practical side, mid side compression lets you do mastering style moves like tightening the center more than the sides, or gently controlling wide synths and reverb tails without flattening the vocal and kick.
In addition, the Variety of Sound plugin page suggests using the Range functions for each channel while working in mid side mode because it makes it easier to cap gain reduction differently for mid and side components.
- Sidechain Filter for Low End Control
The plugin includes a sidechain filter option designed to decouple subsonic frequencies below about 90 Hz. Low end energy is a common reason bus compression starts breathing in an unmusical way, and this feature lets you keep kick and sub energy from forcing the whole mix down every time it hits.
I think this is often the difference between compression that feels like glue and compression that feels like the mix is wobbling.
3. Analog Obsession COMPER
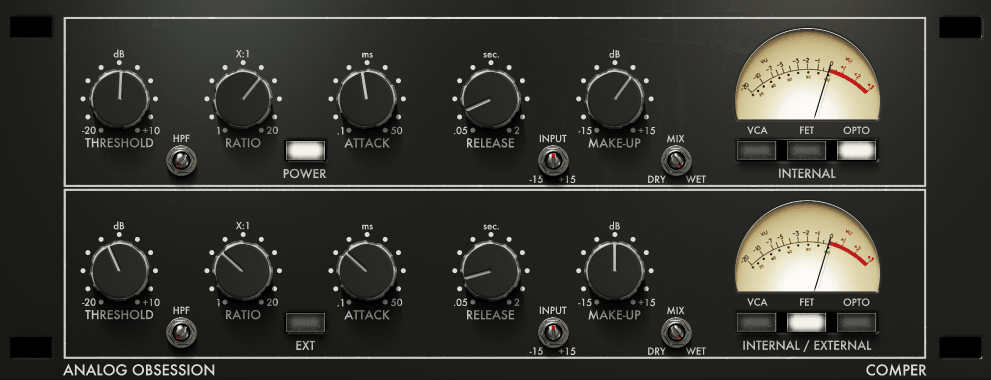
Serial compression usually means building a chain with multiple plugins, but Analog Obsession COMPER handles that inside one interface by giving you two compressor stages you can configure independently. The setup solves a real mastering problem where pushing one compressor too hard creates obvious artifacts, while splitting the work across stages keeps things controlled.
I can only say this approach gets you more transparent results on full mixes. Each stage doing lighter work means fewer side effects, and you’re making decisions about how to distribute compression instead of just how much to apply.
- Two Independent Compressor Stages
The plugin splits into a top compressor labeled INTERNAL and a bottom compressor labeled INTERNAL/EXTERNAL. The top one acts as first stage peak control, while the bottom one can run off its internal detector or be driven by an external sidechain input.
I like how this naturally suggests a workflow where the first stage tames peaks and the second stage does slower glue work. Instead of asking one compressor to do everything, you might aim for 1 to 2 dB in the first stage plus another 1 dB in the second stage. That tends to sound calmer and more predictable on full range material.
- Three Circuit Types with Blending
Each compressor stage includes 3 circuit types: VCA, FET, and OPTO, and you can enable multiple at once for parallel blending. If you enable 2 modes simultaneously, you get 50/50. If you enable all 3, it sums as roughly 33.33% per mode.
If you enable only one, it’s 100% that circuit. I think this blending is genuinely practical on a master bus because you can steer how the compressor grabs without overthinking it.
For example, you might use VCA plus OPTO blend for slightly firmer response that still feels smooth. Because each stage can run any combination of the 3 circuits, you effectively have 7 possible circuit combinations per stage, and across 2 stages that’s 49 possible circuit pairings before touching timing or threshold.
- Wide Control Ranges for Different Material
Threshold runs from +10 dB down to -20 dB, giving you room for gentle compression and more assertive control. Ratio ranges from 1:1 to 20:1, and the 1:1 setting is worth mentioning because it delivers extra transformer color even when you’re not really compressing.
Attack is continuously variable from 0.1 ms to 50 ms, and release runs from 0.05 seconds to 2 seconds. In addition, you get an Input control with ±15 dB that’s gain compensated, plus Make Up gain with ±15 dB for output level matching. The Mix control blends dry and wet for parallel style mastering moves.
- Sidechain High Pass Filter
The sidechain includes a high pass filter from 20 Hz to 750 Hz, which is a very usable range for keeping sub and kick energy from dominating the detector. Low end can trigger gain reduction in a way that makes the whole track breathe, and this filter solves that.
I would say if you notice the compressor reacting mostly to kick and bass, raise the HPF until the low end stops steering gain reduction. The EXT option engages external sidechain for the second compressor, matching the INTERNAL / EXTERNAL labeling.
- Four Times Oversampling and Resizable Interface
4x oversampling is enabled by clicking the Analog Obsession label on the GUI. This is most useful when you’re pushing the plugin harder or leaning into coloration aspects because oversampling helps reduce aliasing artifacts from nonlinear processing.
The UI supports touchscreen control and a resizable interface from 50% to 200% via a corner handle.
4. TDR Kotelnikov

TDR Kotelnikov takes a proudly digital approach instead of chasing vintage hardware behavior, and I think that’s exactly why it works so well on full mixes where you need precision without side effects.
The difference becomes obvious when you’re trying to glue a master together without adding pumping or stereo image problems. Tokyo Dawn built this specifically for wideband mastering and bus compression, and the control set reflects that priority. I would say this is the kind of compressor you reach for when transparency matters more than character.
The plugin runs a Peak path and an RMS style path in parallel, and whichever produces higher gain reduction takes control with smooth transitions between them. This is why it can do gentle leveling without typical pumping on full mixes. You control these paths using Peak Crest, which offsets the peak path threshold relative to main threshold.
The manual gives a practical target of Peak Crest between 3 dB and 8 dB, where higher values generally feel smoother and lower values feel more aggressive. I like how turning Peak Crest fully left disables the RMS section while fully right disables the Peak section, letting you force one behavior when needed.
- Two Processing Quality Modes
Kotelnikov includes 2 processing quality modes: Eco with internal bandwidth around 100 kHz, and Precise with internal bandwidth around 200 kHz. Higher quality comes at the cost of more CPU usage.
- Delta Monitoring and Parallel Workflow
Delta monitoring lets you listen to the difference between original and compressed signal, basically what the compressor is doing. This makes it easier to keep settings subtle and catch when you’re shaving transients or pulling ambience down too much.
- Continuous Ratio and Dual Release Controls
Ratio runs continuously from 1.1:1 up to 7:1, positioning this as a compression and leveling tool rather than brickwall limiter. Instead of a single release knob, you get Release Peak and Release RMS with separate behavior for short transients versus sustained gain reduction.
For full mixes, the manual suggests Release Peak around 25 to 100 ms and Release RMS above 150 ms as useful starting ranges. I can only say this dual release approach gives you more control over how compression responds to different material than single release designs.
- Low Frequency Relaxation with Four Slope Options
The Low Frequency Relaxation system is essentially a sidechain high pass approach that stops the compressor from overreacting to low frequencies. The frequency range runs from 25 Hz to 500 Hz with 4 slope options: 0 dB per octave (off), 3 dB per octave, 6 dB per octave, and 12 dB per octave.
5. Analog Obsession SPECOMP
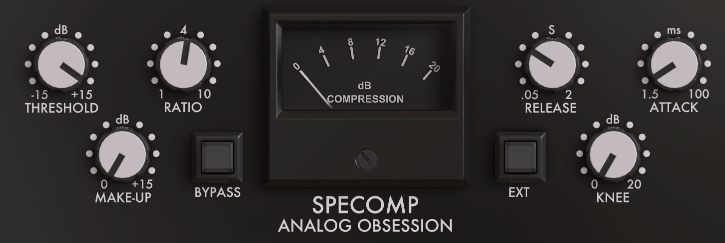
Visual feedback during compression changes how you make decisions on complex mixes. When standard gain reduction meters don’t explain why a bus compressor feels right or wrong, seeing frequency specific compression activity helps me understand what’s actually happening.
I’ve noticed this especially matters when dealing with dense productions where different frequency ranges compete for attention. Analog Obsession SPECOMP handles this by showing both overall gain reduction and frequency compression simultaneously, which gives you insight most bus compressors hide.
- Dual Metering System for Spectral Compression
The plugin displays both overall gain reduction and a separate frequency compression indicator, which is the main difference from regular SSL style bus compressors. It’s based on an S Type console bus compressor concept that’s been heavily modified to tame parts of the spectrum during compression.
I like how this internal behavior can make mixes feel more cohesive faster than simple VCA bus compression. The developer explicitly states there is no saturation or added color in SPECOMP, so this is purely a dynamics tool without transformer style thickness.
- Mix Control for Parallel Workflow
- Four Times Oversampling with Visual Indicator
4x oversampling toggles by clicking the Analog Obsession label or logo, and the logo changes color with a notification when engaged.
Hello, I’m Viliam, I started this audio plugin focused blog to keep you updated on the latest trends, news and everything plugin related. I’ll put the most emphasis on the topics covering best VST, AU and AAX plugins. If you find some great plugin suggestions for us to include on our site, feel free to let me know, so I can take a look!