This guide covers the best multiband compressor plugins available right now, from premium tools to free alternatives that are genuinely worth using.
A multiband compressor is like using several compressors at once, with each one handling a different part of the frequency range. Rather than compressing your whole mix at once, you can control the lows, mids, and highs separately.
This gives you much more control over your mix and helps solve problems that regular compressors can’t, such as reducing harsh high frequencies without losing the punch in your low end. Multiband compressors are great when you need precise adjustments or want to boost certain parts of your sound. The challenge is finding one that fits your workflow and budget.
I created this guide to cover both premium and free plugin options. You’ll find detailed breakdowns of each plugin, what sets them apart, how they perform in real sessions, and tips for better results. If free plugins work for you, feel free to use them; that’s why they’re included. Also, many paid plugins offer trials, so you can try those as well.
No matter your experience level, you’ll find something here that suits your needs.
From the Pluginerds Store
Before you get into the plugins on this list, something most mixing and mastering guides do not mention. The decisions you make with any of these plugins are only as reliable as what your monitoring is telling you. A compact IEM pair as a second reference at low volume catches what your main headphones are smoothing over — and that single habit changes how well your mixes translate.


1. Devious Machines Multiband X6
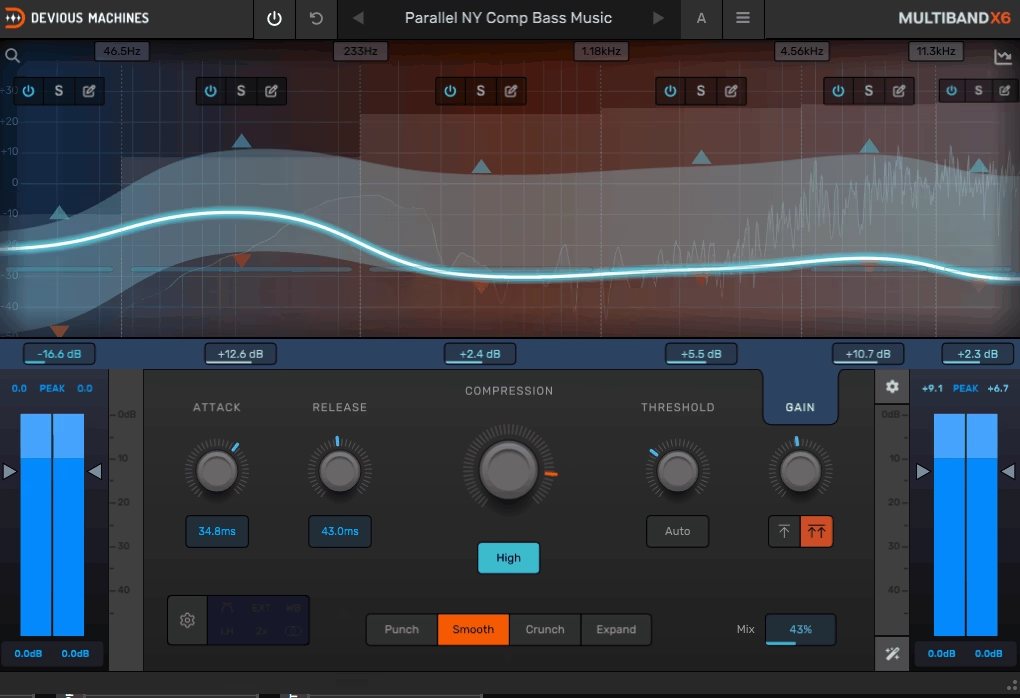
Multiband X6 stands out among the best multiband compressor plugins because it gives you six bands of dynamic control in an interface that actually makes sense, and the versatile preset bank means you’re never starting from zero.
Most multiband compressors look complicated, almost like something from a power plant control room. X6 changes that by offering six bands of dynamic control in an interface that is easy to understand. I used it on drum buses, vocal chains, and full mixes, and it always feels smooth to work with.
The zero-latency performance stood out to me immediately. You can process audio in real time without any noticeable delay, which is important when tracking or mixing live elements. The plugin also runs smoothly and does not slow down your sessions.
Main features:
- Four Character Modes for Different Tonal Flavors
The X6 multiband VST compressor offers four modes that each change how compression shapes your sound. Punch mode keeps transients sharp and clear, making it great for drums or other percussive sounds.
Smooth mode works like classic FET compression, giving a natural and even response. Crunch mode adds saturation to loud transients for extra grit or character. Expand mode acts as an expander for shaping transients or gating, so you have more options than just compressing. I use these modes depending on whether I want clean control or a more creative sound.
- Auto-Threshold and Smart Gain Compensation
Setting up multiband compression manually can take a long time. The X6’s auto-threshold feature analyzes your input and sets balanced thresholds for all bands, which saves a lot of time.
The smart gain compensation keeps your output level consistent, so you are not fooled into thinking louder is better. This makes A/B testing much more reliable.
- Mid/Side Processing and External Sidechain
You can process the center and sides of your mix separately, which is very useful for mastering or controlling the width. Mid/Side mode lets you shape the stereo image without affecting the center. The external sidechain support also works across multiple bands, so you can duck the bass around the kick or create more complex interactions between elements.
- Professional Metering and Oversampling
X6 includes peak, true-peak, LUFS, and RMS metering, plus a spectrum analyzer for both input and output. You can enable up to 4× oversampling for cleaner processing at high frequencies. The lookahead feature, up to 20ms, helps catch fast transients without distortion, which is especially helpful on aggressive material.
2. FabFilter Pro-MB
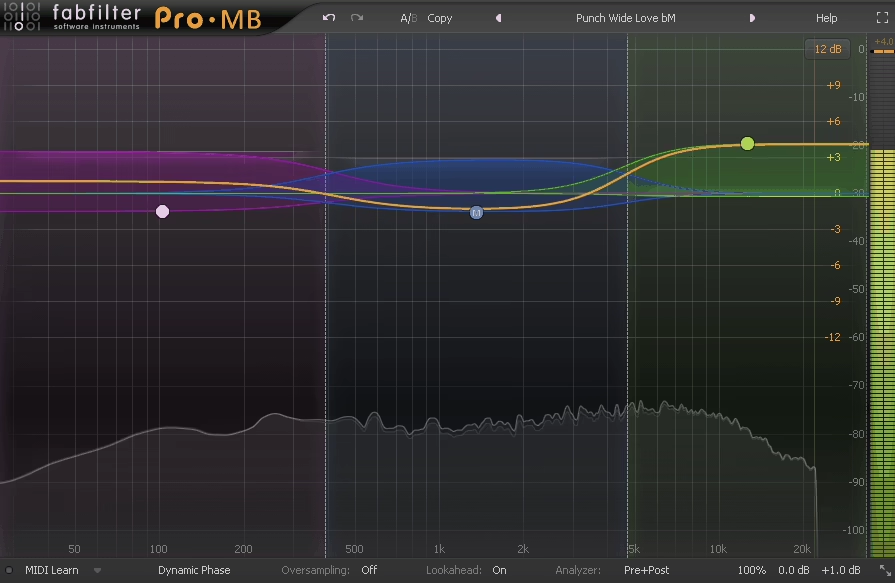
Pro-MB stands out because you can place its bands wherever you want. Unlike other plugins that make you divide the whole frequency range into set sections, this one lets you add a band exactly where you need it and leave the rest alone.
Like the X6 from DM, I suggest using Pro-MB when you want precise control without making things too complicated. The interface is simple and quick, and the visual feedback shows you exactly what’s going on. You can use up to six separate bands, and each one can act as a compressor, expander, gate, or limiter based on your settings.
Dynamic Phase mode offers a balance between minimum phase and linear phase processing. It keeps latency low and avoids the usual phase problems you might get with static algorithms, so you can use it on single tracks without worrying about unwanted artifacts.
- Flexible Band Placement and Dynamic Control
You don’t have to use only adjacent crossover bands like with most multiband tools. For example, you can set a band at 3kHz to smooth out harsh vocals, add one at 80Hz to manage low-end rumble, and leave the rest of the frequencies untouched.
Each band comes with its own threshold, ratio, knee, attack, release, and lookahead controls. This makes it easy to solve specific issues without affecting the whole signal.
- Multiple Processing Modes for Each Band
With Pro-MB, you can set each band to compress, expand, gate, or even use upward compression. For example, I’ve used upward compression to highlight subtle air in a vocal without making the loud parts louder, and downward expansion to tidy up room mics between drum hits.
Side-chain options give you more control by letting you trigger a band using a different frequency range or even an external input.
- High-Quality Processing & Visual Feedback
The real-time spectrum analyzer updates smoothly and can show pre, post, or side-chain signals with adjustable detail. You can see exactly what each band is doing as you make changes. The plugin also has features like dry/wet control, full-screen mode, MIDI learn, and undo or redo.
Pro-MB works in VST, VST3, AU, AAX, and CLAP formats on both macOS and Windows, so it’s compatible with most setups.
3. Relab Development Maselec MLA-4
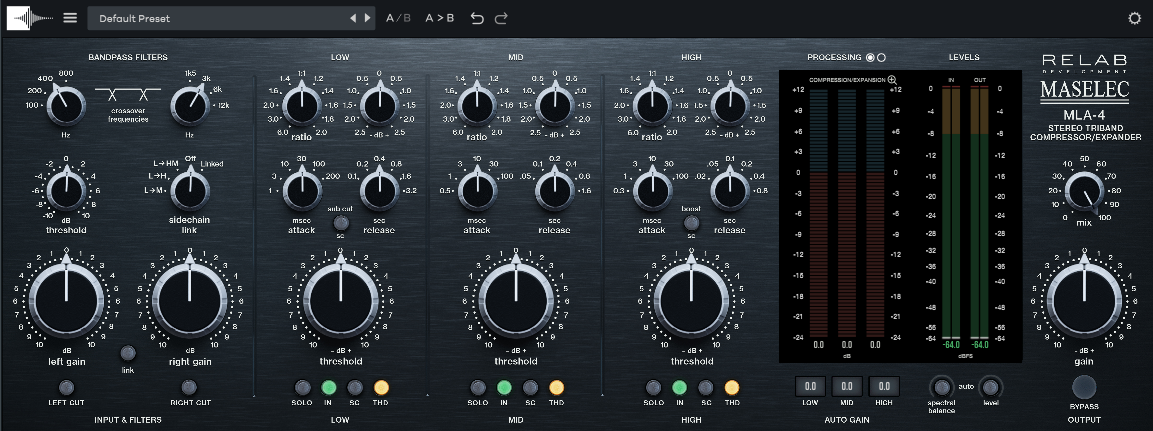
I was interested in the MLA-4 plugin not only because it’s a multiband tool, but also because Relab worked directly with Leif Mases, who designed the original hardware.
Most multiband compressors only offer compression. The MLA-4 gives you both compression and expansion on each of its three bands, so you can shape dynamics in new ways. You can control peaks, bring out quiet details, tighten the low end, and add air to the highs all at once.
The per-band THD controls are especially helpful. You can add a bit of harmonic warmth to the low mids without affecting the highs, so your mix doesn’t sound too digital. This small feature makes a big difference if you want analog character without phase issues.
The workflow is well designed. You get independent channel monitoring, per-band solo, and adjustable crossover points, so you can hear exactly what each band does to your mix. This control is important when mastering or fixing an overcompressed stem.
- Compression and Expansion Per Band
Standard multiband compressors only reduce peaks, but here you get compression ratios up to 6:1 and expansion down to 1:2 on each band. This lets you tighten the bass and expand the top end for more sparkle at the same time. You get dynamic control in both directions, which gives you creative options that single-function tools can’t offer.
- Per-Band Harmonic Distortion Control
The THD feature lets you add analog-style warmth to the low, mid, or high bands as needed. If I want the bass to sound warmer without making the whole mix muddy, I add a bit of harmonic content to just the low band. It’s a subtle change, but it helps digital mixes sound less clean or sterile.
- Precise Monitoring and Band Isolation
You have per-band solo, left and right cut, and separate input and output gain controls. This makes it easy to hear what each frequency range is doing and check the stereo balance for each band.
- Transparent Crossover Design
The plugin’s filter network is made to keep a flat frequency and phase response at unity gain. I’ve used other multiband tools that cause odd phase shifts or tonal problems, but the MLA-4 avoids most of these issues. It stays musical even when you make big changes across several bands.
4. MeldaProduction MDynamicsMB

MDynamicsMB is MeldaProduction’s main multiband dynamics processor, and it covers more than just compression. You also get expansion, gating, and limiting per band, with up to 6 independent bands, and most parameters can be modulated.
It’s deeper than most multiband compressors on the market, which has its pros and cons. The learning curve is steeper, and the interface can feel cluttered if you’re new to Melda. But if you’re comfortable with deep plugins, MDynamicsMB will probably replace several others in your chain.
You get up to 6 fully independent bands, each with its own threshold, ratio, attack, release, knee, and makeup gain. Each band can also do compression, expansion, gating, or limiting independently, so you’re not stuck running the same processor type across the spectrum.
- Customisable Crossovers
Crossover points are fully customisable, and you can pick between linear-phase and minimum-phase crossovers. Linear-phase suits mastering where phase shift matters more than latency, minimum-phase is better for mixing where you want lower latency.
- Upward & Downward Compression
Each band can do both upward and downward compression, plus expansion and gating. Most plugins make you pick one direction, MDynamicsMB does both at once if needed, which is useful for evening out levels without flattening the dynamics.
- Modulation System
Most parameters can be modulated by LFOs, envelope followers, sidechain signals, MIDI, or audio-rate sources. Compression ratio responding to input level, threshold modulated by an LFO, makeup gain following a sidechain — that’s all possible. For most users this is overkill, for sound designers it’s useful.
- Mid/Side Per Band
Full Mid/Side processing on every band, so you can compress the centre of your mix differently from the sides at every frequency range. Useful for mastering work where you want to control the low-mid centre without affecting the stereo highs.
5. Mathew Lane TiAMO
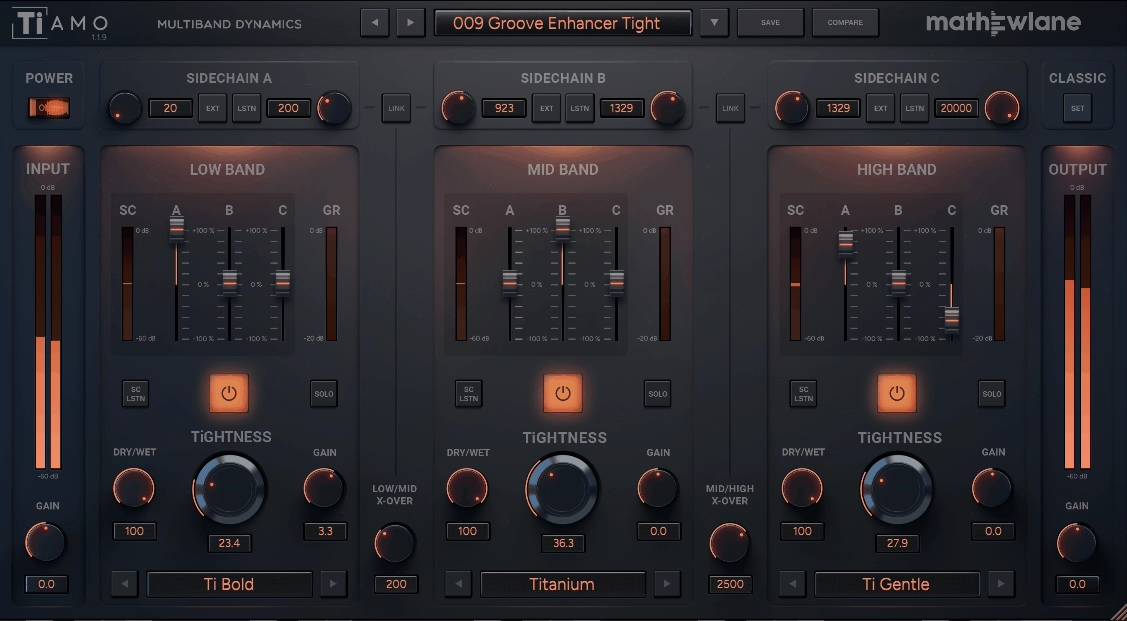
This is probably one of the most transparent multiband compressors I’ve used. When I tried it on drums, I didn’t notice much at first, but once I muted it, the difference was clear. Installing it was a bit tricky since the process was different from other plugins I’ve used.
The TiAMO multiband compressor works differently from most others. Rather than just splitting your audio into three bands, it gives you three separate sidechains that you can route any way you like. For example, you can trigger the low band from the high band, or use an external kick drum to control the mids. This setup gives you a lot of creative flexibility.
The plugin uses analog-modeled compression based on Mathew Lane’s TiCo technology, so it sounds warm and musical instead of cold or digital. It helps your tracks blend together naturally. Plus, the linear-phase crossovers prevent the phase smearing you sometimes get with other multiband compressors.
- Three Independent Sidechains With Mixing Control
TiAMO stands out because you can mix sidechain triggers across different bands. You aren’t limited to having the low band only respond to low frequencies.
For example, you can set the high band to trigger compression on the mids, or combine several sidechain sources to create more dynamic movement. Each sidechain has its own high-pass and low-pass filters, so you can choose exactly which frequencies trigger the compression. This is great for creative pumping effects or making grooves that feel natural.
- Analog-Style Compression With Modern Precision
The compression sounds great. It’s based on the TiCo analog compressor models, which add warmth and character without making your mix muddy. I’ve used it on drum busses, synth groups, and full mixes, and it always adds some life instead of just flattening the dynamics.
The linear-phase crossovers keep your sound tight and clear, so you get the analog feel without losing clarity or causing phase problems.
- Classic Mode For Simple Workflows
If you don’t need all the advanced sidechain options, TiAMO also has a classic three-band compressor mode. It’s simple and quick, making it perfect for basic tasks like controlling bass, balancing mids, or smoothing out harsh highs.
This mode works well for de-essing vocals or adding gentle control to a master bus, all without needing to set up complex routing. The plugin lets you keep things simple if you just want a reliable, musical multiband compressor.
6. Slate Digital MO-TT
If you’ve tried Ableton’s OTT or Xfer’s version, you know they can sound pretty intense. MO-TT’s multiband compressor gives you modern controls, so you can pull things back when you want. I like that I can push it on synth basses or keep it subtle on vocals, all with one plugin.
The plugin splits your audio into low, mid, and high bands, each with its own compression settings. You can tweak the threshold, ratio, attack, release, and control how much compression each band gets. This is great because you’re not forced into an all-or-nothing sound.
- Timing Styles for Different Materials
MO-TT has three timing modes that change how the compressor works. Classic mode gives you the usual OTT punch. Smooth mode is better for vocals or melodic instruments because it sounds more natural. Smack mode adds extra bite to drums and percussion.
- Quick Set Modes & Presets
The plugin has built-in modes like OTT, Hip-Hop, and Vox to help you get started quickly. Hip-Hop mode boosts the low end, while Vox mode focuses on vocal frequencies.
I use these modes as starting points instead of setting everything up from scratch. The preset library has options for instruments, drums, vocals, and full mixes, which saves a lot of trial and error.
- Advanced Band Control & Routing
MO-TT stands out from basic OTT clones because it gives you much more control. You can solo or bypass each band, adjust crossover points, and even use external sidechains.
It also has high-pass and low-pass filters to keep unwanted frequencies out. When I’m mixing a busy track, shaping each band on its own really helps.
- Mix Bus & Stem Processing Power
I’ve gotten great results with MO-TT on my mix bus or grouped stems. It adds energy and glue without needing a bunch of different plugins. For electronic music, it gives you that modern loudness and punch.
On vocals, it smooths out the dynamics but still keeps the performance lively. Just be careful with your levels, since it’s easy to go too far and flatten everything.
7. Waves C6 Multiband Compressor
The Waves C6 has been around for a while, but it still holds its own against the best multiband compressor plugins available today, especially when you need both fixed and floating bands in one tool.
It gives you four fixed crossover bands and two floating bands that you can place anywhere in the frequency range. This setup gives you much more control than a typical multiband compressor, since you can process the whole signal and also focus on specific problem areas with the floating bands.
I’ve found the Waves C6 multiband compressor plugin really helpful for vocals that have several problems. With it, you can reduce a boomy low end, control harsh sibilance, and balance the midrange, all in one plugin, instead of using several different processors.
Here’s what C6 offers:
- Six independent bands with flexible processing
Each of the six bands can handle compression, expansion, upward expansion, limiting, or dynamic EQ-style gain changes. The floating bands are especially useful because you can place them exactly where you need, like fixing a resonance at 3.2 kHz or reducing sibilance around 8 kHz.
I use this feature when I need to fix problem frequencies that a regular EQ can’t handle without affecting the parts of the sound I want to keep.
- Per-Band Sidechain Capability
Each band has its own sidechain feature, which lets you try creative techniques you won’t get with simpler compressors. For example, you can lower certain frequency ranges in response to another track, without changing the rest of the sound.
For instance, you can use this to lower the bass of a synth pad only when the kick drum hits, while leaving the high frequencies alone. This keeps your mix clean and avoids obvious pumping effects across the whole track.
- Multiple Release Modes and Dynamic Response
C6 gives you several release options, like VCA-style, opto-style, and automatic ARC release. This flexibility lets you control how each band recovers after compression. ARC mode is especially helpful because it changes the release time based on the signal, so you don’t have to keep adjusting settings.
- Visual Dynamic Line Interface
The plugin displays a real-time dynamic line that shows how your gain changes affect the spectrum as the audio plays. This visual feedback makes it easier to see what each band is doing, especially when you use the plugin as a dynamic EQ.
8. Drawmer 1973 Multi-Band Compressor by Softube
The Drawmer 1973 VST stood out to me because it lets you compress three separate frequency bands on their own. Full-band compressors just can’t do that.
I like how it mixes precision with character. The FET-based compression adds warmth but never sounds harsh or digital. Whether I want to tighten the bass, smooth the mids, or add air to the highs, this plugin does it all and keeps things balanced.
The interface is easy to understand. Each band has its own threshold, attack, release, and gain controls. You can also set the crossover points to choose where the bands split. It’s detailed, but you always feel in control.
Here’s what you get:
- Three-Band Independent Compression
This is where the Drawmer 1973 shines. You can compress lows, mids, and highs separately, each with its own settings. If your kick drum needs tightening but your cymbals sound great, you can work on just the low end and leave the rest alone.
Each band has a mute button, so you can cut out a frequency range completely. This helps when you’re trying to find the right balance.
- BIG and AIR Enhancement Switches
These two buttons add nice color without needing extra plugins. The BIG switch boosts low-end warmth and punch, which is great for making bass guitars or kick drums sound fuller in a thin mix.
The AIR switch raises the high frequencies, adding brightness and shimmer to vocals or acoustic guitars without making them harsh. Both buttons act like gentle dynamic EQ moves that sound musical, not technical.
- Mid/Side Processing Mode
The plugin also has Mid/Side processing, so you can work on the center and sides of your stereo field separately. This is really helpful in mastering if you want to compress vocals in the center without changing stereo synths or reverb. It’s the kind of control that can make a good mix sound polished.
9. PSP oldTimerMB
I was drawn to PSP oldTimerMB because it feels both vintage and practical. It doesn’t try to be the most feature-packed multiband compressor, but it really delivers on warmth and musicality.
This plugin offers three bands of compression using the same algorithm as PSP’s popular oldTimer single-band compressor. You get that vintage character, but now it’s spread across low, mid, and high frequencies. I like using it to add glue to a mix without making it sound too processed or digital.
Nerd-Approved Picks
What I use to hear compression accurately — the monitoring is the issue, not the plugin
Hand-picked from the Pluginerds shop to match what you are reading.


The adjustable valve emulation is a great feature. You can add a bit of harmonic warmth or turn it up for more saturation. This helps your mix feel more analog, even if you don’t have real hardware.
Features:
- Three-Band Compression with Crossover Control
You can choose your own crossover points for the low, mid, and high bands. I usually set the low band for bass and kick, the mids for most other sounds, and the highs for air and shimmer.
Each band has its own threshold, ratio, attack, release, and makeup gain, so you can fine-tune your settings. The auto-release option is helpful if you want the compressor to respond naturally to different sounds without adjusting every setting yourself.
- Valve Emulation & Stereo Width Per Band
The built-in tube saturation adds warmth and harmonic color when needed. I usually use it lightly, but even a small amount can make digital sounds feel more lively. Each band also has a width control, so you can adjust the stereo image for each frequency range.
This is really helpful if your low end is too wide or your highs need more space. Each band has solo, mute, and bypass switches, so you can easily hear what each section is doing.
PSP oldTimerMB multiband VST compressor plugin wThe PSP oldTimerMB multiband VST compressor works well on mix buses, mastering chains, or anywhere you want vintage-style multiband compression that stays smooth and musical.
10. SSL G3 MultiBusComp
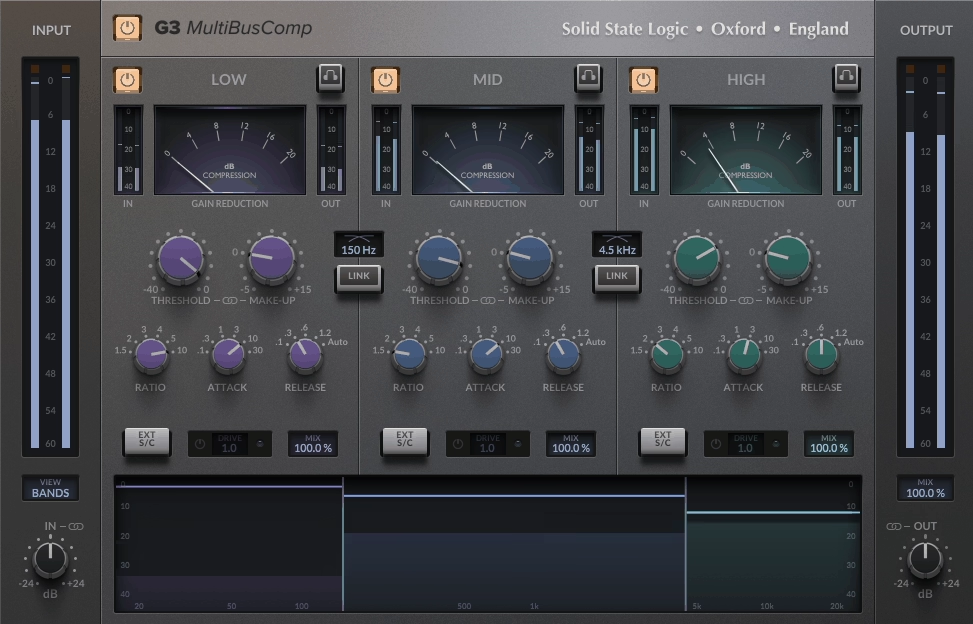
SSL took their famous bus compressor and gave it three independently configurable frequency bands. You get that classic SSL glue sound, but now you can shape lows, mids, and highs separately instead of crushing everything at once.
I use the G3 MultiBusComp plugin when I want to tighten a full mix or bring a drum bus together without losing detail in each frequency range. The 4K Drive feature, inspired by SSL’s console design, lets me add warmth or saturation to each band on its own, so I don’t need extra saturation plugins.
The interface is simple and you can resize it, which is helpful on a small laptop screen. You can see your crossover points and thresholds on a graph, so it’s easy to make changes without guessing. If you want to check what’s triggering the compression, you can solo each band and listen.
Things to mention:
- Three-Band Frequency Control
I chose G3 MultiBusComp mainly because it lets me compress lows, mids, and highs separately. For example, on a drum bus, I can tighten the kick in the low band, bring the snare and toms together in the mids, and control the cymbals in the highs, all without them clashing.
You can set your own crossover points wherever your mix needs them, which gives you real flexibility for different genres and arrangements.
- Per-Band Drive and Saturation
Each frequency band has its own Drive control, modeled after SSL’s SL 4000 console. If your mix sounds too clean or digital, you can add a bit of Drive to the low or mid bands for some analog-style warmth.
You can turn up the Drive for a stronger effect or keep it subtle for just a touch of character. Since you can set different amounts for each band, you don’t have to over-saturate the whole mix just to warm up one part.
- Advanced Sidechain Routing
The flexible sidechain options for each band have changed how I deal with frequency masking. For example, I can set the bass to compress only when the kick hits by sending the kick to the low band’s sidechain, or I can lower the mids when vocals get loud without affecting the highs or lows.
You can also add high-pass or low-pass filters to the sidechain input, and use bell filters for even more precise control. This helps me make space in busy mixes without having to automate everything by hand.
G3 MultiBusComp works with VST, AU, and AAX formats, and runs on macOS 11 or later and Windows 10 or later. It’s now one of my main tools for mix bus and group bus processing when I want SSL’s classic glue sound with modern multiband control.
11. Minimal Audio Fuse Compressor
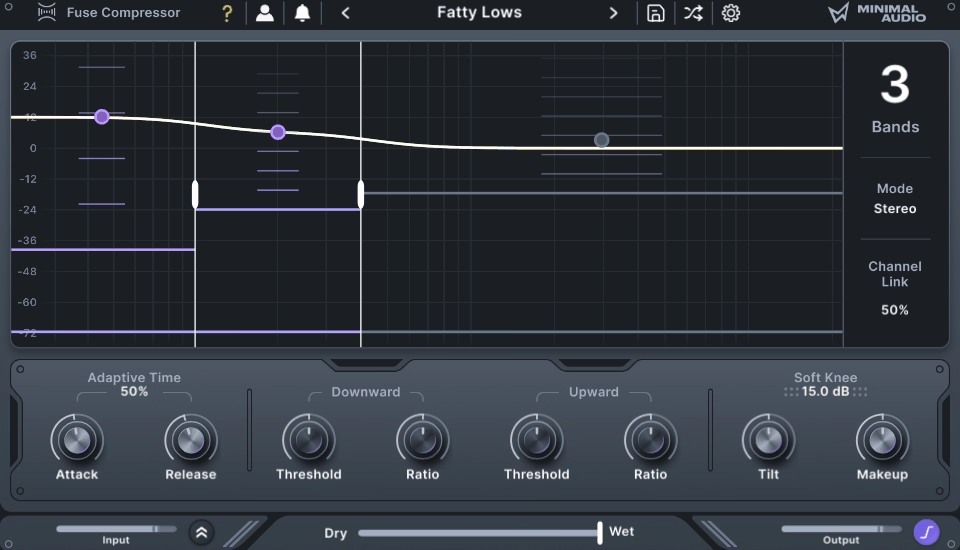
Minimal Audio Fuse Compressor is powerful, but its design always feels easy to use.
A lot of multiband compressors have so many knobs that they can be confusing. Fuse is different. It gives you up to six bands of compression, but the interface stays clear and organized.
The dual compression system is a standout feature. Each band lets you use both downward and upward compression. You can control loud peaks as usual, but also boost quieter sounds below the threshold. I like using this on drums to highlight ghost notes or on vocals to make whispers stand out, all without adjusting faders.
- Macro Controls for Quick Adjustments
One feature that saves me tons of time is the macro control system. Instead of changing the threshold or ratio for each band one by one, you can adjust them all together with one knob. When I want quick results, or I’m working on a rough mix, this makes Fuse feel like a regular compressor. If I need more control, I can still fine-tune each band separately.
The Spectral Tilt control is great for balancing how compression affects the low and high frequencies. If your mix sounds too heavy in the lows after compression, you can shift it toward the highs without changing all your settings.
Adaptive Time changes the attack and release automatically based on the frequency. High frequencies react faster than low ones. This helps keep transients sharp while still managing the main part of the sound.
- Mid/Side Processing with Soft-Clip Limiter
Fuse has both mid/side and stereo modes, along with channel linking. This gives you a lot of control over your stereo image. For example, you can use M/S mode on the master bus to make the center tighter and keep the sides more lively.
The built-in soft-clip limiter stage adds gentle saturation and prevents harsh digital clipping when you push things hard. It’s perfect for getting that polished, glued-together sound without extra plugins.
Fuse works great on mix buses, drum groups, vocals, and even creative sound design. The 40+ presets cover everything from transparent glue to aggressive multiband effects. You can work fast or go deep, depending on your mix’s needs.
Freebies
1. Analog Obsession KolinMB
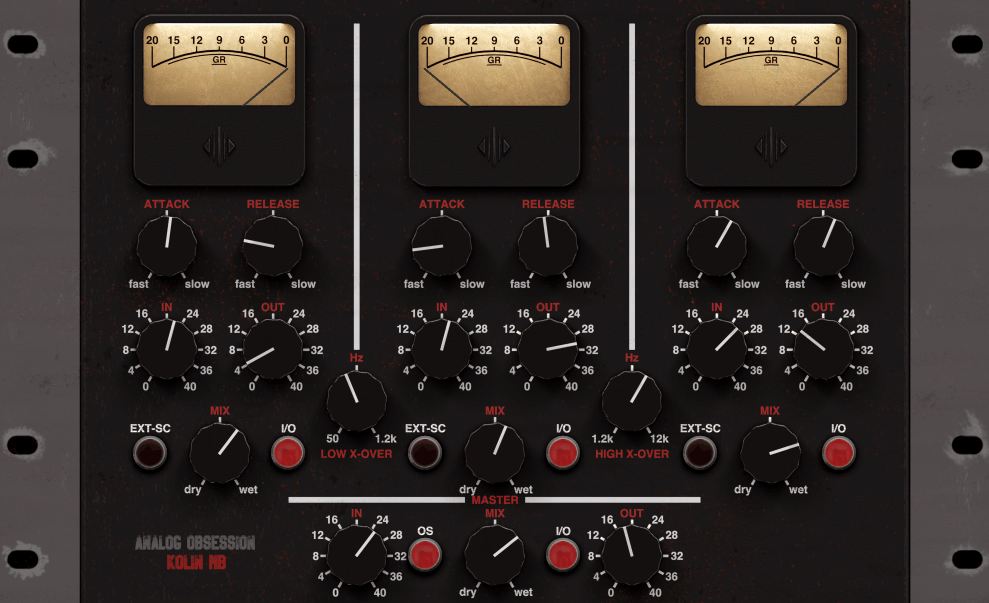
KolinMB is based on Analog Obsession’s popular Kolin limiting amplifier, but it splits the sound into three frequency bands while keeping its vintage feel.
This plugin stands out because it gives you a lot of control at no cost. Each band has its own mix knob, so you can blend compressed and dry signals for lows, mids, and highs separately. This is great if you want a tight low end without squashing your whole mix.
In my experience, KolinMB works best on drum buses and full mixes that need some analog-style glue. Since it’s based on classic tube limiters from the 1960s, it naturally adds warmth and color. Instead of clinical precision, you get real character.
The interface is simple and you can resize it, which is a nice touch. Attack times range from 1ms to 50ms, and release times go from 0.1 to 3 seconds. This gives you enough flexibility for most tracks without too many options to worry about.
- Independent Band Processing with Mix Controls
Each of the three bands gets its own input gain, output control, mix knob, and bypass switch. This setup lets you apply heavy compression to your low end while keeping mids and highs more natural.
The master mix knob adds another layer of parallel processing to the entire signal. Use it if you want the compression effect without losing dynamics completely.
- External Sidechain Per Band
KolinMB includes external sidechain support for each frequency band, opening up creative options. You can duck specific frequency ranges based on another signal, perfect for making space in busy mixes. If you want your bass to pump only when the kick hits, you can set that up without affecting the rest of your mix.
- Vintage Coloration and Character
The plugin doesn’t try to be transparent. It’s modeled after vintage tube limiters, so you get 40dB of gain-compensated input and that warm, slightly saturated sound. This works great on material that feels too clean or digital. Drums especially respond well to this kind of processing.
- Format Support and Resizability
KolinMB runs as VST3, AU, and AAX on both Mac and PC, so compatibility isn’t an issue. The resizable interface means you can scale it to fit your screen setup.
2. Xfer OTT
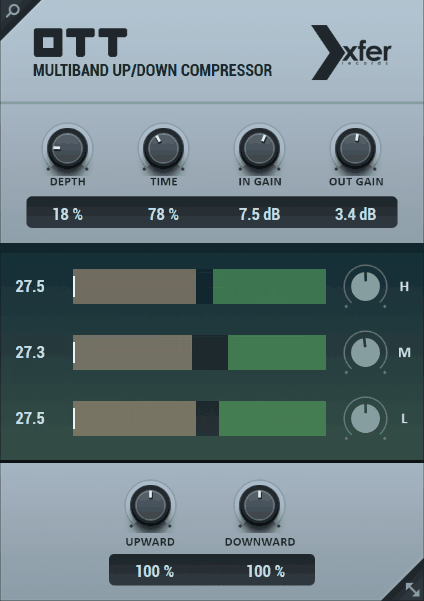
When I first downloaded OTT years ago, it totally changed how I approach dynamics. This freebie is one of the best multiband compressor plugins you can get as it gives you an aggressive, upfront sound that’s now a staple in electronic music production.
OTT free compressor stands out because it handles compression differently from most plugins. It splits your audio into three frequency bands and applies both upward and downward compression at once. This means quiet parts get louder and loud parts are controlled, giving you that punchy, energetic sound common in modern EDM and bass music.
The interface is really straightforward. There’s a Depth knob that acts like a wet/dry control, a Time knob for adjusting attack and release across all bands, and simple input and output gain controls. You also get a visual meter that shows what’s happening to each frequency band in real time.
I recommend trying OTT on basslines, synth leads, and drum buses. It brings out details you might not even realize are there. A soft pad can suddenly stand out in the mix, and a weak kick drum gets instant punch and presence.
- Upward and Downward Multiband Compression
OTT’s main strength is processing dynamics in both directions at the same time. Most compressors just reduce peaks, but OTT also boosts the quieter parts, making everything sound more present and upfront.
It was originally inspired by an Ableton Live preset, but Xfer made it into a standalone plugin that works in any DAW. You’ll quickly notice how it makes tracks sound louder and more aggressive without just turning up the volume. I often use it on synths and bass to make them stand out in the mix.
- Fast Workflow with Minimal Controls
The Depth control is my favorite part because it lets you smoothly blend the compressed signal with your original sound. You don’t have to adjust tons of settings to get good results.
The Time knob handles attack and release for all three bands simultaneously, keeping things quick. I can dial in the exact amount of aggression I want in seconds, making OTT perfect for fast production sessions or when you’re just trying out ideas.
- Free and Lightweight
OTT runs smoothly on both Windows and Mac, including Apple Silicon. You can download it directly from Xfer Records, and it supports VST, AU, and AAX formats.
Because it’s so light on CPU and easy to use (I usually just open the plugin and that’s it), I run multiple instances across tracks without any performance issues. It’s a nice freebie, especially for electronic and bass-heavy genres where you need that modern, punchy sound.
3. Integraudio & Sixth Sample Cramit (OTT on Steroids)
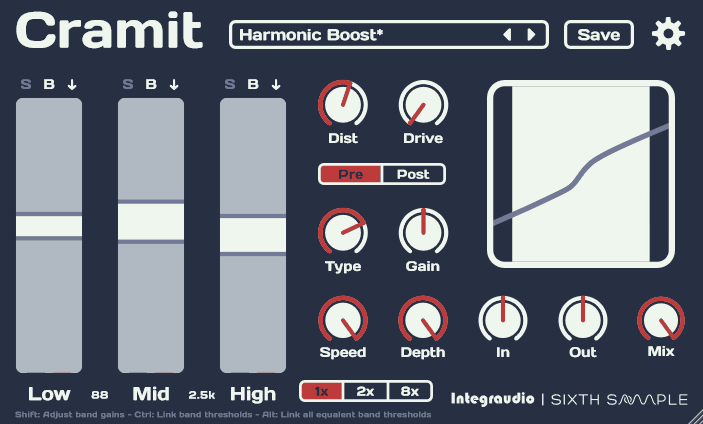
Cramit VST gives you both multiband compression and distortion in one plugin.
Most OTT-style compressors only handle dynamics, but Cramit goes further. You can add harmonic color before or after compression, giving you more control over tone and texture in one go. I find this really helpful when I want a sound to stand out without using several plugins.
The interface is simple to use. There are three bands: low, mid, and high, each with its own compression and expansion controls. You get real-time visual feedback, and the layout adjusts to your screen size. I like being able to solo or bypass each band to hear what each frequency range is doing.
- Multiband Compression With Built-In Expansion
Cramit handles both downward compression and upward expansion simultaneously. That means you can tame loud peaks while lifting quiet details in one move. I use this on drum loops all the time to bring out room tone and snap without needing parallel chains. It’s fast and aggressive when you need energy, but you can dial it back with the mix knob if things get too intense.
- Pre or Post Distortion Section
The distortion section is what sets Cramit apart from other free multiband compressors. You can add saturation or drive before or after the compression stage, which can completely change the character. Pre-distortion colors the signal first, then compresses it, which feels smoother.
If you add distortion after compression, it hits harder and adds more bite once everything is under control. I switch between pre and post distortion depending on whether I want a warmer or grittier sound.
Cramit is great for synths, bass, drums, and sound design when you want more presence and punch. It’s free and works with VST3, AU, and AAX on both Windows and Mac. Just be careful with upward compression, since it can boost noise along with the details if you overdo it.
4. Analog Obsession Dynasaur
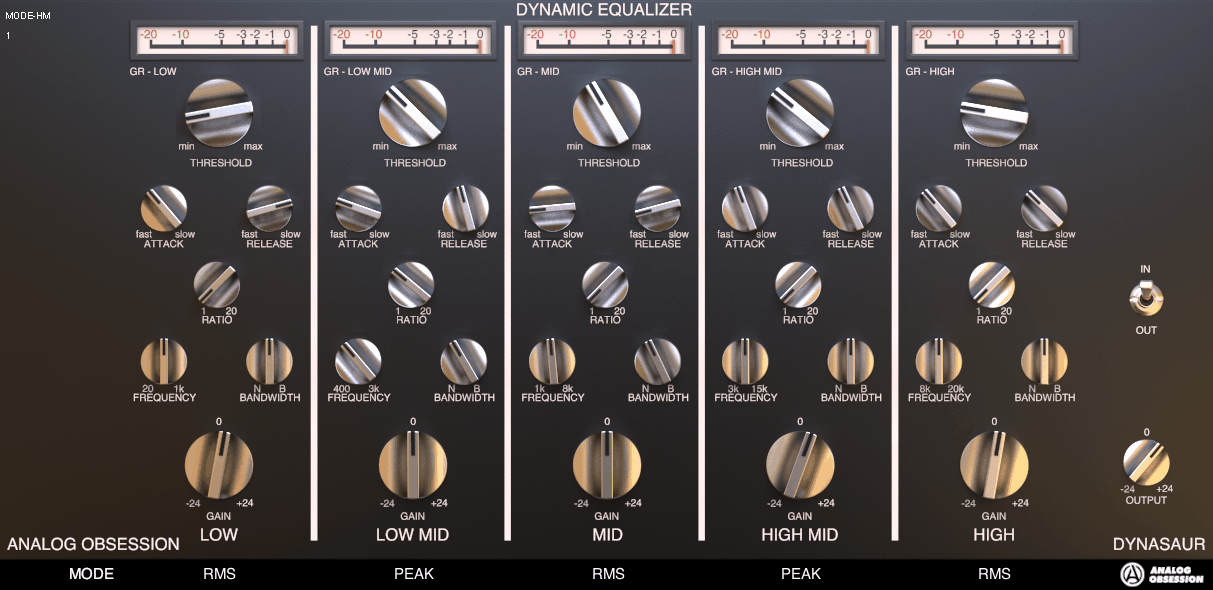
What stands out to me about the Dynasaur free multiband compressor plugin is that it doesn’t fit neatly into one category. Technically, it’s a dynamic equalizer with multiband compression, but I use it more as a precise problem-solver than a standard compressor.
The plugin gives you five frequency bands that you can control independently. Each band has its own threshold, ratio, attack, release, and frequency controls. You can narrow or widen each band depending on whether you need broad strokes or precise targeting.
Dynasaur is especially useful because each band has both RMS and PEAK detection modes. You can set the low end to respond to average levels and the high end to react to quick peaks. This flexibility lets you solve different frequency issues in one plugin.
- Flexible Band Control and Adjustable Detection
I like how much control you have over each of the five bands. Unlike many multiband tools, you aren’t stuck with fixed frequencies. You can adjust the center frequency, change the bandwidth, and pick either RMS or PEAK detection for each band.
This lets you use gentle RMS compression on the bass while using quick PEAK detection to catch harsh treble spikes. It’s really helpful for de-essing vocals or controlling resonant frequencies without changing the whole mix. Dynamic Processing
Dynasaur can be a de-esser, multiband compressor, dynamic EQ, or even a subtle peak rider, depending on your settings. For example, when I mix vocals and hear sibilance around 7kHz, I can focus on that band, set a moderate ratio with PEAK mode, and fix the issue without making the whole top end sound dull.
On mix buses, I’ll use wider bands with gentler settings to glue elements together. The plugin adapts to your needs instead of forcing you into a single workflow.
- Resizable Interface
Understanding Multiband Compression
Multiband compression breaks your audio into different frequency ranges, letting you compress each one separately. This gives you much more control compared to a standard compressor, which processes everything together.
What Sets Multiband Compressors Apart
Standard compressors treat your whole signal as one piece. When you lower the loud parts, every frequency gets turned down together. This usually works, but sometimes a loud kick drum can cause your vocals to sound dull, or a bright hi-hat can affect your bass.
Multiband compressors split your signal into two to six separate bands. Each band has its own threshold, ratio, attack, and release settings. For example, you can compress only the low end to tighten the bass without changing the mids, or control harsh highs while leaving the rest untouched.
This approach gives you surgical control over dynamics and tone. You can fix problems in one frequency range without affecting others. It’s like having multiple compressors running simultaneously, each focused on its own job.
When to Use Multiband Compression
I use multiband compression when regular compression doesn’t fix the issue. It’s most common in mastering, where you need to balance all frequencies without making any part of the mix sound flat.
It’s also helpful when you have frequency buildup. If your mix sounds muddy in the low-mids, but compressing the whole track kills the energy, a multiband compressor lets you focus only on that problem area.
Mixing bass-heavy genres like EDM, hip-hop, or pop? Multiband compression is great for them. It helps you keep the sub-bass tight and controlled while letting the mids and highs stay open and natural.
Common Mistakes to Avoid
The biggest mistake I see is over-compressing individual bands. Just because you can compress each range separately doesn’t mean you should slam them all. Too much multiband compression sounds unnatural and disconnected.
Randomly setting crossover points can also cause issues. Place them carefully, based on where your frequency problems are. If you set a crossover in the wrong spot, you might split an instrument between two bands in an awkward way.
Another mistake is using the same attack and release times for every band. Low frequencies need slower settings than high ones. If not, your bass might sound distorted, and your treble could become choppy.
Only use multiband compression when you really need it. If a standard compressor does the job, stick with that. Adding extra complexity can make mixing more difficult.
Tips for Getting the Most Out of Your Multiband Compressor
Multiband compression is most effective when you know how to use it in different mixing situations and styles. The main thing is to figure out which bands need control, how much compression fits your track, and when to stop before you overdo it.
Best Practices for Mixing and Mastering
I always start by soloing each frequency band before adding compression. This way, I can hear what I’m changing and avoid compressing frequencies that don’t need it.
When I’m mixing, I use gentle ratios, usually between 2:1 and 4:1. Stronger ratios are better for mastering, but subtle compression during mixing keeps things sounding natural. I set attack times based on the track: fast attacks (1-10ms) for controlling transients, and slower ones (20-40ms) to keep the punch.
Release times also matter. Release times are more important than many people realize. I set them to match the tempo so the compression moves with the music. In mastering, I use multiband compression as a final touch, not to fix mixing issues. The goal is to compress only problem frequencies rather than splitting the entire spectrum. If your low end sounds loose, compress just the 60-150Hz range. If vocals get harsh, target 2-5kHz. You don’t need to activate every band just because it’s there.
Enhancing Vocals, Drums, and Instruments
For vocals, I control muddiness in the 200-800Hz range and tame harshness in the 3-6kHz band, but keep the presence. I use ratios around 3:1 and medium attack times to keep consonants clear.
For drums, I use different settings for each part. I compress 60-120Hz to tighten the kick, and treat 2-8kHz separately to control the snare and hi-hat brightness. For bass guitars, I compress 80-200Hz to reduce boominess.
Guitars need a careful touch. I compress the 300-800Hz midrange if they sound boxy, but I use gentle ratios. In busy mixes, electric guitars often need some control in the 2-4kHz presence band.
Practical Settings for Different Genres
EDM and electronic music work well with strong multiband compression. I use ratios up to 6:1 on bass (40-150Hz) for a tight, pumping low end, and treat the mid and high bands more lightly at 3:1.
For rock and metal, I compress drums heavily in the low-mid range (100-400Hz) to keep them punchy against distorted guitars. I leave the top end (8kHz+) mostly untouched to preserve cymbal detail.
Hip-hop tracks need a controlled low end. I compress 50-100Hz at 4:1 to keep 808s steady, and lightly compress 150-400Hz to shape the vocal body without making it sound thin.
In jazz and acoustic music, I use the lightest touch possible, often just 2:1 ratios with slow attack times. I only compress frequencies that truly need control, usually the low-mids around 200- 400Hz, where acoustic instruments can build up.
FAQs:
When to use multiband compression?
Use it when a standard compressor affects the whole signal in ways you don't want, like a loud kick ducking the vocals. It is ideal for mastering, taming inconsistent low end on a mix bus, controlling sibilance, and evening out frequency balance on tracks with a wide dynamic range.
How to use multiband compression on vocals?
Set three or four bands targeting the problem areas in your vocal. Use one around 200-400 Hz to control muddiness when it builds up and another around 2-5 kHz to tame harshness and sibilance. Keep ratios gentle around 2:1 and only compress the bands that actually need it, leaving the rest untouched.
Nerd-Approved Picks
My honest recommendation for anyone whose compression always sounds slightly off
Hand-picked from the Pluginerds shop to match what you are reading.


Hello, I’m Viliam, I started this audio plugin focused blog to keep you updated on the latest trends, news and everything plugin related. I’ll put the most emphasis on the topics covering best VST, AU and AAX plugins. If you find some great plugin suggestions for us to include on our site, feel free to let me know, so I can take a look!