Logic Pro ships with a genuinely impressive set of stock plugins. I’ll be the first to admit that you can make professional-sounding music without ever leaving Apple’s ecosystem. But after spending some time working inside Logic, I’ve found that certain third-party plugins fill gaps that the stock tools simply can’t cover, whether that’s a specific sonic character, a workflow shortcut, or a creative approach that doesn’t exist anywhere in Logic’s built-in library.
This list isn’t about collecting plugins for the sake of having them. Every pick here is something I actually reach for on a regular basis, and more importantly, something I think you’ll keep using long after the novelty wears off.
Some of these handle bread-and-butter mixing tasks better than anything else available. Others unlock creative directions that Logic’s stock instruments and effects can’t touch. All of them run beautifully inside Logic Pro without compatibility headaches or CPU disasters.
The twelve plugins I’m covering are FabFilter Pro-Q 4, Valhalla VintageVerb, u-he Diva, XLN Audio Retro Color, 510k SEQUND, 510k PEACH, AAS Chromaphone 3, Devious Machines Infiltrator 2, Sweetsonics Laser 2, Native Instruments Kontakt 8, Tracktion Novum, and Brainworx bx_masterdesk True Peak.
1. FabFilter Pro-Q 4 (pro equalizer)
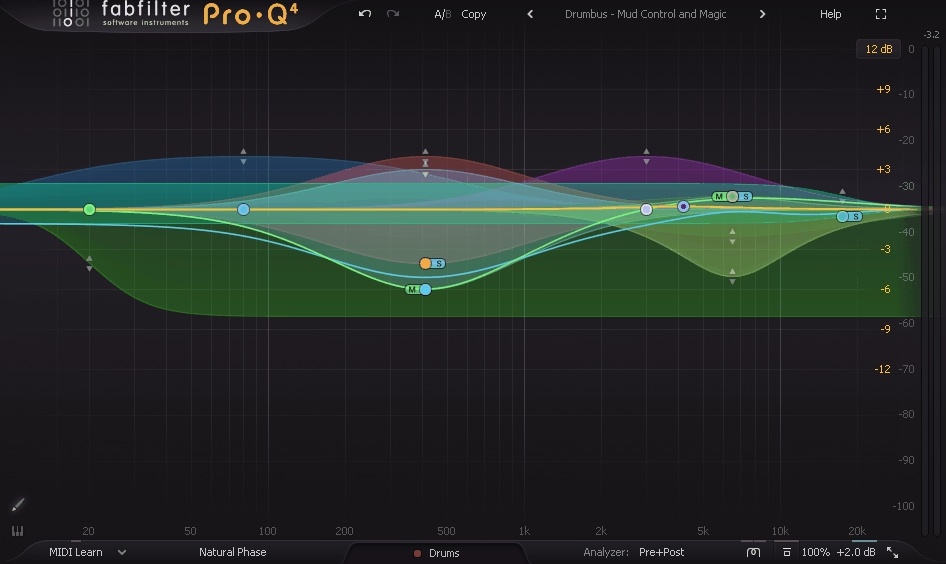
Logic’s Channel EQ is perfectly fine for quick moves, but the moment you need to do anything beyond basic tone shaping, you’ll feel its limitations. FabFilter Pro-Q 4 is the plugin that made me stop thinking about EQ as a chore. I load it on virtually every channel, and it handles everything from gentle tonal adjustments to surgical problem-solving without ever feeling like I’m fighting the interface.
What keeps me coming back isn’t just the sound quality, which is pristine. It’s the fact that Pro-Q 4 keeps finding ways to speed up my workflow in ways I didn’t know I needed. Version 4 adds features that directly compete with dedicated spectral processors and resonance suppressors, which means fewer plugins on your channel strip and less time bouncing between windows.
- Spectral Dynamics mode built directly into the EQ
This is the headline feature of version 4, and it’s the reason I stopped loading separate resonance suppressor plugins on half my tracks. Spectral Dynamics lets you target and tame problem frequencies dynamically without affecting the surrounding spectrum.
Think of it as having something like Soothe built right into your go-to EQ. A Spectral Density slider controls how selective the processing is, from broad strokes on low-end buildup to surgical precision on harsh upper-mid resonances. You get attack and release controls per band now too, which Pro-Q 3 never had. For me, this alone justified the upgrade.
- EQ Sketch for drawing curves in one gesture
I genuinely didn’t think I wanted this until I tried it. Click the paintbrush icon, drag across the display, and Pro-Q 4 interprets your movement to create a full EQ curve with appropriate band types, automatically placing shelves, bells, and cuts where your gesture implies them. It’s surprisingly accurate and shaves significant time off the initial tone-shaping phase. When I’m rough-mixing and need to move fast, Sketch gets me 80% of the way there in about two seconds.
- Instance List for session-wide EQ management
If you’re the type of Logic user who puts Pro-Q on every track (and you should be), the Instance List is a game changer. Click one button and you see every Pro-Q 4 instance in your session displayed as scrollable thumbnails, each with a live animated spectrogram. You can jump between instances, edit any of them without opening separate plugin windows, and even perform EQ matching between tracks directly from this view. I’ve started pinning this to a second monitor during mixing sessions and it’s completely changed how I manage frequency balance across a project.
- Character Modes for analog-flavored processing
Pro-Q has always been known for transparency, which is usually what you want. But sometimes you need a bit of color. The new Character button offers Subtle and Warm modes that add gentle saturation and harmonic richness to the processing. Warm mode uses tube-style modeling, and combined with the Natural Phase processing option and Gain-Q Interaction (which narrows the Q as you boost, like a classic console EQ), you can get Pro-Q 4 to behave like vintage hardware when you want that vibe.
2. Valhalla VintageVerb (versatile reverb)

I’ve tried dozens of reverb plugins over the years, and Valhalla VintageVerb is the one that never leaves my template. Logic’s built-in reverbs are fine for basic room sounds, but VintageVerb has a specific character that sits in a mix differently. It sounds like a piece of hardware with personality, not like a clinical algorithm trying to simulate a room.
Sean Costello designed this plugin around the aesthetic of classic 1970s and 1980s digital reverb units, and you can hear that lineage in every preset. The tails are lush without being washy, the early reflections have weight, and the color options give you everything from bright plate shimmer to dark, cavernous halls. It’s also absurdly light on CPU for what it does.
- Color modes that define entirely different reverb characters
VintageVerb’s Color control isn’t just a tone knob. It fundamentally changes the reverb algorithm’s behavior. 1970s mode gives you dark, dense, slightly gritty tails inspired by early digital hardware. 1980s shifts to a brighter, more polished character.
Now offers a cleaner, more modern sound. And Shimmer adds pitch-shifted octaves to the reverb tail for atmospheric, otherworldly textures. Each mode responds differently to the same settings, which means you effectively get four reverb plugins in one.
- Diffusion and modulation controls that actually do something useful
A lot of reverb plugins give you a modulation knob that wobbles the tail in a vaguely chorus-like way and calls it a day. VintageVerb’s modulation section genuinely reshapes the character of the reverb from subtle movement that prevents metallic buildup to deep, almost chorus-like motion that turns the tail into a lush pad.
Combined with the Diffusion control, which determines how quickly the early reflections blur into the tail, you can dial in everything from tight, defined spaces to massive, smeared washes.
- 9 reverb algorithms with distinct spatial character
You get Concert Hall, Bright Hall, Plate, Room, Chamber, Random Space, Chorus Space, Ambience, and Sanctuary, each with its own algorithm rather than just parameter variations of the same engine. Random Space is particularly interesting. It uses randomized reflection patterns that create a sense of space without any obvious repeating artifacts. I reach for it on vocals constantly because it adds dimension without cluttering the mix.
3. u-he Diva (analog synth)

Logic’s Retro Synth is a perfectly capable analog-style synthesizer, but if you’ve ever played a real Moog, Juno, or Jupiter, you know there’s a quality to those instruments that Retro Synth doesn’t quite capture.
u-he Diva does. It’s the most convincing analog emulation I’ve used in software, and the reason it sounds so good is also the reason it eats CPU like nothing else: it models the actual circuit behavior of classic hardware, including the imperfections.
Urs Heckmann and his team built Diva around a modular architecture where you mix and match oscillator sections, filter sections, and envelope types from different classic synthesizers. Want Moog oscillators through a Roland Juno filter with Korg MS-20 envelopes? You can do that. It shouldn’t work, but it consistently produces sounds that feel thick, alive, and organic in a way that most virtual analogs can’t touch.
- Interchangeable oscillator, filter, and envelope modules from different hardware
Diva lets you combine components from 5 different oscillator types, 5 filter types, and 3 envelope types, each modeled on specific hardware. The oscillator modules are based on the Minimoog, Roland Jupiter-8, Roland Juno-60, Korg MS-20, and a dual VCO design.
Filters come from the same lineage. The ability to cross-pollinate these modules means you’re not just recreating one classic synth. You’re building entirely new instruments from vintage DNA.
- Variable CPU/accuracy tradeoff that’s actually worth using
Most plugins pick one level of quality and stick with it. Diva gives you a Draft, Great, and Divine quality setting per oscillator and filter section, and the difference is audible. Divine mode models zero-delay feedback filters and full nonlinear circuit behavior. It sounds incredible and will push your CPU hard. Draft mode is lighter but still sounds better than most competing synths at full quality. Being able to compose in Draft and render in Divine is a workflow that respects both your creativity and your computer’s limits.
- Trimmers section for analog drift and imperfection
The Trimmers page is where Diva separates itself from every other analog emulation. Controls for oscillator drift, slop, filter feedback instability, and tuning variance let you add the exact kind of imperfection that makes real analog synthesizers feel alive.
Crank the drift and each note wobbles slightly differently, just like hardware that’s been warming up for twenty minutes. I’ve never found another plugin that replicates this feeling as convincingly.
4. XLN Audio Retro Color (color/saturation and tape)
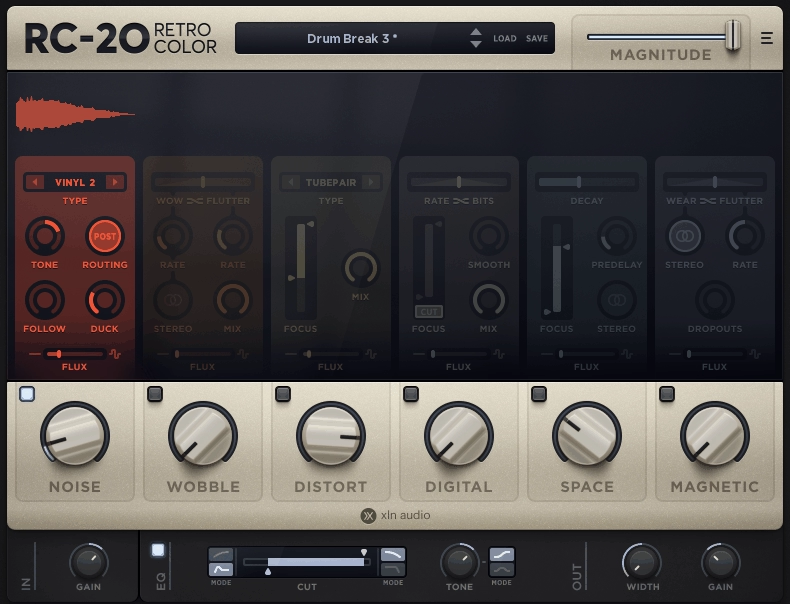
Saturation plugins are everywhere, and most of them do roughly the same thing with different marketing. XLN Audio Retro Color is different because it’s not trying to model one specific piece of hardware. It gives you an entire spectrum of coloration possibilities, from subtle warmth that barely touches the signal to absolutely destroyed, mangled distortion, all through a signal path that feels musical at every setting.
What sold me on Retro Color was how it handles the interaction between its modules. You’re not just stacking effects in series. The three main sections, Color, Contour, and Noise, influence each other in ways that produce results you can’t recreate by chaining separate plugins.
The whole thing feels cohesive, like one unified processor rather than a multi-effect.
- Physically modeled saturation circuits with distinct character
Retro Color doesn’t use generic waveshaping algorithms. Each of the saturation types is a physical model of a real analog circuit: tube, transistor, tape, VHS tape, and others. The behavior changes dynamically based on input level, frequency content, and the settings of other controls.
Push a loud signal into the tape model and it compresses and saturates differently than a quiet one, just like actual tape. This dynamic response is what makes it sound organic rather than artificial.
- Contour section for frequency-dependent processing
The Contour module lets you control how the saturation interacts with different parts of the frequency spectrum. You can focus the coloration on the low end while leaving the highs clean, or push the midrange into distortion while keeping the bass tight. This kind of frequency-targeted saturation is something I used to do with complicated parallel processing chains, and Retro Color handles it in a single knob.
- Noise module with vintage machine emulation
Rather than just adding static white noise, Retro Color models the specific noise profiles of different vintage equipment: tape hiss, vinyl crackle, VHS artifacts, and others.
Each noise type responds dynamically to the audio signal and sits in the mix as part of the texture rather than as an obvious layer on top. For lo-fi production, sound design, or just adding subtle analog character, this section alone makes the plugin worth exploring.
5. 510k SEQUND (sequencer)
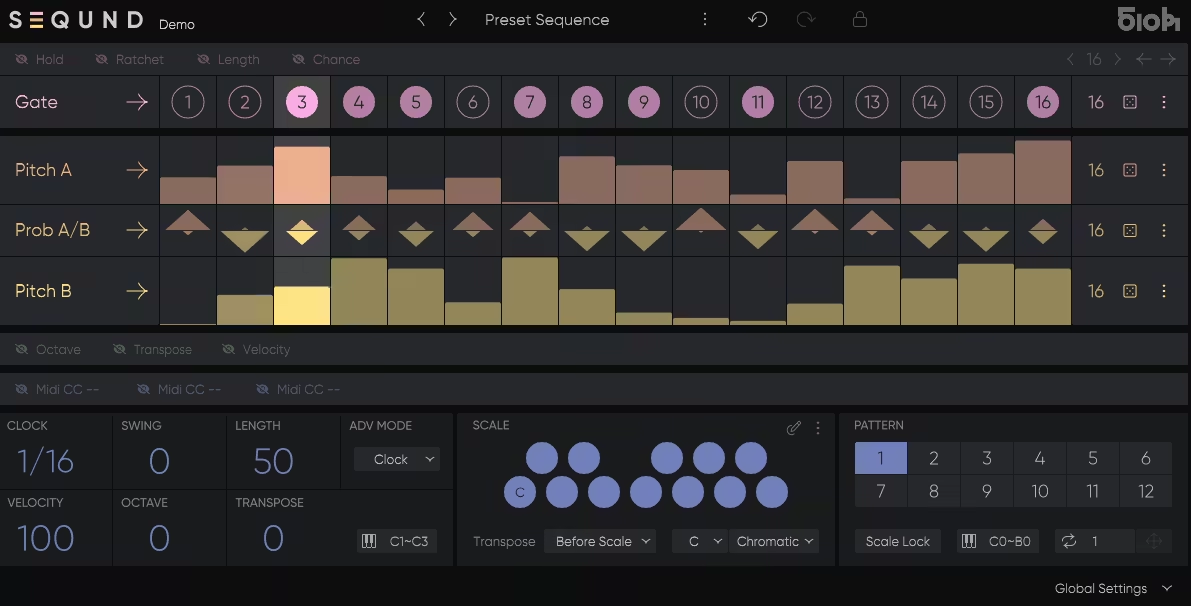
Logic’s built-in MIDI effects are functional, but they don’t really encourage experimentation. 510k SEQUND is a polyrhythmic step sequencer that came out of the Max4Live world, built by electronic musician Alexkid in collaboration with Tadashi Tsuginomori from HY-Plugins.
It’s designed to generate patterns that evolve and shift in ways that a traditional step sequencer can’t, and it’s become one of my favorite tools for writing basslines, melodies, and rhythmic patterns that don’t sound like they were drawn in a piano roll.
The secret is in how SEQUND handles lane lengths. Instead of locking every parameter to the same number of steps, each lane, whether it’s Gate, Pitch, Octave, Velocity, or MIDI CC, can run at its own independent length.
Set your gate pattern to 7 steps and your pitch sequence to 5, and the relationship between rhythm and melody constantly shifts, producing patterns that feel organic and alive without you having to program a single variation manually.
- Dual melodic lanes with probability switching
SEQUND features Pitch A and Pitch B lanes, each defining its own melodic sequence. A separate Probability A/B lane determines the per-step likelihood of hearing one melody or the other.
Combined with independent lane lengths, this means your sequences don’t just evolve rhythmically, they mutate melodically in controlled but unpredictable ways. I use this constantly for creating basslines that have subtle note variations without programming each change by hand.
- 12 patterns per preset with instant MIDI recall
Each preset stores up to 12 individual patterns that you can switch between instantly via MIDI notes. In a live or performance context, this lets you change patterns on the fly with seamless timing.
In the studio, it’s great for A/B comparing different sequence ideas without interrupting your workflow. The transitions between patterns are tight and tempo-synced, which matters more than you’d think when you’re building an arrangement.
- Ratchet, Swing, and Step Lock for detailed groove control
The Ratchet feature repeats notes within a single step, creating rapid bursts or rolling effects that add rhythmic complexity. Positive and negative swing lets you push timing ahead or behind the grid.
And Step Lock lets you freeze specific cells so they’re immune to randomization, which means you can keep the backbone of a pattern intact while letting the dice buttons randomize everything else. That balance between control and accident is exactly what makes SEQUND feel like a musical instrument rather than just a utility.
- Real-time MIDI transpose with scale quantization
The Transpose function works via MIDI notes from your keyboard, letting you shift the entire sequence in real time while staying locked to your chosen scale.
Transpose can operate before or after scale quantization, which gives you two very different behaviors: musically safe transposition that always stays in key, or raw chromatic shifting for more experimental results. I’ve recorded entire performances just by holding chords and letting SEQUND generate the melodic content.
6. 510k PEACH (midi /polymetric arp)
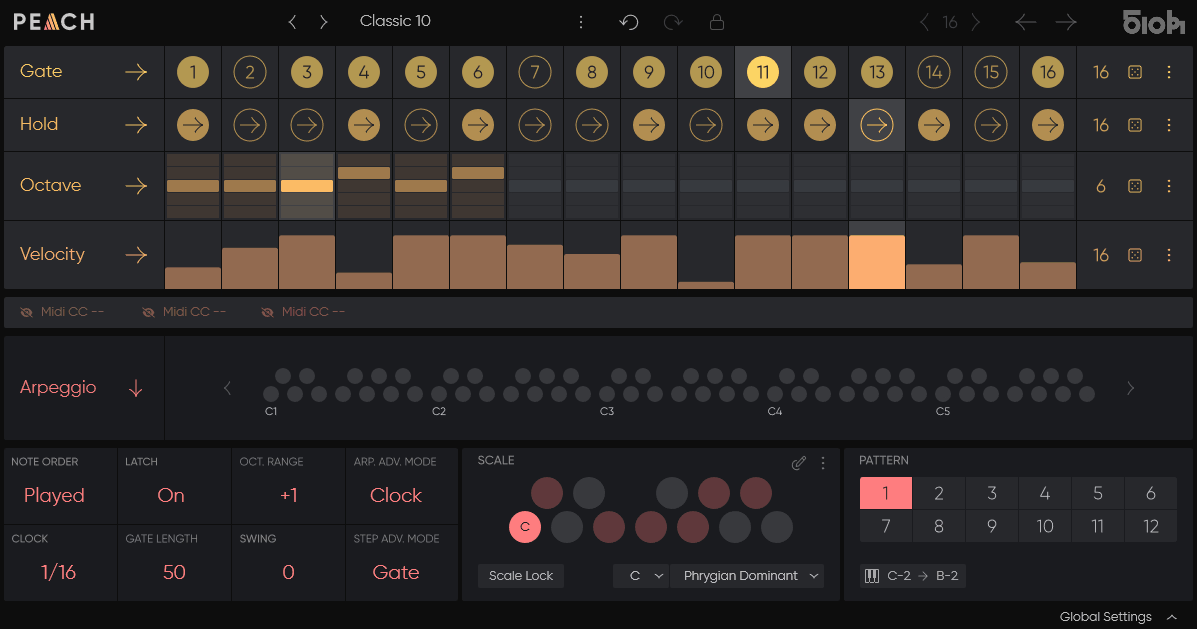
If SEQUND is about generating sequences from scratch, 510k PEACH is about taking the chords you’re already playing and turning them into something far more interesting than a standard arpeggiator would produce.
Built by the same team behind SEQUND, PEACH is a polymetric arpeggiator that breaks every convention of the tired up/down arp cycle. Hold a chord, and PEACH doesn’t just cycle through the notes. It evolves, shifts, and creates patterns that sound like a real musician interpreting your harmonies.
Traditional arpeggiators bore me. They’re predictable, repetitive, and after about four bars you’ve heard everything they’re going to do. PEACH solves this by applying the same independent lane length philosophy from SEQUND to arpeggiation.
Your Gate, Octave, Velocity, and Hold lanes each run at different step counts, which means the relationship between them constantly shifts, producing results that never quite repeat the same way twice.
- Polymetric lane structure that prevents repetitive cycling
Each lane in PEACH, whether it controls Gate, Hold, Octave, Velocity, or any of the three assignable MIDI CC lanes, can have its own independent step count.
Set Gate to 5 steps, Octave to 3, and Velocity to 7, and the resulting arp pattern won’t repeat its exact combination for dozens of bars. This is what separates PEACH from every built-in arpeggiator I’ve used in Logic or any other DAW. The patterns breathe and develop over time without any manual automation.
- Scale snapping with factory and custom scales
PEACH includes scale quantization that keeps your arpeggiated patterns locked to any factory or user-defined scale. This means you can hold any cluster of notes and the output will always be musically coherent. For production styles where harmonic safety matters, whether that’s scoring, ambient, or pop writing, this feature lets you experiment freely without worrying about wrong notes.
- Dice buttons with step locking for controlled randomization
The randomization tools in PEACH strike a smart balance between chaos and control. Dice buttons generate instant variations across any lane, but you can lock individual steps before rolling. This lets you preserve the parts of a pattern that work while shuffling everything else. I’ve found this especially useful when I’ve built something I mostly like but want the last few steps to surprise me.
- 12 switchable patterns with MIDI triggering
Just like SEQUND, PEACH stores up to 12 patterns per preset and lets you switch between them via MIDI notes. For live performance or arrangement building, this turns the arpeggiator from a static effect into a dynamic instrument you can play. You can set up dramatically different patterns for verse and chorus sections and switch between them seamlessly without any jarring transitions.
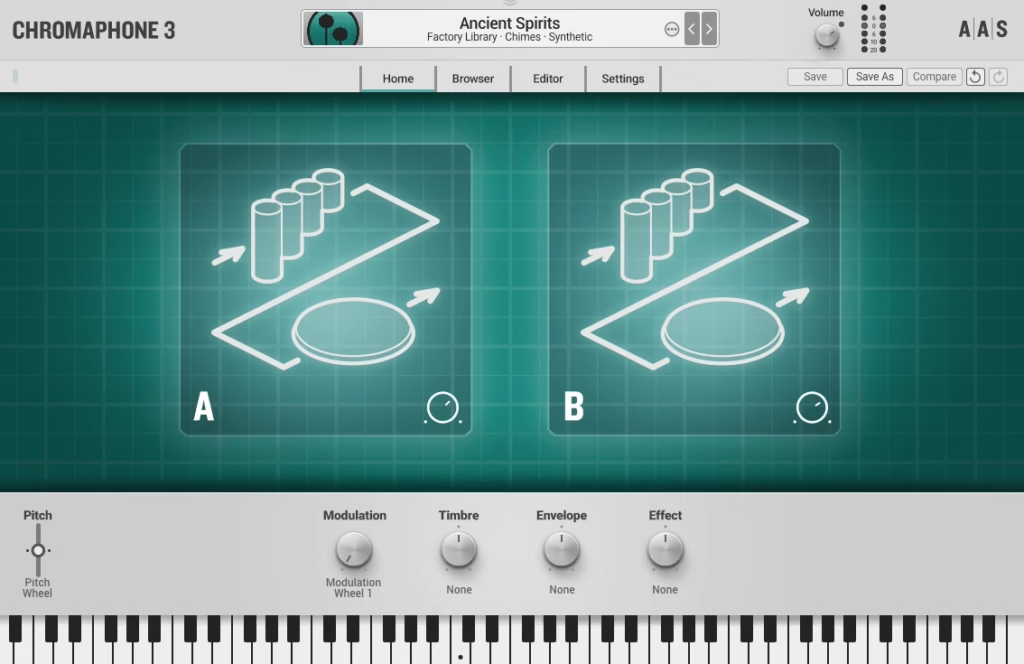
7. AAS Chromaphone 3 (physical modelling synth)
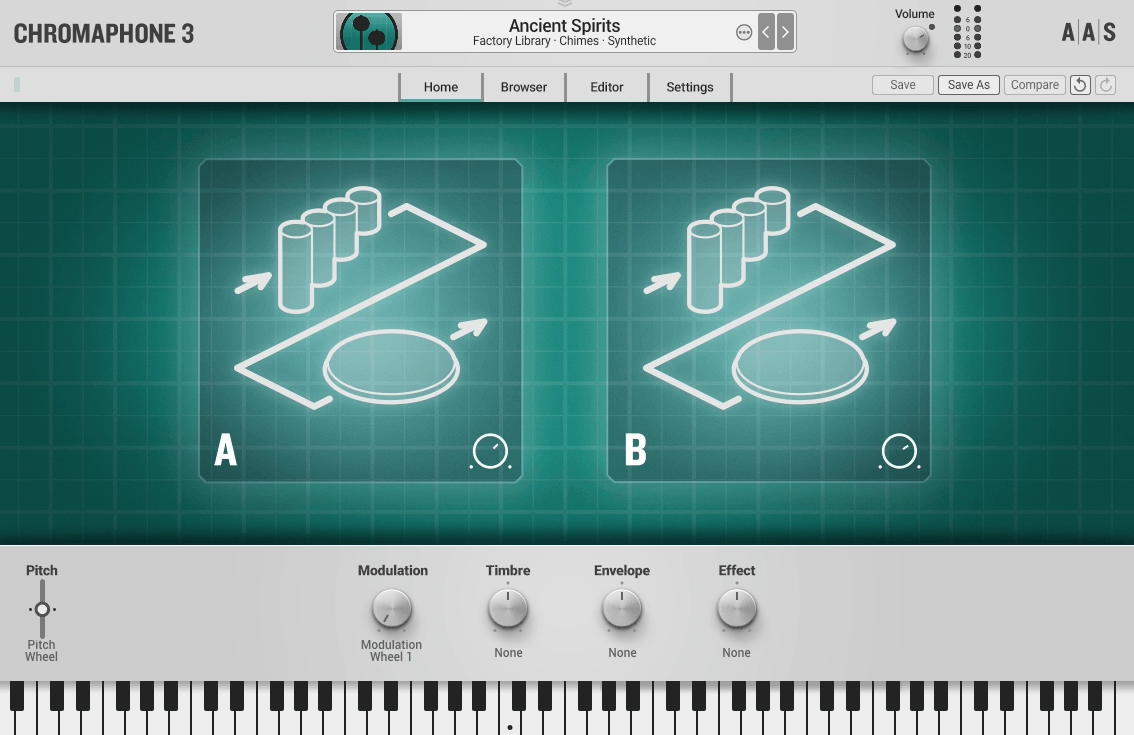
If every synth in your collection uses the same subtractive or wavetable architecture, your palette starts to sound familiar no matter how many presets you scroll through.
AAS Chromaphone 3 uses physical modeling synthesis to generate sound, which means it simulates the actual vibration of objects like strings, plates, membranes, tubes, and bars interacting with different types of mallets and exciters. The result is a sonic territory that neither sample libraries nor traditional synths can reach.
I started using Chromaphone specifically for drum sounds and percussion, but it’s become one of my go-to instruments for melodic content too.
The tones it produces have a natural resonance and decay that sample-based instruments can’t replicate because the physics are calculated in real time. Every velocity, every sustain length, every modulation wheel movement changes how the virtual object vibrates, and you hear it in the response.
- Dual-layer physical model with cross-coupling
Chromaphone’s architecture pairs two resonators that can be linked through acoustic coupling, meaning the vibration of one physically excites the other.
Set one layer to a metal plate and the other to a marimba bar, couple them together, and the interaction produces overtones and behaviors that neither model would create alone. This coupling is what gives Chromaphone its unique identity. No other synth I own can produce these kinds of sounds.
- Mallet and noise exciters with detailed control
The exciter section determines what strikes or activates each resonator. You can choose between mallet, noise, bow, and pluck types, each with independent controls for stiffness, brightness, color, and velocity response.
A hard mallet on a tubular resonator sounds completely different from a soft bow on the same tube, and the parameter space between those extremes is vast. I find myself designing sounds that sit somewhere between organic percussion and synthetic texture, which is exactly the territory that’s hard to reach with conventional instruments.
- Multi-effect rack with physical modeling reverb
Chromaphone’s built-in effects include a convolution reverb, but the standout is the physical modeling reverb that applies the same acoustic simulation principles to the spatial processing.
Reverb tails interact with the instrument’s resonance characteristics rather than just being layered on top. The result is a more cohesive sound where the space and the instrument feel like they belong together.
8. Devious Machines Infiltrator 2 (multi effect)

There are multi-effects plugins, and then there’s Devious Machines Infiltrator 2. I’ll be honest. I bought this on impulse after watching a single demo video, and it’s become one of the most creatively useful tools in my entire plugin folder. Infiltrator 2 chains up to 54 different effects modules in a sequential signal chain, and the way it handles morphing, sequencing, and modulation between states is unlike anything else I’ve encountered.
The plugin is designed for mangling, transforming, and reinventing audio in ways that would take a rack of effects and hours of automation to achieve manually. But it’s not just a chaos machine. You can be incredibly precise with it when you want to be, using it for subtle movement and texture on pads, or for rhythmic gating and stutter effects on drums. The range between gentle and extreme is wider than any other multi-effect I’ve used in Logic.
- Sequential multi-effect chain with up to 54 modules
Infiltrator 2 offers 54 effects that you arrange in a sequential chain where the output of each feeds into the next. Effects categories span distortion, filters, modulation, dynamics, pitch, reverb, delay, lo-fi, and more.
The signal passes through each module in order, and because you can stack multiples of the same type, you can create compound effects that don’t exist in any single plugin. I’ve built chains that use three different filters feeding into a granular delay and then through a bit crusher, and the result was a sound I’d never heard before.
- Multi-point morphing between effect states
You can save multiple snapshots of your entire effect chain and morph between them using the XY pad or automation. This isn’t just crossfading parameters. The morphing engine interpolates between states in a way that produces smooth, musical transitions. Automate the morph position over the length of a track, and your effects chain gradually evolves from one character to another. For sound design and production, this feature alone is worth the plugin.
- Beat-synced sequencer for rhythmic effect modulation
Infiltrator 2 includes a built-in step sequencer that can modulate any parameter to your DAW’s tempo. Set up a filter sweep that follows a 16-step pattern, a distortion amount that pulses on every beat, or a stutter effect that only engages on specific steps.
The sequencer turns static effects into rhythmic instruments, and combined with the morphing system, it can create evolving, tempo-locked textures that react to the music.
9. Sweetsonics Laser 2 (envelope/volume shaper)

If you’ve ever struggled to get a sound to cut through a mix, or felt like a drum hit was too soft in the attack but too long in the body, Sweetsonics Laser 2 is the plugin you need. It’s a transient and envelope shaper that gives you precise control over the attack, sustain, and release phases of any sound, and it does it with a level of transparency and precision that I haven’t found in Logic’s built-in tools.
I use Laser 2 on drums more than anything else, but it’s become indispensable on bass, guitars, and even vocals when I need to reshape the dynamic envelope without reaching for heavy compression. The visual feedback is clear, the controls are responsive, and the processing introduces zero coloration unless you specifically push it into saturation territory.
- Independent multi-band transient shaping
Laser 2 doesn’t just process the entire signal as one block. It offers multi-band processing that lets you shape the transient of the low, mid, and high frequency ranges independently
. Boost the attack on the beater of a kick drum while softening the high-frequency snap, or sharpen the pick attack on a bass guitar without affecting the low-end sustain. This kind of frequency-targeted envelope shaping is extraordinarily useful and something I previously needed multiple plugins to accomplish.
- Saturation and clipping options for tonal push
Beyond clean transient shaping, Laser 2 includes saturation and soft clipping options that add harmonic density when you push the processing hard. This means you can simultaneously reshape the envelope and add tonal weight in a single plugin instance. On drums, pushing the attack shaping into mild saturation produces a punchy, aggressive snap that compression alone can’t deliver.
- Visual envelope display with real-time waveform
The interface shows your audio waveform in real time alongside the envelope curve that Laser 2 is applying. You can see exactly what the plugin is doing to the attack and sustain phases of each hit, which makes dialing in the right settings significantly faster than working blind with just your ears. For someone like me who likes to understand what a plugin is doing to the signal, this visual clarity is invaluable.
10. Native Instruments Kontakt 8 (sampler / platform for libraries)
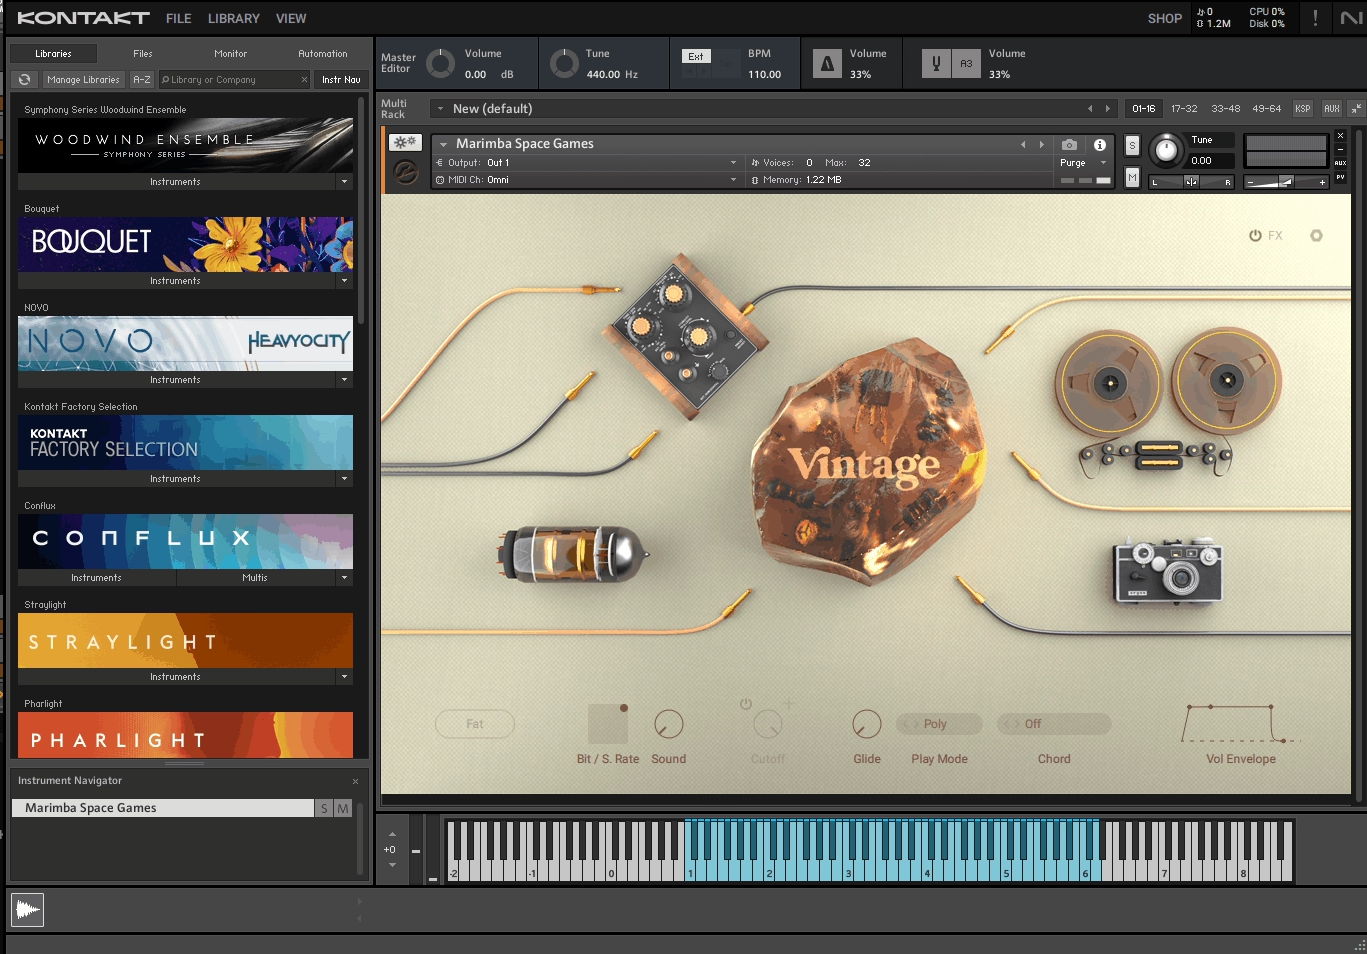
I resisted getting Kontakt for a long time because Logic’s EXS24/Sampler handles basic sampling duties well enough.
But the reality is that Kontakt has become the universal standard for third-party sample libraries, and at some point you realize that the entire world of orchestral instruments, ethnic percussion, cinematic textures, and boutique sound design runs on this platform. Skipping Kontakt means skipping access to thousands of professional libraries.
Kontakt Version 8 brings a significantly overhauled interface and new creative tools that make Kontakt more than just a library player. The addition of Conflux, a new instrument engine, and improved browser functionality mean I actually enjoy using Kontakt for sound design now, not just loading other people’s patches. If you’re serious about production in Logic, you’ll end up here eventually.
- Conflux engine for layered, evolving sound design
Conflux is Kontakt 8’s new creative instrument that layers and blends multiple sound sources with independent modulation routing. It’s not just a preset player.
You can drag in your own samples, combine them with Kontakt’s factory content, and build evolving textures using granular, wavetable, and sample-based synthesis modes simultaneously. For pad design, atmospheric textures, and cinematic scoring, Conflux gives you tools that compete with dedicated synth plugins.
- Universal third-party library compatibility
This is the practical reason most Logic users eventually get Kontakt. Developers like Spitfire Audio, Cinesamples, 8Dio, Output, Heavyocity, and hundreds of others build their instruments exclusively for Kontakt.
The free Kontakt Player handles many commercial libraries, but the full version unlocks access to the massive ecosystem of community-created and boutique instruments that would otherwise be inaccessible. If you ever want to use orchestral samples, world instruments, or specialized sound design libraries, Kontakt is the gateway.
- Improved browser with tag-based searching and favorites
Kontakt 8’s browser is dramatically better than previous versions. Tag-based searching lets you filter instruments by type, character, timbre, and source, and a favorites system keeps your most-used patches accessible.
For someone with a large Kontakt library, which you will accumulate faster than you expect, these improvements save real time that used to be spent scrolling through endless folder hierarchies.
11. Tracktion Novum (granular synth great for pads, atmos and drones)

Logic has plenty of options for leads, basses, and keys, but when I need to create drones, evolving pads, or atmospheric textures, most traditional synths feel like they’re working against me. Tracktion Novum was designed specifically for this territory.
It’s a granular resynthesis instrument that takes audio sources, breaks them into tiny grains, and rebuilds them into sounds that shift, morph, and evolve over time.
What makes Novum special compared to other granular synths is how musical it sounds by default. A lot of granular processing produces interesting textures that are difficult to actually use in a track.
Novum’s architecture, with its three-layer blending system and built-in harmonic controls, produces results that feel compositional rather than purely experimental. I’ve used it for film scoring, ambient production, and even as a textural layer underneath pop mixes, and it’s delivered every time.
- Three-layer granular engine with independent parameter control
Novum loads three audio sources simultaneously, each with its own grain size, position, density, pitch, and modulation settings.
You can blend between the layers using the central morph pad, and because each layer processes its source independently, the blended result can be extraordinarily complex. Load a piano recording in one layer, a field recording in another, and a vocal sample in the third, and Novum produces a shifting, living texture that contains elements of all three.
- Harmonic locking for pitched, playable results
Most granular processors give you interesting noise. Novum includes harmonic controls that lock the grain playback to specific pitch relationships, which means you can play the result chromatically on your keyboard and it actually sounds musical. For pads and drones that need to follow a chord progression, this feature turns what would be unpredictable texture into a playable instrument.
- Built-in modulation system with per-layer LFOs and envelopes
Each layer has its own LFO and envelope modulation routing, plus a global modulation matrix that can target virtually any parameter.
The modulation depth and speed of each layer can be completely independent, which means layer one might be slowly sweeping while layer three pulses rapidly. The result is sound that moves and breathes on multiple timescales simultaneously, which is exactly what you want from a pad and drone synthesizer.
12. Brainworx bx_masterdesk True Peak (mastering console)
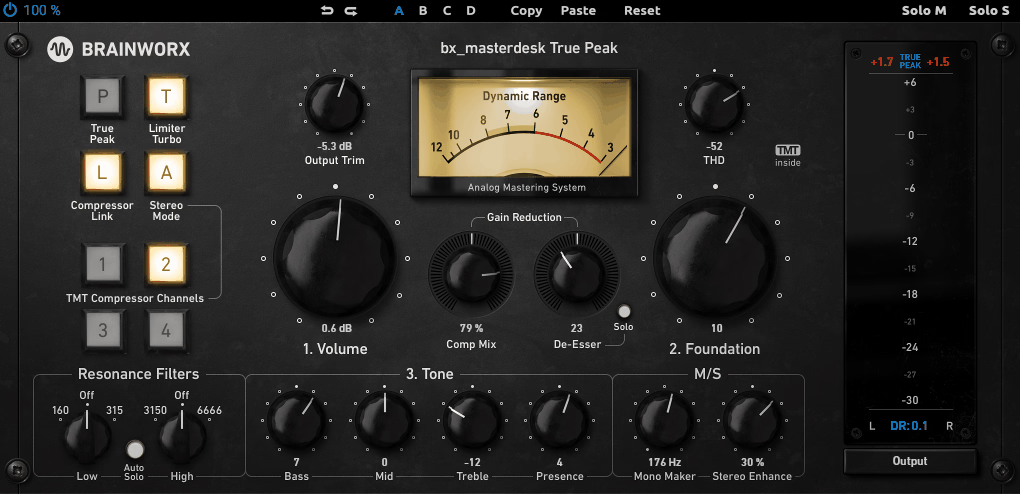
Logic’s Adaptive Limiter is decent, but when I need to master a track and deliver a finished, loudness-compliant file, I reach for Brainworx bx_masterdesk True Peak. It’s a complete mastering chain in a single plugin, designed by Dirk Ulrich, who spent over two decades in the mastering industry before building this tool.
The philosophy is that mastering shouldn’t require 15 plugins on your master bus if you know what you’re doing.
What I appreciate about bx_masterdesk True Peak is that it doesn’t dumb things down, but it does streamline them. Three core controls handle the bulk of the work: Volume, Foundation, and Tone.
Within a minute of loading it, you can have a master that sounds professional. But the plugin also opens up for deeper control when you need it, with compression, stereo enhancement, a de-esser, and a true peak limiter all accessible without cluttering the interface.
- True peak limiting with inter-sample peak detection
The limiter section is the real star here, and it’s been upgraded with the full feature set from Brainworx’s standalone bx_limiter True Peak plugin. Inter-sample peak detection catches the peaks that standard limiters miss, the ones that occur between samples and cause distortion on playback systems.
If you’re delivering masters for streaming platforms, this is essential. The limiter includes a modern/classic switch and variable release for different compression characters.
- Mono Maker for low-end stereo management
The Mono Maker collapses everything below a selectable frequency (20 to 300 Hz) to mono, which is critical for masters that need to translate well across playback systems. Stereo low-end information causes phase issues on mono systems and wastes headroom in your master.
I use this on every single master, and it consistently tightens up the bottom end in a way that’s immediately audible.
- TMT channels with 10 selectable analog tolerances
Tolerance Modeling Technology gives you 10 different virtual channels, each with slightly different analog component behavior modeled from real hardware tolerances. Audition them to find which one sits best with your material.
The sonic differences between channels are subtle but real, and they affect how the compression and saturation respond to your specific mix. It’s the kind of detail that separates this from a generic loudness maximizer.
- Metering suite with peak, RMS, dynamic range, and loudness display
The metering transplanted from bx_limiter True Peak shows input and output peak levels, RMS, gain reduction, dynamic range, and integrated loudness simultaneously.
For mastering in Logic, where the built-in metering is limited, having this level of visual feedback directly in your mastering plugin eliminates the need for a separate metering tool. You can see at a glance whether your master hits streaming platform targets without leaving the plugin window.
Hello, I’m Viliam, I started this audio plugin focused blog to keep you updated on the latest trends, news and everything plugin related. I’ll put the most emphasis on the topics covering best VST, AU and AAX plugins. If you find some great plugin suggestions for us to include on our site, feel free to let me know, so I can take a look!