Sidechain compression used to be all about making the bass quieter when the kick drum hits. That technique is still important, but now there are tools that go way beyond what sidechain compression originally did.
Now there are plugins like Xfer LFO Tool, which lets you draw curves to shape volume changes in time with your track. Others, like Sonnox Envolution, let you adjust the attack and sustain of a sound separately. There are also dedicated ducking tools like Devious Machines Duck that don’t use compressors at all.
Some plugins, like Polyverse Gatekeeper, combine several of these features into one tool. They blur the line between a mixing plugin and a creative sound design instrument.
This category has grown because volume automation is one of the most powerful tools in mixing, even if it’s not flashy. Adjusting volume at the right times can solve problems that EQ or compression can’t, like a synth pad covering up a vocal or a bass guitar getting lost between kick hits.
These plugins take the idea of moving a fader by hand and make it much more precise, fast, and consistent than you could do manually.
This list is organized into three main types: dedicated sidechain ducking tools that replace traditional sidechain compression, envelope shapers that let you adjust the attack and sustain of recorded sounds, and LFO-based volume modulators that add rhythmic movement to any signal.
Some plugins on this list focus on doing one thing really well, while others try to cover all three areas. Knowing what each plugin is best at will help you choose the right one and avoid buying something that does the same job as a tool you already have.
1. Sweetsonics Laser 2

Rather than improving on the compressor-based approach, Laser 2 abandons it entirely in favor of a ducking engine driven by customizable curves that respond to either an internal trigger or an external sidechain input. The result is a plugin where you draw the exact volume shape you want and the plugin executes it with sample-accurate timing, no threshold tweaking or ratio adjustments involved.
What separates this from the half-dozen other ducking plugins on the market is the attention Sweetsonics paid to the transition quality between ducked and non-ducked states. Cheap ducking tools produce clicks at the edges of their curves or introduce an audible pumping quality that sounds mechanical rather than musical.
Laser 2’s curves feel smooth in a way that’s immediately obvious when you A/B it against a basic volume shaper, and the difference becomes even more apparent at faster tempos where the transitions happen more frequently.
- Multi-Point Curve Editor with Tempo Sync and Trigger Modes
The central interface is a resizable curve editor where you place and drag nodes to define exactly how the volume drops and recovers over time. The grid snaps to beat divisions when tempo sync is engaged, but you can also draw freehand curves for shapes that don’t align to any rhythmic grid.
Each node supports adjustable tension controls that determine whether the transition between points is linear, logarithmic, or exponential, which gives you the ability to create curves that ease in gradually or snap down hard depending on what the mix needs.
The trigger system offers MIDI note input, audio sidechain detection, and a free-running internal clock that cycles the curve independently of any external signal. MIDI triggering is where most producers will spend their time, because it means you can program your duck pattern on a MIDI track and edit it alongside your arrangement rather than relying on the audio output of a kick drum to drive the effect.
The audio sidechain mode includes an adjustable threshold and hysteresis control that prevents false triggers from ghost notes or bleed, which solves one of the most persistent annoyances of traditional sidechain compression setups.
- Lookahead and Latency Compensation for Transparent Ducking
Laser 2 includes a lookahead function that lets the plugin begin attenuating the signal slightly before the trigger event actually arrives, which eliminates the brief moment of overlap where the kick and bass collide before the duck engages.
This is something that compressor-based sidechaining fundamentally cannot do because compressors react to signal that has already passed through them. The lookahead introduces a small amount of latency that your DAW compensates for automatically, so the timing stays aligned even though the plugin is technically responding to events before they happen.
The plugin reports its latency to the host DAW for automatic delay compensation, and the total processing delay stays low enough that real-time monitoring remains practical during tracking and mixing.
2. Devious Machines Duck
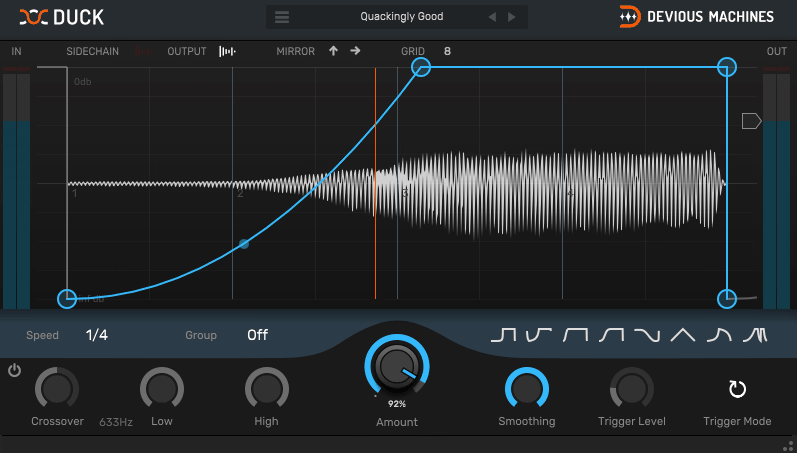
If you’ve ever wished you could just type in how many dB of sidechain ducking you want and have the plugin handle everything else, Duck is built for you. Devious Machines designed this specifically for producers who are tired of routing buses, configuring compressor sidechains, and fighting with threshold settings just to get a bass to pump with the kick.
The entire plugin can be set up and producing results in under ten seconds, which is not marketing hyperbole but a genuine reflection of how little stands between you and a working duck.
The design philosophy is maximum result with minimum friction, and it shows in every aspect of the interface. There are no hidden menus, no secondary pages, no modulation matrices to configure. You see the curve, you shape it, you hear the result.
At $39, it’s priced to be an impulse purchase, and it has quietly become one of the most popular sidechain tools in electronic music production because it removes every excuse for not sidechaining properly.
- Sidechain-Free Operation with MIDI and Internal Triggering
Duck’s biggest selling point for many producers is that it requires no audio sidechain routing whatsoever. You can trigger the ducking envelope from a MIDI input, from the plugin’s own internal detection, or set it to run freely in sync with your DAW’s tempo.
This eliminates the entire bus-routing workflow that makes traditional sidechain compression tedious, especially in DAWs where setting up sidechain paths requires multiple steps across different windows.
The MIDI trigger mode accepts input from any MIDI track in your session, so you can draw in your duck pattern with MIDI notes and see it reflected instantly in the plugin’s curve display. The internal trigger mode uses the plugin’s own input signal to detect transients and fire the envelope, which works well when you want a channel to duck itself on its own transients rather than responding to an external source.
Both modes support adjustable hold and release shapes that determine how the signal recovers after each duck event, giving you precise control over whether the recovery is sudden and rhythmic or gradual and smooth.
- Visual Waveform Overlay and Multiple Curve Shapes
The interface displays your audio waveform underneath the ducking curve in real time, so you can see exactly where the attenuation is happening relative to the transients and rhythmic content of your signal. This visual feedback makes dialing in the timing dramatically faster than working blind with a compressor, because you can see immediately if the duck is firing too early, too late, or recovering at the wrong moment.
Duck provides several preset curve shapes including smooth sine-like dips, sharp V-shaped cuts, and asymmetric curves with fast attacks and slow releases. Each shape can be further adjusted with attack, hold, and release controls that modify the base curve to your specifications.
The depth control sets the maximum attenuation in decibels, and the entire effect can be mixed in parallel using the wet/dry knob for subtler applications. The plugin runs in VST, VST3, AU, and AAX formats on both Windows and macOS.
3. Sonnox Oxford Envolution
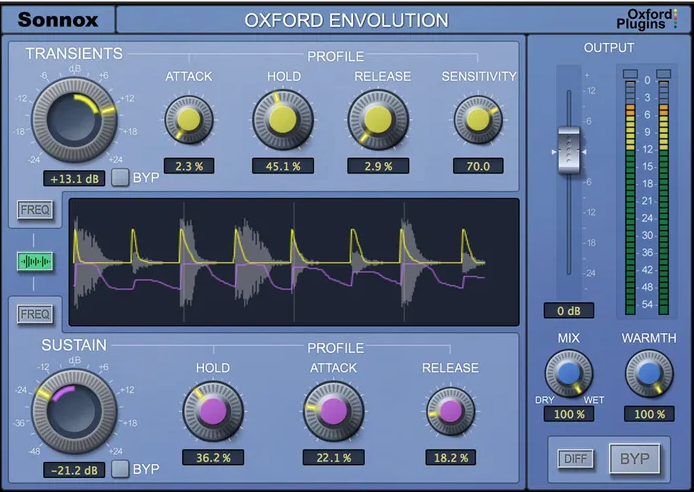
Sonnox took a fundamentally different approach with Envolution by asking a question that most dynamics plugins don’t bother with: what if you could boost or cut the attack and sustain of a sound independently, without any sidechain signal, threshold, or ratio?
The result is a transient shaper that operates more like a frequency-independent envelope EQ than a traditional dynamics processor. You push the attack slider up, the transients get louder. Pull the sustain slider down, the ring and decay disappear. No setup, no calibration, no interaction between the two controls unless you want it.
Sonnox has a long history of making plugins that recording engineers actually rely on in professional sessions, and Envolution reflects that pedigree in its reliability and transparency.
The processing is clean enough to use on a vocal without introducing artifacts, yet powerful enough to completely reshape a drum room mic from washy ambience into tight, punchy close-mic character. The price sits around $147 for the native version, which is steep for a transient shaper, but the Sonnox name carries weight in professional circles for a reason.
- Frequency-Focused Transient and Sustain Control
What makes Envolution genuinely different from cheaper transient shapers is the Frequency Focus section that lets you target the attack and sustain processing to specific frequency bands. Most transient shapers treat the entire signal as one block, so boosting the attack of a snare also boosts the attack of whatever bleed is present in the same channel.
Envolution’s focus controls let you isolate the transient processing to the frequency range where the actual snare hit lives while leaving the hi-hat bleed and room tone untouched.
The Atk Focus and Sus Focus parameters each have their own frequency and bandwidth controls, so you can set the attack enhancement to target the 2-5kHz crack of the snare stick while the sustain reduction focuses on the 200-400Hz ring of the shell.
This dual-band focus system turns Envolution into something closer to a dynamic EQ that responds to envelope characteristics rather than amplitude thresholds. I found it particularly effective on toms, where you often want to emphasize the beater attack in the upper mids while taming the low-frequency ring without killing the fundamental tone.
- Warmth Control and Transient-Sensitive Saturation
Below the main attack and sustain controls sits a Warmth parameter that adds harmonic saturation scaled to the transient content of the signal. Unlike a static saturation plugin that processes everything equally, Warmth responds more aggressively to the peaks and transients while leaving quieter sustain portions relatively clean. This means you can add density and harmonic richness to drum hits without the sustain and reverb tails becoming distorted or muddy.
At moderate settings, the Warmth control gives drums a thicker, more analog quality that pairs naturally with the transient enhancement. Pushed harder, it moves into obvious distortion territory that can work as a creative effect on room mics and overhead channels.
The combination of envelope shaping and transient-aware saturation in a single plugin makes Envolution useful in situations where you’d otherwise need to chain a transient shaper with a separate saturation plugin and spend time balancing the interaction between them.
Envolution is available as VST, VST3, AU, and AAX in both native and Sonnox’s HDX format for Pro Tools systems.
4. FabFilter Pro-C 3
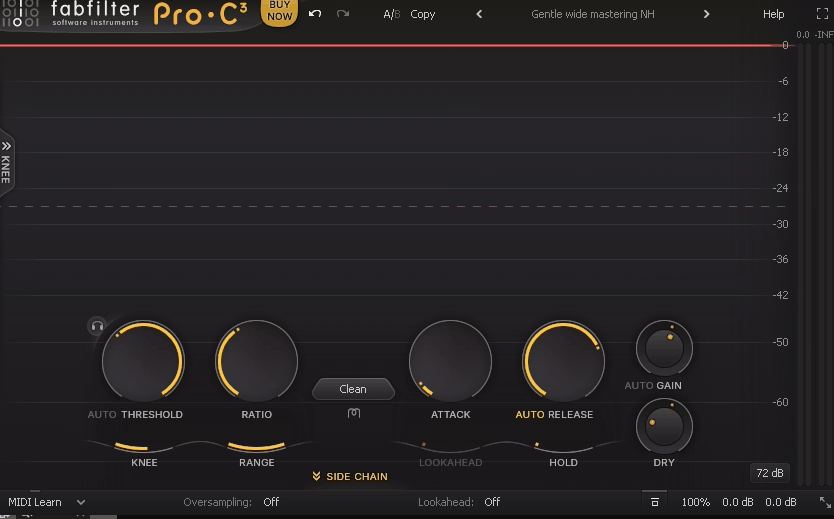
Calling Pro-C 3 a sidechain plugin undersells it dramatically, but the sidechain capabilities it contains are so refined that it deserves a spot on this list regardless. FabFilter’s third generation compressor is a full dynamics processor with eight compression styles, an incredibly detailed visual feedback system, and a sidechain implementation so flexible that many producers use it exclusively as a sidechaining tool rather than as a conventional compressor. The plugin represents years of iterative refinement from a company that treats interface design with the same seriousness as DSP engineering.
The v3 update introduced several features that specifically improve sidechain workflows, including a redesigned sidechain section with more filter options, improved metering, and per-band external sidechain in the multiband modes.
For producers who need both a world-class compressor and a precise sidechain tool, Pro-C 3 eliminates the need to own separate plugins for each task. At €199, it’s not cheap, but few plugins at any price offer this combination of transparency, flexibility, and visual feedback.
- Eight Compression Algorithms with Distinct Sidechain Behavior
Each of Pro-C 3’s eight styles, Clean, Classic, Opto, Vocal, Mastering, Bus, Punch, and Pumping, responds differently to sidechain input because the underlying detection and gain reduction circuits are modeled on different hardware philosophies.
Pumping mode is purpose-built for the aggressive ducking effect that electronic producers want from sidechain compression, with a fast attack and a release curve specifically shaped to create that rhythmic breathing movement.
Clean mode, by contrast, offers the most transparent ducking with minimal coloration, which makes it better suited for film scoring and acoustic genres where you don’t want the compression to be audible.
The ability to switch between these algorithms while keeping the same sidechain routing means you can audition dramatically different compression characters without reconfiguring anything. This is something I don’t see discussed enough about Pro-C 3: the sidechain section stays consistent across all eight modes, so the only variable when switching styles is the sound of the gain reduction itself.
- Advanced Sidechain Filtering and External Input Routing
The sidechain section includes a fully parametric filter that lets you shape exactly which frequencies from the sidechain source trigger the compression. You can high-pass the sidechain input so only the beater click of a kick triggers the duck rather than the sub-bass body, or notch out a specific frequency to prevent a particular element from causing unwanted gain reduction.
The filter display shows the frequency content of the sidechain signal in real time, which makes surgical sidechain filtering intuitive rather than guesswork.
Pro-C 3 supports external sidechain input from any bus in your DAW, internal self-sidechaining, and mid/side sidechain configurations where the compression responds to only the mid or side content of a stereo signal.
The sidechain gain control adjusts the level hitting the detector independently of the audio path, giving you another dimension of control over how aggressively the compressor responds.
Combined with FabFilter’s trademark real-time gain reduction visualization that shows exactly what the compressor is doing at every moment, the sidechain implementation in Pro-C 3 is as transparent and controllable as anything available. The plugin runs as VST, VST3, AU, AAX, and CLAP on macOS and Windows.
5. Xfer LFO Tool
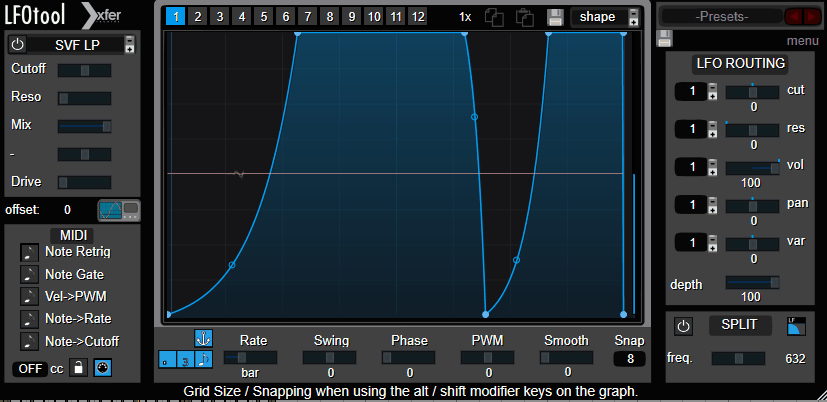
LFO Tool has been a staple of electronic music production since Xfer Records released it, and its longevity says everything about how well the core concept works. The idea is disarmingly simple: draw a custom LFO shape and use it to modulate volume, filter cutoff, or panning in sync with your DAW’s tempo.
That’s it. There’s no compression involved, no threshold detection, no envelope following. You draw the shape, the plugin repeats it, and your audio moves accordingly.
The reason producers keep reaching for LFO Tool instead of newer alternatives is partly habit but mostly because it does this one job with zero friction and near-zero CPU usage.
You can have dozens of instances running across a session without any performance impact, which matters when you’re using it on every bass, pad, and synth channel to create rhythmic movement. Steve Duda designed it to be the kind of utility plugin you never think about because it just works every single time.
- Custom LFO Shape Editor with Point-Based Drawing
The shape editor lets you create LFO curves with up to 128 individually draggable nodes positioned on a tempo-synced grid. Each node has an adjustable curve tension that controls whether the line between it and the next point bends smoothly or angles sharply.
The grid divisions cover everything from 1/128 note to 8 bars, and shapes can be drawn in triplet and dotted note resolutions as well. A handful of preset shapes including sine, saw, square, and triangle are available as starting points, but the real power is in drawing your own.
Shapes can be copied, pasted, mirrored, and inverted within the editor, and the plugin stores shapes as small preset files that can be shared between sessions or with other producers. I’ve accumulated a library of custom LFO shapes over the years that I reuse constantly, and the ability to load them instantly across different projects is a workflow advantage that compounds over time.
The editor also supports MIDI note-on triggering so the LFO shape restarts from its beginning every time a MIDI note is received, which is essential for bass patches where the volume movement needs to reset with each new note.
- Three Independent Modulation Targets
LFO Tool can simultaneously modulate volume, filter cutoff, and stereo panning, each with its own amount control and its own LFO shape if you want them running different patterns. The filter is a resonant low-pass type with adjustable cutoff and resonance, and it can create the classic rhythmic filter sweep effect that’s ubiquitous in electronic music.
The panning modulation moves the signal left and right according to the drawn shape, which is useful for creating auto-pan effects that stay locked to tempo.
Most producers use the volume modulation almost exclusively, treating LFO Tool as a precision sidechain replacement. But the filter and pan targets shouldn’t be overlooked, because combining all three simultaneously can create complex rhythmic textures from a single static sound source.
A sustained pad with volume ducking, filter movement, and subtle panning modulation applied simultaneously sounds dramatically more alive than the same pad with only volume ducking. LFO Tool supports VST, VST3, and AU on macOS and Windows.
6. Caelum Audio Flux Mini 2 (Free)
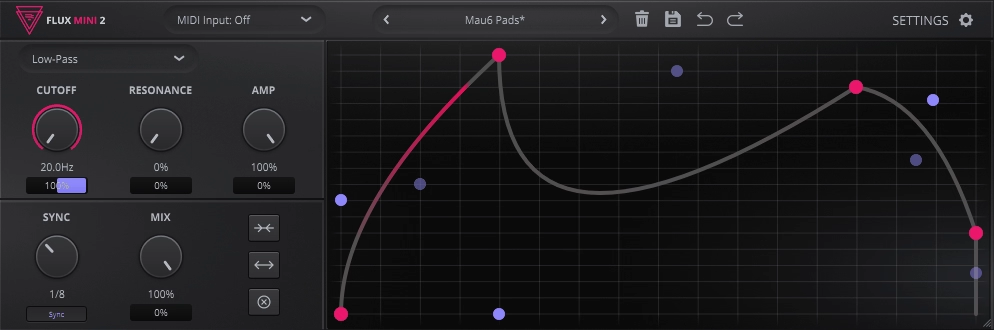
Caelum Audio offers Flux Mini 2 at no cost as an entry point to their paid Flux 2 plugin, and while the limitations are real, the core functionality covers what most producers need from a simple LFO-based volume modulator.
The interface is clean, the CPU usage is low, and the learning curve is essentially flat.
It’s worth setting expectations: this is a trimmed-down version of a paid product, and it feels like one in certain areas. You’re getting a functional tool, not a competitive alternative to the dedicated options elsewhere on this list. For quick sidechain-style ducking on a budget, it handles the basics. For anything more involved, you’ll hit the walls fairly quickly.
- Single-Band LFO Volume Modulation with Preset Shapes
Flux Mini 2 provides a curve editor where you select from a set of built-in waveform shapes and adjust the depth and rate of the modulation. The shapes cover standard sine, triangle, and square waves along with some sidechain-oriented duck curves that are more immediately useful for typical production scenarios. The rate can be synced to host tempo with standard beat divisions, or run freely at a manually set speed.
The modulation depth is controlled by a single amount parameter, and the overall output level can be adjusted to compensate for any perceived volume change caused by the ducking. It functions well as a quick way to add pumping movement to pads and synths without configuring sidechain routing, which is genuinely useful for producers working in DAWs where sidechain setup is cumbersome. Flux Mini 2 is available in VST, VST3, AU, AAX, and CLAP formats on macOS, Windows, and Linux.
- MIDI Trigger and Basic Envelope Control
The plugin accepts MIDI input to trigger the modulation envelope, so you can fire the duck pattern from a MIDI track rather than relying solely on the free-running LFO. This is the feature that makes Flux Mini 2 actually practical for sidechain replacement, because a free-running LFO will inevitably drift out of alignment with your kick pattern if the arrangement includes any variations or fills.
Attack and release parameters let you adjust the shape of the triggered envelope beyond what the preset curves offer, though the range of adjustment is limited compared to what you’d get in the full Flux 2 or in paid alternatives like LFO Tool. For producers just starting out who want to understand how volume shaping works before investing in a more capable tool, Flux Mini 2 serves that purpose adequately.
7. Polyverse Gatekeeper
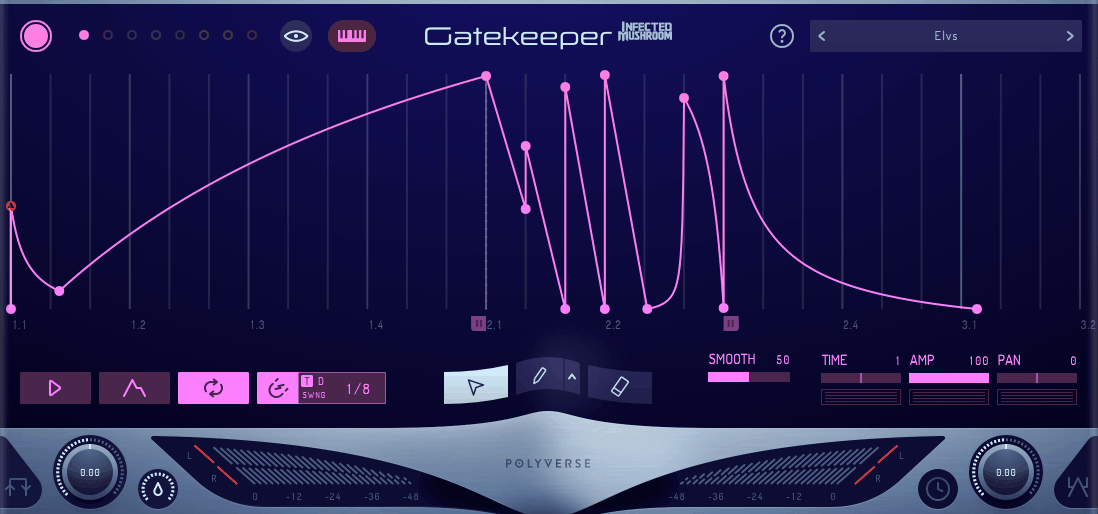
Polyverse collaborated with electronic musician Infected Mushroom to build Gatekeeper, and the result is a volume modulation plugin that’s aimed squarely at producers who want rhythmic gating and ducking effects that go far beyond simple pump-and-release shapes.
The plugin treats volume automation as a creative instrument rather than a mixing utility, and its feature set reflects that orientation with multi-point envelope drawing, step sequencer modes, and modulation capabilities that approach what you’d expect from a synthesizer.
The visual design is bold and immediately communicates that this isn’t another minimal utility plugin. The waveform display is large, the controls are spread across a spacious interface, and everything is oriented toward experimentation and performance rather than clinical precision.
At around $49, it sits in the mid-range for this category, and the depth of its feature set justifies the price for producers who want more creative possibilities than a standard volume shaper offers.
- Advanced Envelope Editor with Step Sequencer Integration
Gatekeeper’s envelope editor supports complex multi-point shapes with per-segment curve types including linear, exponential, logarithmic, and S-curve transitions. You can draw intricate rhythmic patterns that would be impossible to achieve with simple attack/hold/release controls, and the grid snaps to a wide range of tempo-synced divisions for precise rhythmic alignment.
The step sequencer mode layers on top of the envelope system, letting you program amplitude patterns in discrete steps that the plugin interpolates between according to your chosen curve settings.
This hybrid approach means you can start with a step-based pattern for the basic rhythm and then refine the transitions between steps with the envelope editor for smoother or more aggressive shapes. MIDI triggering lets you restart the envelope on every note, which is critical for bass sounds and leads where the volume shape needs to align with the musical phrase rather than cycling independently.
- Sidechain Input with Envelope Follower
Beyond the drawn envelopes and step sequences, Gatekeeper includes an envelope follower that can extract the amplitude shape from an external sidechain input and use it to control the volume modulation.
This means you can feed a kick drum into the sidechain and have Gatekeeper generate a ducking curve that follows the exact dynamics of each individual kick hit, including velocity variations and timing fluctuations that a static LFO curve would miss.
The envelope follower includes attack and release controls that determine how closely the generated curve tracks the incoming signal, from tight and aggressive following to loose and smoothed responses.
The followed envelope can be inverted so that the volume rises when the sidechain signal is present rather than dipping, which opens up interesting expansion effects where quiet sounds get louder in response to transients on another channel. Gatekeeper supports VST, VST3, AU, and AAX on macOS and Windows with a fully resizable interface.
8. Slate Digital Submerge
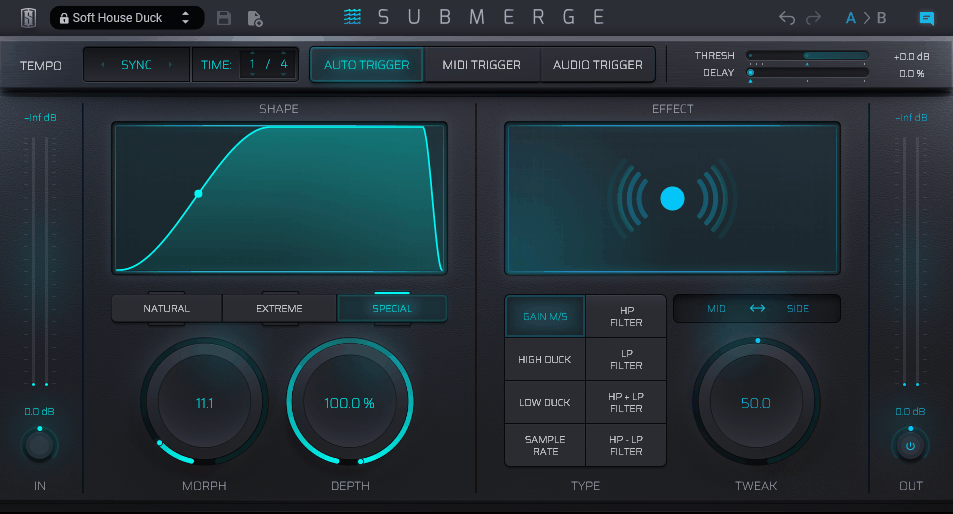
Rather than being a general-purpose sidechain or volume shaper, Slate Submerge combines low-pass filtering with volume attenuation to produce that specific drowning sensation in a single plugin.
The approach is deliberately narrow, and Slate Digital didn’t try to disguise that fact. There’s no envelope editor, no step sequencer, no multi-target modulation system. Submerge does one thing, and the entire interface is organized around making that one thing happen as fast as possible.
Whether that focus is a strength or a limitation depends entirely on how often you need this specific effect in your productions.
- Combined Filter and Volume Ducking with Single-Knob Control
The primary control is a large Depth knob that simultaneously drives the low-pass filter cutoff downward and reduces the output volume as you turn it up. At zero, the signal passes through untouched. At maximum, the audio is heavily filtered and attenuated, producing the fully submerged effect.
The relationship between the filter movement and the volume reduction has been calibrated so that the two effects track together naturally, avoiding the common problem where DIY versions of this effect using separate filter and gain plugins end up with mismatched curves that sound disjointed.
A tone control adjusts the character of the filtering, letting you shift between darker, more muffled results and slightly brighter, more present filtered tones.
The plugin also includes a mix knob for blending the submerged signal with the dry original, which is useful for partial submersion effects where you want the muffled quality without completely losing the clarity of the source.
- Automation-Optimized Design for Arrangement-Based Use
Submerge is built to be automated. The Depth parameter responds smoothly to DAW automation curves without stepping, clicking, or zipper noise, which matters because the whole point of this effect is sweeping between full clarity and complete submersion over the course of an arrangement. You can draw automation that gradually pulls the mix underwater during a pre-chorus and releases it at the downbeat, and the transition will sound seamless regardless of how quickly the parameter changes.
The plugin’s minimal control set means there’s nothing to accidentally bump or misconfigure when you’re automating in a live session or building arrangement transitions under time pressure. Every parameter is exposed for automation, and the plugin integrates with the Slate Digital All Access Pass subscription alongside their full catalog of mixing and mastering tools. Submerge runs as VST, VST3, AU, and AAX on macOS and Windows.
9. PluginBoutique ShapeMod
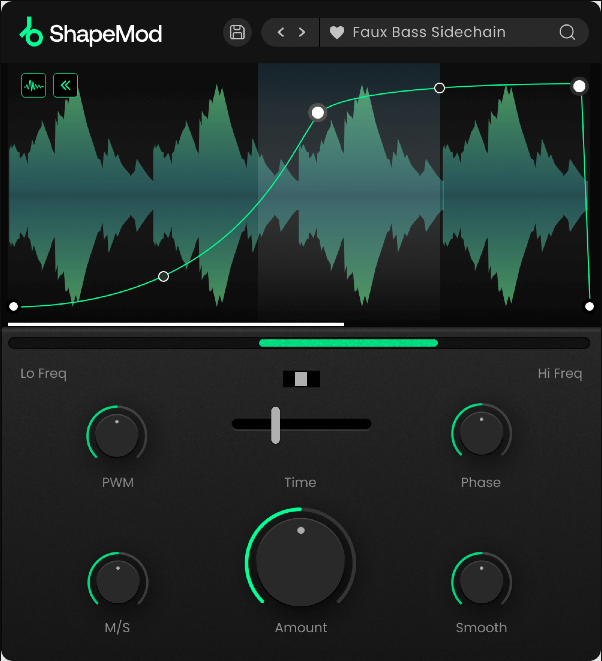
What makes ShapeMod worth considering alongside the more established names on this list is its combination of breadth and price. At roughly $30, you’re getting multi-lane modulation, MIDI triggering, tempo sync, and multiple target parameters at a cost that undercuts most competitors significantly.
The interface won’t win design awards, but the feature set is genuinely competitive, and producers who need one plugin that handles volume ducking, filter modulation, and rhythmic panning without buying three separate tools will find real value here.
- Four Modulation Lanes with Independent Shape Editors
Each of ShapeMod’s four lanes contains its own curve editor with draggable breakpoints and adjustable curve tension between nodes. The lanes can target volume, filter cutoff, resonance, panning, and combinations thereof, and each lane runs at its own rate and grid division. This means you can have a volume duck running at quarter notes, a filter sweep at eighth notes, a panning movement at half notes, and a resonance modulation at dotted quarters, all simultaneously from a single plugin instance.
The shapes can be drawn freehand or selected from a library of preset waveforms that cover standard LFO shapes alongside production-oriented patterns designed for sidechain ducking, trance gates, and rhythmic filter effects. Each lane has its own depth and offset controls that determine the range and center point of the modulation, and the lanes can be linked or unlinked depending on whether you want them to share timing or run independently.
- Flexible Triggering with Retrigger and Phase Control
ShapeMod supports free-running tempo-synced operation, MIDI note triggering, and audio input triggering across all four lanes. When MIDI triggering is active, each note-on message restarts the modulation shape from the beginning, which ensures the volume movement aligns with your musical phrasing rather than cycling freely.
The phase control lets you offset the starting position of each lane’s shape, which is useful for creating staggered modulation effects where different parameters begin their movement at different points in the cycle.
The retrigger behavior can be configured to either hard-reset the shape position on each trigger or smoothly transition to the beginning of the curve, preventing clicks that can occur when a shape jumps instantaneously from one position to another.
An output gain stage compensates for level changes introduced by the modulation, and the plugin includes a preset manager with factory presets organized by effect type. ShapeMod runs in VST, VST3, AU, and AAX formats on both macOS and Windows.
Hello, I’m Viliam, I started this audio plugin focused blog to keep you updated on the latest trends, news and everything plugin related. I’ll put the most emphasis on the topics covering best VST, AU and AAX plugins. If you find some great plugin suggestions for us to include on our site, feel free to let me know, so I can take a look!