If you’ve ever stacked a bunch of plugins just to fix the low end or add some life to a dull mix, you’re not alone. Enhancement plugins are designed to make this process easier, and there are some great choices for bass, saturation, stereo width, and drum tuning.
In this roundup, I’ll cover a few tools I think are worth checking out, like Wavesfactory Spectre for precise per-band saturation, Denise Audio Bass XXL for clever low-end tricks, Waves Torque for changing drum tone without messing up transients, and ADPTR Audio HYPE for practical multiband processing. There are a few others here too, each offering a unique approach to enhancement in mixing.
I’ll explain what each plugin does, why it’s useful, and where it works best, so you can decide which ones will actually help with the problems you face in your sessions.
1. Brainworx bx_enhancer (All Round 1)
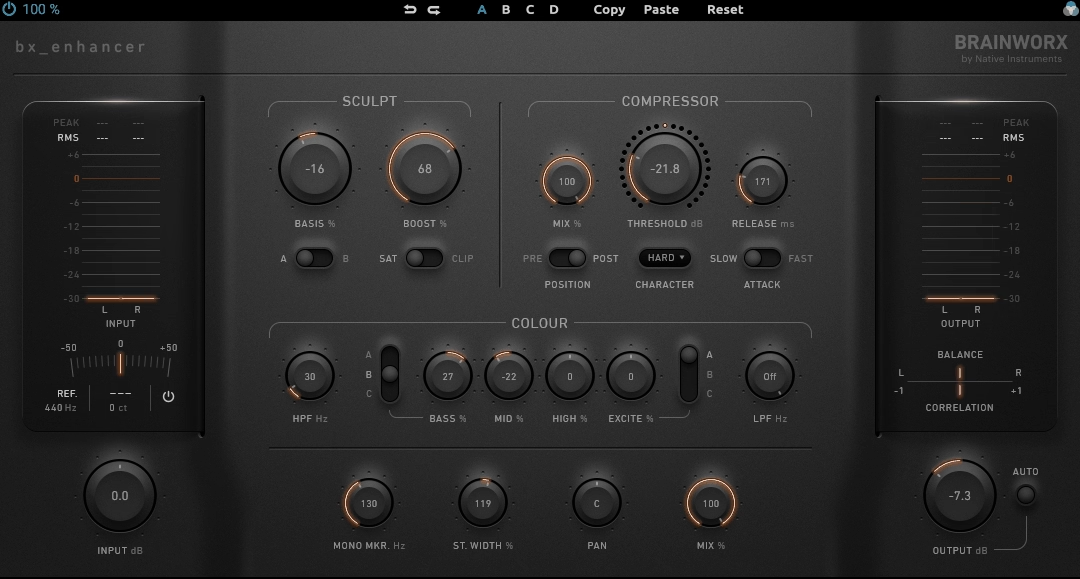
Brainworx really made something useful with the bx_enhancer. This channel strip plugin combines a saturator, compressor, EQ, and clipper in one window, so you don’t have to load four separate plugins on every track. It works well on almost anything—vocals, guitars, drum buses, or synths—and adds a nice analog warmth without much effort.
The best part is how easy it is to use. Just load it up, adjust your tone, add some compression, and you’re good to go. It’s a solid pick for producers who want simple, all-in-one processing without any hassle.
What it offers:
- Sculpt Section with Saturator and Clipper
There are two types of harmonic enhancement you can choose with the A/B switch. Position A gives you smooth, mixer-style saturation for warmth, while position B turns on a clipper for a more aggressive sound.
The Basis knob works as either a tilt filter or a mid-range boost or cut, depending on how you set it. This lets you shape the tone before adding saturation, which is a smart way to control how the effect hits your sound.
- VCA Compressor with Flexible Routing
The compressor has Threshold, Release, and a three-way Character selector to control how strong the analog-style compression is. You can switch between fast and moderate attack modes, like on classic or modern consoles. There’s also a Pre/Post switch, so you can put the compressor before or after the tone shaping, giving you real control over how it works with your EQ and saturation.
- Colour EQ with Excite Control
The EQ section has adjustable high-pass and low-pass filters, along with fixed-frequency gain knobs for bass, mids, and highs. The Excite control is especially useful—it cuts the 1 to 5 kHz range while boosting 10 to 20 kHz, so you can quickly add air and presence without making things harsh.
Both the Bass and Excite controls have three contour curves to choose from, so you can adjust how the boosts and cuts work for different sounds.
- Mono Maker for Low-End Tightness
This feature sums everything below a set frequency (up to 1,500 Hz) into mono, which tightens up the low end and reduces phase problems that can make things sound muddy. It’s especially useful on stereo buses and group tracks when you want the bass to stay focused and sound good on any system.
- Stereo Width, Pan, and Mix Controls
When you use it on a stereo track, you get knobs to widen or narrow the stereo image, a Pan control, and a Mix knob to blend the processed and dry signals for parallel processing.
- Built-In Tuner Display
2. Slate Digital Infinity Bass (for Bass)
Low-end processing can get complicated fast when you start stacking up sub generators, exciters, and EQ moves trying to get your bass to sit right. Sometimes you just want one plugin that gives you a few clear options without turning into a whole engineering project.
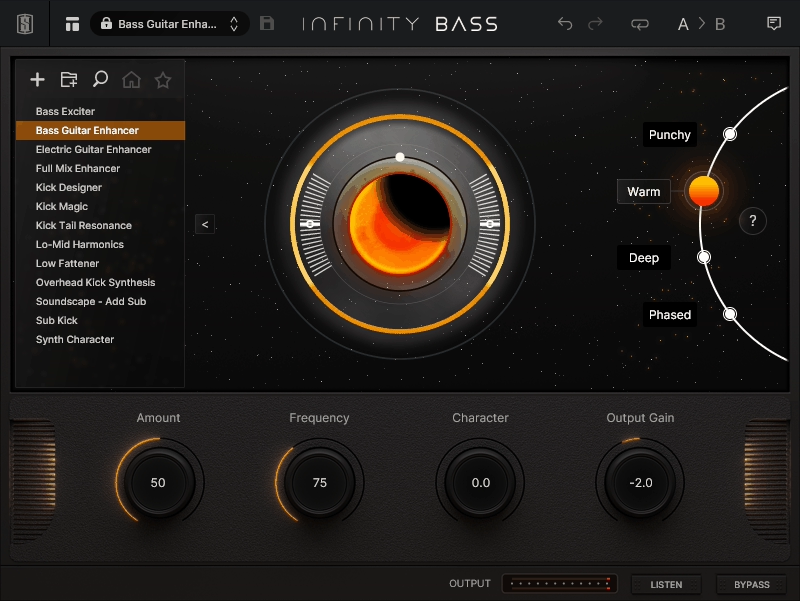
Slate Digital Infinity Bass keeps things surprisingly focused by giving you four distinct processing modes that each tackle the low end from a completely different angle, and I found that switching between them on different sources was where the plugin really showed its range.
The interface is visually engaging too, with a reactive visualizer in the center that responds to every adjustment you make, so you’re always getting real-time feedback on what’s happening to your signal. It’s the kind of plugin where you can throw it on a kick, a bass DI, a synth stack, or even a full mix and get usable results quickly without a lot of menu diving.
- Four Processing Modes for Different Low-End Needs
This is really the heart of what makes Infinity Bass worth your time, because each mode is built around a fundamentally different processing engine rather than just being variations of the same algorithm.
Punchy works as a bass exciter that adds transient presence and harmonic energy, making it a great fit for kicks and bass lines that need to cut through without just getting louder. Warm is a dual-band subharmonic synthesizer that splits your signal into two bands and generates sub content from each one independently, creating an octaver-style effect that adds real dimension to monophonic material like bass DIs or synths.
Deep gives you a clean sub-bass generator with dynamics control, so you can actually shape the decay and envelope of the generated sub rather than just stacking on low-end weight indiscriminately. Lastly, Phased uses a bass-focused all-pass filter to revitalize weak transients and add resonance in the low frequencies, which I found works particularly well for subtle mastering touches where you don’t want the enhancement to be obvious.
- Character Control for Tonal Shaping
I want to call attention to this knob specifically because it does something different depending on which mode you’re in, which is a clever design choice. In Punchy mode, the Character control blends additional saturation into the enhanced signal so the bass sticks out more in a dense mix.
In Warm and Deep modes, it shifts toward affecting the decay and dynamics of the generated subharmonics, giving you control over how long the sub content rings out and how tightly it follows your source.
I found that even small adjustments here change the feel of the low end pretty dramatically, and it’s the kind of parameter where trusting your ears really pays off because the visual feedback alone doesn’t tell the whole story.
- Frequency Control for Targeted Enhancement
The Frequency knob lets you set the specific range where Infinity Bass focuses its processing, so you’re not blindly enhancing everything below a fixed cutoff. This means you can target just the sub region around 40 to 60 Hz on a kick drum, or push it higher to catch more of the fundamental on a bass guitar that lives around 80 to 100 Hz.
I like that it keeps the processing surgical rather than broad, because in my experience low-end plugins that work across the entire bass spectrum tend to create more problems than they solve.
- Listen Mode for Isolating the Processed Signal
Hit the Listen button and you hear only what Infinity Bass is adding to your signal, with the dry content completely removed. I have to say this changes the way you use the plugin entirely, because instead of guessing whether you’re improving things or just making them louder, you can hear the exact harmonic and subharmonic content being generated in isolation.
It also makes running the plugin in parallel much more practical, since you can duplicate your track, apply Infinity Bass on the copy, and use Listen mode to fine-tune exactly what gets blended back into your mix with complete control over the crossover between dry and processed content.
- Interactive Visualizer for Real-Time Feedback
The central display reacts to every parameter change in real time, showing you the intensity and frequency range of the processing as you adjust things. It’s not a traditional spectrum analyzer, but more of an artistic representation of what’s happening to your low end, and I found it actually helpful for getting a quick visual read on whether you’re being subtle or going overboard.
Combined with Listen mode, it gives you both ears and eyes on the processing, which speeds up decision-making when you’re working through a session and don’t have time to A/B everything a dozen times.
3. Denise Audio Bass XXL (for Bass & Sub bass)
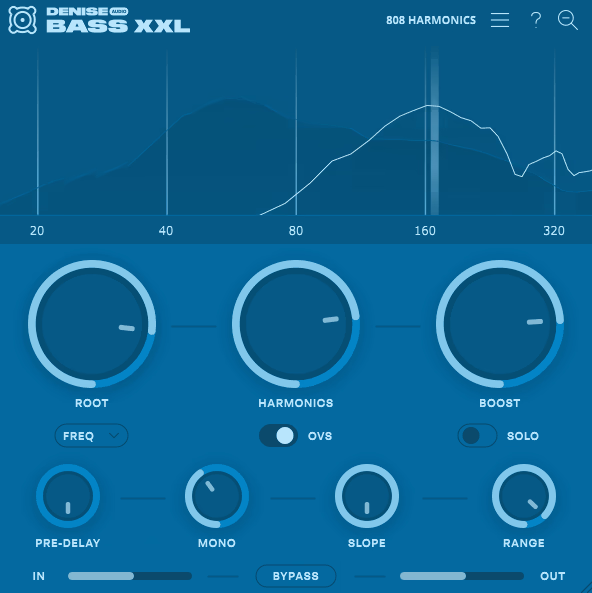
Bass XXL is a plugin that focuses on one job and does it well. It’s made for low-end enhancement and uses a special algorithm to create harmonics above your bass frequencies, instead of making new sub-bass below them.
I like that Denise Audio kept the interface very simple. When you’re working on your low end, you don’t want a cluttered screen getting in the way.
- Psychoacoustic Harmonics Algorithm
This is what sets Bass XXL apart from sub-synths or regular bass boosters. Instead of adding new low frequencies, it creates harmonics above the root note, making your bass sound fuller and heavier to your ears.
It uses the way our brains fill in low-end information from harmonics, not just the main note. This is really helpful because your bass will still sound full on earbuds, laptop speakers, and small monitors that can’t play deep sub frequencies.
- Root Frequency Targeting with Three Input Modes
You can set the target frequency by Hz, root note, or MIDI follow, giving you plenty of flexibility for different situations.
MIDI mode is great for melodic bass lines because the plugin tracks your performance in real time and keeps the harmonics in tune as the notes change. This feature really sets it apart from most bass enhancers that only let you pick one frequency.
- Pre-Delay for Transient Preservation
You don’t usually see this feature in low-end plugins, and it’s really practical. The pre-delay adds a short gap between your dry signal’s attack and the harmonics, so the natural hit of a kick or bass comes through clearly before the extra weight is added.
This gives you a punchy, compressed feel without using actual compression. It really helps on percussive sounds when you want impact but don’t want to blur the start of the hit.
- Slope Control for Harmonic Shaping
The Slope knob controls how quickly the harmonics fade out, so you can pick a smooth, gradual sound or a sharper, more focused effect.
You can get an analog, warm feel with lower slope settings, or a tighter, more precise sound with higher ones. This gives you real control over how the harmonics fit into your mix without making things complicated.
- Range Knob for Octave Spread
This knob sets how many octaves the harmonics cover. It acts like a filter, so you can keep the effect focused in the low end or let it reach up into the mids for more presence.
Lower settings keep the effect subtle and focused, while higher settings make it more noticeable. This lets you adjust how much of your sound is affected, whether you’re working on a kick, bass line, or a whole drum bus.
- Phase-Free Parallel Processing
Bass XXL creates harmonics as a parallel signal, so your original track stays untouched. Denise Audio also made sure to avoid the phasing problems that often happen with other plugins like this.
4. Wavesfactory Spectre (All Round 2)
Most enhancer plugins offer just one or two simple controls to add harmonic excitement to your entire signal. That works in many cases, but sometimes you need more flexibility.
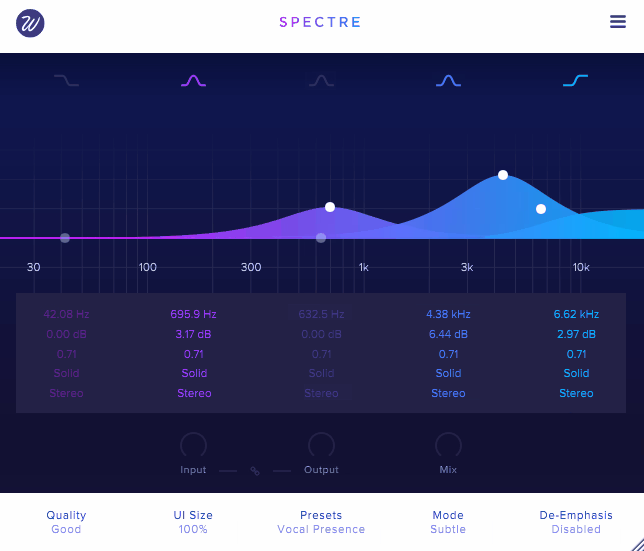
Wavesfactory Spectre does things differently. It lets you add saturation to specific frequency ranges using a five-band parametric EQ, so you use it much like a regular EQ. Instead of just boosting volume, though, you’re adding new harmonic content. That’s what makes this plugin so useful in real-world mixing.
Under the hood, the plugin takes the difference between your dry signal and the EQ’d signal, then runs that difference through your chosen saturation type. This way, only the frequencies you select get saturated, while the rest of your sound stays unchanged.
This approach makes Spectre much more precise than most enhancers. That’s why I think it works just as well on single tracks as it does on a mix bus or during mastering.
- 10 Saturation Algorithms Per Band
You get ten saturation types: Tube, Warm Tube, Solid, Tape, Diode, Class B, Bit, Digital, Rectify, and Half Rectify. Each one gives your sound a different character. You can set a different type for each of the five bands, so you might use Tape on the lows for warmth and Tube on the highs for brightness—all in one plugin. There’s also a Clean mode that turns Spectre into a parallel EQ with no saturation, which is great when you want natural frequency boosts without extra harmonics.
- Per-Band Channel Processing (Stereo, Left, Right, Mid, Side)
This feature really sets Spectre apart. Each band can process Mono, Stereo, Left, Right, Mid, or Side channels on its own, giving you detailed control over your stereo image for each frequency range. For example, you can boost and saturate just the low end in the Mid channel to keep your bass centered, while adding excitement to the highs on the Sides to make your mix wider. Once you try this, it’s tough to go back to enhancers without this kind of routing flexibility.
- De-Emphasis Mode
This feature is very practical. It evens out the EQ boosts after saturation, so each band’s volume stays balanced even as you add harmonics. I like this because it lets you focus on the tone you’re adding, not on changes in loudness, and you don’t have to keep adjusting your output to compare before and after.
- Three Saturation Intensity Modes
You can also set the intensity to Subtle, Medium, or Aggressive, which changes the distortion from gentle warmth to heavy grit. I find Subtle and Medium work best for mixing and mastering, while Aggressive is great for creative effects on things like snares or synth leads when you want extra bite.
- Parallel EQ Architecture with Mix Control
Spectre operates as a parallel processor by design, meaning it blends the harmonically enhanced signal with your dry input rather than replacing it. The global Mix knob lets you dial back the effect for subtle coloring or push it forward for a more pronounced effect. I’d say this makes it really forgiving to work with, because even if you push the saturation hard on a particular band, you can always pull the mix back and find a sweet spot that sits naturally in your track without overwhelming the original character.
5. Wavegrove Vastaus (Free enhancer)
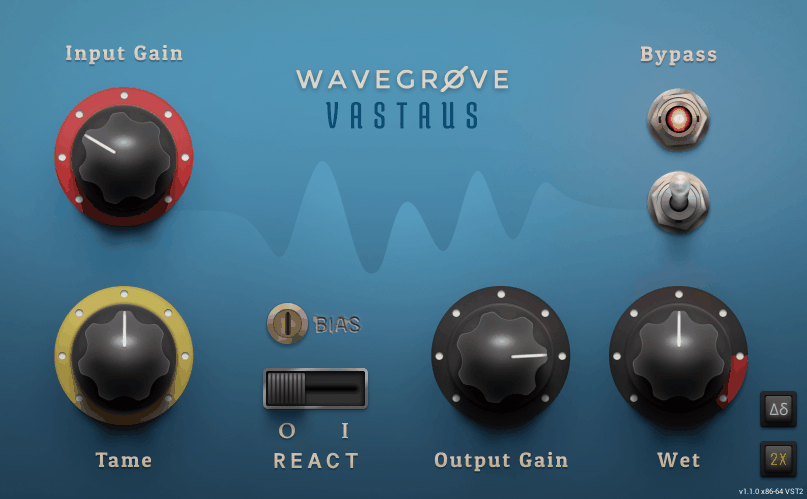
If you’ve ever had a track where the high end just feels harsh or brittle and no amount of EQ cutting quite fixes it without killing the life up there, that’s exactly the problem Vastaus was built to solve. It’s a free high-frequency enhancer and smoother from Wavegrove, and I think it deserves a spot on this list because it does something surprisingly musical for a plugin that costs nothing.
At its most neutral setting with Input Gain and Tame both at zero, the plugin quietly tames and blocks overly harsh high frequencies without you really noticing it’s there. It smooths out sibilance, takes the edge off piercing cymbals, and rounds out brittle guitars in a way that feels natural rather than filtered.
- Tame Control for Progressive Smoothing
Turning this up increases the intensity of the high-frequency smoothing effect, and what I noticed is that it manages to reduce harshness without making things sound dull or rolled off. It’s the kind of processing that makes a bright condenser mic recording start to feel more like a ribbon mic capture, which is a useful trick to have available for free.
- React Mode for Transient-Aware Processing
Engaging React changes how the Tame control behaves by letting certain transients pass through while still smoothing the sustained portions of the signal. I found this gives you more detail and clarity compared to running Tame on its own, because the initial attack of a guitar pick or a cymbal hit comes through naturally while the ringing decay gets softened. It’s a really smart feature for keeping energy in a mix without the harshness that comes with it.
- Bias Knob for Harmonic Generation
This lets you limit the processing to either the positive or negative side of the audio waveform, which generates harmonics that add a silky, saturated character to the top end. I like that you can use Bias in combination with Input Gain to actually extend and boost frequencies above where the original signal rolls off, which turns Vastaus from a simple smoother into something closer to an enhancer when you push it.
- Wet/Dry Mix and Gain Staging
The Input Gain drives the signal harder into the processing for more color, while the Output Gain acts as a pad to keep levels in check. The Wet knob lets you blend the processed signal against the original in any ratio you want. I’d say keeping Wet around 50 to 70 percent tends to give the most natural results, but cranking it full can work well when you’re after a more obvious effect on something like electric guitar.
6. MeldaProduction MDrumEnhancer (For Drums)
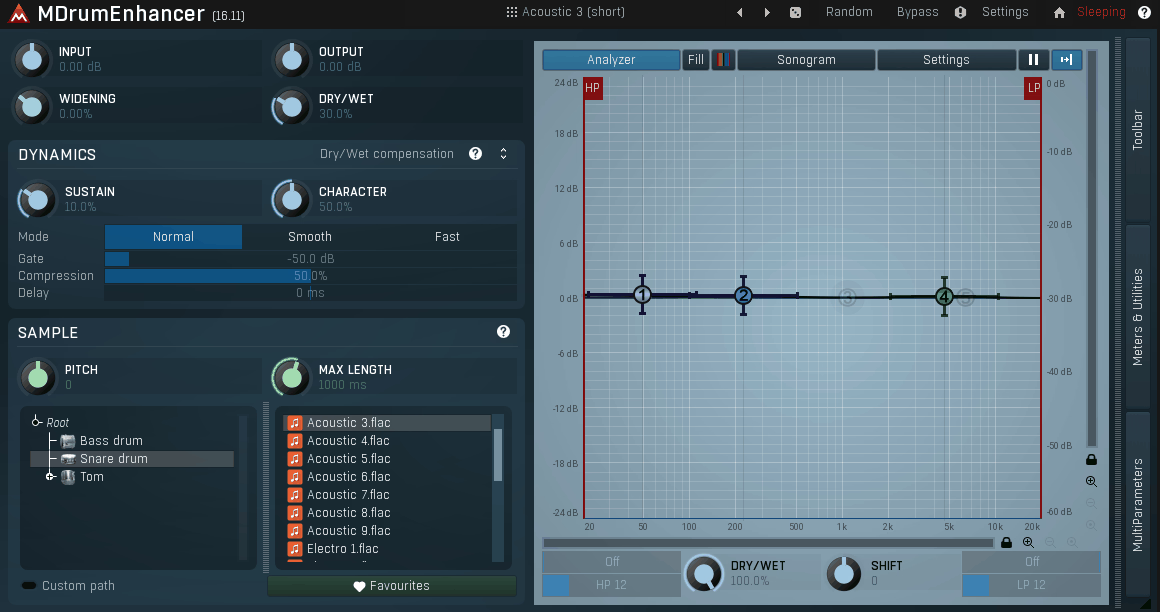
Making your drums sound big and full in a mix often means using several compressors, EQs, or even replacing the drums entirely if the recordings aren’t working. This can take hours and still leave you with results that don’t feel true to the original performance.
MeldaProduction MDrumEnhancer works differently. It follows your drum track and creates its own enhancement signal from samples, blending it under your original hits to fill in what’s missing without replacing anything.
This approach is practical because it keeps the character and dynamics of the real performance, while the plugin adds body, weight, or brightness that the recording missed. It sits between a drum replacer and a traditional enhancer, which is where many producers need help. It’s not trying to create a completely new drum sound.
It’s made to take your existing drum sound and make it feel like it was recorded with better microphones in a better room.
- Sample-Based Resynthesis Without Transients
This is what sets MDrumEnhancer apart from a standard drum replacer. The plugin uses samples with the transients removed, so you’re only blending in the body, sustain, and tone of the sample, not another attack. Your original drum hit keeps its natural punch, while the added layer fills in with extra weight or brightness. This way, you avoid the awkward “double hit” feeling that often happens with traditional drum replacement.
- Accurate Dynamic Tracking
The detection in this plugin is very accurate. It tracks the velocity and dynamics of your input in real time, without the latency, missed notes, or wrong velocities that make other drum replacers frustrating. It responds to ghost notes, accents, and everything else, so the enhancement layer feels like part of the performance instead of a static sample on top.
- Sustain Control for Hit Length
The sustain control lets you make drum hits shorter or longer than they are naturally, giving you more creative options. You can tighten a ringy snare by shortening its tail, or stretch it out to add a reverb-like sustain that thickens the sound. This is especially useful on toms, where extra sustain can fill out a drum fill without needing a separate reverb.
- Built-In Dynamic Equalizer
Instead of just blending in a raw sample, MDrumEnhancer has a full dynamic EQ to shape the enhancement signal before it goes into your mix. You can adjust the frequency content of the added layer, so if you only want the low-end from a kick sample and not the midrange, you can do that right in the plugin. This control helps keep the results sounding natural, not just layered.
- Pitch Adjustment for Sample Tuning
You can retune the samples to match the pitch of your drum track, which makes the enhanced sound feel more cohesive. If your snare has a certain fundamental frequency, you can pitch the sample layer to fit instead of clash. This is especially helpful with tuned percussion or toms that need to fit musically in the arrangement.
7. SSL SubGen
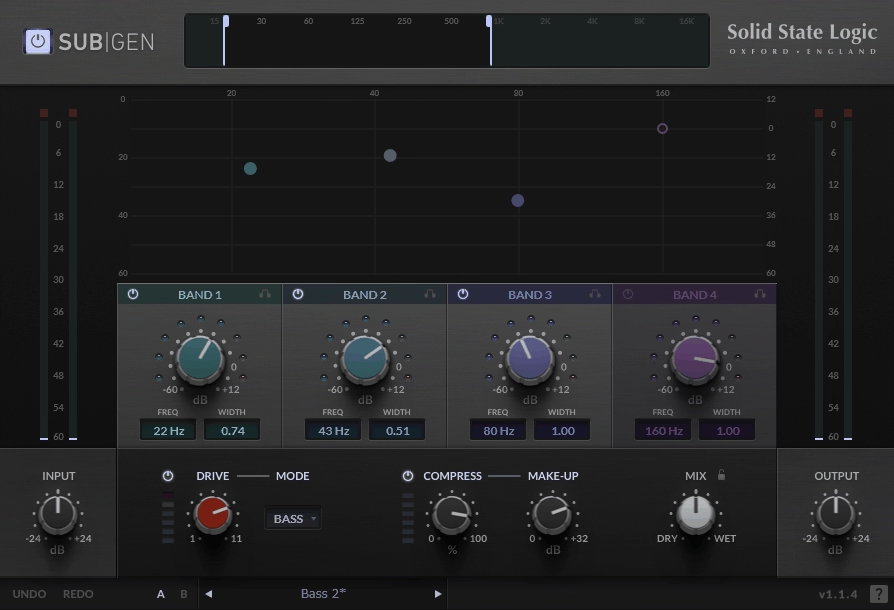
There are plenty of sub-bass plugins available, but most only offer a single band and leave the rest to chance. SSL SubGen stands out by giving you four sub-harmonic generators, each with its own adjustable frequency, bandwidth, and gain. I like this level of control because it lets you boost the low end of a kick at 55Hz on one band and add weight to a bass guitar on another, all without making the mix sound muddy.
The plugin’s synthesis algorithm uses wave inversion to create sound an octave below your original signal, and the result feels natural instead of fake. What really makes SubGen different from basic generators is that it acts more like a full bass processing channel strip, not just a simple sub synth.
- Four-Band Sub-Harmonic Synthesis
Each band lets you set its center frequency (from 20Hz to 160Hz), bandwidth (0.1 to 1.0 octaves), and gain, either from the interactive graph or the controls below. You also get LED meters and solo buttons for each band, so you can hear exactly what each one adds. I found this really helpful for avoiding the frequency overlap issues that often come with single-band generators.
- Three Tailored Saturation Modes
The Drive section, which is gain-compensated, only affects the synthesized signal and leaves your original sound untouched. The Pre mode gives you smooth 50s-style tube overdrive with both even and odd harmonics. Kick mode adds lighter 60s and 70s transistor-style overtones that work well on drums. Bass mode is more aggressive, adding strong harmonics and grit for electric bass and synths. Keeping the drive on just the wet signal is a smart move because it preserves your original tone.
- Built-In SSL Compressor
There’s a built-in compressor with attack and release times set for best results, plus a smooth knee to help blend the synthesized sub with your original sound. It also offers up to 32dB of make-up gain and a gain reduction meter.
8. SPL Big by Branworx (Stereo enhancer)
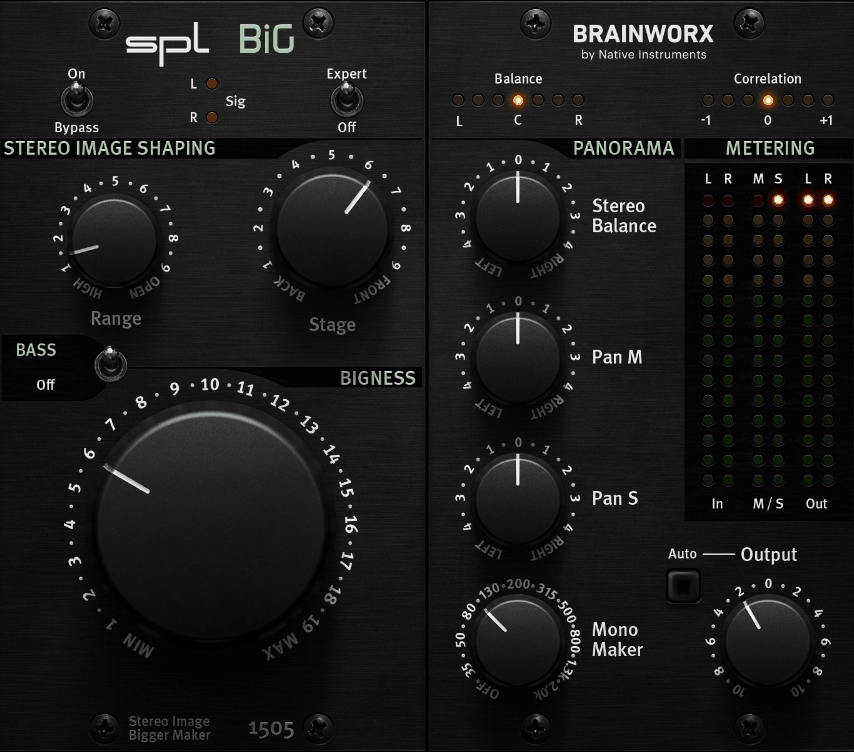
Getting stereo width right can make a mix sound amazing, but if you get it wrong, it can ruin everything. Using stereo wideners often leads to problems like phase issues, comb filtering, or losing clarity when summed to mono.
SPL BiG avoids these problems by using a different approach. Instead of traditional mid/side processing, it’s based on SPL’s 2024 TEC Award-winning 500-series hardware, with Brainworx handling the analog modeling for the plugin.
- Proprietary Filter Network (Not M/S Processing)
What sets this plugin apart is how it processes your audio. Instead of splitting the signal into mid and side channels like most stereo tools, SPL BiG extracts a difference signal, runs it through an analog filter network, and then blends it back in using a unique combining stage.
As a result, when your widened stereo signal is summed to mono, whether on a phone speaker or a club system, you get a clean fold-down with no phase cancellations or unwanted artifacts.
This might sound like a marketing claim, but you can actually hear the difference. Unlike most wideners, SPL BiG keeps mono compatibility even when you push the effect.
- Range Control for Frequency Targeting
Instead of affecting the whole signal, the Range knob lets you choose which part of the frequency spectrum to process. For example, you can widen just the upper mids and highs on vocals without changing the low end.
This helps prevent unwanted buildup in frequencies that should stay focused and centered. It also gives the plugin a surprising level of precision for something with just three main knobs.
- Stage Control for Depth Placement
It took me some time to appreciate the Stage knob. It changes the slope and bandwidth of the processed range, letting you move elements forward or backward in the stereo field.
You can use it to make a sound feel more upfront and present, or to add depth by placing it slightly behind other elements in the mix.
This control is subtle, but once you try it on individual tracks instead of just the mix bus, you’ll see how much it can shape the space in your mix.
- AirBass Circuit for Low-End Warmth
Turning on the Bass switch activates a passive filter based on the AirBass circuit from the SPL IRON Mastering Compressor. It adds a low-end boost that sounds musical, not just louder.
To me, it feels like a mix between a gentle shelf and a resonant bump. It adds analog-style weight to the low end without making things muddy. This feature is handy when you just want a bit more warmth without using a separate EQ.
- Expert Panel with Panorama and Mono Maker
When you turn on the Expert switch, you get extra controls not found on the hardware. These include Stereo Balance, separate Pan controls for Mid and Side channels, a Mono Maker adjustable from 20 to 2,000 Hz, and output gain with automatic gain compensation.
The Mid and Side panning feature is rare. Panning only the side channel tilts the stereo image around the center, instead of moving everything, which gives you creative options that standard pan knobs can’t offer.
- M/S Metering with Solo Functions
The Expert panel also adds dedicated Mid/Side meters and lets you solo the Mid or Side signal. This makes the plugin much more reliable for critical work, since you can see and hear exactly how each part of your stereo field is being processed before making a decision.
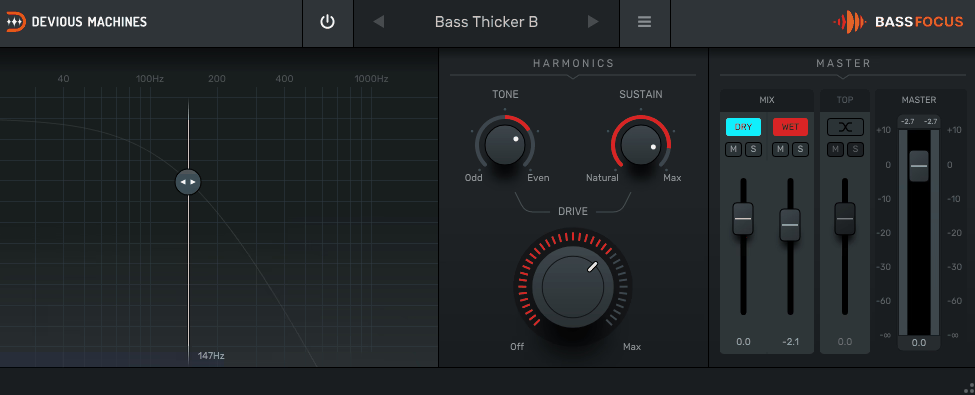
9. Devious Machines Bass Focus (For Bass)
If you’ve ever tried to enhance low-end in your mixes, you probably know the basic idea: adding harmonics above the bass to make it sound fuller.
Plenty of plugins do this, and some of them have been around for years.
Devious Machines Bass Focus stands out because it uses a custom algorithm to generate harmonics that don’t depend on input level. I think this makes the results more consistent and easier to control than most saturation-based bass plugins.
It’s also one of the most affordable plugins in this category. I like that the interface is simple, so you can work quickly without wondering what each control does.
- Tone Control for Odd/Even Harmonic Balance
This control really lets you shape the sound, and I find it’s one of the most useful features in the plugin. Turning it toward Odd creates harmonics like a filtered square wave, giving you a clear, focused sub-bass that doesn’t add much extra color.
Turning it toward Even adds warmer, valve-style saturation with a rounder and more musical feel.
In the middle, you get a blend of both, which sounds more like a filtered sawtooth. Each setting gives you a noticeably different result, so you can really match it to what your track needs.
- Sustain Knob for Envelope Shaping
I noticed this control isn’t discussed enough, given how much it affects the final sound. The Sustain knob controls how input-level-dependent the drive effect is, shaping the dynamic envelope of the generated harmonics.
If you set it lower, you get a tighter sound where the harmonics follow the natural attack and decay of your bass.
If you turn it up, the harmonics last longer and the sound gets smoother. I found this works well for sustained bass notes or pads when you want the low end to feel steady instead of punchy.
- Split Frequency Crossover with Draggable Display
You can move the vertical bar on the spectrum analyzer to set the crossover point between 30 Hz and 300 Hz. This lets you choose which frequencies the harmonic generator processes.
Everything below that line receives the enhancement, and the smooth rolloff means the frequencies just above the split point are affected gently rather than cut off suddenly.
I like how this visual setup makes it clear which part of your signal you’re working on. It also helps you avoid adding harmonics to midrange sounds that don’t need it.
- Three Independent Output Faders
Instead of just one wet/dry knob, Bass Focus gives you separate faders for the dry bass, the wet harmonics, and the high-end content above the split point.
I want to point out this three-way balance because it lets you mix the enhanced low end, the original bass, and the highs separately. You can also mute or solo each one to hear exactly what the plugin adds, so it’s much easier to get the sound you want.
- Split Mode for Additional EQ-Like Control
When you turn on Split Mode, the output section splits the dry signal into high and low frequencies. This basically gives you a simple built-in EQ along with the harmonic processing.
10. ADPTR Audio HYPE (Multiband enhancer)
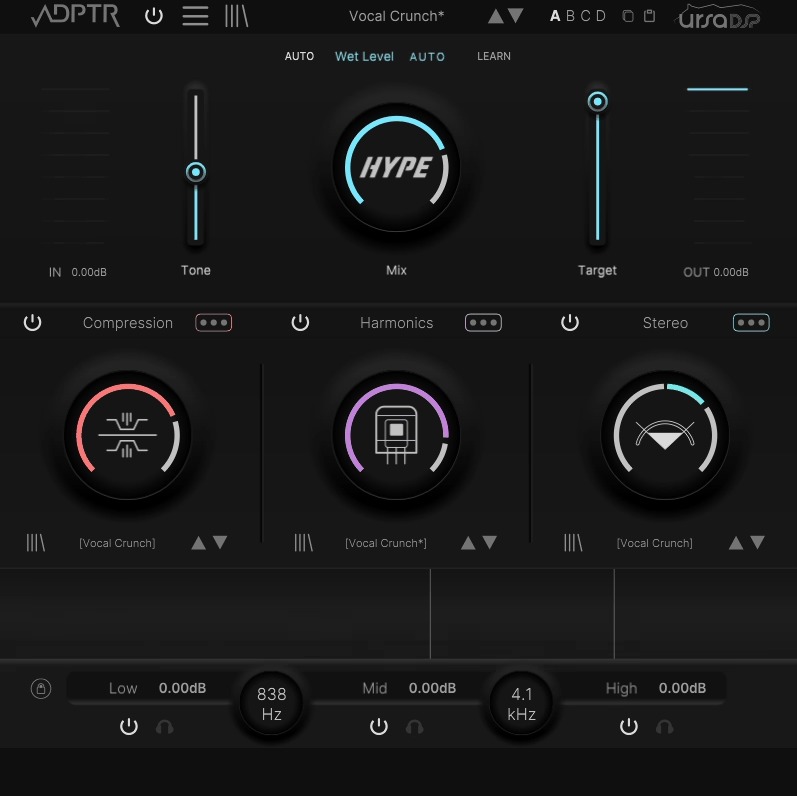
ADPTR Audio HYPE rolls multiband compression, harmonic generation, and stereo width control into a single plugin with a three-section layout that keeps things moving quickly.
I found it covers a lot of ground that would normally require three or four separate inserts on a channel, and the workflow stays straightforward even though there’s serious depth underneath if you want to dig in.
What I appreciate is that everything here is built around practical mixing needs rather than flashy gimmicks. The plugin ships with over 200 presets that include mix notes from the authors, so you’re not just scrolling through random starting points.
You actually get context for each one, which helps you understand what the preset is trying to accomplish and how to fine-tune it for your material.
- Trajectory Technology for Alias-Free Harmonics
The harmonic section uses UrsaDSP’s Trajectory technology combined with advanced ADAA algorithms to generate overtones that stay clean across the entire gain range.
I think this is worth understanding because most saturation plugins hit a sweet spot and then fall apart into harsh clipping if you push them further. HYPE doesn’t have that problem, so the harmonics remain musically useful whether you’re adding a subtle warmth or driving things hard into distortion.
You can apply different harmonic modes across each of the three bands independently, choosing from options like Sine, Fold, Fold Clean, and Fold Over, so the low end can get a warm tube-style treatment while the highs get something brighter and more aggressive.
- Six Compressor Modes with Transient and Body Controls
Rather than giving you one compression algorithm and calling it a day, HYPE includes Slam, Opto, Brick, Transient, Combo, and Gentle modes that each respond differently to your dynamics.
I like that the controls go beyond standard threshold and ratio, offering dedicated Transient, Mix, and Body parameters that let you shape how the compression grabs the front of a hit versus how it handles the sustain.
The Combo mode is especially interesting because it merges three different compression behaviors into a blended result, and the Gentle mode is tuned specifically for mastering situations where you need the lightest possible touch.
- Per-Band Mid/Side Stereo Control
The stereo module lets you adjust mid/side processing independently across all three bands, and you can apply it separately to the dry and wet signals. I noticed this gives you a level of spatial control that most multiband processors don’t offer, because you’re not just widening or narrowing the whole signal.
You’re deciding how the stereo image behaves in the lows versus the mids versus the highs, which makes a real difference on mix buses and master chains.
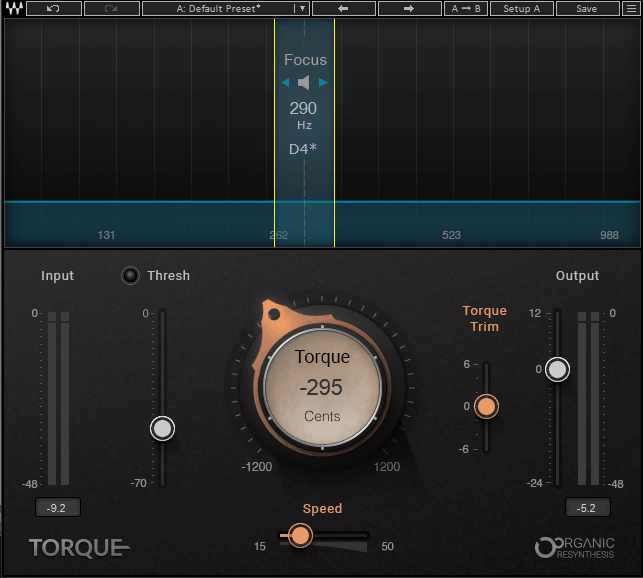
11. Waves Torque (Drum Enhancer)
Every producer has been there at some point, where you’ve got a killer drum performance or a loop that fits the vibe perfectly, but the tuning of the kick or snare just isn’t sitting right against the key of the track.
Traditional pitch shifters can technically move the tone up or down, but they smear your transients, destroy the character of the drum, and leave you with something that barely sounds acoustic anymore.
Waves Torque was built specifically for this problem, and it handles drum tone shifting in a way that I haven’t found any other plugin replicate quite as naturally, because it’s not just pitch-shifting your audio in the traditional sense.
The plugin runs on what Waves calls Organic ReSynthesis technology, which breaks your drum sound down into its formant, amplitude, and carrier components before processing, then reassembles everything after the shift.
That means you’re only changing what actually needs to change, and the attack, resonance, body, and duration of the original hit stay intact. I found the results genuinely impressive, especially on kicks and snares where even small tonal adjustments can make or break how the drums lock in with your bass and harmonic elements.
- Focus Display and Formant Analyzer
The top section of the interface is a formant analyzer scaled from 98 to 988 Hz that shows you the resonant energy peaks in your drum signal, and this is where the whole workflow starts.
You drag a highlighted Focus Area band across the display to target the specific tonal component you want to shift, whether that’s the fundamental frequency or a higher harmonic. I love how you can click and hold the speaker icon to solo-monitor just the focused frequency range, which makes it so much easier to zero in on exactly the right spot before you start turning anything else.
Waves actually recommends trying the second harmonic rather than just defaulting to the fundamental, and I found that experimenting across the full range often reveals sweet spots you wouldn’t expect, especially on snares where different formant regions respond very differently to the shifting.
- Torque Knob with Full Octave Range
The big central control lets you shift the pitch up to 1,200 cents in either direction, which gives you a full octave of range both up and down. The amount is displayed in musical pitch and cents rather than just frequency, so you always know exactly how far you’ve moved the tone in a musically meaningful way.
I’d say moderate shifts of a few semitones tend to give the most transparent results, but I was genuinely surprised at how far you can push kicks downward to add serious weight without the sound falling apart.
Larger shifts on toms and snares can start to introduce some artifacts, particularly if there’s reverb or ambience baked into the recording, but for the kind of adjustments most producers actually need in a real mixing scenario, it handles them beautifully.
- Threshold Control with Traffic Light Detection
The Threshold fader determines the level above which the pitch-shifting kicks in, and it uses a clever color-coded LED system to guide you toward the right setting. Yellow means you’re in the sweet spot, green means the threshold is set too low and the plugin might trigger on bleed or room noise, and red means it’s too high and not catching enough of the signal.
I think this is one of the smartest design decisions in the plugin, because threshold is usually the control that trips people up with drum processors, and the visual feedback takes the guesswork out of it completely.
It’s also what lets you use Torque on overhead or room mics without the hi-hat and cymbal bleed triggering false shifts, which opens up a lot of practical applications beyond isolated close-mic tracks.
- Speed Control for Attack and Release Timing
The Speed slider adjusts how quickly the formant shift engages and releases, essentially controlling whether the tonal change happens instantly or eases in after the initial transient. Shorter settings give you a fast, immediate shift that catches the whole hit from the very beginning, while longer settings let the natural attack pass through unprocessed before the tone change takes effect on the body and sustain.
I noticed this makes a real difference on snares where you want the crack of the stick to stay completely untouched while only reshaping the resonance that follows, and it also helps keep things sounding natural when you’re doing bigger pitch moves that might otherwise feel abrupt.
- Trim Control for Processed Signal Level
When you shift a drum’s pitch downward, the lower frequencies naturally gain energy and can start to sound boomy or overpowering. The Trim slider lets you adjust the level of just the processed portion of the signal over a ±6 dB range without affecting the dry component, so you can thin out a downward shift that’s getting too heavy or thicken up an upward shift that feels too light.
I found this especially useful on kick drums where dropping the pitch a few semitones for extra weight would sometimes push the low end past where it needed to be, and a quick Trim adjustment brought everything right back into balance.
- Zero-Latency Live Component
Alongside the standard studio version, Torque includes a dedicated Live component with zero samples of latency, which makes it usable in real-time front-of-house and monitor mixing situations.
I must say, for live sound engineers this is a pretty big deal, because you can now retune a problematic kick or snare mid-show without any timing offset between the processed signal and the rest of the drum kit.
The Live version shares the exact same controls and functionality as the studio version, so there’s no feature compromise, and for studio producers who track with plugins in real time, it means you can monitor through Torque while recording without any delay compensation issues.
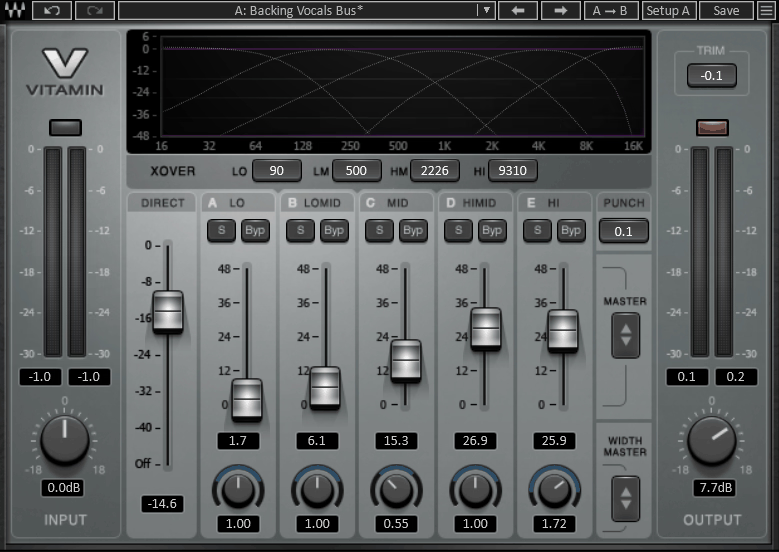
12. Waves Vitamin (Mastering & Mixing)
Here’s the thing about mixing, sometimes you reach for an EQ and it gets you close, but what you’re really after is something that makes a track feel more alive rather than just louder or brighter at certain frequencies. That’s the gap Waves Vitamin fills.
Under the hood, it’s running a combination of parallel compression, harmonic saturation, and multiband processing through a single streamlined interface, so you’re getting the effect of what would normally be three or four plugins chained together, except it takes about ten seconds to dial in.
I’d say the beauty of Vitamin is that it doesn’t ask you to understand what it’s doing technically. You just push the faders up in the frequency ranges that need more life, and the plugin handles the rest. It’s been around for a while now and there’s a reason it keeps showing up in sessions, because it works on practically everything and it’s hard to make it sound bad if you use some restraint.
- Five-Band Gain Faders with 48 dB Range
Each of Vitamin’s five bands has its own gain fader that controls how much of the enhanced signal gets blended into your dry audio, and the range goes all the way up to 48 dB, which is a lot of headroom to work with. What’s happening behind each fader is a calibrated mix of compression, saturation, and EQ that Waves doesn’t fully break down publicly, but the result is that pushing a fader doesn’t just add volume at that frequency. It adds harmonic richness and density that actually changes the texture of the sound.
I found that even small moves on the low and high bands can open up a track noticeably, and the fact that each band operates independently means you can treat the lows and highs aggressively while leaving the midrange completely untouched if that’s what the mix calls for.
- Adjustable Crossover Points Across All Five Bands
The four crossover controls each sweep from 20 Hz to 18,000 Hz, giving you total freedom to define where each band starts and stops. The defaults sit at sensible spots for general mixing work, but I like that you can push the crossovers around to isolate very specific problem areas or target narrow frequency regions on a particular source.
For example, on a muddy acoustic guitar you might tighten the crossovers around the low-mid band to focus the enhancement right where the boxy frequencies live, which is something a broadband enhancer just can’t do with the same precision.
- Per-Band Stereo Width Control
In stereo mode, every single band gets its own continuously variable width knob that can go from collapsed mono all the way out to an exaggerated wide image. I believe this is one of the most overlooked features in the plugin, because it means you can do things like keep your sub bass perfectly centered while widening the high frequencies for airiness, all within a single insert.
There’s also a Width Master that moves all five width controls together while maintaining their relative offsets, which is really handy when you want to scale the overall stereo effect up or down without losing the balance you’ve already set between bands.
- Punch Control for Transient Management
The global Punch parameter works on a scale from 1 to 5, where 3 is neutral and anything above starts emphasizing transients in the processed signal. It operates on a similar principle to a transient shaper, but it only affects the wet portion of the audio, not your original dry signal. I noticed this makes a meaningful difference on drums and percussive sources where you want the harmonic enhancement to feel snappy rather than smooth, and backing it off below 3 softens the processed transients for sources like pads or vocals where you want warmth without extra bite.
- Direct Signal Mix and Master Gain Controls
Instead of a standard wet/dry knob, Vitamin gives you a dedicated Direct fader that sets the level of your unprocessed signal independently from the five band faders. This is a subtle but important distinction, because it means you’re not just blending between two signals on a single axis. You have full control over the dry level and the enhanced level separately, which makes parallel-style processing much more intuitive.
The Master control scales all five band faders simultaneously while keeping their relative balance intact, so once you’ve shaped the enhancement curve across your frequency spectrum, you can dial the whole effect back or push it forward without touching individual bands.
- Solo and Bypass Per Band
Each band has its own solo and bypass buttons, and the way they interact is worth understanding. Soloing a band lets you hear both the dry and wet content within that frequency range, so you can evaluate what the enhancement is actually contributing in context. Bypassing a band mutes just the wet signal, leaving the dry through. I found this combination makes it very fast to work through each band and decide whether the added harmonic content is actually helping or if you’re overdoing it, which is easy to do with Vitamin since the effect is so immediately satisfying.
13. United Plugins BassRift by Instant Audio (For Bass)
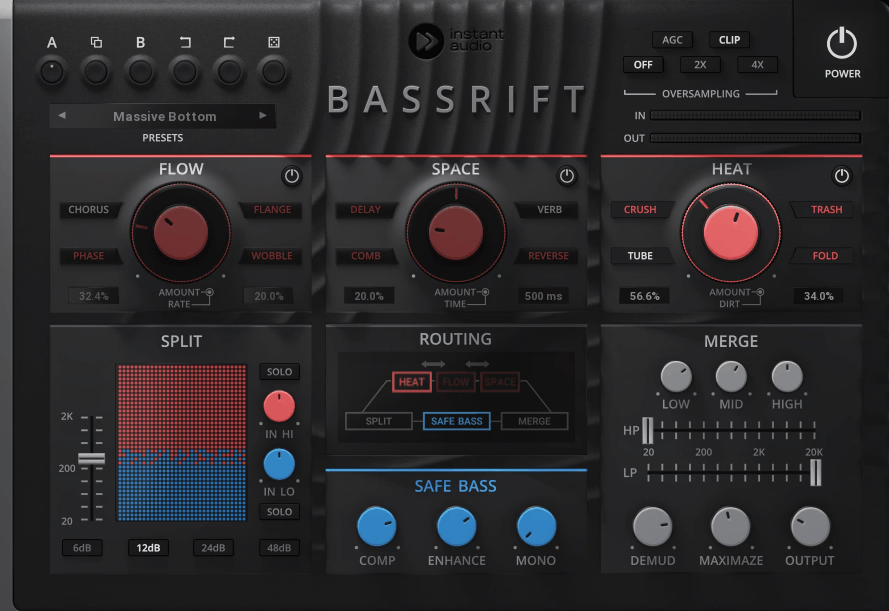
Most bass enhancement plugins focus on one job, whether that’s adding harmonics, generating sub content, or tightening the low end. BassRift takes a wider approach by splitting your signal at a crossover point and running the low and high frequencies through completely separate processing chains, then merging everything back together at the end. I think that split architecture is what makes it feel more like a bass production tool than just an enhancer.
- Split Section with Adjustable Crossover
The signal divider sits at the front of the chain and lets you choose exactly where the frequency split happens, with independent gain controls for each path and a selectable slope of 6, 12, 18, or 24 dB per octave. The lower frequencies go to the Safe Bass section while everything above goes through the effects routing. I like that you can solo either band to hear what each path is contributing on its own, which keeps you from guessing when you’re balancing the two sides against each other.
- Safe Bass with Compression, Enhance, and Mono
The low-frequency path isn’t just a passthrough. It gives you a dedicated compressor to tighten up the dynamics, an Enhance control to add weight and presence, and a Mono switch that collapses the low end to center. I found this combination handles the stuff that usually requires two or three separate plugins on a bass channel, and the mono folding in particular is something every electronic and hip-hop producer should be using to keep subs from floating around the stereo field on different playback systems.
- Three-Stage Effects Routing (Flow, Space, Heat)
The upper frequency path runs through three effect modules that you can rearrange in any order, which opens up a lot of creative possibilities depending on what hits your signal first. Flow handles modulation effects, Space covers spatial processing, and Heat is where you get into distortion with options like Crush, Trash, Tube, and Fold, each with separate Amount and Dirt controls for dialing in the intensity and texture. I noticed that changing the order of these modules produces genuinely different results, so putting Heat before Space gives you a completely different vibe than the reverse.
- Merge Section with EQ and Maximizer
Once the two signal paths come back together, the Merge section gives you high-pass and low-pass filters to clean up the combined result, plus a maximizer that adds punch and pushes the final output without clipping. I’d say this final stage is where BassRift goes from being a creative tool to a mix-ready one, because you can shape the frequency balance and slam the output in one move rather than needing a separate limiter or EQ after it in your chain.
- Automatic Gain Compensation
The plugin continuously matches your output level to your input so you’re not fooled by volume increases as you stack on processing. I appreciate this because BassRift can add a lot of energy to a signal across multiple stages, and without the AGC it would be easy to convince yourself everything sounds amazing when really it’s just gotten louder.
Hello, I’m Viliam, I started this audio plugin focused blog to keep you updated on the latest trends, news and everything plugin related. I’ll put the most emphasis on the topics covering best VST, AU and AAX plugins. If you find some great plugin suggestions for us to include on our site, feel free to let me know, so I can take a look!