There was a time not too long ago when reverb baked into a recording was essentially permanent. If a vocal was tracked in a bathroom, a conference room, or a church, you were stuck with whatever the walls gave you, and the only real option was to record it again or try to bury it in the mix.
That’s changed dramatically over the past few years as machine learning and spectral processing have matured into tools that can genuinely separate the dry signal from its reflections in real time.
What makes this category interesting is that the plugins approach the problem from fundamentally different angles. Some rely on neural networks trained on thousands of room scenarios, while others use envelope shaping derived from analog hardware, and a few take a perceptual de-mixing approach that models how the human ear distinguishes direct sound from ambience.
Each method has strengths and trade-offs depending on whether you’re cleaning up dialogue, tightening drums, or salvaging a vocal take that was recorded in a less-than-ideal space.
I want to be upfront about expectations here: no plugin will perfectly erase heavy reverb without any artifacts whatsoever, especially when early reflections are involved. But used with realistic goals and a light hand, these tools can take a recording from unusable to genuinely workable, and in many cases the results are remarkably transparent.
Whether you’re a podcast producer dealing with untreated rooms, a post-production editor rescuing location sound, or a music mixer trying to dry up stems that arrived with too much ambience baked in, there’s a tool on this list that should fit your workflow and budget.
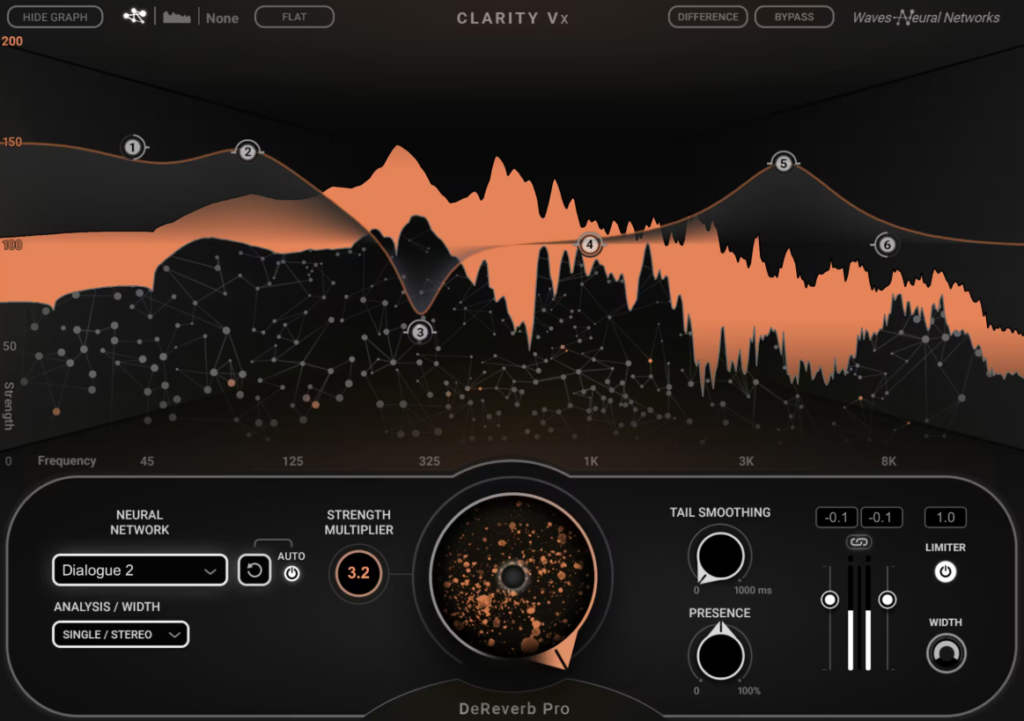
1. Waves Clarity Vx DeReverb Pro
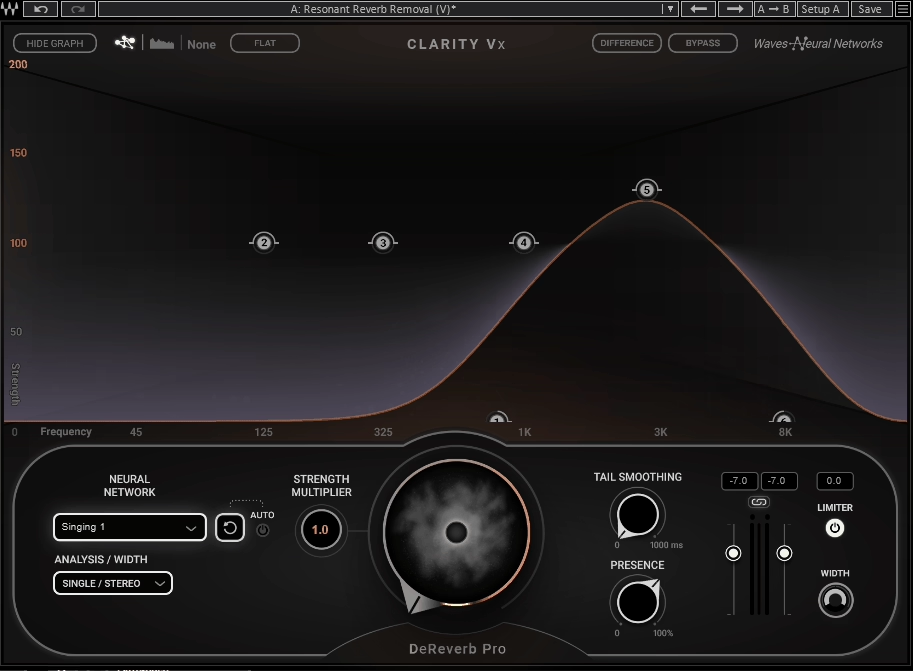
If you’ve already tried the standard DeReverb and found yourself wishing you could push certain frequency areas harder while leaving others untouched, the DeReverb Pro is where that level of control lives.
It shares the same neural network engine as its sibling, but wraps it in a much more detailed interface with six flexible processing bands that give you surgical precision over where and how aggressively the de-reverberation happens.
For dialogue editors working on film and television, this kind of frequency-selective control can mean the difference between a result that sounds obviously processed and one that just sounds like the room was better than it actually was.
I think the Pro version really earns its higher price point when you’re dealing with challenging recordings where a single global reduction amount either does too much in the highs or not enough in the lows. Being able to address those problems independently across the spectrum is what makes this a professional-grade tool rather than just a consumer convenience.
- Six Independent De-Reverberation Bands
Each of the six bands can be independently adjusted up to 200% reduction strength, giving you far more surgical control than any single-knob approach. You can visually set the frequency range and intensity for each band directly on the graphical display, and I found that using two or three bands focused on the most problematic regions while leaving the rest at moderate settings consistently produced the most natural-sounding results.
The ability to push individual bands to 200% is something you won’t find in the standard version, and it’s genuinely useful on recordings where a specific frequency range has severe reverb buildup that lighter processing can’t adequately address without over-treating the rest of the spectrum.
- Three Dedicated Neural Networks
Just like the standard version, you get separate neural network modes for dialogue and vocals, but the impact of choosing the right one is more noticeable here because the multiband processing amplifies the differences between how each model identifies and separates reverb.
I’d recommend always switching between the dialogue and vocal networks when working on singing to see which one introduces fewer artifacts on sustained notes and vibrato, because the vocal-trained network handles the harmonic complexity of pitch and melody more gracefully than the speech-optimized model in most cases I tested.
- Tail Smoothing for Visual Matching
This is a feature aimed squarely at post-production for film and video, where it’s not always desirable to completely eliminate the reverb tail because doing so can make dialogue feel disconnected from the visual environment. Tail Smoothing lets you shape how the remaining reverb decays rather than just cutting it off, so you can match the dryness of your processed dialogue to the room the audience sees on screen.
I found this especially useful when editing scenes that cut between different locations, because you can standardize the reverb characteristics across takes without making everything sound artificially dead.
- Frequency Analyzer Display
A small real-time frequency analyzer on the right side of the interface shows you where in the spectrum reverb is being detected and removed, which provides useful visual context for your band placement decisions.
- Presence Enhancement
After removing reverb, recordings can sometimes lose a bit of high-frequency sparkle and sound slightly dull or flat, because the algorithm inevitably takes some of the harmonic content along with the reflections.
The Presence control lets you dial in additional high-frequency clarity to compensate, effectively restoring the sense of detail and air that can get diminished during processing. I found this most useful on female vocals and brighter dialogue recordings where the top end really matters for intelligibility and naturalness, and it’s calibrated well enough that moderate settings add shimmer without introducing harshness.
- Built-In Output Limiter
A limiter at the end of the signal chain catches any peaks that the de-reverberation process might introduce, which prevents clipping artifacts when you’re pushing the processing hard on problematic material.
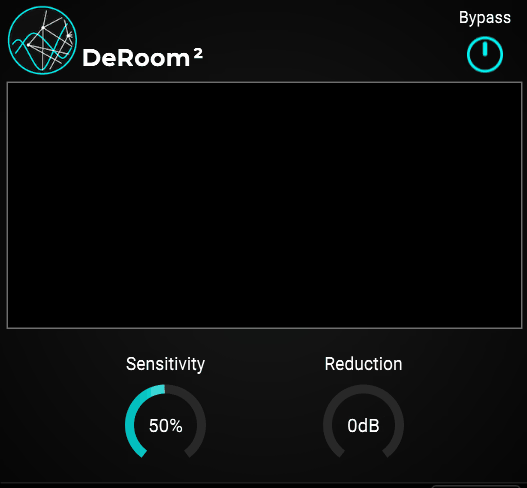
2. Accentize DeRoom2
What drew me to Accentize DeRoom2 initially was how well it handles situations where the talent was moving around the room during the recording. A lot of de-reverb plugins work great on consistent, stationary sources, but the moment the distance from the microphone changes or the angle of reflections shifts, they can struggle to keep up.
The second generation of the algorithm brought a completely reworked neural network that Accentize trained on an even larger set of room recordings than the original, and I noticed the improvement is most apparent on larger rooms with long reverb tails where the first version sometimes lost track of the changing acoustics.
The standard version keeps things approachable with automatic room detection and a straightforward amount control, while the Pro version opens up a much deeper set of tools for demanding post-production work. Both process in real time and integrate directly into your DAW without requiring any external applications.
- Automatic Room Size Detection
The algorithm estimates the room characteristics on its own by analyzing the incoming signal, which means you don’t need to manually tell it whether you’re dealing with a small booth or a cathedral. During its training phase, the neural network processed thousands of different ambience recordings, so it can recognize and respond to a wide range of acoustic environments without manual intervention.
I found this particularly reliable on dialogue recorded in medium to large spaces with noticeable tails, and the automatic estimation updates continuously as the signal changes, which is why it handles moving sources better than tools that assume a fixed room throughout the recording.
These are the features that comes purely wih Pro2 Version, so keep that in mind:
- Spectral Focus Mode (Pro)
This is where DeRoom Pro2 really separates itself from simpler de-reverb tools. The Spectral Focus Mode lets you target specific frequency ranges for more aggressive processing while leaving other parts of the spectrum less affected.
I appreciate this because reverb doesn’t always need to be removed uniformly. Sometimes the low-mid buildup is the real problem, and the high-frequency air actually sounds fine and should be left alone.
Being able to concentrate the heaviest processing on the 200 to 800 Hz range where room resonances tend to accumulate, while barely touching the highs, consistently gave me more natural results than applying the same amount of reduction across the entire spectrum.
- Attack and Release Controls (Pro)
The Pro version (not on the image) gives you manual control over how quickly the processing engages and disengages, which is critical when you need to preserve the natural onset of words or transients while still catching the reverb tail that follows.
I noticed that adjusting the attack even slightly can make the difference between processing that sounds transparent and processing that feels like it’s clamping down on the beginning of each phrase. Longer release times allow the algorithm to hold onto the reverb longer before letting it through again, which can be useful when you want a smoother, more gradual transition rather than an abrupt cut.
- Separate Left and Right Channel Processing (Pro)
Rather than applying identical processing to both channels, DeRoom Pro2 can treat the left and right channels independently, which matters when the stereo image of the room sound isn’t symmetrical.
3. Waves Clarity Vx DeReverb
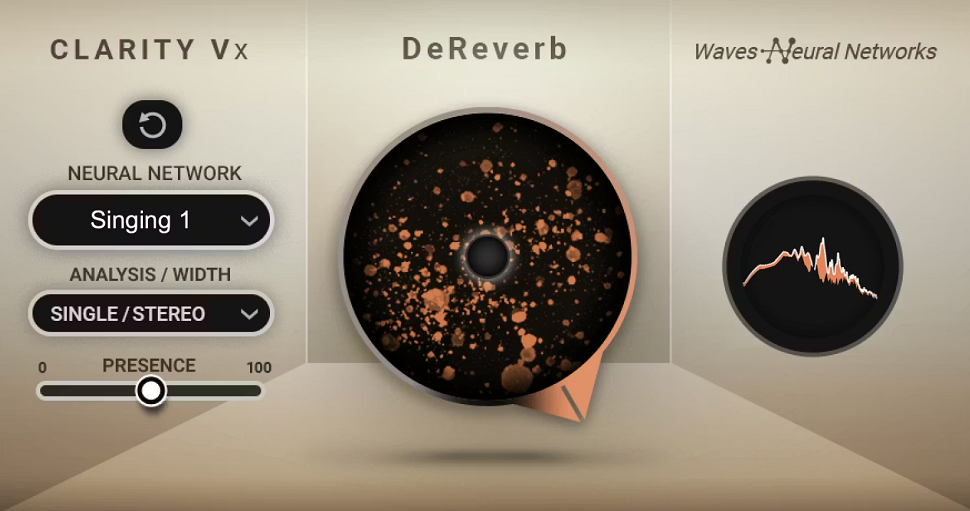
For anyone who needs reverb gone from a vocal or dialogue track and doesn’t want to spend twenty minutes tweaking parameters, this is probably the fastest route to a clean result. Waves Clarity Vx DeReverb is built around the Waves Neural Networks engine and is designed to be as close to a one-knob solution as this kind of processing can realistically get.
I found that at moderate settings it does a genuinely impressive job of making a recording sound like it was captured in a treated room, even when the original was tracked in a living room or glass-walled office.
The key is restraint. At lower settings the processing stays transparent and natural, and I think that’s really where this plugin lives best. It’s not trying to be the deepest or most configurable de-reverb on the market, and for a lot of people that simplicity is exactly the point.
- One-Knob AI Reverb Removal
The main interface is centered around a single large control that adjusts the amount of reverb reduction applied to the signal. Behind that simple knob is a neural network that’s been trained on recordings in a wide variety of acoustic spaces, from tight booths to large halls, and it handles both short and long reverb tails in real time.
I appreciate that this simplicity doesn’t come at the cost of quality, because the algorithm genuinely preserves the character and tone of the voice while pulling back the room. For podcasters, voiceover artists, and anyone working with dialogue in untreated spaces, this single knob can get you most of the way to a professional-sounding result without touching anything else.
- Multiple Neural Network Modes
You get a choice of neural networks optimized for different source types, including separate modes for spoken dialogue and sung vocals.
This is a meaningful distinction because the tonal and dynamic characteristics of speech versus singing are different enough that a single model can’t always handle both equally well, and I noticed the vocal mode tends to be more forgiving with sustained notes, vibrato, and pitch variation.
Switching between them on the same recording can reveal surprisingly different results, so I’d recommend always testing both before committing to a final setting, especially on material that sits somewhere between speech and singing like spoken word over music.
- Combined Noise Reduction Option
One of the neural network selections includes a combined reverb and noise reduction mode, so you can address both background hiss and room ambience simultaneously without needing a separate de-noise plugin in the chain.
I’d say this is particularly useful for podcast and video production work where the recording environment introduced multiple problems at once.
Rather than stacking two different processors and worrying about how they interact with each other, you get a single pass that handles both issues together, which tends to produce fewer cumulative artifacts than running two separate tools in series.
4. Acon Digital DeVerberate 3
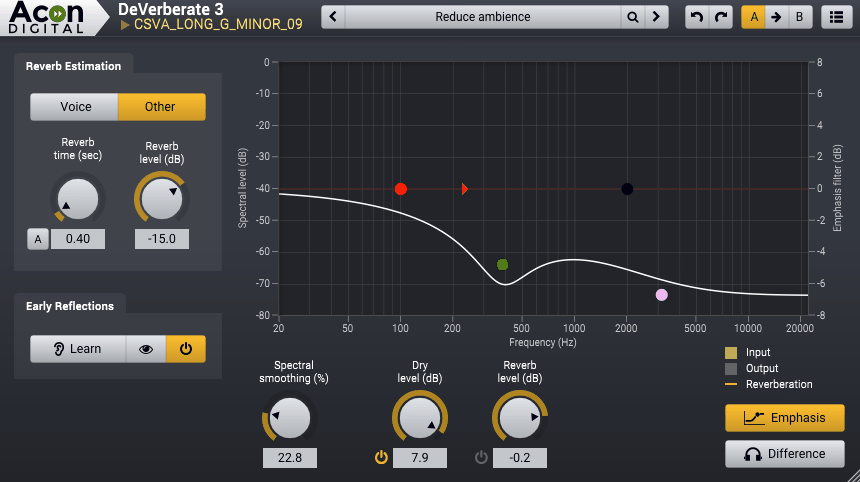
The thing that impressed me most about Acon Digital’s approach is that DeVerberate 3 includes two entirely separate algorithms in a single plugin. You get a deep learning-based Voice mode for dialogue and a classic signal processing mode carried over from version 2 that works on music, instruments, and other non-voice sources.
Most competing plugins force you to choose between AI-powered voice processing or general-purpose reverb reduction, but having both available means you’re covered regardless of what ends up on your timeline.
I’ve seen a lot of post-production professionals describe this one as their go-to, and after spending time with it I understand why. The default settings in Voice mode alone can fix a surprising amount of room sound with essentially zero tweaking, and the price point is notably lower than most of its direct competitors. For anyone building their first serious restoration toolkit, this is an easy recommendation.
- Dual Algorithm Design with Voice and Music Modes
The AI-based Voice mode uses a neural network trained on thousands of recordings to automatically separate dialogue from reverb, while the classic reverb reduction algorithm from version 2 remains available for instruments, drums, and full mixes.
I found the classic mode still holds up well for tightening room sound on drum overheads and acoustic guitars where the AI mode isn’t necessarily the right tool, because it’s designed to handle the broader harmonic complexity of musical sources without the voice-specific assumptions that the neural network relies on. Having both means you genuinely don’t need to buy separate plugins for different types of source material, and you can even use them together on the same track for layered processing.
- Early Reflections Filter
This is the feature that really sets DeVerberate 3 apart from the crowd. The plugin uses sophisticated statistical methods to estimate the impulse response of early reflections and then cancels them, which addresses the hardest part of the de-reverb problem that most competitors still struggle with.
Long reverb tails are relatively easy for any decent algorithm to handle, but those short, boxy reflections from nearby walls are what make a recording sound like it was tracked in a closet or a tiled bathroom.
- Emphasis Filter with Frequency Weighting
The emphasis filter gives you high and low shelving filters with variable slopes, plus high and low peak filters with adjustable bandwidth, all of which control how much de-reverberation is applied across different frequency ranges.
Handles in the frequency response curve let you visually sculpt where the processing focuses its energy, and I found this critical for avoiding that hollow or metallic quality that can happen when reverb removal is applied too uniformly across the spectrum. You can essentially tell the plugin to work harder on low-mid room buildup while being gentler on the highs where the voice needs its air and presence to remain intact.
- Triple Spectral Display
The plugin shows you three spectral representations simultaneously: the input signal, the output after processing, and the estimated reverberation that’s being removed.
- Independent Direct and Reverb Level Controls
Rather than giving you a single reduction amount, DeVerberate 3 lets you independently adjust the level of the direct sound and the reverberated sound, which means you can reduce the reverb while also boosting the dry component for maximum clarity.
I think this dual-slider approach gives you finer control over the final balance than a single knob ever could, and it makes it much easier to achieve a result that sounds natural rather than processed. You can also use this creatively to boost the reverb level if you actually want more ambience, which is useful for matching room characteristics across different takes or creating a sense of distance in a mix.
5. SPL De-Verb Plus
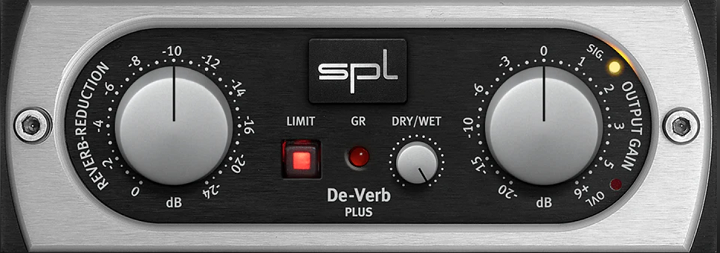
Here’s a plugin that takes an entirely different philosophical approach to the reverb problem. While every other tool on this list uses some form of spectral analysis or neural network to identify and separate reverb, the SPL De-Verb Plus uses Differential Envelope Technology borrowed directly from the legendary SPL Transient Designer hardware.
Instead of trying to “hear” the reverb and surgically extract it, De-Verb Plus shortens the decay envelope of your sounds in a way that reduces reverb as a natural byproduct of reshaping the signal’s sustain characteristics.
This distinction matters more than it might seem at first. Because the processing works with the envelope rather than the frequency content, it tends to feel more musical and less clinical.
It won’t give you the same degree of reverb removal that a dedicated AI-powered tool can achieve, but for music mixing applications like tightening drum overheads, reducing room bleed on vocals, and controlling instrument sustain, it does its job with a smoothness that’s hard to replicate with other approaches.
- Differential Envelope Technology
The core processing is based on SPL’s level-independent envelope shaping, which means it doesn’t rely on a threshold to decide when to act the way a gate or expander would. It continuously tracks the input signal’s characteristics and shortens decay curves in a musical way that follows the natural dynamics of the source material.
I found this makes it behave more like an intelligent sustain control than a traditional noise gate, which is why it avoids the choppy, unnatural artifacts that gates can introduce on complex material with overlapping sounds.
The algorithm is modeled by Brainworx to match the behavior of the original Transient Designer hardware’s sustain knob as closely as possible, and having used both, I’d say the plugin gets remarkably close to the feel of the hardware unit.
- Single-Knob Reverb Reduction
The main control is one knob that reduces the decay and sustain of whatever you feed through it, and the simplicity is genuinely refreshing compared to plugins where you spend more time configuring than actually listening. Turn it left, the room gets quieter.
- Built-In Soft Peak Limiter
A soft peak limiter with its own gain reduction meter sits at the output stage to catch any level spikes that might occur during processing.
6. Zynaptiq UNVEIL

Most reverb removal plugins are designed with a specific source type in mind, usually dialogue or vocals, and they work best when processing isolated tracks. Zynaptiq UNVEIL doesn’t operate within those boundaries.
It’s built on a proprietary MAP (Mixed-Signal Audio Processing) technology that uses a model of the human auditory system to distinguish between what it considers perceptually significant signal components and what it classifies as reverb or “mud.”
This approach works on any channel count from mono all the way up to surround formats, and it doesn’t require the source to be a human voice, which immediately sets it apart from the AI-trained competition.
I’d describe UNVEIL as a signal focusing tool that happens to be exceptionally good at reverb manipulation. I’ve used it on everything from vintage drum breaks to amped guitar recordings to full mixes, and it handled each source without needing to switch modes or profiles. The creative applications alone make it worth investigating, even if you already own a more conventional de-reverb plugin for dialogue work.
- Focus Control for Bidirectional Reverb Balance
The primary control is the Focus parameter, which adjusts the balance between the direct sound and the reverberated components of your signal. Turning it to the right removes reverb, while turning it to the left actually attenuates the dry signal and brings the reverb forward, which is a capability you won’t find in most competing plugins.
I found this bidirectional control incredibly useful for matching perceived room distance across different takes and angles in post-production work, and it’s equally valuable in music production where you might want to push a sound further back in the mix by enhancing its ambience rather than adding a new reverb on top of what’s already there.
- 10-Band Focus Bias for Frequency Targeting
Above the main Focus control sits a bank of 10 sliders that let you bias the reverb detection toward specific frequency regions. This is how you tell UNVEIL where to concentrate its attention when the algorithm isn’t naturally locking onto the reverb you want to address, and I noticed it makes a real difference on material where the reverb character varies significantly across the frequency spectrum.
A snare drum with a lot of mid-range ring but clean high-frequency transients, for example, benefits enormously from biasing the Focus toward the midrange while leaving the top end alone. These sliders give you a level of frequency-dependent control that transforms UNVEIL from a simple one-knob tool into something much more precise.
- Universal Source Compatibility
Unlike AI-powered voice-focused tools, UNVEIL operates on dialogue, instruments, drums, full mixes, and sound effects with equal effectiveness because its perceptual model isn’t trained specifically on speech.
It works by identifying signal components that the human auditory system considers less significant, which includes reverb tails, room resonance, and general muddiness regardless of what produced them.
The surround support goes up to whatever channel count your DAW supports, making it one of the very few options available for film, game, and immersive audio work where you need to process more than stereo. I found this source-agnostic approach particularly valuable when working on sound design material where no voice-trained algorithm would be applicable.
- Reverb Characteristic Modification
Beyond simple attenuation, UNVEIL lets you manipulate the characteristics of the reverb itself using several specialized parameters. The t/f LOCALIZE control determines whether the processing targets broad or narrow frequency components, which affects how surgically the reverb is identified.
The t[REFRACT] parameter adjusts how sensitive the detection is to changes over time, while t[ADAPTION] controls the recovery time before the signal is reanalyzed, functioning similarly to a compressor’s release control.
I think these controls are what give UNVEIL its creative edge, because you can reshape the room sound rather than just removing it, which opens up possibilities for sound design that go well beyond standard corrective processing.
- IO Diff Monitoring for Verification
The IO DIFF button lets you hear the inverse of what you’re focusing on, effectively soloing the reverb component that UNVEIL is identifying and processing. I found this monitoring feature essential for making sure the algorithm isn’t accidentally classifying dry transients or important harmonic content as reverb, which can happen on complex material if the Focus Bias isn’t set up correctly.
Being able to listen to what’s being removed before committing to a setting saves a lot of back-and-forth, and it also serves as a useful educational tool for understanding how much reverb is actually present in a recording versus how much you’re just perceiving because of the mix context.
Hello, I’m Viliam, I started this audio plugin focused blog to keep you updated on the latest trends, news and everything plugin related. I’ll put the most emphasis on the topics covering best VST, AU and AAX plugins. If you find some great plugin suggestions for us to include on our site, feel free to let me know, so I can take a look!