Reaper is a very flexible DAW, but it really shines when paired with the right plugins. The right tools can change how you work, whether you’re recording instruments, making synth sounds, or finishing your mix.
This guide looks at both paid plugins that give professional results and free ones that offer great value. You’ll find drum libraries, wavetable synths, samplers, pianos, organs, bass tools, multi-effects, drum synths, saturation tools, dynamics processors, reverbs, and equalizers.
You don’t need every plugin on this list to make great music. But having the right tool for each job makes the process faster and more enjoyable. Whether you’re just starting out or looking to fill gaps in your current setup, you’ll find options here that fit your needs and budget.
1. Addictive Drums 2 (Drums Library)
Addictive Drums 2 is a reliable drum library that works well in any DAW. It stands out in Reaper because of the attention to detail in how the kits were recorded. The drums are multi-sampled with several velocity layers, so each hit changes based on how hard you play. This helps your tracks sound more natural and less mechanical.
You can use this plugin for rock, indie, jazz, pop, or electronic music, so it fits almost any genre. Each library comes with kit presets and ready-made MIDI grooves to help you get started quickly.
Here are some of the features you get:
- Large Drum Library and Expansion Choices
Addictive Drums 2 comes with over 130 presets, from clean and natural sounds to fully mixed, punchy options. You can quickly find a style that matches your track without spending a lot of time adjusting settings.
If you want more options, you can add full kits with ADpaks or choose individual drums with Kit-Piece Paks. This lets you build your own collection and only pay for what you need.
- Mixing Tools Included
Each drum has its own channel with EQ, compression, transient shaping, and saturation controls. You can easily adjust cymbals, kicks, or snares right inside the plugin. I often use these tools to quickly shape drum sounds without having to use REAPER’s mixer.
- MIDI Groove Library & Beat Transformer
The plugin offers hundreds of MIDI grooves sorted by style and feel. You can drag them into REAPER and edit them as you like. The Beat Transformer tool helps you change grooves, adjust swing, and move accents without having to edit each MIDI note by hand.
This is great if you want variety or a more natural feel without spending time programming every drum hit. It helps me work faster when I’m coming up with ideas or making full drum parts.
2. Opal Morphing Synth (Wavetable Synth)

What drew me to Opal is how polished it sounds from the start. You don’t have to deal with thin or digital-sounding presets. Everything comes across like it’s already mixed for a finished track, not just a demo.
Universal Audio made Opal as a hybrid analog-wavetable synth. This means you get warm analog-style waveforms along with modern wavetable movement in one plugin. That mix gives you both classic synth sounds and evolving, futuristic textures without needing other tools. I use it for hard-hitting bass, pads that feel alive, or leads that change as a song goes on.
The morphing filters and oscillators are where Opal stands out. You can blend between filter modes or move through wavetable positions smoothly, so the sound changes feel natural, not abrupt. When I’m making atmospheric layers or cinematic textures, this morphing saves me from using extra modulation plugins just to get evolving sounds.
Opal also includes studio-quality effects right inside the synth. It has vintage spring reverb, tape delay, modulation, distortion, and an 1176-style compressor built in. You can shape your sound from start to finish without switching between lots of other plugins.
Features:
- Analog-Meets-Wavetable
It has three oscillators that can switch between analog waveforms and 91 wavetables. You aren’t stuck with just one type of synthesis. I use analog mode for thick bass or classic leads, and switch to wavetables for sharper, more vocal-like sounds. The wavetables include digital, synth, complex, vocal, and instrument types, so there’s always something that matches the sound I’m looking for.
- Morphing Oscillators & Filters
The morphing feature lets you move smoothly between waveforms or wavetable positions in real time. With two multimode filters that can morph between low-pass, band-pass, high-pass, and notch modes, you get sounds that change naturally as your track plays.
I like using this for pads that need to stay interesting over several bars or for leads that change character partway through a verse.
- Multi-Seg Modulators
It comes with two programmable multi-segment modulators that work like advanced LFOs, envelopes, or step sequencers. You can draw detailed modulation curves that repeat, loop, or trigger just this. This lets you create rhythmic gating, evolving filter sweeps, or detailed parameter changes without needing extra MIDI or automation. When I want movement that feels more musical and less mechanical, I use these modulators first.
- Built-In Professional Effects
The built-in effects rack has reverbs, delays, modulation, and dynamics processing. You can finish your sound completely inside Opal without using other plugins. I use the tape delay and spring reverb a lot because they add warmth and space without making the mix muddy. The 1176 compressor helps bring everything together when I layer several Opal tracks.
3. Native Instruments Kontakt 8 (Sampler)
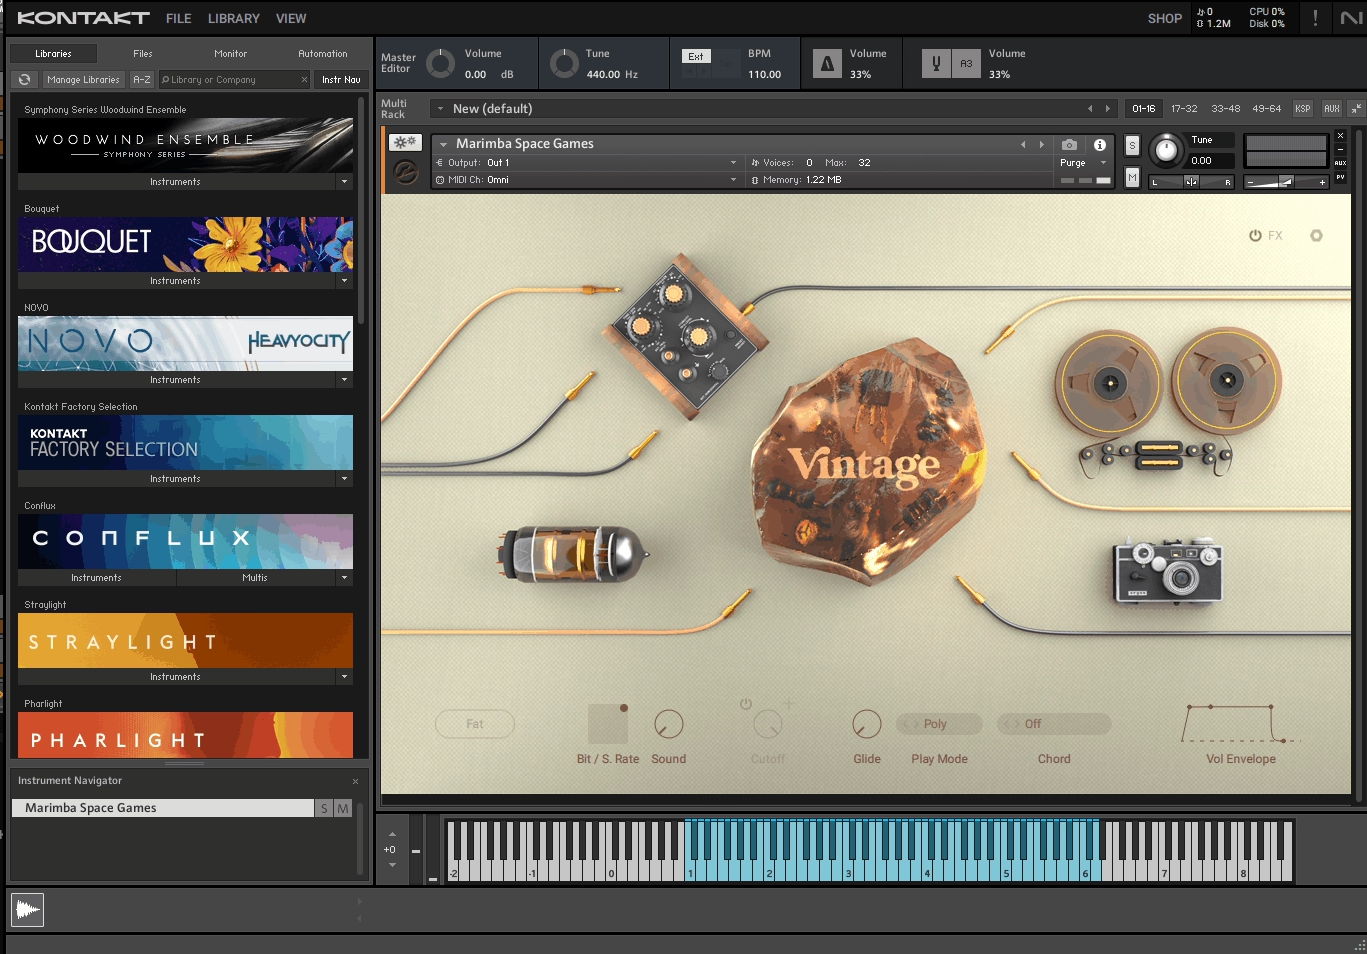
Kontakt 8 really changed the way I see instrument libraries in REAPER. It’s more than just a tool for loading sounds—it opens the door to thousands of professional instruments that would be impossible to record on your own.
What I like most about Kontakt is how it connects realistic acoustic instruments with creative sound design. One moment, you can load a full orchestral string section; the next, you can switch to a hybrid sci-fi pad. Both are available in the same plugin and use the same workflow.
Kontakt 8 runs smoothly in REAPER as a VST3, AU, or AAX plugin on both Windows and macOS. I usually load it once and add several instruments in a single instance, which keeps my project tidy and helps my computer run efficiently. I use it in almost every session, especially when I want sounds that are realistic or layered.
- Massive Library Compatibility
The main reason I use Kontakt 8 is that almost every major sample library developer makes their products for it. This gives you quick access to orchestral ensembles, vintage pianos, world instruments, acoustic guitars, drum kits, sound design libraries, and much more.
It’s like having a universal key to a huge world of sounds. I can load several instruments into one Kontakt instance and create layered setups without filling my REAPER project with lots of separate tracks.
- Deep Modulation and Scripting Engine
Kontakt does more than just play audio files. It offers a full modulation matrix, filters, LFOs, envelopes, velocity layers, round-robin sampling, and zone layering, all of which help instruments sound lively and expressive.
If you want to explore further, the scripting engine allows you or library designers to program custom articulations, smart legato transitions, key-switching, and dynamic behaviors. I’ve used libraries where the violin legato responds like a real player, all because of Kontakt’s scripting features.
- Professional Mixing Tools Built In
One thing that surprised me was how much mixing control Kontakt gives for each instrument. You get multiple audio outputs, built-in EQ, convolution reverb, modulation effects, and per-zone volume, pan, and filter envelopes. I can shape the sound before it reaches my REAPER mixer. The disk streaming and memory management are also reliable, so even with large orchestral templates, Kontakt remains stable and efficient.
4. Arturia Piano V3 (Piano)

Piano V3 by Arturia is different because it uses physical modeling instead of huge sample libraries. It creates piano sounds in real time by simulating how the hammers, strings, and soundboard work together.
I like how much control you get. You aren’t limited to one recorded piano with a fixed mic setup or room. You can move the mics, change how hard the hammers hit, adjust the age of the strings, set the lid angle, and fine-tune sympathetic resonances. It feels more like having several pianos you can make your own, not just picking a preset.
The variety grabbed me right away as Piano V3 offers 12 piano models, including classic American and German grands, uprights, and creative options such as Glass Grand, Metal Grand, and Plucked Grand. This range works well for both traditional music and experimental sound design.
What you get:
- Physical Modeling Engine
Instead of using 50+ gigabytes of samples, Piano V3 uses around 3 GB and calculates sound in real time. That keeps your system running smoothly, especially helpful in REAPER when you’re stacking multiple instruments. You get an authentic piano response without the storage headaches that come with sampled libraries.
- Deep Customization Controls
You can change almost every part of how the piano acts. Make the hammers hit softer or harder, detune the strings for an old-school sound, move the virtual mics, and adjust things like soundboard resonance, string ringing, and even pedal noises.
With this much detail, you can get the exact sound and feel you want, whether you need a bright pop piano or a warm, worn upright.
- Built-In Effects & Mixing Tools
Piano V3 has built-in studio effects like EQ, compressor, reverb, and room simulation. There are also easy controls for brightness, dynamics, stereo width, and timbre. I like this because I can get a finished, mix-ready piano sound without needing a bunch of extra plugins. It saves time and keeps things simple.
The Glass, Metal, and Plucked models let you try new sounds beyond a regular piano. You can make ambient pads, percussive hits, or unique melodies that still sound like a piano but are more experimental. If you score films, make electronic music, or just want something new, these models are great places to start.
5. Arturia B-3 V (Organ)

Whenever I want real organ sounds in REAPER, I always reach for Arturia B-3 V first. This isn’t just a sample pack trying to sound like an organ. Arturia used physical modeling, so the software really recreates how a Hammond B-3 and Leslie speaker work together.
The difference is clear. You get tonewheels, drawbars, key clicks, and that classic rotating speaker sound, all reacting just like a real organ. I can move the drawbars while playing and hear the harmonics change as expected. The rotary speaker emulation alone makes it a must-have, especially if you like rock, jazz, soul, or gospel.
Features:
- Physical Modeling Engine Instead of Samples
B-3 V doesn’t use recordings. Instead, it creates sound in real time by simulating the real parts of a tonewheel organ. This gives you much more control than any sample library. You can change drawbar leakage, set key-click volume, and even decide how much background noise you want.
All these details matter when you want a vintage feel or need a modern, clean sound.
- Full Drawbar and Percussion Control
Each manual has nine drawbars to shape your sound. It’s easy to switch from warm jazz chords to bold rock leads just by moving a few drawbars. The percussion settings let you add that classic attack on the 2nd or 3rd harmonic, which works great for sharp organ lines or solos.
You also get a tube-style preamp drive. Turning up the gain gives you that crunchy, overdriven sound without needing another plugin.
- Built-In Effects Chain with Rotary Speaker
One thing I really like about B-3 V is the built-in effects rack. You get rotary speaker modes like chorale, tremolo, and stop, plus reverb, delay, chorus, flanger, wah, compressor, and amp simulation. This lets me create a complete organ sound without switching between different plugins.
The Leslie emulation is especially good. It really captures the swirling sound from classic records, and you can set the rotor speed and mic placement however you like.
- Modulation and Sound Design Options
Since it’s software, B-3 V can do more than a real Hammond. You can use LFOs, step sequencers, and envelopes to change the drawbars, which lets you create evolving pads, rhythmic textures, and new sounds. I’ve used it for ambient music and film cues when I want something organ-based but different. It’s not only for traditional organ fans.
6. IK Multimedia MODO Bass 2 (Bass Guitars Collection)

I chose MODO Bass 2 as one of the best REAPER plugins because it does things differently from typical sample libraries. Rather than using pre-recorded notes, it models how 22 different bass guitars actually behave in real time.
This gives you the natural feel of strings, frets, pickups, and even hand positions, all without using up lots of hard drive space. I can easily adjust string gauges, pickup types, and playing styles, which gives me much more control than any sampled bass instrument I’ve used before.
You get a wide range of sounds, from punchy electric basses to smooth fretless and upright acoustic models. This variety lets you move between rock, jazz, funk, or cinematic styles without changing plugins or loading new libraries.
Here are some key features worth mentioning:
- Physically Modeled Sound Engine
MODO Bass 2 uses physical modeling to create sound instead of samples. This means you get more realistic details like slides, string bends, and fret noise that react to how you play or program your MIDI.
I like that I can change string materials, move the pickups, or switch between active and passive electronics even after writing a bassline. It feels like having a full bass workshop in one plugin.
- 22 Bass Models, Including Fretless and Upright Options
The plugin offers a wide range of bass types. You get classic electric basses for pop and rock, fretless basses for jazz and R&B, and upright basses for acoustic or orchestral music. Each model has its own sound and style, so you’re ready for any genre.
- Built-In Amps, Effects, and Signal Chain
MODO Bass 2 includes amp modeling made for bass and a full effects chain with compression, distortion, envelope filters, chorus, and delay. You don’t need extra amp sims or effect plugins to get a complete bass sound. I can shape everything from clean fingerstyle to aggressive slap bass right inside the plugin.
- Patterns Library for Quick Basslines
If you don’t play bass, the built-in patterns section is really helpful. It has pre-played grooves in different styles that you can drag into REAPER and edit. These patterns sound natural, not like stiff MIDI loops. I often use them for quick mockups or when I need ideas for a bassline.
7. Native Instruments Guitar Rig 7 Pro (Pedals, Amps & More)

If you want a full amp and effects rack inside your DAW, Guitar Rig 7 Pro is one of the most flexible choices out there. I’ve used it for years, and now I rely on it for much more than just guitar sounds.
It’s worth checking out because it comes with 26 virtual amps and over 115 effects, pedals, and rack modules in one plugin. You can set up complete signal chains like a real pedalboard and amp rig, but without any gear cluttering your space.
Intelligent Circuit Modeling (ICM) technology makes it stand out from older amp sims. Native Instruments uses machine learning to capture how real hardware responds to your playing. As a result, the amps react more naturally to your dynamics and avoid the flat, lifeless sound of some older digital sims.
Features:
- Amp Models & Cabinet IRs
Guitar Rig 7 Pro adds four new ICM-modeled amps to its existing library, offering everything from clean vintage tones to heavy modern metal sounds. Each amp includes matching cabinet simulations, and you can also load your own impulse responses for custom cab sounds.
The custom IR loader is great if you want a specific studio-quality tone. I’ve used third-party IRs and mixed them with the built-in cabs to get sounds that feel more personal and polished.
- Effects Rack & Lo-Fi Tools
Besides amps, you get over 100 new rack presets and many individual effects modules. The four new lo-fi components (tape wobble, noise machine, vintage vibrato, and analog texture tools) are perfect for adding warmth or character to synths, vocals, or even full mixes.
I would use these effects on non-guitar tracks, as they add a cassette-tape or vinyl feel without requiring extra plugins.
- Signal Routing & Frequency Splitting
You can split your signal by frequency, stereo channels, or mid/side, and send each part through different effects chains. This is especially useful for bass, where you want a clean low end but gritty mids and highs. It also works well for parallel distortion on guitars, letting you blend clean and dirty sounds.
This routing flexibility makes Guitar Rig feel more like a modular studio rack than just a basic amp sim.
- Built-In Loop Machine
Guitar Rig 7 Pro has a looper module that lets you sketch ideas, jam, or build loops right inside the plugin. If you’re working on song ideas in Reaper, you can loop parts, layer effects, and try out tones before adding anything to your timeline. This helps keep your creative process moving without breaking your workflow.
8. Devious Machines Infiltrator 2 (Multi FX)

When I need a creative multi-effect that goes beyond basic chains, Infiltrator 2 is my go-to. It’s different from stacking ten separate plugins because everything lives in one interface with deep modulation and sequencing built in from the start.
What makes it a best plugin for Reaper is how much control you get over movement and transformation. Infiltrator 2 lets you stack up to ten effects at once, then modulate and sequence them in ways that feel more like sound design than typical mixing.
I use it constantly for everything from drum loop mangling to evolving pads to glitchy vocal effects. The ability to draw custom modulation curves and trigger effects rhythmically with the step sequencer means you can create textures that breathe and evolve without tedious automation.
Features:
- 54 Effect Modules for Deep Sound Design
Right away, you get access to 54 different effects including filters, distortions, spectral processors, time manipulation, reverb, delay, vocoder, and more. I love that it covers both traditional mixing effects and wild experimental tools like granular stretch and formant filters.
You can go from subtle analog warmth to reality-bending transformations without leaving the plugin. This range makes it perfect when I want to explore sounds I wouldn’t normally reach for.
- Advanced Modulation & 32-Step Sequencer
Each effect slot includes two multi-segment envelopes that you can draw however you want, plus an envelope follower that reacts to your audio. On top of that, the 32-step sequencer lets you turn effects on and off rhythmically, creating stutters, glitch patterns, or evolving textures that sync to your project tempo.
I can map multiple parameters to macro controls for quick tweaking or live performance. This level of control turns static effects into moving, breathing elements.
- Over 1500 Presets Ready to Go
When I’m short on time or need instant inspiration, I dig into the 1500+ presets that come with Infiltrator 2. They cover ambient, glitch, dubstep, cinematic, experimental, and more, all created by professional sound designers. Each preset comes with modulation and macros already mapped, so I can load one up, tweak a few knobs, and have something usable in seconds.
- Built-In Dynamics & Master Section
Beyond creative effects, Infiltrator 2 includes a master compressor, multiband limiter, and drive module. This means I can shape loudness, control peaks, or add grit without bouncing to another plugin. It’s especially useful when I’m processing a full bus or want to keep everything self-contained during sound design sessions.
9. Beatsurfing RANDOM Metal (Randomizer)

RANDOM Metal stood out to me because it makes percussion feel alive and unpredictable, not just like a set of static samples.
What sets this plugin apart is its 20+ synth engines that generate percussive sounds from scratch. You’re not loading samples. You’re sculpting metallic hits, shakers, cymbals, and glitchy textures in real time using synthesis.
The RANDOM button is where the fun starts. Each time you press it, the plugin changes its settings and gives you a brand new sound. You can use the deviation slider to decide if you want small tweaks or a totally different result, like turning a hi-hat into something unrecognizable.
I reach for RANDOM Metal when I want percussion that stands out from everything else in my track. It works great for experimental electronic music, cinematic sound design, or adding unique metallic layers to hybrid drum kits in Reaper.
Features:
- Randomization Engine with Deviation Control
The RANDOM button is what really sets this plugin apart. Press it once and you get a new percussive sound each time. The deviation control lets you choose how much the sound changes, so you can keep things subtle or go for total chaos if you want.
I’ve discovered sounds I never would have made on my own just by clicking through a few random options. It feels like having a creative assistant who comes up with ideas faster than I can try them.
- 20+ Synth Engines for Percussive Textures
RANDOM Metal offers more than 20 engines, covering everything from sharp metallic hits to gentle shakers and bursts of industrial noise. Each engine has its own feel, and switching between them can totally change the mood of your percussion.
You can explore textures that don’t exist in traditional drum libraries, which is exactly what I need when I’m working on atmospheric or experimental tracks.
- XY Pad and Per-Pad Parameter Control
Each of the 12 pads has its own set of controls for decay, pitch, impact, stereo placement, and more. The XY pad lets you morph between parameter sets in real time, which makes it easy to automate evolving percussion throughout a track. I love using this feature during breakdowns or transitions where I want the percussion to shift and breathe with the arrangement.
- Chromatic Mode for Pitched Percussion
You can switch RANDOM Metal into chromatic mode and play it like a melodic instrument across your keyboard. This turns it into a pitched percussion synth, which is perfect for creating tonal hits, melodic rhythm layers, or sound design elements that need to follow your track’s key.
10. XLN Audio RC-20 Retro Color (Saturation & Character)
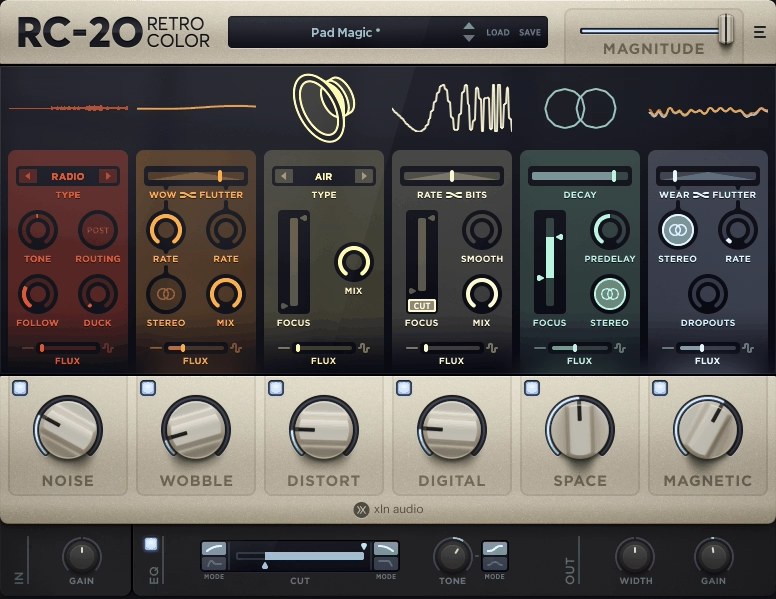
RC-20 is my go-to plugin when a track sounds too clean. It gives you the warmth and grit of old vinyl, tape machines, or vintage samplers, all without needing the actual hardware.
RC-20 Retro color is considered one of the best Reaper plugins, as it combines six effect modules into a single interface. You get Noise, Wobble, Distortion, Digital degradation, Space, and Magnetic effects all working together or separately. Each one brings a distinct vintage character that you can dial in or stack however you want.
The plugin works well on single tracks like drums or vocals, but I also use it on full mixes when I want a more lived-in sound. You can keep it subtle with a bit of tape hiss and saturation, or go all out for a lo-fi effect. This flexibility makes it useful in more situations than you might think.
- Six Effect Modules for Complete Control
RC-20 breaks vintage sound into six modules you can combine as you like. The Noise module adds vinyl crackle or tape hiss. Wobble gives you pitch changes like an old cassette. Distortion adds analog warmth or heavy fuzz.
The Digital module crushes bit depth for that old sampler vibe. Space adds retro reverb, and Magnetic simulates tape dropouts and fluctuations. Being able to turn each one on or off lets you build exactly the texture you’re after, instead of settling for a one-size-fits-all vintage preset.
- Flux Control for Organic Movement
Every module has a Flux knob that adds randomness and movement to the effect. Instead of static crackle or unchanging wobble, Flux makes everything evolve over time as real analog gear would. This keeps your track feeling alive rather than like you just slapped a filter on it. I use this constantly on pads and keys to keep them shifting subtly in the background.
- Magnitude Slider for Easy Automation
The Magnitude control adjusts all active effects at once, which is great for transitions. You can automate it to bring in vintage character during a breakdown or push a drop into lo-fi without changing six knobs. One slider controls everything, making creative changes much faster.
11. Waves IDX Intelligent Dynamics (Smart Dynamics)
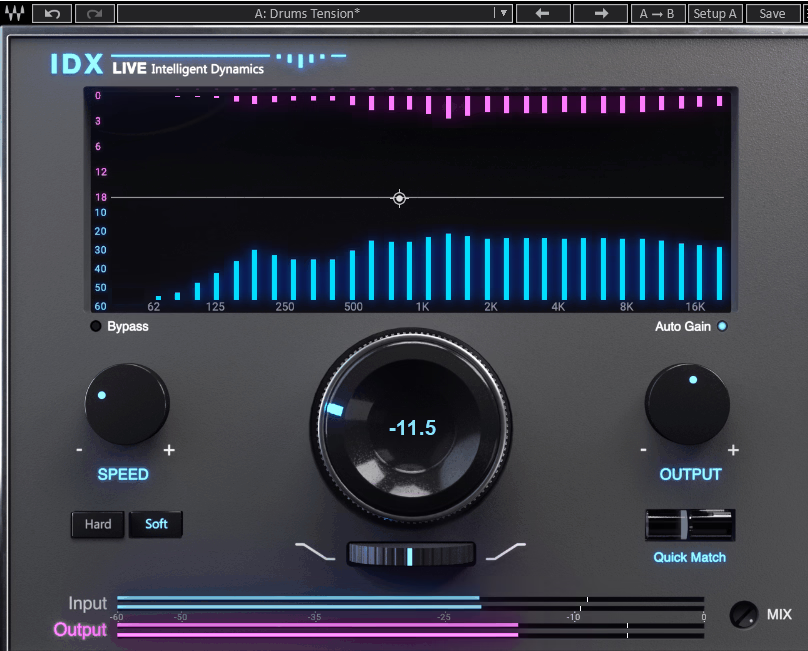
IDX by Waves works differently from the compressors I usually use. Rather than just reducing the volume of everything that gets too loud, it focuses on the frequencies that are taking up too much space and compresses only those parts.
The main thing that sets this plugin apart is how it responds to different frequencies. When I use it on a drum bus or synth track, IDX finds the parts of the sound that are making the mix crowded and reduces them, but it leaves the key tones untouched. This gives you punch and clarity without the pumping effect that some compressors cause.
The interface is very simple, which helps when I need to work quickly. There is one main knob for adjusting the amount of processing, along with a few extras like output level and a speed switch. You can choose between Hard and Soft modes, depending on whether you want stronger control or a smoother sound.
Features:
- Smart Frequency-Aware Compression
IDX does not compress the entire signal the same way. It analyzes your audio as it plays and finds which frequency bands are too crowded or muddy, then compresses only those areas while leaving the rest of your sound unchanged.
This lets you add energy and focus without losing the unique sound of your track. I have used it on vocals that sounded flat, and it helped them stand out in the mix without making them sound too processed.
- One-Knob Workflow with Quick Match
The main Dynamics knob handles most of the work. If you turn it up, IDX adds more processing; if you turn it down, it does less. There is also a Quick Match feature that automatically balances the input and output levels, making it easy to compare the processed and original sound.
This makes it much easier to tell if the plugin is really improving your sound or just increasing the volume. The Mix knob lets you blend the original and processed signals, which is great for parallel processing when you want a more subtle effect.
- Built-In Tilt EQ for Tonal Balance
Once IDX has finished compressing, you can use the Tilt filter to make the overall tone brighter or darker. This is useful because dynamics processing can change how a track sounds in the mix. Instead of loading another EQ plugin, you can adjust the tilt and keep working. It is a small feature, but it saves time and helps your workflow.
12. Pulsar Audio Primavera (Spring Reverb)

Spring reverb often feels limited, but Primavera changes that.
I was immediately impressed that Pulsar used physical modeling instead of impulse responses. This means you aren’t limited to static, sampled spring sounds. You can control how the springs behave in real time, which opens up creative options I didn’t expect from a reverb plugin.
I use Primavera when I want vintage character without dealing with real hardware. It’s great for adding warmth to vocals, giving synths a retro feel, or making lo-fi textures on drums. This plugin handles all of it easily.
Six Distinct Spring Tank Models
Primavera offers six spring reverb tanks, each with a unique sound. You can choose from clean, hi-fi springs to gritty, vintage models. The “Great British Spring” sounds open and airy on vocals. For a classic surf-rock feel, the “Twang” tank is perfect. The “HR12” and “SR202” models have a vintage Japanese character that works well for retro or experimental tracks.
- Spring Tension & Excitation Controls
The Tension control lets you adjust how tight or loose the springs feel, so you can change the tone from warm and relaxed to bright and metallic.
Excitation simulates striking the springs, creating the reactive “boing” sounds that make spring reverb unique. I’ve used this on percussion to add unusual textures you can’t get from standard reverb plugins.
- Built-In Saturation & Mix Controls
Primavera has tube and germanium preamp saturation options that add warmth and grit before the reverb. It also offers ducking with sidechain support, so your reverb tails won’t cover up your dry signal.
The highpass and lowpass filters, stereo width control, and presence knob let you shape how the reverb fits in your mix. I like that I can add character without making things muddy or too wet.
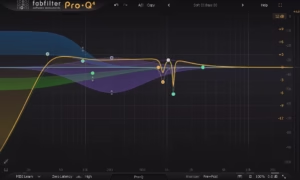
13. FabFilter Pro-Q 4 (Pro Equalizer)
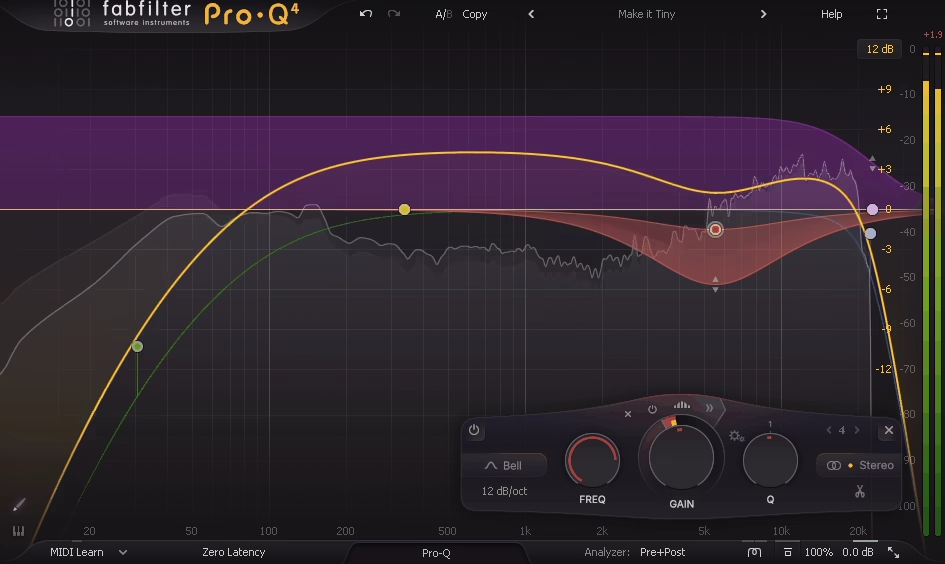
Whenever I need an EQ that’s precise, fast, and flexible, I go straight to Pro-Q 4.
It’s built around a clean, surgical approach to mixing and mastering. But what makes Pro-Q 4 stand out isn’t just its transparency; it’s the spectral dynamics feature that targets problem frequencies inside a band instead of affecting the whole range. That means you can fix harshness or mud without dulling everything around it.
I really like the EQ Sketch tool. You draw the curve you want, and Pro-Q 4 creates real EQ bands for you to tweak. It speeds up broad tonal shaping, especially when you’re working on a tight deadline or know what you want but do not want to set each band by hand.
The Instance List is extremely helpful for bigger projects. If you use Pro-Q 4 on many tracks, you can see and adjust them all in one window. This keeps your session organized and lets you make changes across your mix without switching between different tracks.
- Spectral Dynamics Per Band
This feature changed the way I handle problem frequencies. Instead of cutting an entire band and losing the good parts, spectral dynamics only reacts to the exact frequencies that go above your chosen threshold.
I use this feature often on vocals to control sibilance or on guitars to reduce harshness without making them sound dull. It works like a multiband compressor but is much more precise. You just set a band, turn on spectral mode, and it handles the rest.
- EQ Sketch & Unified Workflow
When I want to quickly shape the tone, I sketch the curve I imagine. Pro-Q 4 turns that drawing into real bands like bells, shelves, or cuts that I can adjust further. This is great for making quick changes before fine-tuning the details.
The Instance List puts all your EQ instances together, so you can compare settings across tracks or adjust buses without losing your place. I use this all the time in busy sessions when I need consistency across similar sounds.
- Character Modes for Analog Color
Pro-Q 4 offers three modes: Clean, Subtle, and Warm. Clean mode keeps the sound transparent. Subtle adds a gentle, transformer-style saturation. Warm mode gives a tube-like richness that adds weight and brings your mix together.
I use Warm mode on drum buses or master chains when I want an analog feel without using another plugin. It is subtle, just enough to make digital mixes sound more unified and lively.
14. Surge XT (Versatile / Sound Design Synth) FREE

The first thing that drew me to Surge XT wasn’t the fact that it’s free, although that’s a big plus. What really impressed me was realizing this synth could actually take the place of paid instruments I’d relied on for years.
Surge XT is an open-source hybrid synthesizer that offers much more than just basic subtractive synthesis. It includes wavetable, FM, physical modeling, and other options all in one engine. Each patch uses two full synthesis scenes, which you can layer or split across your keyboard. This means you’re basically running two synths at the same time.
What keeps me coming back is how flexible Surge XT feels, but it doesn’t get confusing once you get used to it. I can make warm analog pads one moment, then switch to aggressive FM bass or glitchy digital sounds the next.
The built-in effects rack has up to 16 slots, so I rarely need to use extra plugins when shaping sounds. Delay, reverb, distortion, and chorus are all included and sound great.
- Multiple Synthesis Engines in One Synth
Surge XT offers three oscillators per scene and twelve different algorithms to choose from. You’re not limited to just one synthesis style. I like being able to use classic analog waves for warm sounds, or switch to wavetable or FM for sharper, more modern tones.
You can set each oscillator to 16-voice unison for huge, wide sounds that fill out a mix right away. This kind of flexibility used to cost hundreds of dollars.
- Deep Modulation System
This is where Surge XT stands out for sound design. It gives you 12 LFOs, full envelopes, step sequencers, and an MSEG with 128 nodes. Almost every parameter can be modulated, so you can make evolving pads, rhythmic textures, or sounds that are always changing.
There’s also a formula modulator that lets you script custom behaviors if you want to experiment. I’ve made patches with it that sound completely different from standard synth presets.
- Integrated FX & Massive Content Library
Having a full effects chain built into Surge XT saves me a lot of time. I can shape and finish sounds without leaving the synth window, which helps me work faster in REAPER.
You also get thousands of presets and hundreds of wavetables included. Even if you’re new to sound design, there are plenty of starting points that already sound professional.
I really think this plugin deserves a spot on the best Reaper plugins list!
15. iZotope Ozone EQ (Equalizer) FREE

What really sets Ozone EQ apart is how it treats different parts of your audio. Most free EQs just boost or cut frequencies in a basic way, but this one gives you tools that feel like they came from a mastering studio.
I turn to Ozone EQ when I want precise control without paying for plugins. It’s totally free through Native Access, which is a big plus. You get pro-level processing at no cost, and it works smoothly in REAPER with VST3 support.
The interface is easy to understand from the start. You can see your adjustments, hear changes right away using the delta function, and shape your sound without dealing with confusing menus.
- Transient/Sustain Mode
This feature changed the way I EQ drums and percussive sounds. Instead of adjusting the whole frequency range, you can choose to work on just the attack or just the body of the sound.
When I work on snares that sound harsh, I can soften just the transient without losing the body of the sound. This level of control usually takes several plugins or some compression tricks.
- Mid/Side Processing for Stereo Control
You can EQ the center and sides of your stereo field separately. I use this all the time on mix buses to tighten the low end in the middle and keep the highs wide.
Mid/Side mode helps you create space without making your mix mono or losing stereo detail. It’s great for mastering or fixing stereo imaging problems, and you don’t need to set up complex routing.
- Analog and Digital Filter Modes
Ozone EQ lets you pick between clean digital precision and a warmer analog-style sound. For mastering, I use digital mode for clear, accurate results. When mixing tracks that need more character, analog mode adds gentle warmth without making things muddy.
- Zero Latency Operation
The plugin works without adding any delay, which is important when you use it on many tracks in a big session. I can run Ozone EQ on ten tracks in REAPER without timing problems or overloading my computer. It stays efficient even when your system is under heavy use.
16. Lunacy Audio HAZE (Chorus & Phaser) FREE

Free Lunacy Haze transforms simple sounds with a dreamy, atmospheric layer, all without needing to use several different plugins.
It’s free, which is surprising given how much it offers. You get chorus, phasing, algorithmic reverb, and spectral dispersion in one lightweight effect. I’ve used it on synth pads, vocals, and guitars, and it always adds width and movement that sounds high-end.
The interface is straightforward, so you won’t spend ages adjusting knobs. You can add a bit of stereo width or go all the way to a full ambient wash. Haze is easy on your CPU, so you can use it on many tracks in a session without slowing down your system.
Here is what you get:
- Spectral Dispersion Engine
This is what sets Haze apart from regular chorus plugins. The dispersion engine gives your sound a shimmering, almost crystalline quality that spreads across the stereo field.
When I want a pad or vocal to sit in the background with texture but stay clear, this is my go-to. It’s especially helpful in cinematic or ambient tracks where you need space but don’t want to lose clarity.
- Blended Modulation Effects
Haze blends rich chorus, dreamy phasing, and lush reverb in one plugin, so you don’t have to chain effects. I like using it when I’m sketching ideas and want quick atmosphere. You can get tape-style wobble, gentle flutter, or evolving textures, depending on how you set the controls. It adds movement without sounding artificial.
- Motion & Feedback Controls
The motion controls let you decide how much modulation you want. With the feedback option, you can create vibrant, resonant soundscapes or keep things smooth for mixing. I use lower settings for adding width to vocals and higher ones when I want something more experimental for sound design.
- Quick Presets & Easy Workflow
Haze comes with about 20 presets, covering everything from subtle width to big ambient swells. They’re genuinely useful, not just filler. When I need to work quickly or want inspiration, I try a few presets and adjust as needed. It’s VST3, AU, and AAX compatible, so it works in REAPER right away without any hassle.
17. Analog Obsession ATTRACTOR (Dynamic processor) FREE
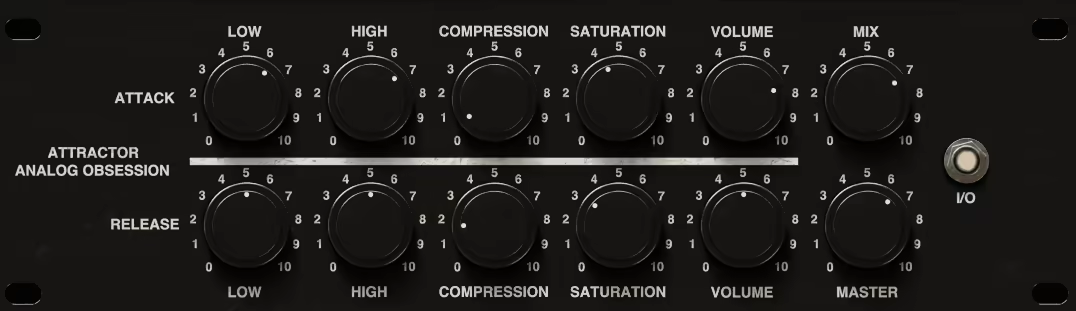
ATTRACTOR offers something you rarely find in free plugins: you can process the attack and release parts of your audio separately.
I’m always looking for tools that let me shape transients without affecting the rest of the sound. Most compressors or transient shapers process the entire waveform together.
ATTRACTOR splits your audio into two separate chains: one for attack and one for release. This lets you boost the snap of drums while keeping the tail clean, or add warmth to a guitar’s body without losing the sharpness of the pick.
What makes this plugin worth downloading is the amount of control you get for free. It’s more than just a basic transient tool.
Each section comes with its own low shelf (±12dB at 120Hz), high shelf (±12dB at 8kHz), compressor with auto-gain, and saturator. You also get a mix knob for parallel processing and separate volume controls for each part. It’s like having two channel strips focused on different parts of your sound.
I use ATTRACTOR when I need precise control over dynamics. Drums sound tighter and punchier. Synth plucks hit harder without too much sustain. Bass stays focused. It’s especially handy in Reaper since you can use it on many tracks without worrying about cost.
A few highlights:
- Independent Attack & Release Processing
This is the main reason I use ATTRACTOR. You can process the start of a sound separately from its decay and sustain. When I mix drums, I boost the snare’s attack so it stands out, while keeping the release smooth so it doesn’t fill up the mix. On bass, I can tighten the pluck without losing the body. It’s more precise than standard compressors.
- Built-In EQ, Compression & Saturation Per Section
Each chain has its own set of tools. The low and high shelves let you shape the tone before or after dynamics. The compressor includes auto-gain and automatic attack and release times, so it adjusts to your audio without a lot of tweaking.
You can add saturation to either section for extra warmth or grit. I like to add a little saturation to the attack of acoustic guitars so the pick stands out, but the sustain still sounds natural.
- Mix Knob & Parallel Processing Options
ATTRACTOR has a mix control that lets you blend the processed sound with the original. This is great for parallel compression. You can push the attack section hard, then use the mix knob to add punch without making it sound over-processed.
It keeps your sound musical, even when you use extreme settings. I use it all the time on drum buses and vocal layers.
- Free & Cross-Platform (VST3, AU, AAX)
ATTRACTOR is totally free and works on both Windows and Mac in VST3, AU, and AAX formats. It runs smoothly in Reaper and most modern DAWs. Analog Obsession uses a donation-based model, so you can download it for free and support the developer later if you find it useful.
18. Echo Sound Works Vinyl Guitar 2 (Classic Guitar) FREE

If you want a guitar plugin that focuses on vibe instead of perfection, Vinyl Guitar 2 could be just what you need.
What I like most about this free plugin is that it doesn’t try to sound super realistic. Instead, it gives you 10 multi-sampled acoustic guitars, each with a warm, nostalgic, lo-fi sound already built in.
This isn’t a clean studio guitar. It sounds like it was recorded on tape years ago, with all the charm and grit that brings.
The plugin has 25 presets made for styles like lo-fi hip-hop, chillout, trap, and ambient music. I can open it in REAPER, choose a preset, and start building a track right away without worrying about extra effects or processing.
It works as VST, VST3, AU, and AAX, so you won’t have compatibility issues on either Windows or Mac.
- 10 Layered Sample Sets
Vinyl Guitar 2 lets you use 10 different sample sets that you can layer or blend. You’re not limited to just one guitar sound. I can mix layers to make my own custom tone, which is pretty flexible for a free plugin.
If I want a fuller sound or a different texture, I just tweak the layers until it feels right. It’s a simple setup that gives you more creative control than you might expect.
- Built-In Lo-Fi Processing & Effects
The plugin includes effects such as delay, reverb, and vinyl-style processing. You don’t need to use other plugins to get that nostalgic sound; it’s already included. I like that it also has speaker coloration, background noise, and ambience options. When I’m making chill beats or film cues, these features add instant atmosphere without extra effort.
- Robin Toggle & Pitch Effects
Echo Sound Works added user feedback from the first version, including a round robin on/off toggle and unique pitch-shifting effects. The round-robin feature helps avoid the “machine gun” effect, where the same sample repeats over and over. The pitch effects let you create interesting variations and movement, which keeps things from sounding too static or robotic. These small touches make the plugin feel more natural and musical in your tracks.
19. Matt Tytel Vital (Wavetable Synth) FREE

Vital is another excellent free synth, especially for anyone using Reaper, right up there with Surge XT.
It’s amazing that Matt Tytel released Vital as a fully functional wavetable synth without removing features or hiding them behind a paywall. You get three oscillators, spectral warping tools, drag-and-drop modulation, built-in effects, and a visual interface that helps you see what’s happening to your sound. I use it for bass, leads, pads, and experimental textures.
The wavetable editor by itself makes Vital worth downloading. You can import your own samples, turn them into wavetables, or even type in text and see Vital create a waveform from it. Usually, this level of creative flexibility isn’t free.
- Spectral Warping & Wavetable Manipulation
Vital’s spectral warping modes let you twist wavetables in ways that feel almost broken in the best sense. You can stretch harmonics, randomize phases, or time-skew the spectrum until a simple sine wave turns into something unrecognizable.
I use this feature when I want aggressive bass sounds or evolving pads that change over time. The waveform display updates in real time, so you always see what you’re creating.
- Drag-and-Drop Modulation System
The modulation workflow in Vital is extremely easy to use. You just click a modulator, drag it to any knob, and it’s assigned. There are no complicated menus or hidden panels. You get envelopes, LFOs, random sources, and even stereo-split modulators that can pan modulation left and right independently.
I recommend using it for rhythmic filter sweeps, wobbling basslines, or pads that move across the stereo field. Seeing the modulation curve directly on the interface makes adjustments quick and easy.
- Built-In Effects Rack
Vital comes with delay, reverb, distortion, chorus, phaser, flanger, and compression built in. This lets you design a complete sound without leaving the synth or adding extra plugins. I often create a full lead or bass patch, add some saturation and reverb, and export it right away.
This keeps my workflow fast and helps my CPU run more efficiently since I don’t have to use lots of separate effects.
The only downside is that your CPU can spike if you use a lot of voices, unison, and heavy modulation at the same time. Still, for a free synth that competes with plugins like Serum or Pigments, Vital is a must-have for your Reaper setup.
20. Analog Obsession CHANNEV (Channel Strip) FREE
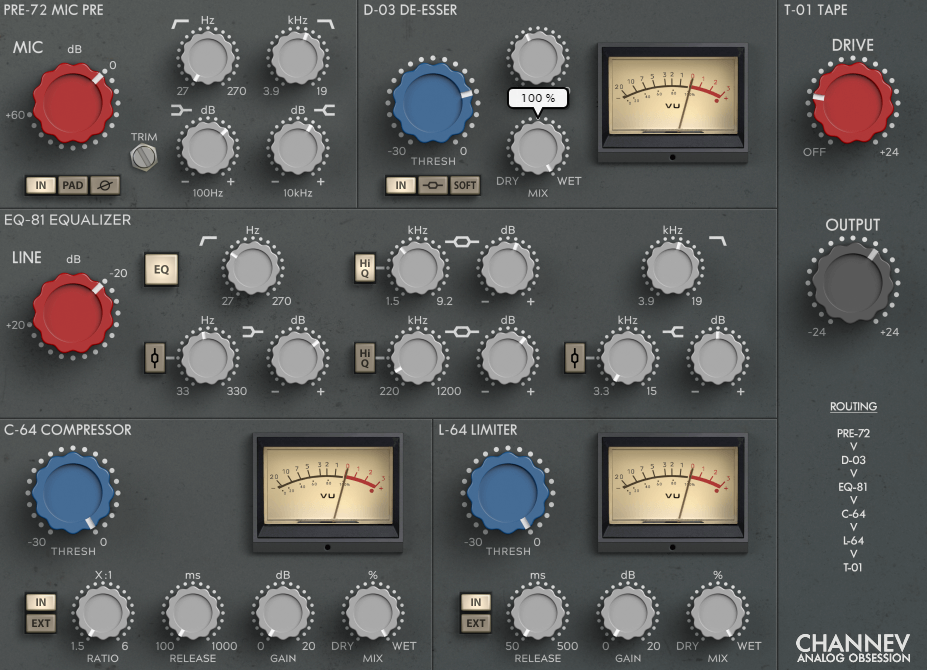
CHANNEV puts a whole signal chain into one window, which is impressive for a free plugin.
I like this plugin because it does so much without needing several different plugins. It gives you a mic preamp, de-esser, 4-band EQ, compressor, limiter, and tape saturation all in one place. When I’m working quickly in REAPER and want to adjust a vocal or guitar sound without opening lots of windows, CHANNEV makes it easy.
The preamp section provides up to 60 dB of gain, phase flip, high- and low-pass filters, and a pad switch. This is helpful whether you’re recording something quiet or want to push the input for extra color. I like that it’s not just for show; you can really use it, and you can hear the warmth come through.
Main features:
- Full Channel Strip in One Plugin
CHANNEV puts your whole processing chain in one plugin. The mic preamp manages gain, the de-esser controls harsh sounds, and the 4-band parametric EQ lets you shape your tone with adjustable frequencies on each band.
Next, you get both a compressor and a limiter that work separately, and you finish with tape saturation for an analog feel.
- Flexible EQ and Dynamics Control
The EQ is flexible, not limited like some free plugins. You get four fully parametric bands, with Bell options for the lows and highs, and Hi-Q for the mids. The shelving filters sound smooth, and you can fix problem frequencies or add body where needed.
Both the compressor and limiter have their own sidechain options, so you can try things like ducking or frequency-selective compression. I’ve used the sidechain de-esser trick on bright vocals and it works well.
- Tape Saturation and Analog Color
The tape saturation adds warmth and depth without sounding artificial. You can keep it subtle for mix-bus glue or turn it up for more grit on drums and synths. I like using it on drum groups in REAPER because it adds weight and makes the mix feel tighter. The preamp gain also lets you push the input for that classic analog sound before the EQ and dynamics.
Hello, I’m Viliam, I started this audio plugin focused blog to keep you updated on the latest trends, news and everything plugin related. I’ll put the most emphasis on the topics covering best VST, AU and AAX plugins. If you find some great plugin suggestions for us to include on our site, feel free to let me know, so I can take a look!