
Cubase has always been one of those DAWs that rewards you the deeper you go. Steinberg packed it with some seriously capable stock plugins, and if you’re running Pro or Artist, you’ve already got a solid foundation for mixing and production.
But over the years I’ve found specific third-party tools that either do something Cubase’s built-in options can’t, or do it so much better that they’ve permanently replaced the stock alternatives in my workflow.
This isn’t a list of plugins you’ll install, try once, and forget about. Every single one here has earned its place by being something you actually open on a regular basis. Some handle the unglamorous work of mixing and mastering more efficiently than anything else I’ve tried.
Others completely changed how I approach sound design and composition. If you’re producing in Cubase and want to know what’s genuinely worth adding to your setup, these twelve plugins are where I’d start.
The plugins I’m covering are IK Multimedia MODO BASS 2, Minimal Audio Current 2, FabFilter Pro-Q 4, Native Instruments Kontakt 8, UAD Studer A800, FabFilter Saturn 2, and some others including 2 freebies as well. I could add 100 plugins but it would just be little too much so here are my top 12 picks:
1. IK Multimedia MODO BASS 2

Most bass plugins are sample-based instruments, which means someone recorded a real bass at fixed velocities and articulations, and you’re essentially triggering those recordings. MODO BASS 2 takes a completely different approach.
It uses physical modeling to simulate how a bass guitar actually produces sound, from the string vibration and pickup position down to the body resonance and fret buzz. The result is a virtual instrument that responds to your playing in a way that samples never quite manage.
What this means in practice is that you get an instrument that weighs around 200 MB instead of multiple gigabytes, loads almost instantly, and produces tones that react dynamically to velocity, note length, and articulation in real time.
I started using MODO BASS because I needed realistic bass parts for demos, but it’s become a permanent fixture in my productions because the output genuinely sounds like a bassist played it.
- 22 physically modeled bass guitars
You’re not scrolling through sample banks here. MODO BASS 2 gives you 22 distinct bass models covering everything from classic Precision and Jazz basses to a 12-string Rickenbacker, fretless models, acoustic basses, and modern extended-range instruments.
Each model has its own body shape, scale length, and pickup configuration that affects the tone at a fundamental level. Switching between models doesn’t just change the sound. It changes how the instrument feels under your fingers because the physics of each design are different.
- String age
This is one of those features that sounds trivial until you hear it. A string age slider lets you move from the bright, zingy tone of brand-new roundwounds to the dull, thumpy character of strings that have been played for months.
In between, you get all those intermediate sweet spots that bassists spend real money on strings to find. I usually sit around 40-60% age for rock and pop because it removes the artificial brightness that gives away most virtual bass instruments.
- Fretted and fretless toggle per model
Any of the 22 bass models can be switched between fretted and fretless mode, and the fretless behavior isn’t just a filter change. The physical model adjusts the string-to-fingerboard interaction, producing the characteristic mwah and smooth slides that fretless basses are known for.
Slides between notes behave differently on fretless too, with continuous pitch glide rather than discrete fret jumps. For genres where fretless adds that liquid quality, this feature alone saves you from needing a separate plugin.
- 1,500+ MIDI patterns
If you’re not a bass player and struggle to write convincing bass parts, MODO BASS 2 includes over 1,500 MIDI grooves covering rock, pop, funk, R&B, metal, jazz, blues, and more. These aren’t simple root-note patterns.
They’re musically interesting phrases that you can drag into Cubase’s MIDI editor and customize. You can use them as starting points when you need a specific groove feel and don’t want to spend twenty minutes programming something from scratch.
2. Minimal Audio Current 2

Cubase’s HALion Sonic and Retrologue cover a lot of synth territory, but they’ve never made me lose track of time the way Current 2 does. This thing is a multi-engine synthesizer that runs five sound sources simultaneously: two spectral wavetable oscillators, a granular engine, a time-stretching sampler, and an additive sub-oscillator. The sheer range of sounds you can pull out of it in a single session is staggering.
What sets Current apart from other super-synths is how well the interface keeps all that power accessible. The dark, modern GUI makes it clear where everything lives, and every parameter feels like it was placed where your hand naturally wants to reach. I’ve watched producers who normally avoid deep sound design start building patches from scratch in Current because the workflow just invites experimentation.
- Spectral wavetable oscillators
The two main oscillators go far beyond standard wavetable morphing. Each one gives you Wave, Time, and Spectral shaping controls with over 40 different warp modes including hard sync emulation, bit reduction, formant shifting, filtering, and frequency folding.
Starting from a basic sine wave, these three parameters alone can produce an enormous variety of tones. The visual feedback shows you exactly how the waveform is being affected in real time, which makes sound design intuitive rather than abstract.
- Granular engine
Current’s granular synthesizer lets you drag any audio file directly into the interface and immediately start deconstructing it into grains with controls for playback position, spray, grain rate, density, and grain envelope shape.
I’ve thrown field recordings, vocal takes, and random samples into this engine and gotten usable textures within minutes. It includes hundreds of built-in sound sources too, but the real magic happens when you feed it your own material.
- Nine-slot effects rack
Instead of generic built-in effects, Current 2 loads its entire rack with Minimal Audio’s own dedicated effect plugins: distortion, reverb, chorus, delay, compression, and more. The standout addition in version 2 is the Wave Shifter, which combines frequency shifting with FM, AM, and Ring Modulation in ways that produce dynamic, evolving distortion. Every effect parameter is fully modulatable, which means the effects rack becomes an extension of the sound design engine rather than just a post-processing afterthought.
- Play View
Version 2 introduced the Play View, which gives you two customizable XY pads controlling up to four macro parameters simultaneously. This view is designed for people who want to interact with presets rather than dive into the architecture. Each pad comes pre-mapped to the most impactful parameters of whatever preset you’ve loaded, so even factory sounds become performable instruments. I use this view when I’m jamming and want to shape the sound in real time without thinking about which knob does what.
- Up to 32-voice polyphony
Current 2 supports 32 voices of polyphony with each wavetable oscillator capable of running up to 16-voice unison independently. That unison doesn’t count against your total polyphony budget, which means you can play fat, stacked chords without running into voice-stealing issues. The result is a synth that can be both delicate and absolutely massive depending on how you configure it. Combined with 2x and 4x oversampling options, the output stays clean even when you’re pushing it hard.
3. FabFilter Pro-Q 4

There’s a reason this plugin appears in almost every serious producer’s workflow, and it’s not hype. Pro-Q 4 is the EQ that Cubase’s StudioEQ and Frequency wish they could be. I’ve used Steinberg’s built-in options for years and they get the job done, but the moment I switched to Pro-Q, I started making better mixing decisions faster because the interface communicates frequency information so clearly.
Every version of Pro-Q has been about making EQ faster and more intuitive without sacrificing depth. Version 4 does something I didn’t expect: it absorbs the functionality of dedicated resonance suppressor plugins into the EQ itself, which means fewer plugins on your channel strips and a more streamlined mixing workflow inside Cubase.
- Spectral Dynamics processing
The biggest addition in version 4 is the ability to switch any band into Spectral Dynamics mode, which targets and reduces problematic resonant frequencies dynamically without touching the surrounding spectrum. A Spectral Density slider controls how surgical the processing is, and you get per-band attack and release controls that weren’t available in Pro-Q 3. This feature directly competes with standalone resonance suppressors, and having it built into my primary EQ means I no longer need separate plugins for that task.
- EQ Sketch
Click the paintbrush icon and drag across the display, and Pro-Q 4 interprets your gesture to create a complete EQ curve with appropriate shelves, bells, cuts, and slopes placed automatically. It’s genuinely fast for rough-mixing scenarios where you need to shape a track quickly before fine-tuning individual bands later. I was skeptical about this feature before trying it, but it’s become one of my most-used workflow shortcuts during early mixing passes.
- Instance List for managing EQ
The Instance List lets you see every Pro-Q 4 instance in your project as scrollable thumbnails, each showing a live animated spectrogram. You can edit any instance without opening its plugin window, perform EQ matching between tracks, and monitor frequency balance across your entire session from one view. For Cubase users who tend to put Pro-Q on every channel (which you should), this transforms how you manage frequency balance at the project level.
- Character Modes
Pro-Q has always been transparent by design, but version 4 adds optional coloration through Subtle and Warm Character Modes that introduce tube-modeled saturation. Combined with the Natural Phase processing option and Gain-Q Interaction (which narrows the Q proportionally as you boost, mimicking classic console behavior), you can get Pro-Q 4 to sound and respond like vintage analog hardware when the mix calls for it.
4. Native Instruments Kontakt 8
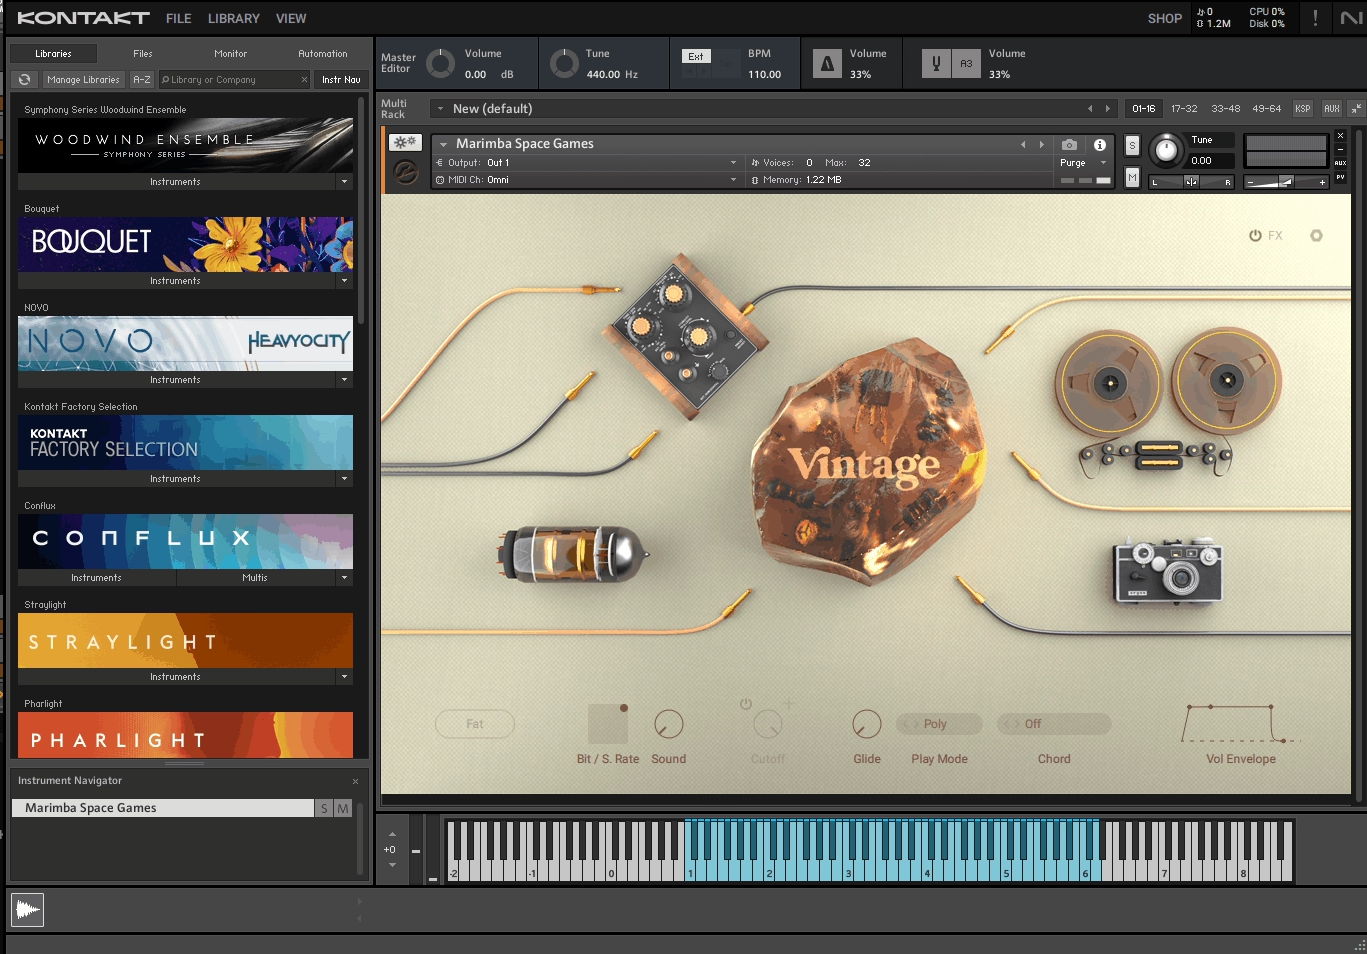
I’ll be honest with you: I put off buying Kontakt for longer than I should have. Cubase’s HALion handles basic sampling, and I convinced myself that was enough. It wasn’t. The reality is that the professional sample library ecosystem runs on Kontakt. If you want access to the best orchestral instruments, cinematic sound design tools, ethnic percussion, or boutique acoustic libraries, this is the platform they’re built for.
Kontakt 8 brought a complete interface overhaul and a new creative engine that makes Kontakt more than just a sample player for other developers’ libraries. The improved browser, the addition of Conflux, and better performance monitoring mean I actually enjoy spending time inside Kontakt now, not just loading patches and closing the window.
- Conflux engine
Conflux is Kontakt 8’s built-in creative instrument that blends multiple sound sources with independent modulation. It supports granular, wavetable, and sample-based synthesis modes running simultaneously, and you can drag your own samples into it alongside Kontakt’s factory content. For pad design, atmospheric scoring, and ambient textures, Conflux gives you capabilities that used to require a separate synth plugin.
- Universal compatibility
Developers like Spitfire Audio, Cinesamples, 8Dio, Output, and Heavyocity build exclusively for Kontakt. The free Kontakt Player handles many commercial libraries, but the full version opens up the massive world of community-created, educational, and boutique instruments. Once you own Kontakt, an entire universe of specialized instruments becomes accessible that simply doesn’t exist on any other platform.
- Redesigned browser
Kontakt 8’s library browser is a massive improvement over previous versions. Tag-based searching lets you filter by instrument type, timbre, character, and source material, and a favorites system keeps your go-to patches one click away. You will accumulate Kontakt libraries faster than you expect, and this browser redesign is the difference between finding what you need in seconds versus scrolling through endless folders.
5. UAD Studer A800 Multichannel Tape Recorder
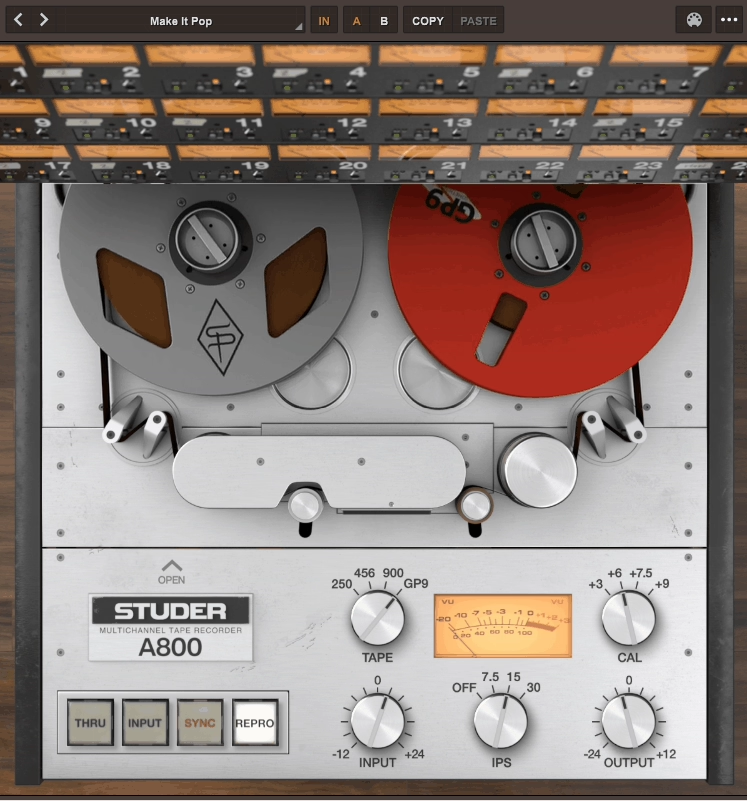
Some plugins are subtle. The Studer A800 is subtle too, but it’s the kind of subtle that makes you wonder why your mixes suddenly sound more finished. Universal Audio spent a year modeling the complete circuit path of an actual Studer A800 MkIII from Allen Sides’ Ocean Way Studios collection, including the Input, Sync, and Repro heads, the electronics, and the magnetic tape behavior itself. The result is a tape emulation that doesn’t just add warmth. It changes how your tracks sit together.
I put this on every channel in my Cubase sessions. Not because each instance does something dramatic, but because the cumulative effect of running 20+ tracks through tape simulation creates a cohesion that’s impossible to achieve with EQ and compression alone. Instruments separate better, the low end tightens up, and transients get that slight rounding that makes digital recordings feel more musical.
- Four tape formulations
The Tape Type selector gives you 250, 456, 900, and GP9 emulations, each modeled after real magnetic tape formulas that engineers have spent decades choosing between for different applications. 250 is warm and saturated, 456 is the all-rounder that most engineers default to, 900 is brighter and more open, and GP9 offers the most headroom with the least coloration. I use different formulations on different instrument groups within the same session, which creates a layered texture that a single tape setting across everything can’t achieve.
- Three tape speeds
Switching between 7.5, 15, and 30 IPS doesn’t just change the speed. Each setting produces different head bump characteristics, frequency response curves, and saturation behavior. Lower speeds create more pronounced low-end bumps and earlier saturation. Higher speeds give you a cleaner, more extended frequency response. 15 IPS with NAB EQ is my default for most sessions, but I’ll sometimes drop drums to 7.5 for that extra thump.
- Calibration level and bias controls for fine-tuned saturation
Four calibration levels (+3, +6, +7.5, +9 dB) plus a Bias control let you set exactly how hard the signal hits the virtual tape. Lower calibration levels mean the signal reaches saturation sooner, producing more harmonic distortion and compression. Higher levels give you more headroom before the tape starts working. The Bias control fine-tunes the magnetic recording characteristics, and adjusting it slightly above or below optimal produces different flavors of harmonic content.
- Gang controls
When you’re running the Studer on 24+ channels in Cubase, the Gang function lets you adjust settings across all instances simultaneously from a single plugin window. Change the tape formulation or speed on one instance, and every ganged instance follows. This makes it practical to experiment with different global tape settings without opening dozens of plugin windows, which is exactly the kind of workflow consideration that separates a good plugin from one you’ll actually use.
6. FabFilter Saturn 2

Distortion and saturation plugins are a dime a dozen, but Saturn 2 operates on a different level. It’s a multiband distortion and saturation processor that lets you split your signal into up to six frequency bands and apply completely different saturation types, amounts, and modulation to each one.
The practical result is that you can push specific parts of the frequency spectrum into saturation while leaving others clean, which gives you surgical control over harmonic content that a full-band saturator can’t provide.
I started using Saturn on individual channels for adding character to drums and vocals, but it’s become indispensable on buses and even the master. The ability to saturate the midrange for presence while keeping the low end clean and the highs airy is something I used to attempt with parallel processing chains. Saturn does it in one plugin with better results.
- Over 25 distortion styles
Saturn 2 offers more than 25 saturation algorithms including tube, tape, transformer, amp, fuzz, rectifier, guitar pedal, bit crusher, and various digital distortion models. Each style responds differently to input level and frequency content. Tube saturation adds smooth even harmonics. Tape introduces compression alongside the harmonics. Rectifier produces aggressive, asymmetric distortion. Having all of these available per-band means you can use tube warmth on the lows, tape compression on the mids, and clean gain on the highs within a single instance.
- Per-band dynamics controls
Each frequency band includes its own compressor with feedback and feedforward modes, plus drive, mix, tone, and level controls. The crossover points are fully adjustable and visually displayed, making it easy to isolate exactly which frequencies you want to process. You can also solo any band to hear it in isolation. This level of per-band control turns Saturn from a distortion plugin into a multiband dynamics and character processor that handles tasks normally requiring two or three separate plugins.
- Modulation system
Saturn 2 has a full modulation engine with LFOs, envelope followers, XY pads, MIDI inputs, and step sequencers that can be routed to virtually any parameter. Modulate the drive amount with an envelope follower and the saturation responds dynamically to the incoming signal. Use an LFO on the crossover point and the frequency split moves rhythmically. This modulation capability transforms static saturation into a living, breathing effect that reacts to and shapes your audio in real time.
7. UAD Fairchild Tube Limiter Collection
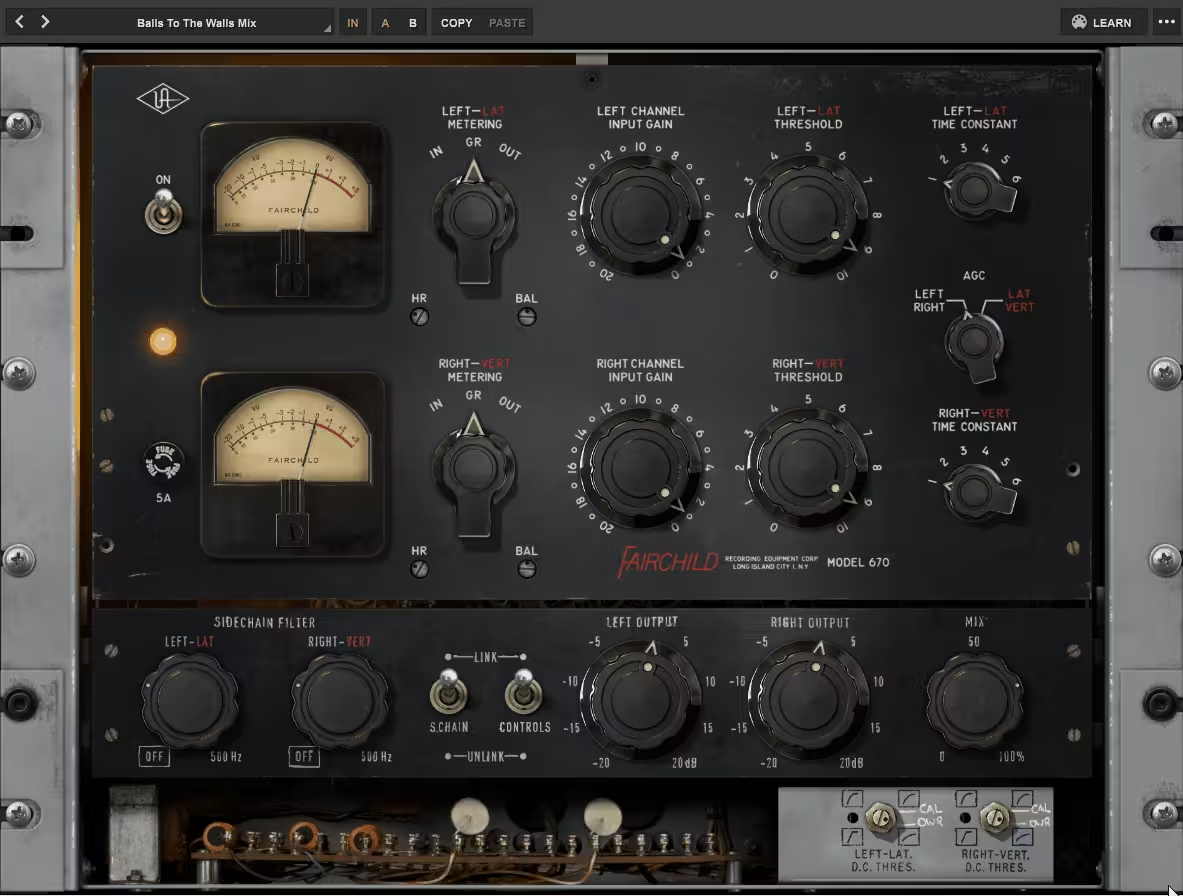
You can spend a fortune on compressor plugins and still not own anything that sounds like a Fairchild. The UAD Fairchild Tube Limiter Collection gives you both the mono 660 and the stereo 670, each independently modeled from the “golden reference” hardware at Ocean Way Studios.
These aren’t generic tube compressor emulations. UA modeled the complete electronic signal path, including the tube amplifiers, transformers, and the nonlinear gain reduction characteristics that make real Fairchilds worth more than most cars.
I’ll tell you something that surprised me: I often load the 670 on my mix bus with compression barely engaged, just to run signal through the modeled tube and transformer stages. The harmonic content and subtle thickening that the circuit adds, even without significant gain reduction, is something you can’t fake with an EQ or a generic saturation plugin. It’s an expensive-sounding glow that immediately makes a mix feel more polished.
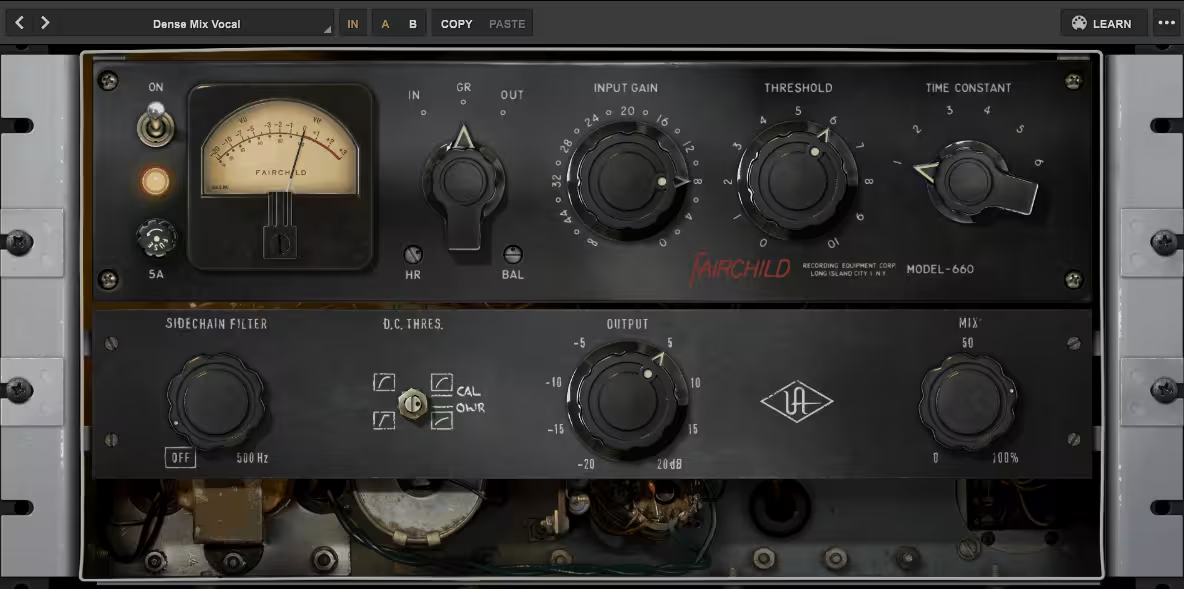
- Distinct 660 and 670 models
The 660 is the aggressive one. It punches up piano, bass, and guitar tracks with a snarl that cuts through dense mixes. The 670 is the elegant stereo workhorse, known for adding vibe and color to vocals, drum buses, and full mixes. UA modeled these independently rather than just making the 660 a mono version of the 670, so they genuinely offer different threshold behaviors, distortion characteristics, and program-dependent compression curves. Having both gives you a pair of complementary tools rather than two versions of the same compressor.
- Lateral-Vertical mode
The hardware 670’s Lat/Vert mode is faithfully reproduced, allowing you to process the sum and difference signals separately rather than left and right channels.
This lets you compress the center image differently from the stereo width, which is incredibly useful for mastering and mix bus work where you want to control the vocal or bass in the center without squashing the stereo field. Combined with the Stereo Sidechain Link mod, you get stereo imaging control that most compressor plugins don’t even attempt.
- Headroom control
The plugin-only Headroom (HR) control raises or lowers the gain reduction threshold. Increasing headroom gives you cleaner compression with less distortion, which is ideal for mastering applications. Decreasing it drives the signal harder into the tube and transformer stages, producing grittier, more aggressive textures.
Combined with the Wet/Dry mix for parallel compression blending, you can dial in everything from transparent glue to heavily colored crush without leaving the plugin.
8. Slate Digital MO-TT
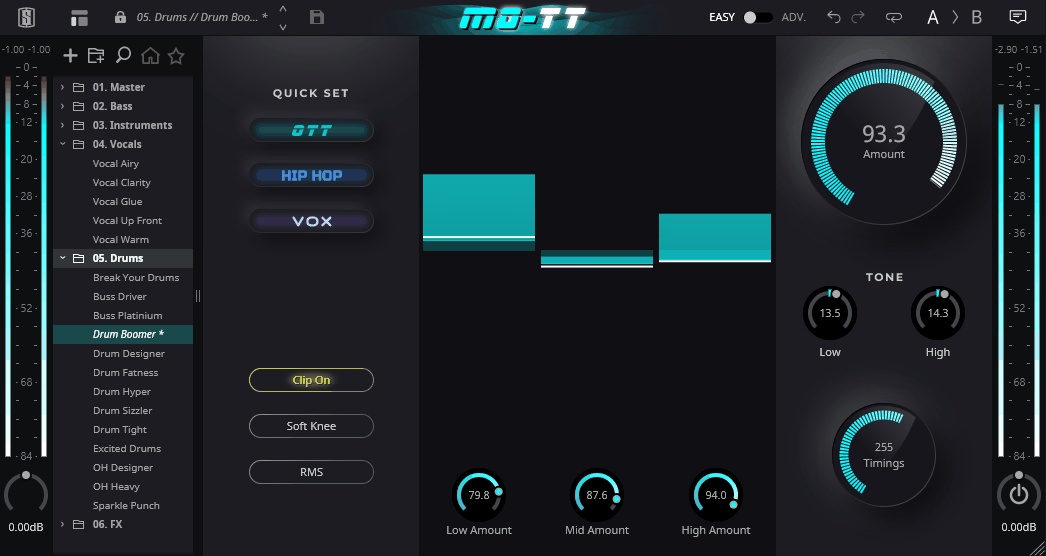
If you produce any kind of electronic music, hip-hop, or modern pop in Cubase, you probably already know about the OTT preset from Ableton’s Multiband Dynamics processor. It became the secret weapon for making sounds bigger, brighter, and more present. The problem was that it only worked in Ableton, and tweaking it was a nightmare.
Slate Digital MO-TT is a standalone recreation of that exact sound, rebuilt from the ground up to work in any DAW, with a bunch of extra controls that make it far more useful than the original ever was.
Slate’s engineers reverse-engineered the specific sonic characteristics of OTT, figured out why other recreations never quite nailed it, and then added features that the original desperately needed. The result is a plugin that gives you that same explosive energy when you want it, but with enough control to use it musically rather than destructively.
- Dual-stage upward and downward compression
MO-TT’s core architecture combines upward compression (which lifts quiet details toward the threshold) with downward compression (which pushes loud peaks down) simultaneously across low, mid, and high frequency bands.
This dual-stage approach is what creates that characteristic OTT sound where everything feels maximized and in-your-face. Understanding that this is happening on three bands independently helps you use it more deliberately rather than just slamming the Amount knob and hoping for the best.
- Three Quick Set modes
The OTT, Hip-Hop, and Vox presets aren’t just starting points. They fundamentally reconfigure the compressor’s behavior for different tasks. OTT gives you the classic sound. Hip-Hop delivers massive, solid low end with clear highs, perfect for 808-heavy productions.
Vox pushes a vocal or melodic element to the front of the mix with crystal-clear presence. I use the Vox setting on vocal stacks constantly because it gives me the upfront quality I want without the pumping artifacts that the default OTT behavior can produce.
- Timing Styles
Classic, Smooth, and Smack modes change how MO-TT responds to transient material. Classic replicates the original OTT timing. Smooth is what I reach for on vocals and pads where I want prominence without exaggerated transients. Smack adds percussive punch, making it ideal for drums and plucked instruments.
This single control dramatically changes the feel of the compression and is one of the key additions that separates MO-TT from every other OTT recreation.
- Advanced mode
Flip to the Advanced page and you get individual upward and downward thresholds, ratios, attack, release, hard clip thresholds, and input gain for each band. You can adjust crossover frequencies and slopes, solo or bypass individual bands, and add high-pass and low-pass filters to remove the extremes from being processed. The high-pass filter in particular solves the classic OTT problem of bringing up rumbling sub frequencies that you definitely don’t want boosted.
9. Surge XT

You don’t need to spend money to get a world-class synthesizer in Cubase. Surge XT is completely free, open-source, and honestly better than several paid synths I own. Originally developed by Claes Johanson and now maintained by a dedicated community of volunteer developers, Surge XT is a hybrid synthesizer that combines subtractive, FM, wavetable, string modeling, and other synthesis methods into a single instrument with an almost absurd depth of features.
The interface is dense. I won’t pretend otherwise. Surge XT puts nearly everything on screen at once, and the first time you open it, the sheer number of controls can feel overwhelming. But once you spend an hour learning where things live, the payoff is enormous.
This synth covers territory from classic analog pads and leads to experimental noise and algorithmic textures, and it does all of it without costing you a single euro.
- 12 oscillator algorithms
Each of Surge XT’s three oscillators per scene can run any of 12 different algorithms: Classic, Modern, Wavetable, Window, Sine, FM2, FM3, String, Twist, Alias, S&H Noise, and Audio Input. The String oscillator uses filtered waveguides for plucked and bowed sounds. Twist is inspired by Mutable Instruments’ Plaits module. FM2 and FM3 give you proper frequency modulation with two or three operators. Having all of these available simultaneously in one patch means you can layer completely different synthesis methods per oscillator without needing multiple plugin instances.
- Dual scene architecture
Every Surge XT patch contains two scenes, each running its own independent copy of the full synthesis engine (oscillators, filters, modulators). You can layer both scenes for thick, complex sounds, or split them across the keyboard for performance patches. The scenes share only the effects section, which itself offers a generous chain of processors. This dual-scene design effectively gives you two separate synths in every instance of the plugin.
- Formula modulator
Beyond standard LFOs and envelopes, Surge XT includes a formula modulator that accepts Lua scripts for creating completely custom modulation shapes and behaviors. You can write mathematical expressions that generate modulation signals based on note data, time, velocity, or any other variable.
This is the kind of deep feature that most commercial synths don’t even attempt, and for sound designers and experimenters, it opens up modulation possibilities that have no ceiling.
- 2,700+ factory presets
Surge XT ships with over 2,700 presets across every category you’d expect, and the community regularly contributes new sound packs. The preset browser supports text search and favorites, making it practical to navigate a library this large.
The quality is genuinely impressive for a free instrument. Many of the patches are complex, multi-layered designs that demonstrate just how capable the engine is.
10. FabFilter Pro-C 3
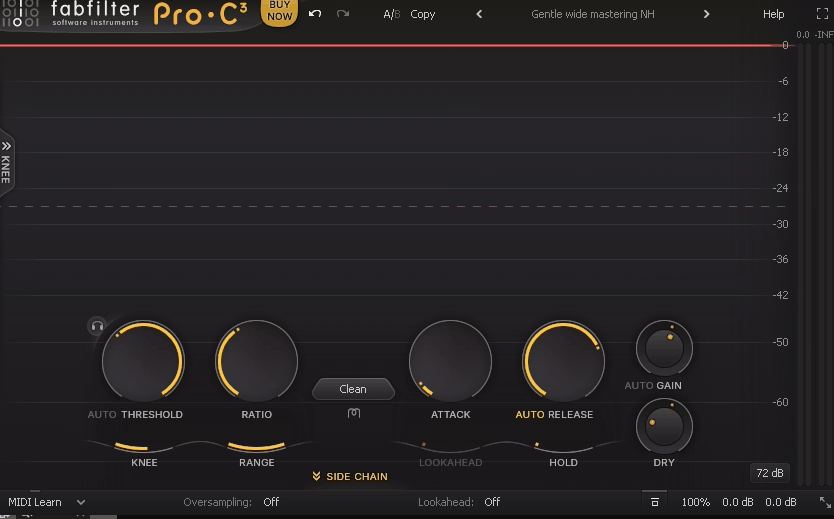
Cubase ships with the Compressor plugin, which handles basics fine. But if compression is something you spend real time on during mixing, Pro-C 3 is in a different league entirely.
FabFilter just released this update in early 2026, and it takes what was already one of the most respected compressor plugins and pushes it into territory that makes vintage emulations feel limited by comparison. Fourteen compression algorithms, analog character modes, and integration with Pro-Q 4’s Instance List turn this into the centerpiece of a channel strip that spans your entire Cubase session.
What I appreciate about Pro-C 3 is that it doesn’t force you into one style of compression. Every algorithm sounds genuinely different, and the new Character section means you can add analog warmth directly inside the compressor instead of reaching for a separate saturation plugin. It’s flexible enough to handle every compression task in a session, from transparent bus glue to aggressive vocal squashing.
- 14 compression styles including 6 new algorithms
The original eight from Pro-C 2 are all present, but the six additions are what matter. Versatile handles anything you throw at it. Smooth is perfect for bus compression where you want invisible glue. Upward applies pumping upward compression for in-your-face sound design. TTM (To The Max) combines upward and downward compression across multiple bands.
Op-El delivers warm, opto-style tube compression. Vari-Mu adds the rich, harmonically dense behavior of variable-mu hardware. Each algorithm has a distinct character that reacts differently to the same attack and release settings.
- Character panel with Tube, Diode, and Bright saturation
The new Character section adds three flavors of analog saturation that you can blend with the compression. Tube adds smooth even harmonics. Diode introduces edgier odd-harmonic content.
Bright emphasizes upper-frequency harmonics for presence. A Drive control sets the amount, and you can switch between Pre and Post compression routing, which fundamentally changes whether the saturation affects the signal before or after gain reduction.
This turns Pro-C 3 from a clean compressor into a character processor that can replace separate saturation plugins in your chain.
- Host Sync triggering
New in version 3, Host Sync outputs a steady pulse at any tempo-synced note value that triggers the compressor rhythmically without needing an external sidechain source. Adjustable Offset and Length parameters let you fine-tune exactly when the compression engages relative to the beat.
For sidechaining pads to a kick drum groove without actually routing a kick signal, or creating rhythmic ducking effects in electronic productions, this feature is enormously practical inside Cubase.
- 6-band sidechain EQ with Pro-Q 4 filter shapes
The sidechain EQ section expanded from three bands to six, each supporting the full range of filter shapes from Pro-Q 4 including brickwall low-pass and high-pass options. Every band can be independently set to mid or side processing.
This level of sidechain control means you can tell the compressor to respond only to specific frequencies in the mid or side channel, which is the kind of surgical triggering that makes compression musical rather than mechanical.
11. Matt Tytel Vital

Here’s your second free synth recommendation, and it’s a completely different beast from Surge XT. Where Surge covers the broadest possible synthesis territory, Vital focuses specifically on wavetable synthesis and does it with a visual clarity that makes complex sound design feel approachable.
The interface is gorgeous, the sound engine is modern and clean, and the spectral wavetable editor gives you tools that most paid wavetable synths still don’t offer.
Matt Tytel built this as a solo project after working on the open-source Helm synthesizer, and the free version is remarkably generous. You get the full synthesis engine with three wavetable oscillators, the complete modulation system, and all the effects.
The only limitations in the free tier are the number of presets and wavetable imports, which you can unlock by supporting the developer. I mention Vital alongside Surge because they complement each other perfectly: Surge for hybrid and experimental synthesis, Vital for polished wavetable work.
- Spectral wavetable editor
Vital lets you drag any audio file into a wavetable slot and it automatically converts the audio into a playable wavetable using spectral analysis. You can also draw waveforms manually in the time domain or frequency domain, import wavetables from other synths, and edit individual frames with precision.
The visual feedback shows you exactly what each wavetable frame looks like, both as a waveform and as a spectral plot. This level of wavetable creation is something you’d normally only find in Serum or Absynth, and here it’s free.
- Three oscillators
Each of the three oscillators has its own wavetable position, warp mode, and unison controls. The warp modes include bend, squeeze, sync, formant, quantize, FM, and others, each dramatically reshaping the wavetable character. Unison goes up to 16 voices per oscillator with controls for detune, stereo spread, and blend. Because each oscillator can run a completely different wavetable with different warping, you can build layered sounds that morph and shift across the frequency spectrum.
- Drag-and-drop modulation
Vital’s modulation system uses a drag-and-drop approach where you pick up a modulation source and drop it onto any knob. The target knob then displays an animated ring showing the modulation range in real time. LFOs, envelopes, random sources, macros, and note/velocity data can all be routed to virtually any parameter.
The visual feedback makes it immediately clear what’s being modulated and by how much, which dramatically speeds up patch design compared to synths where modulation routing happens in hidden menus.
12. FabFilter Pro-L 2
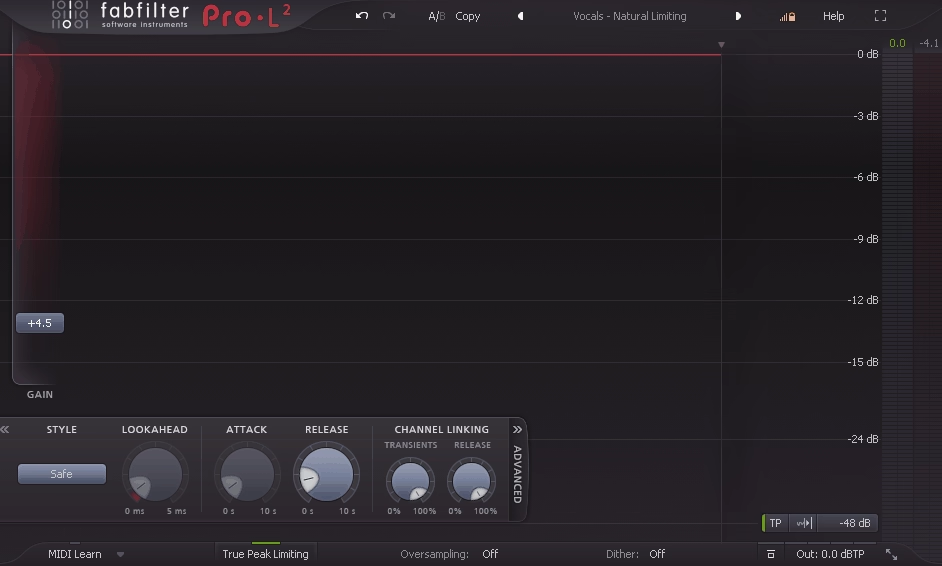
Every mix needs a limiter at the end of the chain, and Pro-L 2 is the one I trust for the final stage. Cubase’s built-in Brickwall Limiter works, but it doesn’t give you the flexibility or metering you need when you’re actually trying to deliver a professional master.
Pro-L 2 gives you eight distinct limiting algorithms, real-time loudness metering to streaming standards, and the kind of transparent ceiling control that lets you push volume without destroying your dynamics.
What keeps me on Pro-L 2 specifically is the combination of sound quality and information.
The metering shows you everything you need for modern delivery targets in one place, the algorithms give you real tonal options rather than just “louder with more distortion,” and the true peak limiting ensures your masters don’t clip on any playback system. It’s the final link in my Cubase mastering chain and the one plugin I’d never consider replacing.
- Eight limiting algorithms
Transparent is my default for masters where I want the limiter to be invisible. Punchy preserves transient impact better than most competing limiters. Dynamic maintains macro-dynamics even at high gain reduction.
Aggressive is for when you want the limiter to bite. Safe introduces no overshoot whatsoever. Bus, Wall, and Modern each handle specific scenarios differently. The difference between these isn’t subtle. Switching algorithms on the same material can change the feel of a master significantly, and having all eight available means you can match the limiter’s behavior to the genre and loudness target.
- Loudness metering
The metering section shows momentary, short-term, and integrated LUFS alongside true peak levels and dynamic range in real time. For delivering masters to Spotify, Apple Music, YouTube, or any other platform with loudness normalization, having these readings directly in your limiter eliminates the need for a separate metering plugin. I used to run a loudness meter after the limiter, but Pro-L 2 made that entirely redundant.
- True peak limiting with up to 32x oversampling
True peak mode catches inter-sample peaks that standard limiters miss, the peaks that occur between digital samples and cause distortion on D/A converters and lossy codecs. At up to 32x oversampling, Pro-L 2 calculates these inter-sample peaks with extreme accuracy.
If you’ve ever had a master that sounded clean in your DAW but distorted slightly on Spotify or YouTube, inter-sample clipping was almost certainly the cause, and true peak limiting is the solution.
- Channel linking with mid/side
Pro-L 2 offers variable channel linking from fully linked to independent, with the option to process in mid/side mode. For mastering, mid/side limiting lets you treat the center image and stereo width with different amounts of gain reduction, which prevents the limiter from clamping down on the entire stereo field just because the vocal in the center got loud. If you work with surround or immersive audio in Cubase, Pro-L 2 handles up to 7.1 channel configurations.
Hello, I’m Viliam, I started this audio plugin focused blog to keep you updated on the latest trends, news and everything plugin related. I’ll put the most emphasis on the topics covering best VST, AU and AAX plugins. If you find some great plugin suggestions for us to include on our site, feel free to let me know, so I can take a look!