I’ve picked and tested some of the best VST plugins for beginners that I found after trying dozens of options across different categories and price ranges.
When I started producing music, I wasted months downloading every free plugin I could find and buying expensive tools I didn’t understand, hoping one would magically make my tracks sound professional. The problem wasn’t the plugins themselves but that I kept choosing tools designed for advanced engineers who already understood compression ratios, phase relationships, and multiband processing.
I realized beginners need plugins that teach while they work, where controls make musical sense rather than requiring a degree in audio engineering to understand what each parameter does. Over the past few years, I’ve tested various plugins specifically looking for tools that deliver professional results without burying you under technical jargon or overwhelming interfaces.
The plugins I’m sharing here prioritize 3 things: intuitive workflows that let you hear results immediately, visual feedback that connects what you see with what you hear, and sound quality that holds up in finished productions. I focused on tools that either simplify complex processes into musical terms or provide educational value by showing you exactly what they’re doing to your audio.
For example, Waves IDX Intelligent Dynamics completely reimagines compression by using controls labeled “energy” and “punch” instead of attack times and ratios, while bx_masterdesk Classic wraps an entire mastering chain into one interface with descriptive controls that make sense even on day one. I’ve also included Softube Model 72 because it strips synthesis down to essential elements that teach you how oscillators, filters, and envelopes actually work, and Kilohearts Convolver for teaching spatial concepts through real impulse responses rather than abstract reverb parameters.
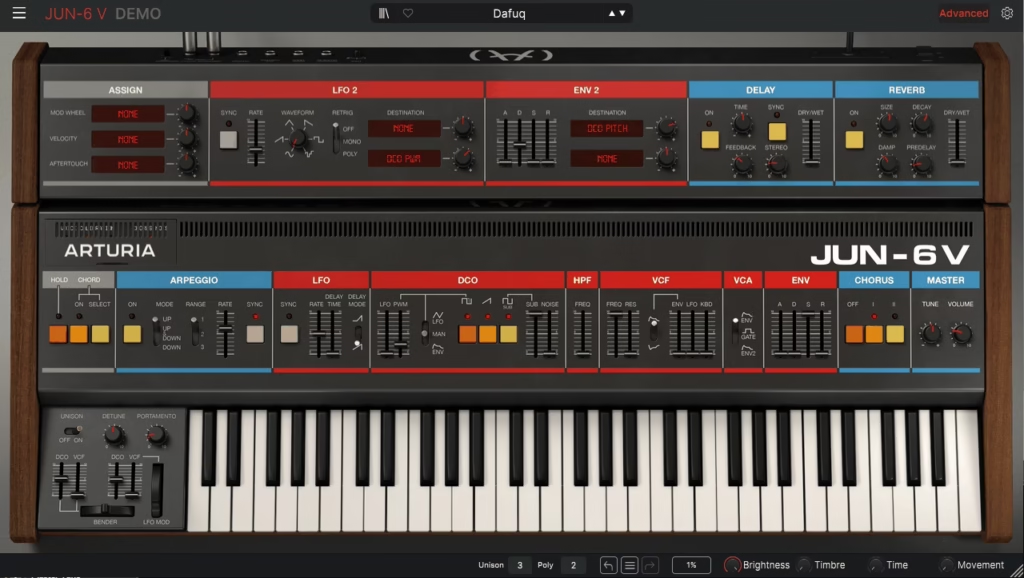
This list includes both paid and free options because I know budget matters when you’re starting out. Some of these plugins like BUSTERse and Lunacy Haze cost nothing but deliver quality that competes with expensive alternatives, while others like Arturia Jun-6 V and Sugar Bytes Looperator offer capabilities you simply can’t find in free tools. What they all share is the ability to help you make better music today while building skills that transfer to more advanced tools tomorrow.
1. Softube Model 72
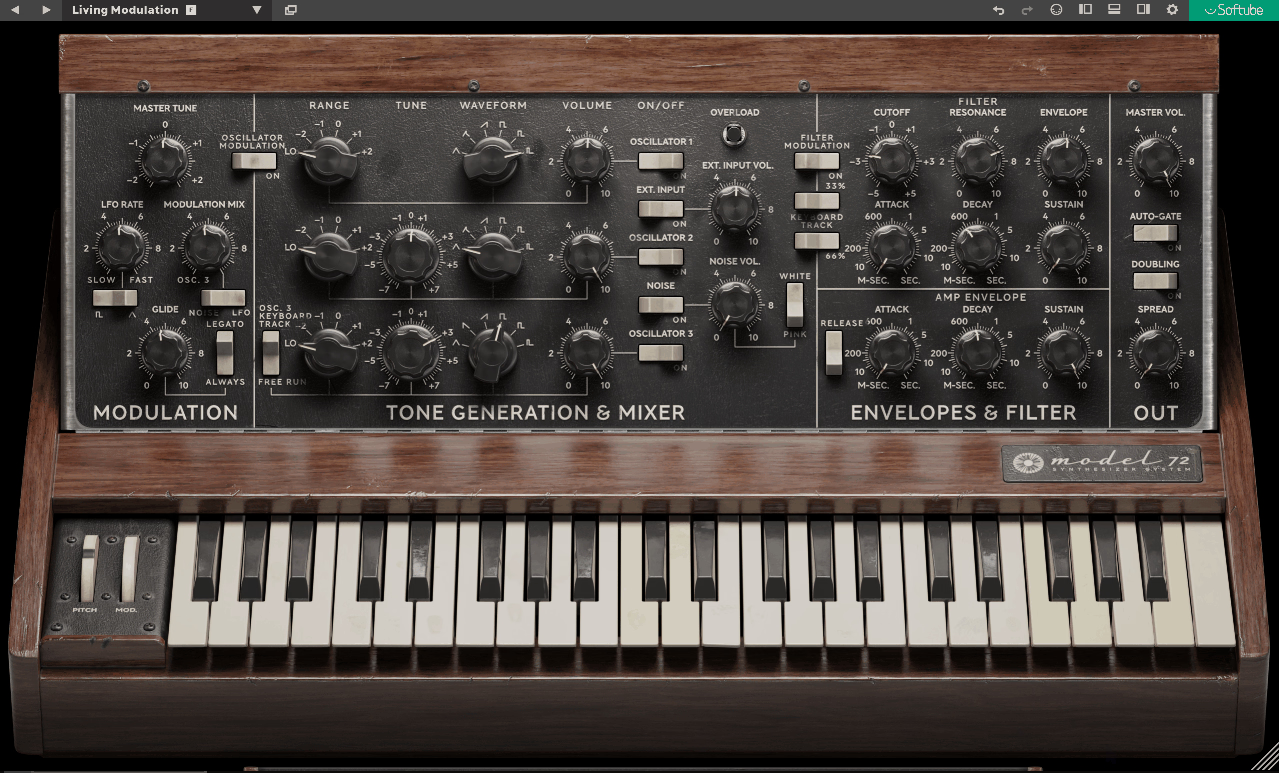
Getting started with synthesis can feel like walking into a room full of blinking lights and cryptic labels that make no sense. Most synths throw hundreds of parameters at you before you’ve even figured out what an oscillator does. This one may seem less beginner-friendly at a first glance but trust me, it really isn’t.
Softube Model 72 Mono Synth takes the opposite approach by stripping synthesis down to its essential elements and presenting them in an interface where every knob does exactly what you’d expect it to.
I remember the first time I loaded it up expecting another overcomplicated synth and instead found myself making usable bass patches within minutes. The layout feels deliberately simple without being dumbed down, which makes all the difference when you’re learning.
Here is what you get:
- Three-Oscillator Architecture with Sub and Noise
The engine runs on three analog-modeled oscillators producing sawtooth, triangle, and square waves plus a dedicated sub oscillator and noise generator for complete frequency coverage. This gives you enough raw material to build anything from chest-thumping bass to screaming leads without needing to layer multiple instances.
What surprised me was how the oscillators interact when you detune them slightly, creating natural chorusing that sounds way more organic than most digital chorus effects I’ve tried.
- Ladder-Style Filter That Actually Responds Musically
The resonant low-pass filter uses classic ladder design that behaves like vintage hardware where pushing resonance adds character without turning into unstable shrieking. I appreciate how the cutoff sweeps feel smooth across the entire range, and driving it harder introduces subtle saturation that reinforces the analog vibe. In one project I was able to get aggressive acid-style squelches by cranking resonance while keeping the fundamental tone intact, which doesn’t always happen with digital filters.
- Over 250 Factory Presets as Learning Tools
The plugin ships with more than 250 presets covering basses, leads, sequences, and classic analog sounds that function as educational references rather than just starting points. I’ve spent some time loading presets and reverse-engineering how they’re built, which taught me more about synthesis than reading manuals ever did!
Each preset shows you exactly which oscillators are active, how the filter is set, and what the envelopes are doing.
- Warm Full-Bodied Analog Character
The sound has a subtle edge and voltage-like quality that makes it suitable for genres where character matters more than sterile perfection. I’ve noticed bass patches maintain clarity even when pushed hard, and lead sounds feel expressive and responsive especially with pitch bend and modulation.
Despite the vintage leaning, it sits well in modern mixes without requiring corrective EQ to make it work.
What’s best is that Model 72 also comes with trial, so you can check out plugin and try it for yourself first.
2. Waves IDX Intelligent Dynamics

Compression represents one of the steepest learning curves in music production because traditional compressors demand you understand attack times, release curves, ratios, thresholds, and how all these parameters interact before you can get usable results.
Waves IDX Intelligent Dynamics is a great vst plugin for beginners that completely reimagines this approach by positioning itself as an intelligent dynamics enhancer rather than a traditional compressor, which matters enormously for beginners who just want their tracks to sound more professional without spending weeks learning technical concepts.
The plugin analyzes incoming audio and adapts its processing in real time to enhance perceived energy, clarity, and punch rather than simply applying static gain reduction that treats all audio the same way regardless of context.
What separates this from other beginner-friendly dynamics tools is how it frames every control in terms of musical impact instead of technical behavior, meaning you think about what you want the track to feel like rather than what milliseconds of attack time you need.
This philosophical shift makes dynamics processing accessible from day one while still delivering professional results that hold up in finished productions, and you don’t need to understand compressor mechanics to get sounds that compete with commercial releases, which is pretty cool!
- Proprietary Analysis Algorithms
The plugin employs proprietary analysis algorithms that monitor incoming audio and adjust processing parameters dynamically based on what it hears. I’ve noticed it reacts differently to fast transients than slow tonal shifts, which mirrors how real compression should behave. I think this intelligent responsiveness makes it feel more like a musical tool than a technical processor, and I can see how it prevents the robotic pumping that plagues static compressor settings.
- Musical Controls
The interface presents controls labeled in terms of musical impact rather than technical specs like energy, punch, and transparency instead of ratio and knee.
This dramatically reduces intimidation for newcomers because you focus on how you want the track to feel instead of memorizing compressor theory. I can see how this design philosophy shifts learning from technical to musical thinking, which ultimately produces better creative decisions.
- Real-Time Visual Feedback
Visual feedback shows exactly when the plugin engages and how much processing gets applied, connecting what you hear with what IDX does. I appreciate this because the visual component reinforces learning where if you drive the input harder and see the display move more dramatically, you begin to intuitively connect visual response with sonic impact. I’ve experienced how this interactivity accelerates understanding for people still developing their ears
- Versatile Preset Library
The plugin includes presets for drums, bass, vocals, guitars, and full mixes that serve as learning templates beyond just quick starting points. I think plugins with presets are crucial if you are starting out because they can give you the instant results which reduces overwhelm, makes things easier and more fun.
3. United Plugins Expanse 3D
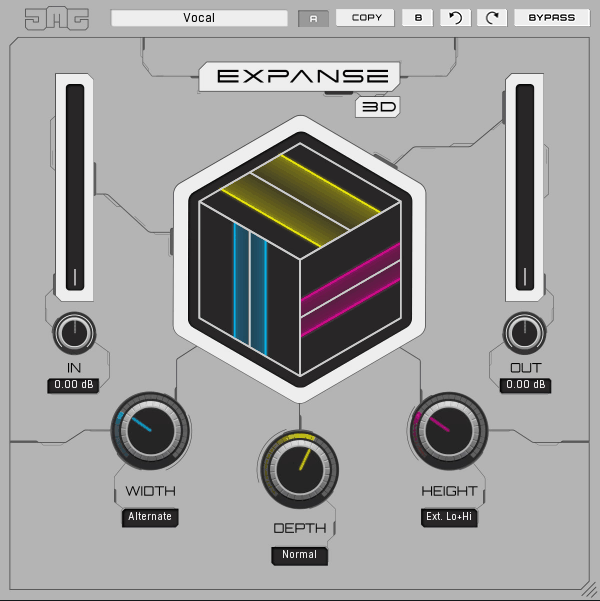
Stereo width plugins often promise immersive soundscapes but deliver phase problems that make your mix collapse in mono. United Plugins Expanse 3D stereo imager prioritize phase coherence and mono compatibility while still delivering noticeable stereo expansion.
The plugin doesn’t rely on simple channel delays or random decorrelation tricks that destabilize your low end. It works quite well on background vocals where I need space without the hollow artificial quality most wideners introduce. The processing core uses phase-aware algorithms that analyze your audio instead of applying blanket widening that treats all frequencies identically.
What Expanse offers:
- Frequency-Dependent Widening with Independent Band Control
The plugin offers both global width adjustment and frequency-specific widening where you can apply subtle broadening across the full range or target particular bands separately. I’ve discovered this proves essential because low frequencies below around 150Hz should generally stay centered to maintain punch and mono compatibility while wider mids and highs create airiness.
You can widen the top end without loosening your bass, which most simple wideners can’t accomplish. In practice this means guitars and pads get spatial depth while kick and bass remain focused and powerful.
- Mid/Side Listening Modes
Expanse 3D includes solo buttons for mid and side channels letting you isolate center versus stereo information independently. I find this educational feature really nice because you actually hear what the widening contributes rather than guessing from the combined output.
When I was working on electronic track, soloing the sides revealed how much the synth pads were crowding the vocal, which I fixed by reducing side content around 2-4kHz. This kind of surgical control becomes possible only when you can audition channels separately.
- Depth Enhancement Beyond Simple Width
Beyond lateral stereo spread, the plugin incorporates depth shaping that affects how close or distant elements feel without using reverb or delay. I appreciate how this isn’t artificial push/pull but nuanced spatial positioning that adds three-dimensionality to flat mixes.
On drum overheads this created a sense of the kit existing in real space rather than just being panned left and right. The depth parameter interacts with the width control in ways that feel musical rather than mechanical, which separates this from tools that only spread things horizontally.
- Phase Coherence Protection
The core algorithms actively prevent phase cancellation issues that plague basic stereo wideners and cause mixes to sound hollow or lose energy when summed to mono. I’ve tested this by checking mono compatibility after widening, and unlike other tools where bass disappears or the mix thins out, Expanse 3D maintains solid center image and frequency balance.
- Real-Time Visual Feedback
The interface shows widening impact visually with spectrum analysis that bridges the gap between what you hear and what’s happening to the waveform. I think this matters more for learning than experienced mixers realize because stereo imaging concepts remain abstract until you can see how width adjustments affect different frequency zones. The visual component helped me understand why widening above 8kHz added air without muddying anything, while widening below 200Hz created instant problems.
4. Lunacy Haze (FREE)

Modulation effects like chorus, shimmer, and creative filtering often get overlooked by beginners who focus primarily on EQ and compression, but these effects can transform static sounds into living breathing textures that add professional polish and movement to productions.
Lunacy Haze delivers this transformation as a free plugin that combines elements of chorus, shimmer, and creative filtering into a single approachable effect that doesn’t demand deep technical adjustment or complex routing knowledge to get impressive results.
Unlike standard chorus plugins that simply thicken sound by duplicating and detuning it in predictable ways, Haze creates movement, texture, and depth that works whether you’re processing pads, leads, vocals, guitars, or entire mixes with equal effectiveness.
- Integrated Chorus and Shimmer for Spatial Lushness
At its heart are modulation components that interact with audio to create spatial lushness and harmonic movement, introducing layers of controlled spectral and temporal modulation. I’ve found the chorus aspect introduces subtle delays and pitch variations that thicken the source and give it motion, while the shimmer element injects higher-frequency content resembling gentle shimmer reverb. I think this combination adds air and presence particularly effectively on pads, vocals, and ambient instruments without needing separate plugins.
- Interactive Filter Section for Tonal Sculpting
The filter section works in tandem with modulation allowing you to shape frequency content that gets emphasized or colored by the effect. I appreciate how this isn’t a one-size-fits-all chorus but a hybridized texture engine producing sounds ranging from gentle widening to lush atmospheric modulation. I can see how the filter and modulation aren’t siloed effects but designed to work in concert so even modest adjustments create dramatic sonic changes.
- Large Clearly Labeled Controls with Immediate Impact
The interface uses large clearly labeled controls with immediate audible impact that remove layers of confusion. I find visual indicators showing when the effect engages and how much modulation gets applied proves useful for understanding degree of effect in real time. I’ve noticed this direct feedback loop between sight and sound helps beginners internalize how modulation affects spatial and harmonic content faster than reading theory.
- Low CPU Usage Enabling Multiple Instances
5. Arturia Jun-6 V
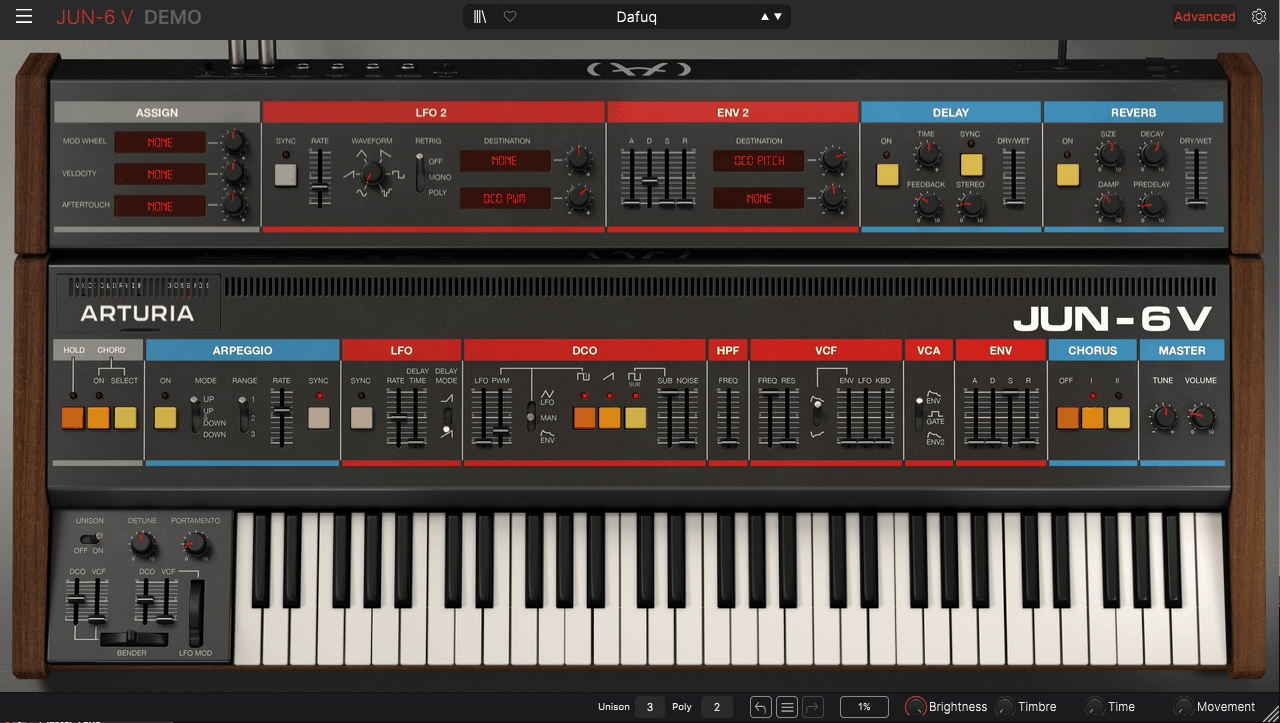
The Roland Juno-6 from the late 1970s became legendary for its lush choruses, warm pads, and fat basses that defined countless hit records across multiple decades, and having that sound in software form means you get the iconic tone without hardware maintenance, tuning drift, or the five-figure price tag.
What makes this particularly valuable is how it balances vintage authenticity with modern workflow enhancements like preset management, expanded modulation, and seamless automation that the original hardware never offered.
I like this because the recall is instant and the sound sits in mixes without extensive processing, which matters in case you’re working on tight deadlines and can’t spend an hour dialing in the perfect patch from scratch every time you open a project. Arturia Jun-6 V delivers that classic polyphonic analog experience while fitting naturally into contemporary DAW-centric production workflows.
- Dual Oscillator Architecture with Sub-Oscillator and PWM
The engine runs on two oscillators per voice where Oscillator 1 provides sawtooth and square waves while Oscillator 2 handles sub-oscillator duties and pulse width modulation. I’ve discovered this combination gives you enough harmonic material to build everything from chest-rattling bass to cutting leads without stacking multiple instances, and the sub-oscillator adds weight that makes even simple patches feel full.
The oscillators interact when slightly detuned, creating natural chorusing and movement that sounds way more organic than most digital chorus effects. The detune control is subtle enough that you can find sweet spots where the oscillators phase against each other in musical ways.
- Classic Resonant Low-Pass Filter
The filter section uses ladder-style low-pass design with resonance that can be pushed from gentle tonal shaping all the way to aggressive self-oscillating peaks. I like how the resonance behaves musically across its entire range where it adds color and emphasis without immediately turning brittle or unstable like some digital filters do when you crank them.
I discovered you can automate the resonance while keeping a fixed cutoff frequency to create evolving timbral movement that doesn’t change the fundamental pitch, which became a rhythmic element in the arrangement rather than just tonal filtering.
The filter responds differently depending on how hard you drive the input, introducing subtle saturation that reinforces the analog character. This interaction between input gain and filter behavior isn’t immediately obvious but becomes crucial when you’re trying to get aggressive sounds without resorting to external distortion.
- Six-Voice Polyphony
The synth typically supports six simultaneous voices mirroring the original hardware’s architecture, which opens up chords, pads, and evolving harmonic textures essential for full arrangements.
- Signature Ensemble/Chorus Effect Defining Juno Character
The standout feature remains the ensemble/chorus effect that creates the signature wide lush sound heard on countless records over decades, and Arturia’s modeling faithfully recreates this with modern precision. I’ve found you can dial in anything from subtle movement that barely widens the stereo image to dramatic chorus that transforms simple waveforms into complex animated textures.
- Large Categorized Preset Library as Learning Templates
The plugin ships with a comprehensive library of presets organized by type including classic Juno basses, pads, leads, evolving sequences, and modern hybrid textures. I think these presets function as educational references rather than just starting points because you can load any preset, examine exactly which oscillators are active, how the filter is configured, what the envelopes are doing, and how the ensemble is set.
6. Sugar Bytes Looperator
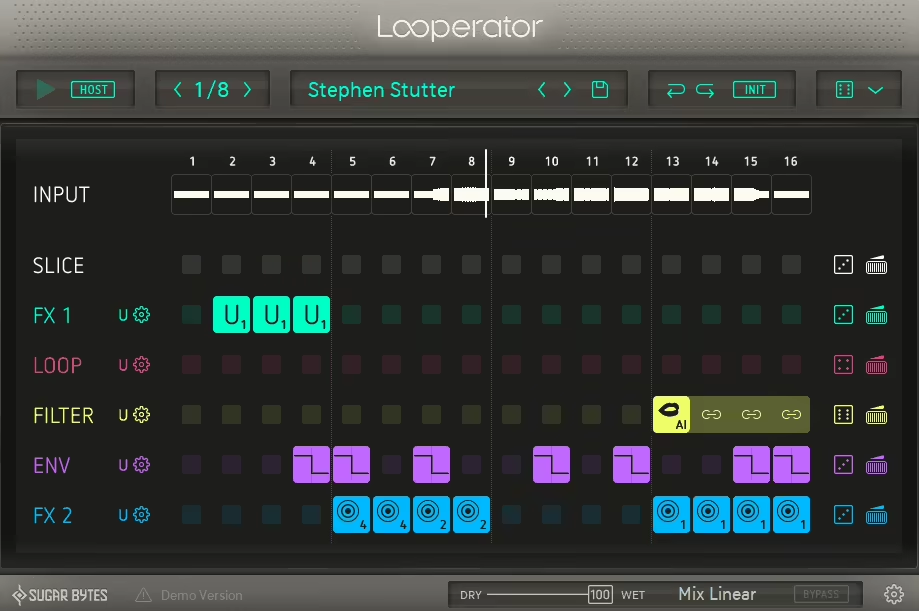
Static effects plugins apply the same processing from start to finish, which means your tracks sound predictable and lifeless no matter how many chorus or delay pedals you stack. Most producers struggle to create evolving textures that keep listeners engaged because manually automating dozens of parameters across multiple effects takes hours and still feels mechanical.
Sugar Bytes Looperator reimagines effect processing as a dynamic multi-effect sequencer that transforms loops, instruments, and full mixes into continuously evolving soundscapes through grid-based pattern sequencing.
I discovered this during a remix project where the client’s vocal loop sounded boring no matter what static effects I applied, and a sound designer friend mentioned Looperator as the tool that turns repetitive material into something unpredictable. The interface presents a sequencing grid prominently with color-coded cells corresponding to different effect events, and within minutes I had a vocal loop evolving through filter sweeps, stutters, delays, and tonal shifts that felt rhythmically locked to the track.
To me, what separates this from typical effect chains is how it encourages thinking in patterns and motion rather than static snapshots, which fundamentally changes your approach to sound design.
- Grid-Based Pattern Sequencer Driving Multiple Effects
The workflow revolves around a grid where each step corresponds to a moment in time and you assign effects to steps while drawing behavior over the timeline.
I’ve found this visual approach makes complex sound design feel intuitive because you see when effects trigger and how they interact rather than programming blind automation curves. When the sequencer plays it animates filter sweeps, rhythmically gated delays, glitch effects, and tonal modulation in sync with your host tempo.
During one electronic track I drew a pattern where the filter opened gradually over 16 steps while delay feedback increased creating this building tension that resolved perfectly into the drop.
- Multi-Effect Chain Including Filter, Stutter, Delay, Distortion, Crusher, Reverb
Rather than a single effect, this beginner’s plugin offers several modules that can be triggered, modulated, and sequenced independently. I appreciate how the filter section produces anything from subtle sweeps breathing life into pads to dramatic gating making percussive loops bounce and evolve.
The distortion and crusher modules add grit while time-based effects provide depth, and each effect works in concert with others rather than isolation.
An unpredictable strength I discovered is using the vinyl crusher on just specific steps creating this intentional lo-fi character that appears and disappears rhythmically rather than constant degradation.
- Preset Patterns
The plugin includes preset patterns serving as starting points that function as playable patterns demonstrating how different effect combinations create different results. I believe these presets work as interactive learning by example rather than static snapshots you load and forget.
- Step-Resolution Adjustment
You get control over step resolution adjusting pattern length and timing divisions while supporting parameter automation from your DAW.
7. Kilohearts Convolver

What struck me immediately with Kilohearts Convolver was how the interface didn’t bury me under technical parameters but instead focused on musical controls that made sense even without understanding the theory behind convolution processing.
I started experimenting with different impulse responses on vocals, drums, and synth pads, and discovered that the same IR could behave completely differently depending on the source material in ways that felt organic rather than predictable. The low CPU usage compared to other convolution reverbs meant I could use multiple instances across my session without worrying about system strain.
What you get:
- Impulse Response Processing
The core technology takes your dry signal and runs it through an impulse response producing wet signal that sounds as though it was recorded in the captured environment. I’ve discovered this IR can be a real concert hall, small vocal booth, plate reverb hardware, speaker cabinet, or even abstract designed spaces that don’t exist physically. What makes this powerful is how it doesn’t simulate reverb mathematically but recreates it based on actual recorded responses, which is why convolution reverbs are considered the gold standard for realism.
In one session I loaded an IR captured from a famous studio’s live room and placed my acoustic guitar through it, and the result sounded like I’d actually tracked in that space rather than added reverb in post. The difference between this and algorithmic reverb became immediately obvious when A/B testing.
- High-Cut and Low-Cut Filtering
Built-in filtering implemented as high-cut and low-cut controls lets you tame overly bright reverb tails or remove muddiness from the low end. I find these simple controls provide powerful tools for making convolution reverb fit into real mixes without overwhelming the source material. On vocal tracks I typically cut everything below 200Hz from the reverb to prevent low-mid buildup while leaving the dry signal full, and this filtering happens inside Convolver without needing external EQ.
What’s cool is how much character you can add just by adjusting the high-cut filter, where rolling off above 8kHz creates vintage plate-style warmth while leaving it wide open gives modern digital clarity. I’ve built entire reverb presets around this filtering behavior.
- Custom IR Import with Expanding Library Possibilities
The ability to import custom impulse responses means you can capture your own spaces with proper IR capture rigs or download third-party libraries created by engineers worldwide. I believe this opens up virtually endless sonic spaces to experiment with beyond the included presets.
Trick I learned is layering multiple IRs by using several Convolver instances with different spaces and blend ratios, which creates complex spatial depth that single IRs can’t achieve. This technique could work brilliantly on a cinematic pads where you combine a cathedral IR with a small room IR for both grandeur and intimacy.
- Low CPU Usage Enabling Multiple Instances
Kilohearts ensures Convolver respects low CPU usage relative to many convolution reverbs that are notorious for being processor-intensive especially with long impulse responses.
8. bx_masterdesk Classic (FREE)
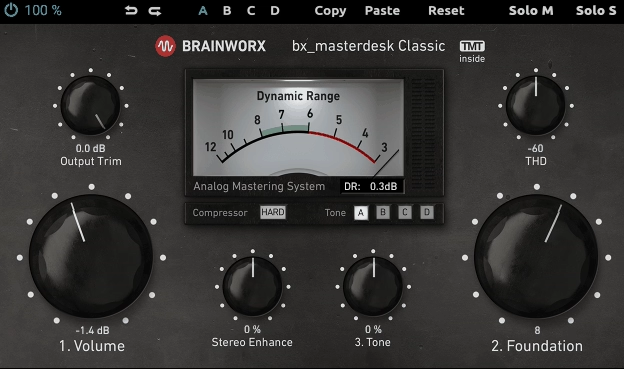
Mastering intimidates most beginners because traditional tools bury you under attack times, release curves, ratio settings, and threshold controls that require years of experience to understand fully. You’re staring at parameters like lookahead, RMS versus peak detection, and mid/side balancing wondering which one to adjust first while your track sits there unmastered.
bx_masterdesk Classic from Brainworx wraps essential mastering functions into a single unified console where controls are labeled in musical terms like warmth, punch, and brightness rather than technical jargon.
What makes this particularly valuable is it’s a free plugin yet it’s built on the same professional-grade Brainworx technology used in high-end mastering studios.
- Musical Controls Replacing Technical Parameters
The interface uses intuitive descriptors like Target Loudness, Dynamics, Color, and Smoothness instead of attack/release times and ratio settings. This lets you shape the master by ear using musical concepts rather than memorizing compressor theory or trying to calculate what 4:1 ratio means for your specific track. The controls have semantic meaning that directly relates to how the sound feels rather than how the processing technically operates.
A workflow tip I learned is starting with the dynamics control at zero then slowly increasing it until you hear the track gel together, which teaches you to listen for cohesion rather than just making it louder.
- Integrated Multi-Stage Mastering Chain
The signal flow functions as a complete mastering chain with EQ, dynamics, saturation, limiting, and output management all housed inside one interface. I appreciate how these stages are interrelated so adjusting one control influences how others behave, much like analog mastering consoles respond as a whole rather than isolated processors.
This encourages holistic thinking where you balance tonal quality, dynamic range, and loudness together instead of obsessing over single parameters.
During mix finalization I’ve noticed how the warmth control interacts with dynamics to create different sonic signatures, where adding warmth first then dynamics produces a different result than reversing that mental approach.
- Target Loudness Control with Transparent Limiting
You get a loudness enhancement stage via transparent limiting that brings tracks up to competitive volume without obvious distortion or pumping. I find this valuable because it lets you think in terms of “how loud do I want this” rather than “what threshold and ratio do I need,” which shifts focus from technical settings to musical goals. The limiter stays clean even when pushed to streaming platform targets like -14 LUFS.
- Warmth and Color Saturation Controls
The plugin offers subtle saturation controls that impart warmth and presence without requiring knowledge of harmonic generation or distortion types. I’ve discovered the warmth/shade controls interact with dynamics and limiting stages, letting you favor smooth analog-like character over digital edge. This proves especially useful when mastering pop, R&B, and acoustic music where excessive brightness feels harsh and fatiguing.
9. Analog Obsession BUSTERse (FREE)

I found myself using BUSTERse compressor on bass to bridge the gap between low-end depth and midrange definition, on vocals to add thickness that helped performances cut through dense arrangements, and even on full mix buses as gentle glue that tied elements together with analog-inspired character.
The visual feedback through gain reduction and level meters taught me to recognize compression behavior by sight and sound simultaneously, accelerating my understanding of dynamics processing in ways that traditional compressors with their buried parameters never did.
This plugin works beautifully for beginners and bedroom producers wanting bigger, fatter, more controlled tracks without needing intimate knowledge of compressor mathematics or spending hours balancing separate processing chains.
- Integrated Dynamics and Saturation Architecture
The plugin folds compression and harmonic enhancement into a unified signal path where both processes interweave rather than operating as isolated modules. I noticed this mirrors how classic analog gear behaved where controlling dynamics naturally changed harmonic character due to saturation and nonlinearities in the circuitry, creating musically cohesive results that feel intentional.
The interdependence means when you dial in drive it affects how compression responds and when you increase compression it influences harmonic generation, which produces a synergy that separate plugins rarely achieve.
- Mix Control for Parallel Processing Without Routing Complexity
You get a mix knob that blends processed and dry signals letting you dial in parallel compression and saturation without setting up aux buses or complex routing. I appreciate how this makes parallel processing accessible to beginners who haven’t yet learned send/return workflows but still need that technique’s benefits.
- Musical Character Embracing Harmonic Coloration
Unlike transparent dynamics plugins that aim for invisible processing, BUSTERse embraces color and character as core identity introducing weight and presence that makes instruments feel larger and more polished.
- Real-Time Visual Feedback Connecting Sight and Sound
The interface provides simple gain reduction and level meters that give instant insight into processing behavior. This helps beginners learn by ear and eye together where you see compression engage as you hear it tightening dynamics, and you watch level changes as you adjust drive adding harmonics.
10. Waves BB Tubes

Waves BB Tubes is awesome plugin for beginners that changed my perspective on saturation plugins after I’d been frustrated with tools that either added too much grit or did nothing noticeable at all, never finding that sweet spot where analog character enhances without overpowering.
I started using it on bass to add fullness without mud, on vocals to create presence without harsh brightness, and even on drum buses where gentle saturation made kicks and snares feel more tangible.
The selection of different tube characteristics lets you experiment with various harmonic profiles depending on musical context, which I discovered by accident when switching models completely changed the vibe of a synth pad from warm and vintage to bright and aggressive. This plugin works beautifully for beginners wanting analog warmth and intermediate producers needing versatile character without complex routing or deep technical knowledge.
Features:
- Vacuum Tube Circuit Emulation with Dynamic Response
The core simulates vacuum tube circuit behavior found in vintage outboard gear where waveforms acquire harmonic content because tubes don’t behave linearly but compress and color signals in musically pleasing ways. When you gently push a signal through BB Tubes you hear warm rounded low end, fuller midrange, and presence boost in highs without harshness that digital EQ boosts can’t replicate. Drive it harder and it introduces more aggressive coloration that rarely sounds brittle or unpleasant, giving you range from subtle enhancement to pronounced tube grit.
Start with the drive control at its minimum then gradually increase it while listening for the point where the sound feels richer but not obviously processed, which teaches you to recognize when saturation enhances versus when it dominates.
- Multiple Tube Type Models for Different Harmonic Profiles
The plugin includes options to switch between different tube characteristics where each model produces distinct sonic fingerprints suited to different musical contexts. I appreciate how this modeling diversity encourages exploration rather than forcing you into one fixed analog flavor, and I’ve discovered certain tube types work better on specific sources.
During one session I found Type A added perfect warmth to vocals while sounding too dark on drums, but Type B gave drums exactly the edge they needed while making vocals too bright.
This variety means you’re not stuck with one-size-fits-all saturation but can match tube character to source material intelligently.
Hello, I’m Viliam, I started this audio plugin focused blog to keep you updated on the latest trends, news and everything plugin related. I’ll put the most emphasis on the topics covering best VST, AU and AAX plugins. If you find some great plugin suggestions for us to include on our site, feel free to let me know, so I can take a look!