These are the bestid/Side Compressor & EQ Plugins plugins I tried and recommend for mixing engineers and mastering professionals who need precise tonal shaping and stereo field control on full mixes without introducing harshness or phase issues!
If you’re like me, you’ve had that frustrating moment where your mix sounds wide and exciting, but the vocal and kick feel unstable, or the center is locked and powerful but the whole mix feels narrow and lifeless. That’s when you realize standard stereo processing treats everything the same – and sometimes the center needs completely different treatment than the sides.
There are some serious tools in this list – FabFilter Pro-Q 4, Shadow Hills Mastering Compressor Class A, Bettermaker C502V, Pulsar VM-COMP, AMEK EQ 250, and more including 4 freebies as well!
Whether you need to tighten low end in the center without narrowing the entire stereo field, add air to the sides without brightening the vocal, compress the mid channel for stability while letting the sides breathe for width, or control side splash without killing stereo excitement, there’s a plugin here that gives you independent control over the center and stereo components of your mix.
From surgical EQ with per-band mid/side capability to bus compressors with separate compression curves for mid and side channels, mastering grade dynamics with dual-stage mid/side control to intelligent EQ that unmasks center elements from stereo clutter, these plugins let you shape your stereo image with precision instead of compromising between center stability and stereo width.
Whether you’re mastering a dense electronic track, mixing a vocal that needs to sit forward while keeping wide synths exciting, or just trying to get your low end focused without collapsing your overhead width, you can solve stereo balance problems that used to require complicated routing, manage frequency masking between centered and wide elements, and make broad tonal moves that affect mid and side independently.
If you want your mixes to sound wide but stable, exciting but controlled, and translate reliably from headphones to speakers to mono playback, the following tools are proven choices for mid/side EQ, compression, and stereo field shaping.
1. Pulsar 8200
I keep coming back to the Pulsar 8200 when you need an EQ that can handle real tonal shaping without turning everything into a surgical mess. It’s modeled after the GML 8200 style topology, and the whole point of that design is how the curves stay smooth even when you’re pushing things hard.
You get five bands with overlapping ranges, adjustable Q, and the ability to swing plus or minus 15 dB per band, covering everything from 15 Hz up to 26 kHz.
What makes this different from a lot of digital EQs is how the gain behavior reflects that parallel circuit design from the original hardware. When you boost, it doesn’t suddenly become sharp and punishing. That matters most on bus work and mastering, where even small moves need to stay musical instead of jumping out at you.
The interface gives you two ways to work. You can use the classic control rack if you prefer deliberate knob tweaking, or you can jump into the fully editable curve editor when you need to shape things quickly. I don’t always want to mix with my eyes, but when time comes, the curve editor actually speeds things up without forcing you to learn a completely different tool.
- Mid/Side Operation with Listen Buttons
Mid side is handled in a way that stays readable instead of confusing. You can switch between stereo or M/S operation, and the Listen buttons let you audition what you’re affecting in real time. This is especially useful when you want to add brightness or width to the sides without messing up the vocal and kick sitting in the middle. You’re not guessing, you’re hearing exactly what’s changing.
- Tilt Filter and Frequency Extensions
The Tilt filter is one knob that pivots the entire frequency spectrum in a way that feels natural rather than forced. When a mix leans too dark or too bright, this is faster than reworking multiple shelves from scratch. It’s implemented as a proper filter rather than some cheap gimmick, so it actually sounds coherent across the range.
You also get dedicated Sub and Air bands, which are fixed frequency curves designed to sweeten the extremes without the usual problems. The Sub band tightens perceived weight without muddying up your low mids, and the Air band opens the top end without pushing into that brittle, hyped territory that digital EQs love to live in.
- Integrated De-Esser
The built in de esser is there for the exact scenario where you’re adding presence or air and sibilance starts poking through. Instead of reaching for another plugin, you handle it right here. You choose the frequency, set the amount, pick between a bell or shelf style, and you’re done. It’s simple on purpose, and that’s exactly what makes it useful in real sessions.
- Auto Gain and Gain Scale
Auto Gain is curve based and keeps comparisons honest by compensating for loudness changes as you work. Gain Scale acts like a multiplier for your entire curve when the general direction is right but the intensity needs to come up or down quickly. These two features change how fast you can make decisions without second guessing whether you’re hearing the EQ or just hearing it louder.
- Stepped Controls and Oversampling
Gain controls can be set to stepped behavior in 0.5 dB, 1 dB, or 3 dB increments, and frequency and Q controls can also be stepped with a fine adjust override when you need it. That’s the kind of detail that matters when you’re making small but deliberate moves and you want them consistent across multiple channels. The plugin also supports offline oversampling that can be set independently from real time processing, so your sessions stay responsive while still rendering at the best quality when you’re printing.
2. sonible smart:EQ 4
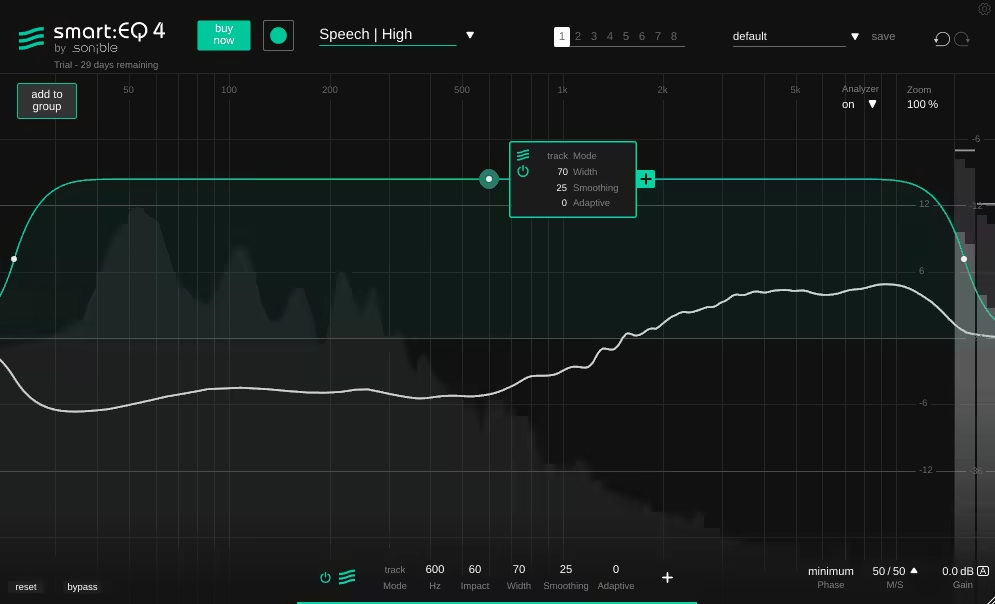
The sonible smart:EQ 4 mid side eq plugin treats tonal balance as a mix context problem rather than something you solve one track at a time. It’s built around the smart:filter, which learns a target balance from a chosen Profile and then applies a curve that you can push toward gentle polish or more assertive correction.
The real breakthrough here is how it handles spectral unmasking across multiple tracks using a simple hierarchy, so clashing parts stop fighting without turning into hours of surgical cuts.
The workflow starts with choosing a Profile. These aren’t just labels. You get instrument and vocal profiles for individual tracks and busses, plus Mix Profiles trained on full mixes in specific genre contexts, and a Reference Profile option that lets you use a reference track to guide the target balance.
When your mix is drifting in overall tone and you need a fast calibration point, the reference approach gets you there without copying the reference literally.
Where this gets genuinely useful is the grouping system. You can add multiple instances into a Group and arrange them into a depth hierarchy like front, middle, back. The important elements keep their space while supporting layers yield where they mask. It’s basically spectral mixing by priority, and you can control everything from a single window using the remote control view, which is what makes it practical instead of just clever.
- Comprehensive Mid Side Support
The mid side support goes deeper than most EQs. You get per band options, which makes this viable on stereo busses when the center and sides need different tonal strategies. You can add air to the sides without brightening the vocal in the middle, or tighten the low end in the center while leaving the sides alone.
The flexibility here is real, and it’s implemented in a way that stays readable instead of turning into a maze of routing.
- Minimum Phase and Linear Phase Operation
You can switch between minimum phase and linear phase operation depending on whether phase transparency or responsiveness is the priority. Linear phase is useful when you’re stacking multiple EQ instances and phase coherence matters, like on a master bus.
Minimum phase keeps things responsive and natural sounding when you’re working on individual tracks and don’t need perfect phase alignment. Having both options in one plugin means you’re not reaching for different tools depending on the context.
- Smart Filter with Processing Modes
The smart:filter has three available processing modes: Track, Group, and Track and Group. That matters in real sessions because sometimes you need it as a track balancer, sometimes as a masking resolver, and sometimes both.
If the learned curve comes out too strict, you can soften it with Smoothing and adjust how hard the filter pushes, so the result stays musical instead of feeling like the AI flattened everything into submission. There’s also an Adaptive behavior for material that changes a lot, which helps when a source isn’t consistent and a static learned curve only matches one section.
- Group Unmasking Across Multiple Tracks
In dense sessions, this is where it saves you the most time. Instead of carving space with repeated static EQ moves, the plugin manages masking by priority. Your vocal or lead elements keep clarity while pads, guitars, percussion layers, and ambience stop piling into the same frequency bands.
You set the hierarchy once, and the plugin handles the spectral adjustments across all grouped instances. It’s consistent across the arrangement and keeps things from getting messy when parts overlap.
- Full Parametric EQ with Dynamic Bands
It’s not limited to the smart filter. You also get a full featured parametric EQ with a high band count, and the standard bands can run dynamic behavior when a frequency problem is level dependent instead of constant.
That means you can handle resonances that only show up when a vocal gets loud, or deal with bass buildup that only happens in certain sections. The dynamic bands respond to the input level, so you’re not stuck with static cuts that affect the entire performance.
3. Lindell 354E (M/S Multiband Comp)
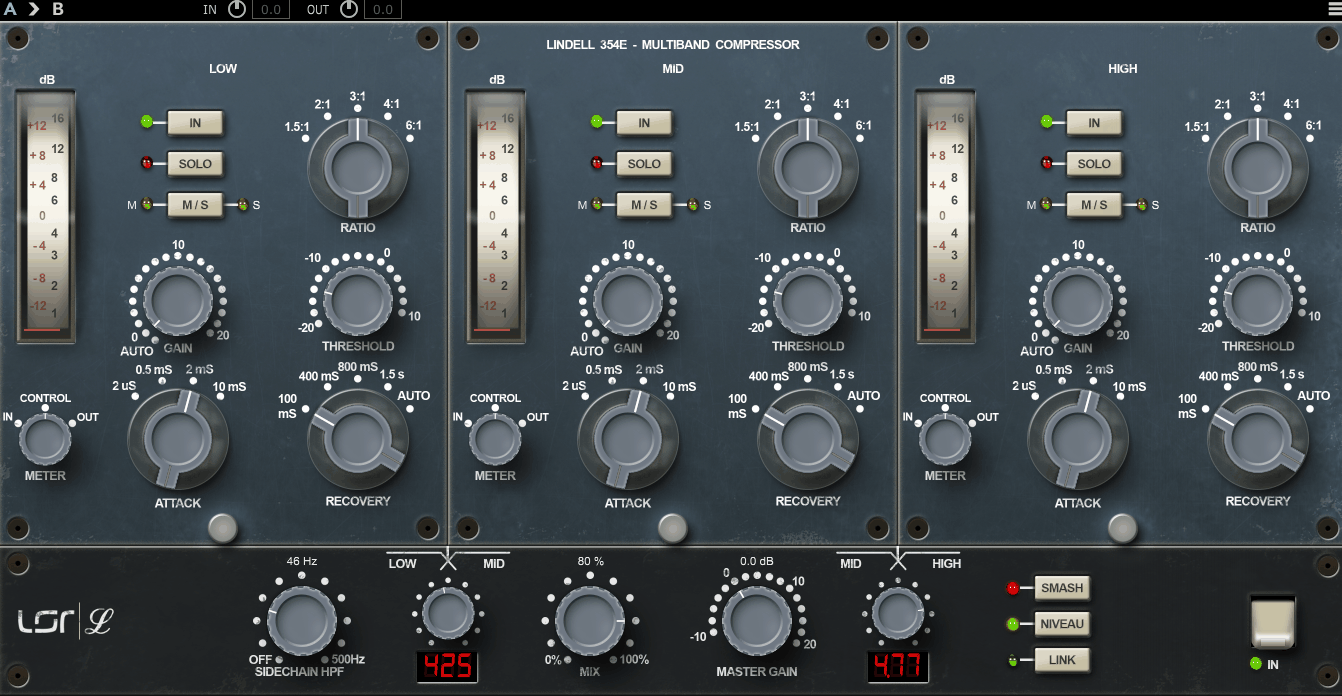
This one is a three band multiband compressor with mid side processing built around a diode bridge, vintage broadcast limiter style behavior.
It’s the kind of dynamics tool that adds density and grip without turning everything into sterile, clinical multiband control. To me, character of Lindell 354E usually feels firm, weighty, and forward in a way that reads as hardware inspired control.
When you push it, it becomes part of the sound rather than disappearing, which is exactly why it works well on aggressive buses. When you keep it gentle, it can still function as glue, but with more attitude and hold than a purely transparent compressor. The timing range makes it flexible enough to catch transients fast when drums or guitars are spiky, or let it breathe so the bus moves with the groove instead of feeling pinned.
- Mid/Side Compression
Mid side control is what makes this actually practical on stereo buses. You can aim compression toward the mid to stabilize the center, or toward the sides to keep wide elements from flaring up without narrowing the mix.
When a chorus expands and the sides get splashy, you can target the sides instead of trying to fix it with extra EQ moves. This keeps your width exciting while the center stays locked, which is a combination that’s hard to get with regular stereo compression.
- Three Band Crossover with Independent Control
The workflow centers on the three bands and adjustable crossover points. That’s the first decision that matters. With sensible splits, the low band can focus on weight and punch, the mid band can manage density and bite, and the high band can control edge and brightness without dulling the whole program.
Each band has its own compression control, which means you can compress the lows for stability while letting the mids stay more open, or calm the top without crushing the body. You can also run it in a more unified way when broad glue is the goal, then switch into true multiband behavior when shaping is needed.
- Sidechain High Pass Filter and Niveau Mode
The sidechain tools are real workhorses here. A high pass filter in the detector keeps low end from dominating gain reduction, which is critical on punchy mixes where you don’t want the kick triggering compression across the entire frequency spectrum.
The Niveau behavior shifts the detector emphasis so compression feels more balanced and punch friendly on full mixes and drum heavy material. It changes how the compressor reacts to energy distribution, which makes it more musical on complex program material instead of just responding to the loudest band.
- SMASH Mode for Aggressive Bus Processing
When a controlled setting isn’t the point, SMASH is the deliberate “make it obvious” mode for aggressive bus crush and impact. It’s not subtle, and that’s the entire idea. You use it when you want the compression to be part of the sound signature, not when you’re trying to be transparent. On drum buses or synth stacks that need to feel locked and intense, SMASH delivers that forward, driven character without apology.
4. AMEK EQ 250 Mastering EQ
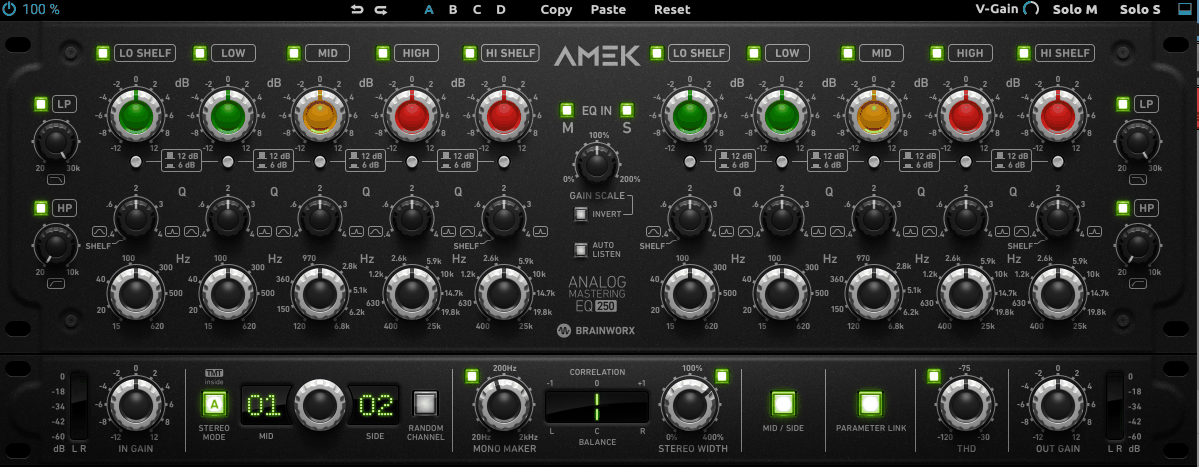
What I like here is how the EQ behaves when you push it. The design is aimed at that mastering grade sound people associate with the Sontec family: sweet top end and a tight, focused bottom, with curves that stay flattering across small and medium moves.
When you need an EQ that can lift presence or tighten lows without turning the mix edgy or hollow, this is exactly the sort of behavior it’s built for. It’s designed as a fully variable, “no switches in the signal path” kind of concept, which translates to a feeling of continuous control rather than stepped, surgical precision.
The core section of AMEK EQ 250 is five fully parametric bands with wide overlaps and up to ±12 dB per band, plus an optional reduced gain range for finer mastering moves. The low and high bands can be switched into shelving behavior, so it covers the classic “weight and air” work without needing a separate shelf EQ.
The filters aren’t just cleanup tools either. You get continuously variable high pass and low pass filters with a musical slope, which makes it easy to control extremes without over sculpting the mids.
- M/S Processing with Mono Maker
M/S processing lets the left and right channels become Mid and Side processing when engaged, and there’s M/S monitoring so you can solo mid or sides while working. Mono Maker tightens low end in the stereo field, which is critical when you need bass to stay centered and focused without narrowing your entire mix.
Stereo Width control lets you adjust the spread, and there’s built in THD for controlled harmonic weight that adds analog style character without going overboard. I can say this covers a lot of real mastering and mixbus needs without leaving the plugin or building complicated routing.
- Gain Scale and Invert for Fast Adjustments
Gain Scale is basically a global more or less control for all bands. When the direction is right but the intensity isn’t, you can dial everything up or down proportionally without rebuilding your curve.
Invert flips all band gains at once, which is useful for checking whether a move is genuinely helping or if the opposite contour actually works better. I would say these two features change how fast you can make decisions and test alternatives without starting from scratch every time you second guess myself.
- Auto Listen with Frequency Isolation
Auto Listen temporarily isolates the active band area while you adjust frequency or Q, with normalization so you can focus on the band’s effect instead of loudness shifts. You don’t want this on all day, but when you’re dialing a precise midrange decision on a master, it saves time.
You hear exactly what that band is doing to the material without the rest of the frequency spectrum confusing your judgment. I like that this keeps my decisions honest when I’m making subtle moves that could easily be biased by loudness changes.
- TMT with 20 Channel Variations
TMT gives you 20 modeled channel variations, plus a stereo mode that can run cleaner or more analog styled behavior where the two channels aren’t perfectly identical. It’s subtle, but on stereo program material it can help avoid the overly perfect “flat digital symmetry” that sometimes makes width feel stiff.
The variations introduce tiny differences between left and right that mimic how analog hardware naturally deviates, which keeps things feeling more organic and three dimensional. I find this useful on mastering work where the stereo image needs to feel natural instead of artificially perfect.
- Four Internal States for Comparison
Each preset can store four internal settings (A/B/C/D). That makes it easy to compare different curve approaches or automate section changes without turning the session into parameter automation chaos. I would say I can treat this like “two or three candidate masters” living inside one instance, then pick the one that holds up across the track. It’s especially helpful when you are testing different approaches to the same material and need to flip between them quickly without losing your work.
5. Lurssen Mastering EQ
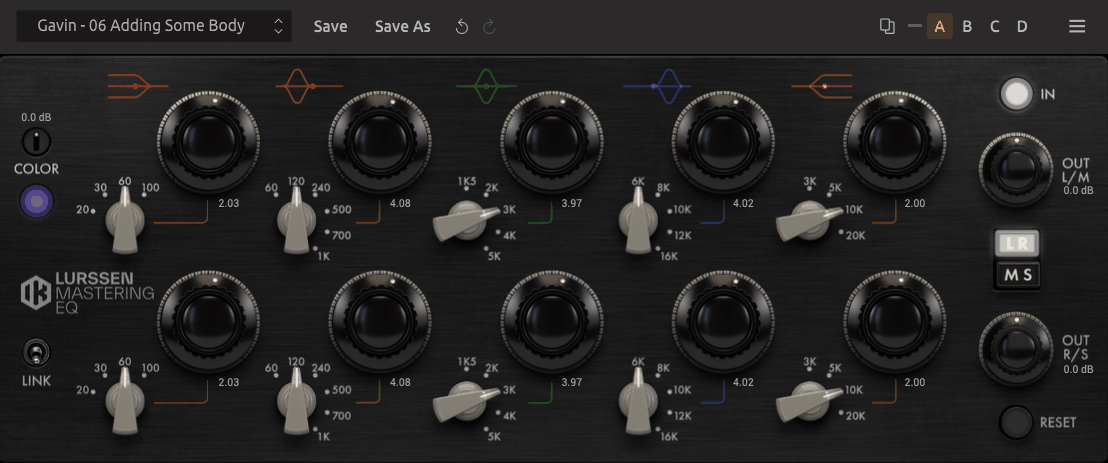
This one is a modeled take on the Lurssen Mastering 825 Tube EQ approach, built for broad, musical tonal shaping and the kind of high and low end lift that feels finished without sounding hyped. It’s not meant to be a surgical problem solver. I would say the point is mastering style contouring with a hardware inspired workflow that keeps you focused on big picture moves.
Lurssen Mastering EQ is designed around preamp section modeling and the way the EQ curves interact, so it’s not just static filter math.
The headline control is Color, which adjusts the amount of harmonic saturation coming from the modeled preamp, letting the EQ sit anywhere between cleaner mastering moves and a slightly thicker, more enriched contour.
I like that when you drive it harder with the adjustable preamp input level, the saturation character changes because it depends on what you’re pushing into the modeled front end.
The gain behavior is deliberately tuned with nonlinear gain control that gives finer resolution in the lower part of the range while still allowing large boosts and cuts when needed. The curves use a proportional Q style behavior where Q shifts with gain to keep shapes smooth and musical.
That translates to moves that stay coherent when the EQ is doing more than a 1 dB touch, without turning into narrow, edgy peaks. It’s good when you are making broader strokes and don’t want the EQ to suddenly become surgical.
- Independent Stereo and Mid Side Processing
Stereo handling goes beyond a simple linked pair. It replicates independent left and right EQ controls, adds parameter linking when you want stereo matched moves, and includes mid side processing for stereo field aware adjustments.
If the center image is already right but the sides need either more air or less glare, mid side lets that happen without compromising the vocal and kick relationship. You can address the sides separately when width needs different treatment than the center.
It’s useful when you are working on mixes where the stereo image is part of the sound design and need precise control over how the center and sides are balanced tonally.
- Five Band Layout
The layout is intentionally minimal and hardware like. You get a five band mastering EQ built as low shelf, three tuned semi parametric mid bands, and a high shelf.
The shelves handle the big framing moves, while the three mid bands are the posture controls for body, presence, and bite. Instead of giving fully continuous frequency sweeps everywhere, the design leans on fixed frequency selections per band.
You get four selectable frequencies for the high and low shelves and five selectable frequencies for each of the three mid bands, which speeds up decisions when the goal is musical shaping rather than corrective hunting. I appreciate this constraint because it keeps you from overthinking frequency choices and helps me commit to moves faster.
- Color Control for Harmonic Character
Color adjusts harmonic saturation from the modeled preamp section, which means you can add density and warmth when the tonal move feels correct but slightly too polite.
I would say nudging Color can add a bit of harmonic enrichment so the EQ change feels more like a record and less like a curve. It’s the difference between a clean mastering move and one that has some analog style weight behind it.
I like that the amount of Color you add interacts with how hard you’re driving the input, so both controls work together to shape the character. I would typically start with the EQ curve I want, then add Color to taste if the result feels too clean or digital.
- Presets from Lurssen Mastering
It ships with presets created and used by Lurssen Mastering, which are practical starting contours rather than gimmicks.
These are actual settings from real mastering sessions, so they give you a direction fast. You pick a starting point, then refine shelves and one mid band until the mix sits where it should.
The plugin tends to reward smaller, deliberate moves where the curve interaction does the heavy lifting rather than extreme boosts and cuts. I find the presets useful as learning tools because they show you how professionals approach common mastering scenarios with this specific EQ design.
6. Pulsar VM-COMP

I keep reaching for a bus compressor that stays smooth when the mix is already loud and busy, and that’s exactly what the Pulsar VM-COMP delivers.
It’s a variable bias tube style compressor built for glue that stays musical, and while you treat it as a bus compressor first, it’s flexible enough to be a tone forward vocal or drum tool when the timing and ratio modes get pushed.
The big reason it holds up is that it’s not just “a vari mu vibe,” it gives genuinely useful modern control where vari mu designs normally feel limited.
The core behavior is what you want from this topology: soft, musical gain reduction that tends to thicken and unify instead of sounding like obvious clampy compression. On buses, it’s easy to land on that familiar effect where the mix feels more connected and a little more confident, without the transient picture getting shredded. When you push it, it can move into a more assertive tone, but it generally stays on the “polished” side of aggressive.
One important part of how it behaves is that the ratio isn’t a fixed modern digital thing. There’s a HI RATIO switch that changes the overall compression attitude from lighter compression into a more limiting style mode, and the effective ratio can climb with heavier gain reduction. In practice, that means it can feel gentle and elastic on my mix bus, or noticeably more controlling when a drum bus needs to stop jumping around.
- Stereo and M/S with Independent Linking
Stereo management is properly thought out. It can run in L/R or M/S mode, and it has separate linking concepts: one for linking the controls so edits stay matched, and another for linking the sidechains so gain reduction stays coherent across the stereo image when the compression gets heavy.
There are also channel listen buttons, which makes M/S work faster because it’s easy to focus on what’s actually being affected. When you’re working on stereo material where width matters, M/S mode is the practical move. It’s not about doing clever tricks, it’s about being able to stabilize the center without flattening width, or calm the sides without messing with the punch that usually lives in the middle.
- Topology Preservation with Modern Workflow
Their Topology Preservation Technology is the point of the emulation side, while the added workflow pieces, visuals, timing extension, and sidechain control are the point of the modern side. You get the vari mu character you want without the limitations that make hardware vari mu compressors frustrating in fast sessions.
- Full Sidechain EQ with Curve Editor
The feature that actually changes how you set this up is the sidechain EQ, because it’s not just a token high pass. It’s a full sidechain shaping section that can be edited visually with a curve editor, so it’s easy to decide what the compressor should react to instead of fighting threshold forever.
- Look Ahead and Look Behind Control
The Look control is one of the most practical “modern additions” on a vari mu style compressor. It provides look ahead to catch very fast transients more cleanly, and look behind to let transients pass a bit more freely when you want a punchier front edge and plan to manage peaks later in the chain.
It’s not a gimmick, it’s a real timing lever that can change the whole feel of a bus. I would use look ahead when you need control and transparency, and look behind when you want the compression to feel more reactive and aggressive.
- Zero Latency and Oversampling Options
7. FabFilter Pro-Q 4

FabFilter Pro-Q 4 is still the “do everything, stay fast” EQ, but the real jump in this version is that it’s no longer just about static curves and per band dynamics. It adds Spectral Dynamics, a proper multi instance control workflow, and a more deliberate way to shape curves quickly when you already know what you want.
It remains the EQ that can live on basically every track, but now it also covers a chunk of the “dynamic resonance control” territory that used to require extra tools.
You still get up to 24 bands, with the familiar FabFilter workflow that’s optimized for fast decisions: create bands directly on the display, adjust Q and gain with simple gestures, and do multi band selection edits when shaping multiple areas at once.
Pro-Q 4 also leans even harder into slope control. It offers continuous slopes up to 96 dB/oct, plus ultra steep brickwall options for high pass and low pass filtering when the job is strict boundary setting rather than gentle shaping. I think this matters because it lets one plugin cover everything from subtle tonal posture to hard cleanup decisions.
Pro-Q 4 now gives three Character modes that can add analog style saturation. Clean stays in the familiar transparent lane, while the more colored modes add subtle harmonic thickening when a boost feels a little too pristine or when a mix needs density without switching to a separate saturator. I would say I treat this as a finishing option rather than a default, but it’s useful when you want your EQ moves to contribute some weight.
- Per Band Stereo Placement and Mid/Side
On stereo and spatial control, Pro-Q 4 stays deep. It supports per band stereo placement, plus Mid Side and Left Right processing paths, which is essential when the center and the sides need different tonal strategies or when the width is being shaped as part of the mix aesthetic.
You can brighten the sides without pushing the vocal forward, tighten low mids in the sides without narrowing the whole image, or keep the center punch intact while managing width sheen. I think it’s the kind of control that keeps a mix clean without making it small.
- Spectral Dynamics for Resonance Control
The bigger behavior change is Spectral Dynamics. Regular dynamic EQ is still there, but Spectral Dynamics lets the plugin react inside the band in a more frequency specific way, which is exactly what you want for resonances that aren’t stable or aren’t centered neatly on one frequency.
This is the feature that turns Pro-Q 4 from “best general EQ” into “also handles a lot of modern resonance control.” You can target harsh resonances, pokey room nodes, brittle cymbal spikes, nasal vocal peaks, or synth resonances that flare only on certain notes.
Instead of stacking a separate dynamic resonance suppressor, it can live inside the same EQ where your overall tonal decisions already are. I would reach for it when dealing with vocal sibilance that moves around or guitar resonances that only show up on specific chord voicings.
- Dynamic EQ with Attack and Release
For dynamics, Pro-Q 4 keeps Dynamic EQ per band, but adds more deliberate control with attack and release tuning, plus options for side chain filtering and external triggering when the dynamic behavior needs to key off something specific.
This is where it starts to feel less like “EQ with dynamics” and more like a controllable tone shaper. You can dial how fast the band responds and how quickly it releases, which changes the entire character of the dynamic behavior from surgical to smooth. I like that you get real control over the timing instead of just hoping the default attack and release work for your material.
- EQ Sketch for Fast Curve Drawing
EQ Sketch lets you literally draw the contour you want, and Pro-Q 4 translates it into bands. It’s not about random doodles, it’s for those moments when you already hear the curve in your head and you want it built instantly. You draw a shape across the spectrum, and the plugin analyzes it and creates the bands to match.
This speeds up broad shaping when you know where you’re going but don’t want to build eight bands manually.
- Instance List for Session Wide Control
The new Instance List and unified control concept changes how you work across a session. You can jump between instances across a session without hunting through track inserts, and you can keep EQ decisions consistent when the same problem repeats across stems or layered parts.
It makes the plugin behave like a session wide tool, not a single insert. I would say jumping between tracks and comparing decisions becomes part of the EQ workflow instead of a DAW navigation chore. In practice, you can compare my vocal EQ to my guitar EQ without switching windows, which keeps you moving faster through tonal decisions across the entire mix.
- Spectrum Grab and EQ Match
For analysis and targeting, the tools are still there that make Pro-Q the workhorse: Spectrum Grab for grabbing visible peaks directly into bands, EQ Match when matching a reference contour is useful as a starting point, and the improved analyzer and display workflow that makes those decisions quick.
8. Bettermaker C502V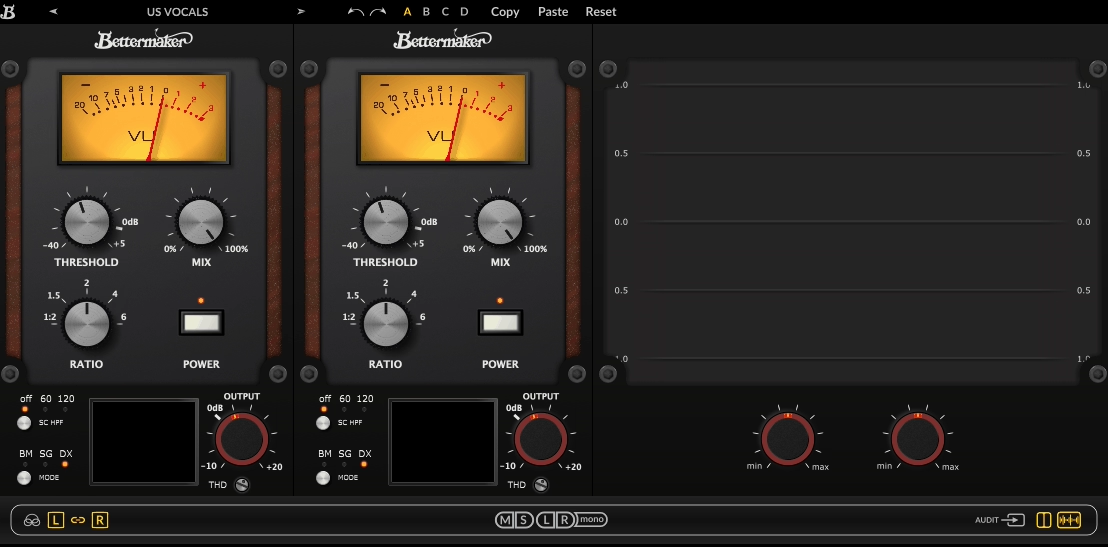
I keep looking for a bus compressor that can move between different compression flavors without swapping plugins, and that’s exactly where this one wins. The Bettermaker C502V is a stereo VCA compressor that behaves like three different compressors in one box, with the twist that the modes can be mixed per channel. Instead of choosing one compressor flavor and living with its limitations, it can run BM, SG, and DX in whatever channel layout makes sense, including Left Right, Dual Mono, and Mid Side.
When you want a bus compressor that can move from glue to snap to subtle mastering control without swapping plugins, this is one of the cleaner ways to do it. The compressor identity is defined by the three modes, and they’re not subtle variants, they’re different behaviors that actually change how the compression responds and sounds.
BM mode is the most forgiving and the most flexible. It has the widest timing range and can act like anything from a gentle leveler to a faster, more controlling compressor.
The attack can run from 5 to 250 ms, and release from 0.01 to 0.8 s, with an Auto release option when a set and forget release is the goal. This mode tends to work when the mix is already good and just needs classy, controlled movement without anything obvious happening.
- M/S with Per Channel Mode Selection
Mid Side mode is not just a switch here. It pairs with channel unlinking and per channel mode selection, so the mid can run one compressor personality while the sides run another. That’s the feature that makes it feel like a serious stereo dynamics shaper rather than a bus compressor with an M/S checkbox.
I can say this is where it gets uniquely useful: you can stabilize a busy center without flattening width, or rein in aggressive sides without dulling the lead. Mixing modes becomes powerful when, for example, you want a tighter, punchier mid with a smoother side treatment to keep the mix energetic while the stereo image stays controlled.
- Double Panel View and Monitoring Options
Channel handling is built for fast decisions. There’s a double panel view to see and adjust both channels at once, and there are monitoring options to listen to Left, Right, Mid, or Side while dialing settings.
- Three Compressor Modes with Different Characters
SG mode is the British VCA bus compressor inspired personality. It’s built for mix glue and the familiar tightening effect on a bus, the kind of compression that makes the groove feel more unified without sounding like the mix is being sat on. I would say it’s usually the fastest route to that “together” sound on a mix bus or drum bus, and it’s the mode I would reach for first when I just need things to gel.
DX mode is the aggressive workhorse option. It uses fixed attack and release behavior and leans into that punchy, clampy VCA attitude that people like for drums, bass, guitars, and forward vocals when they need to stay in line.
It’s the mode that reads as compression immediately, in a good way, when the material calls for it. You can use this on vocals that need to stay pinned and forward, or on drum buses when kicks and snares need to feel more consistent.
- VCA THD for Harmonic Content
One more piece that matters for tone is the built in VCA THD stage. Enabling it adds harmonic content tied to the VCA behavior, so the compression can move from purely dynamic control into slightly thicker, more energized compression when needed. I find this useful when the compression is doing its job but the result feels a little too clean or polite. The THD adds some analog style weight without going overboard.
- Sidechain HPF and External Sidechain
Sidechain control is practical, not decorative. There’s a Sidechain HPF to stop the low end from dominating the detector, plus an External Sidechain option when the compression needs to respond to a different signal.
There’s also sidechain audition so it’s easy to hear what the detector is reacting to before committing to a threshold and timing. I would say it’s important on drum buses where pairing DX mode with the HPF keeps low end from dragging the whole compression response into pumping.
9. FabFilter Pro-C 3
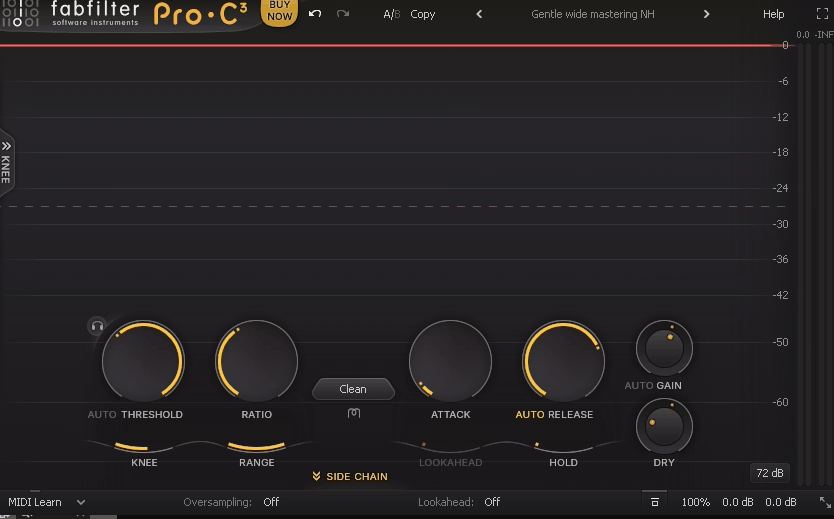
With FabFilter Pro-C 3 you’re not stuck choosing between “transparent utility” and “character box.” You get 14 compression styles that cover clean leveling, glue, punch, pumping, and more colored behavior, and you can pair any of them with analog style character modes when you want the compression to feel like it has a circuit behind it instead of pure math.
The core behavior is built around two things you’ll actually notice: style dependent envelope behavior and very predictable gain reduction control. You can pick a style that naturally behaves the way you need, then dial the envelope without fighting it.
The new styles aren’t just marketing names. You get options that behave like super smooth glue, upward style dynamics, a more aggressive “to the max” limiter like clamp, and additional classic leaning behaviors like opto style and vari mu style compression. That means you can set the compressor’s personality first, then do normal threshold, timing, and range decisions without trying to force one algorithm into every job.
- Six Band Sidechain EQ with Mid Side
The sidechain section is not an afterthought. You get a six band sidechain EQ that uses the same kind of shapes you expect from FabFilter’s EQ workflow, including more advanced filter types. You can shape what triggers compression with enough precision that you stop “fixing the detector with threshold.”
I can say what’s even better is that you can make sidechain EQ bands work on mid only or side only, which is huge when the center needs control but the sides should stay open, or when side energy is triggering unwanted pumping. I would recommend it on stereo buses where the sides are bright and splashy but you don’t want them triggering compression on the entire mix.
- Character Panel with Pre and Post Options
When you want tone, the Character panel is the serious addition. You can add Tube, Diode, or Bright coloration, with control over drive and whether the character sits before or after compression. That pre versus post choice is not subtle.
If you push character before compression, you’re shaping what the detector and gain reduction react to. If you put it after, you’re keeping compression behavior stable and adding color as a finish.
I would say either way, you can keep it restrained or make it part of the sound, depending on what you need. You can use pre-compression character when you want the compressor to respond to a slightly saturated signal, which changes how it grabs transients.
- Host Tempo Synchronized Pulse
If you do rhythmic ducking, you don’t have to build an external trigger track just to get consistent movement. You can trigger the compressor using a host tempo synchronized pulse, with control over timing offset and pulse length, so you can dial in clean, repeatable rhythmic compression directly inside the plugin. This keeps the ducking workflow inside one plugin instead of building complicated routing.
- Adjustable Maximum Lookahead
For timing precision, you have adjustable maximum lookahead. That lets you balance latency against how cleanly you want it to catch extremely fast peaks. You can keep latency low when you’re in a live feeling session, or allow more lookahead when you want the compressor to behave like it has perfect reflexes.
I would say this matters most when you’re doing mastering style work where you need the compressor to be absolutely transparent on fast transients.
- Instance List Integration
You can run a lot of instances without it turning into a workflow problem because the interface is built for fast reading and fast adjustment. The big integration win is that you can manage your compressors like part of a modular channel strip: Pro-C 3 instances show up in the Instance List inside Pro-Q, so you can jump between them quickly and keep settings consistent across a session.
I find this useful when you’re applying similar compression across multiple vocal layers or drum elements and want to compare settings without hunting through track inserts.
- Immersive Format Support
If you work in immersive formats, you can use it on surround and Atmos beds because it supports immersive channel layouts up to 9.1.6, with customizable channel linking so you’re not forced into one linking behavior across an entire bed. That matters when you want control without collapsing movement or space.
10. Shadow Hills Mastering Compressor Class A
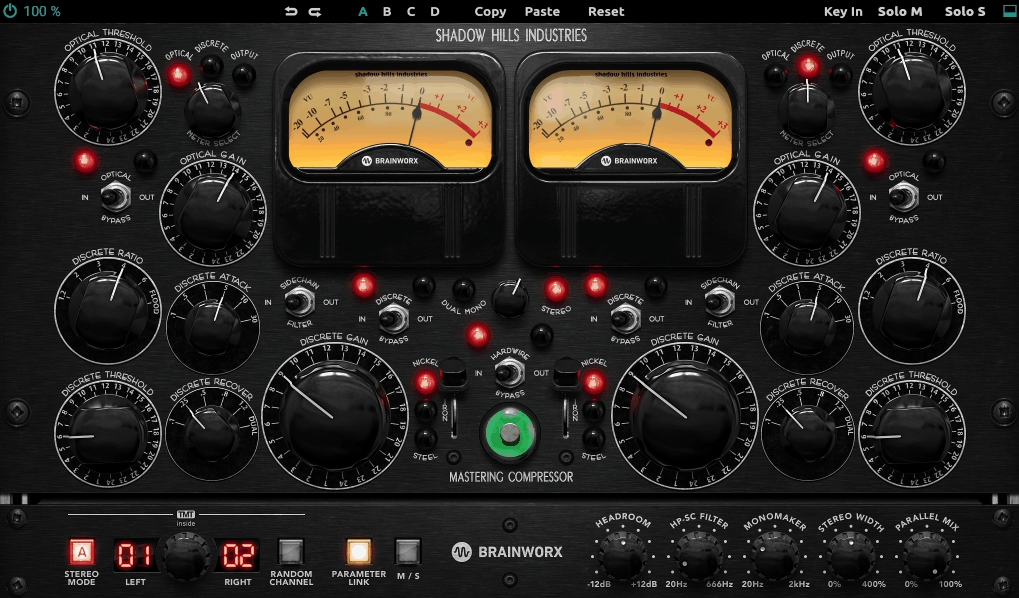
I would reach for the Shadow Hills Mastering Compressor Class A when you need mastering grade control that still feels like a piece of high end hardware shaping the record.
It can tighten dynamics, add weight, and make a mix feel like it “locks in,” while still giving me enough control to keep the movement musical instead of crushed.
At its core, this is a two stage compressor followed by a transformer output stage. That layout is why it’s so useful on mix bus and mastering chains: you can do a first stage that handles overall control, then a second stage that adds a different kind of glue and density, and you can finish with transformer tone that changes the feel of the whole program without turning into obvious distortion.
The two stage design is the whole story. The first stage is the Optical compressor. This is where you get the smooth, leveling style control that feels cohesive rather than grabby.
If you want my mix to feel more stable, vocals to sit, or the whole bus to stop jumping between sections, this stage is usually the one you lean on first. You can make it work gently so it just tucks the mix into place, or you can push it harder to get that thicker, more “finished” density.
- Discrete VCA Second Stage for Punch
The second stage is the Discrete VCA compressor. This is where you get the tighter, punchier control. If the optical stage is the glue and leveling, the discrete stage is the clamp and focus. You can use it to catch peaks, add drive, and make the rhythm feel more locked.
I would say when you use it carefully, it adds energy without flattening the groove. Because you have both stages, you can split the workload and you don’t have to force one compressor to do everything. I can let the optical stage handle the broad movement and let the discrete stage handle the peaks and punch.
- Mid/Side Processing
The plugin supports Mid/Side processing, and is critical when the center needs stability but the sides should stay open and dynamic. You can tighten the mid channel to keep vocals and kick locked while letting the sides breathe for width. I would say this is where the compressor becomes a real stereo shaping tool instead of just a bus compressor with an M/S switch.
When you are working on material where the stereo image matters as much as the dynamics, being able to apply different amounts of compression to mid and side changes how the final master sits in the field.
- Per Stage Gain Reduction Metering
The plugin also includes the kind of metering you want on a bus tool. You can see gain reduction per stage, and make decisions based on how hard each stage is working rather than guessing from one combined meter.
This helps you balance the two stages properly instead of just pushing one until it sounds right. It’s valuable when you are trying to get the optical stage doing most of the work but need just a touch of discrete compression for peak control.
Freebies:
1. iZotope Ozone 12 EQ

Ozone 12 EQ lets you shape tone without blunting energy. The standout here is Transient/Sustain mode. You can target the EQ to react more to the attack portion of the signal or the body and tail, which means you can brighten a mix’s snap without lifting sustained harshness, or add weight to sustain without making the transient hit feel slow.
I would say if you do mastering style enhancement, this is the feature that can save you from reaching for compression when the real issue is frequency balance inside the envelope.
You also get Mid/Side mode, which is exactly what you want when the stereo image is the problem, not “the mix is too bright.”
You can clean up low mids in the sides to keep width clear, add a touch of air to the sides without pushing vocal sibilance in the center, or firm up the midrange in the mid channel so the track stays anchored.
- Delta Auditioning for Verification
Delta is the big one. You can audition what the EQ is changing, so when you’re doing subtle mastering moves you can confirm you’re removing or adding the right thing, not just liking the louder result. If you’re the type who works quickly and trusts your ears, Delta is still useful because it keeps you honest when you’re stacking small moves.
- Analog and Digital EQ Models
The EQ also lets you choose between analog and digital EQ models, which is really about how you want the curves and phase behavior to feel. If you want clean and surgical, you lean digital. If you want slightly more forgiving, “record-like” curves, you lean analog.
I can only say you don’t need to overthink it, but you’ll feel the difference when you’re boosting top end or doing broader low shaping. I recommend using digital when you need precision and analog when you want the EQ to feel a bit more musical.
2. VoS Density mkII
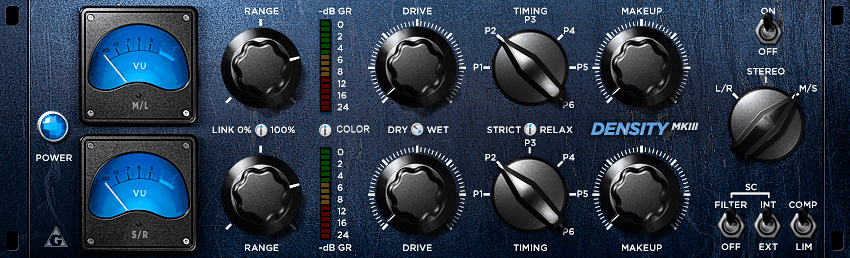
What you are getting here is a stereo bus dynamics processor that’s aimed at one thing: helping you make a mix or bus feel more glued, more forward, and more stable without the obvious pumping you’d associate with a lot of “bus comp” plugins. It’s not laid out like a modern textbook compressor, and that’s the whole point.
You’re working with a handful of controls that steer how the detector reacts, how much gain reduction is allowed, and how the envelope moves, plus a built in character stage that can add density and energy instead of just level control.
The compression character is smooth and cohesive first, and aggressive only if you force it there. You can make it clamp down, but it naturally wants to do the classic “pull things together” move: transients stay readable, the body thickens a bit, and the whole bus feels more organized.
The key part of the sound is that you’re not just setting a threshold and ratio and calling it done. You’re steering the detector and the motion of the gain reduction so it behaves more like gain riding with weight than strict peak policing.
There’s also a built in saturation concept that can add density and a bit of “push” when you want the bus to feel more finished. You don’t use it for obvious distortion. Use it when you want compression to come with a little bit of tone and thickness, which makes the difference between clean dynamics control and something that feels like it went through a piece of hardware.
- Drive and Range Controls
Drive is the first one you’ll learn to respect. It effectively pushes the detector harder so the compressor reacts more assertively without you constantly hunting for a traditional threshold sweet spot. If you turn Drive up, you’re telling the compressor “react more.” I can see that this gives you a more intuitive way to control how hard the compressor works instead of fiddling with threshold values.
Range is the second one that makes Density mkII behave differently from typical comps. It caps how much gain reduction the compressor is allowed to apply. For you, this is a safety rail. You can dial in a reactive, energetic behavior, then use Range so it never overdoes it and ruins the bus.
- Mid/Side Processing
It also supports Mid/Side processing. That matters when you need to tighten the center without flattening your width, or when the sides are getting splashy and you want them controlled without making the vocal and kick feel smaller.
- Limiter Style Mode
There’s a limiter style mode as well. It’s not meant to replace a final brickwall limiter, but it’s useful when you want stricter containment on a bus that’s getting unruly. You can try to use this on drum buses when you need to catch the loudest hits without letting them poke through, while still keeping the overall compression behavior more musical than a true limiter would be.
3. Analog Obsession MAXBAX
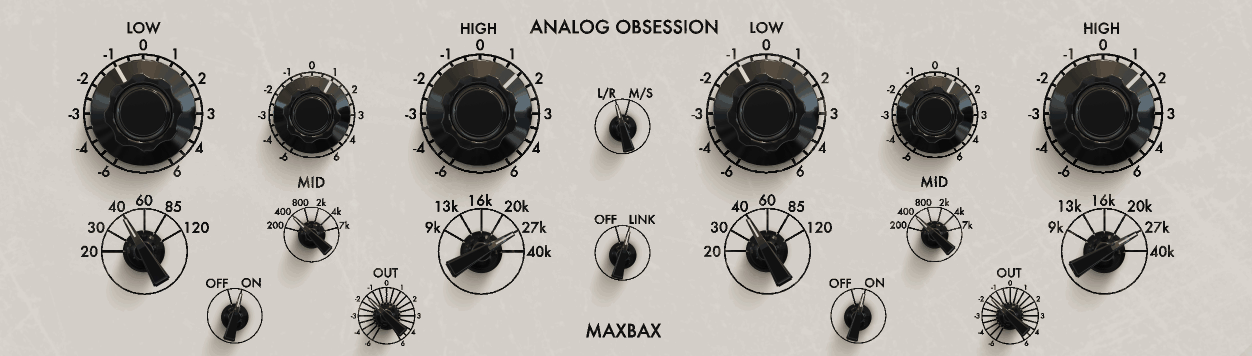
MAXBAX is a free mastering style EQ in the Baxandall tradition, built for the kind of moves you make when you already like the mix and you just need it to feel more finished.
You’re not loading it to hunt surgical resonances or do tight corrective work. You can lift lows and highs without the mix turning spiky, and you can trim body or brightness without the sound collapsing. MAXBAX leans into that, with a layout that makes you commit to big picture decisions fast.
I would say the Baxandall style curves are inherently gentle and wide, which means boosts and cuts tend to sound cohesive instead of peaky.
When you add top end, you usually get air and openness without turning cymbals into glass. When you add low end, you get weight without instantly turning low mids into mud. MAXBAX also includes an analog style gain staging vibe. If you push it, you can get a slightly thicker, more “console-ish” kinda feel rather than purely transparent EQ.
- Broad Low and High Shelves
The workflow is intentionally simple: you get broad low and high shelves in the Bax style, and you make musical decisions quickly. You typically have selectable frequency points for the shelves, so you can decide whether you’re lifting deep weight or more of the upper bass, and whether your top lift is more about presence or true air. This matters because you can get the exact kind of polish you want without stacking multiple EQs.
- High-Pass and Low-Pass Filtering
MAXBAX also includes additional shaping controls beyond just “bass and treble.” You’ll usually find a high-pass and low-pass filtering option for boundary cleanup, and you may have extra midrange or tilt style shaping depending on the version you’re using.
The key is that you’re not working with a dozen narrow bells. You’re working with a small set of curves designed to move the entire mix in a controlled way. I can say this keeps the workflow focused on musicality instead of turning into endless frequency hunting.
- Mix Bus Finishing
On your mix bus, MAXBAX is great when the mix is right but feels slightly closed or slightly thin. You can lift high shelf for air without making the whole thing brittle, or lift low shelf to add weight without wrecking the midrange balance. If the mix is a bit cloudy, a small low shelf reduction can clear it in a way that feels natural rather than scooped.
4. Analog Obsession RareSE
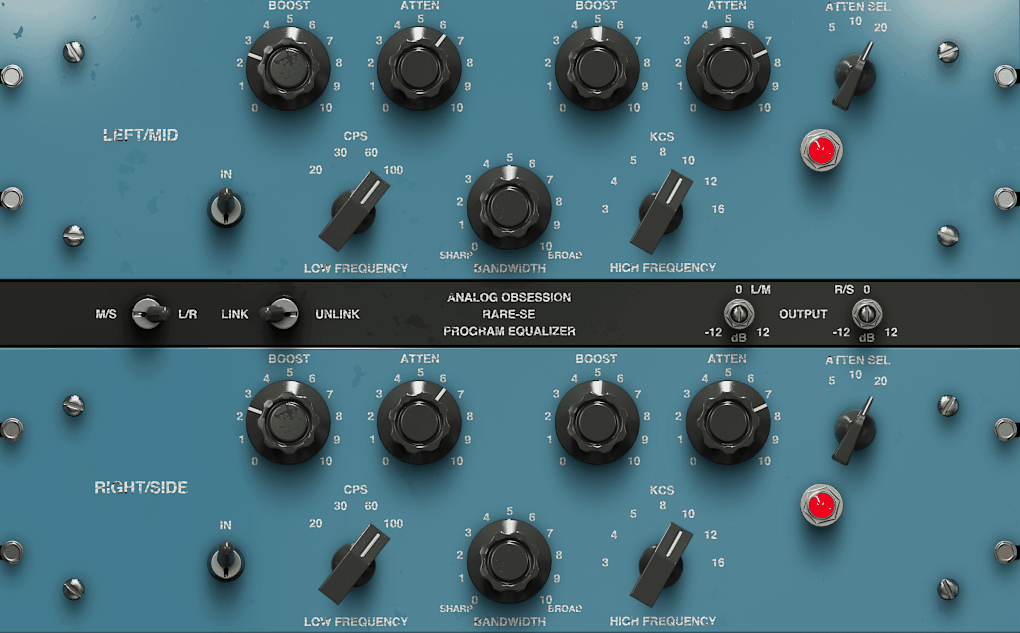
The whole point of RareSE is broad musical moves plus stereo aware control, so you can push a mix toward weight, presence, and air while keeping the center and the sides behaving. It’s a free mastering style EQ built for moments where you want to shape tone without overthinking it.
If you already have a clean parametric EQ for notches and fixes, RareSE is the one you reach for when you want the mix to feel more finished with fewer decisions. This is an EQ, but it has a clear “hardware style” behavior.
The curves are voiced to stay smooth and flattering, especially when you boost the top end or add low weight. You can push presence or air without the mix instantly turning sharp, and you can add bottom without low mids turning into a swamp if you keep the moves sensible.
RareSE also gives you a slightly analog leaning feel in the way boosts land. You don’t use it when you need invisible correction. I would say you use it when you want tone shaping that feels like it belongs on the record, not just technically correct. The curves are designed to be flattering rather than neutral, which matters when you’re trying to enhance instead of fix.
- M/S and Dual-Mono Style Control
You can work in normal stereo linking when you just want broad balance, but you can also target what matters. If you like the center but the sides are messy, you can clean or brighten the sides without pushing the vocal forward.
If your mix feels narrow, you can open the sides in the upper range without inflating the whole program. If your low end feels wide and unstable, you can tighten it so the center stays solid while the stereo image remains wide where it should. I like that this gives me real control over the stereo field without complicated routing or multiple plugin instances.
- Broad Shelves and Midrange Controls
RareSE is also built for quick, decisive EQ moves. You typically get broad shelves for low and high shaping, plus midrange controls tuned for mastering style balance rather than precise hunting.
The idea is that you make one or two changes that move the whole mix in the right direction, not twelve little corrections. This keeps the workflow focused on the big picture instead of getting lost in frequency hunting.
- Practical Filtering Options
You’ll usually also find practical filtering options for controlling extremes. That matters because when you’re making mastering decisions, cleaning sub rumble or trimming overly airy top can be the difference between “nice on monitors” and “translates everywhere.”
I find the filters useful for cleaning up the extreme low end before adding weight with the low shelf, which keeps the bottom focused instead of muddy.
- Mix Bus Finishing
On your mix bus, RareSE shines when the mix is basically right but not quite record ready. You can add a touch of low shelf to give the track weight, add a touch of top to open it, then use M/S control to keep the vocal stable while the stereo image stays exciting. I can only say this is where the plugin earns its keep because you’re making broad finishing moves that affect the entire tonal balance in a musical way.
Hello, I’m Viliam, I started this audio plugin focused blog to keep you updated on the latest trends, news and everything plugin related. I’ll put the most emphasis on the topics covering best VST, AU and AAX plugins. If you find some great plugin suggestions for us to include on our site, feel free to let me know, so I can take a look!